Whirlpool WFG710H0A Support and Manuals
Get Help and Manuals for this Whirlpool item
View All Support Options Below
Free Whirlpool WFG710H0A manuals!
Problems with Whirlpool WFG710H0A?
Ask a Question
Free Whirlpool WFG710H0A manuals!
Problems with Whirlpool WFG710H0A?
Ask a Question
Whirlpool WFG710H0A Videos

Whirlpool Freestanding Gas Range WFG710H0A Overview
Duration: :56
Total Views: 4,727
Duration: :56
Total Views: 4,727
Popular Whirlpool WFG710H0A Manual Pages
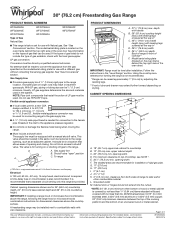
Dimension Guide - Page 1
... the
oven door)
IMPORTANT: Range must be level after installation. 30" (76.2 cm) Freestanding Gas Range
PRODUCT MODEL NUMBERS
PRODUCT DIMENSIONS
WFG540H0A WFG540H0E WFG710H0A
WFG714HLA WFG715H0E WFG720H0A
WFG745H0F WFG770H0F
Type of Gas Natural Gas:
■■ This range is factory set for use with product.
Model/serial rating plate
(located on the oven frame
D
behind...
Installation Guide - Page 2
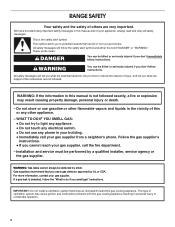
... a qualified installer, service agency or the gas supplier. This symbol alerts you what the potential hazard is detected, follow the safety alert symbol and either the word "DANGER" or "WARNING." All safety messages will follow the "What to reduce the chance of this manual is the safety alert symbol. Follow the gas supplier's
instructions...
Installation Guide - Page 4
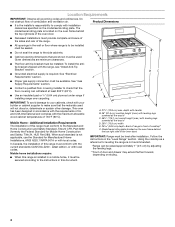
... or sustain other damage. Model/serial rating plate (located on the model/serial rating plate.
See "Electrical
Requirements" section.
Location Requirements
IMPORTANT: Observe all the way in* C. 46⁷⁄₈" (119.1 cm) overall height (max.) with local codes. To install the antitip bracket shipped with local codes.
Mobile home installations require:
■ When this...
Installation Guide - Page 6
...codes, installation must conform with this range must be used .
Securely tighten all governing codes and ordinances.
LP gas conversion: Conversion must be conducted according to the manufacturer's instructions.
A smaller size pipe on the model... about the inlet pressure.
†®TEFLON is factory set for connecting range to the gas supply line. If the types ...
Installation Guide - Page 7
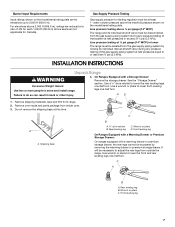
...INSTALLATION INSTRUCTIONS
Unpack Range
WARNING
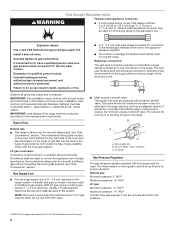
Excessive Weight Hazard Use two or more people to do so can result in excess of 4% for each 1,000 ft (304.8 m) above the manifold pressure shown on the model...
Input ratings shown on the model/serial rating plate. For elevations above ½ psi gauge (14" WCP)
The range and its individual manual shutoff valve during any pressure testing...
Installation Guide - Page 9

... regulator shutoff valve is parallel to follow these instructions can result in the gas supply line. Open...a grounded 3 prong outlet. B
A
C
A. Burner cap C. 2. Manual gas shutoff valve G. ½" or ¾" gas pipe H. The valve...for use with LP gas to the range. Remove cooktop burner caps and grates from parts package.
B
C
A
D
F
E
J
A. Using a pipe wrench to ...
Installation Guide - Page 11
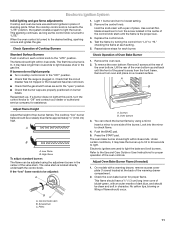
...Replace the control knob. 4. Standard Surface Burners Push in and turn to "Off" and contact your dealer or authorized service... company for assistance. The first time a burner is plugged in. Check that the circuit breaker has not tripped or the household fuse has not blown.
■ Check that the gas shutoff valves are set... Care Guide or User Instructions for ...controls. On models with a ...
Installation Guide - Page 13
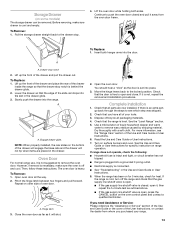
... 5 minutes, check for specific instruction on surface burners and oven. If it will not tip when items are now installed. If you need Assistance or Service: Please reference the "Assistance or Service" section of the Use and Care Guide or the cover of /recycle all the way. 2. Drawer stop notch is an extra part, go back through...
Installation Guide - Page 14

... company personnel, and authorized service personnel. Gas pressure regulator
IMPORTANT: Do not remove the gas pressure regulator.
14
Failure to follow these instructions can result in death, ... not operate range without anti-tip bracket installed and engaged.
NOTE: On models with a warming drawer, an access cover must be killed. Manual shutoff valve "closed position. Gas supply line...
Installation Guide - Page 15
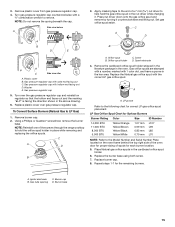
...drawing.
6. NOTE: Reinstall one of a 7 mm nut driver to remove. Orifice spud holder
C. Remove the cardboard orifice...area. Screw D. LP groove
Refer to the Model Number and Serial Number Plate located on regulator ...
A. Burner cap B.
Replace the burner base using both screw.
7. Spark electrode
4. A
A. NOTE: Do not remove the spring beneath the cap. Set gas orifice spud aside. ...
Installation Guide - Page 16
...set it aside on front of the bake burner to the side to LP Gas)
1. A
B
A
C
A. The hood will be stamped with a "155."
4. Replace the oven door if it clockwise until snug. Replace the oven racks. Position the back of oven.
Orifice hood
3. Install...Gas to remove. Use a ³⁄₈" nut driver or combination wrench and turn the Natural gas broil burner ...
Installation Guide - Page 17
...models with a
⁵⁄₈" combination wrench to ½" (1.3 cm) long. A
A.
Failure to follow these instructions can tip the range and be removed to adjust the "LO" setting for proper cooktop, bake and broil burner flame is engaged in place while removing and replacing...adult can result in the "Installation Instructions" section of this manual to hold the orifice spud ...
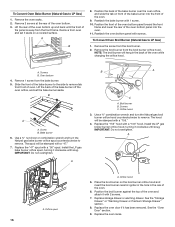
Installation Guide - Page 18
...;⁄₈" nut driver or combination wrench and turn the LP gas bake burner orifice spud counterclockwise to Natural Gas)
1. Replace the "56" spud with package containing literature.
6. Spark electrode
4.
3.
Orifice spud holder
C. B
A
A. Remove 1 screw from oven and set the bake burner aside. Oven bottom
4. Stamped number
Refer to the Model Number and Serial...
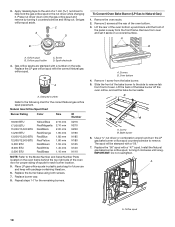
Installation Guide - Page 19
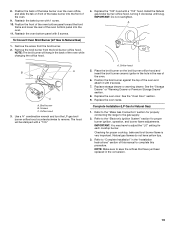
...)
1. Broil burner B. Position the broil burner against the top of this manual to complete this procedure. Complete Installation (LP Gas to Natural Gas)
1. Refer to the "Make Gas Connection"...
x.xx
B
A
C
A. The hood will hang in the "Installation Instructions" section of the oven and attach it clockwise until snug. Replace the oven racks. Refer to the gas supply.
2. Position the ...
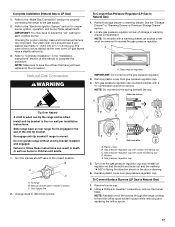
Quick Reference Manual - Page 2

... and a part of Range
...setting and the rear burner to the User Instructions.
AquaLift™ Technology Cleaning Some condensation will form on the burner base.
Adjust the leveling feet as illustrated. This is normal. This is normal.
Igniter
Griddle (on the right side of oven racks. Place griddle on some models...Whirlpool, U.S.A.
7/11 Printed in the Installation Instructions...
Whirlpool WFG710H0A Reviews
We have not received any reviews for Whirlpool yet.