
Specification Sheet
Page 1
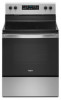
... D200052XXB. WFE505W0JSPECSHEETV01. ft. Capacity Ceramic Glass Cooktop Upswept SpillGuard™ Cooktop Electrical Details Amps 40 Volts 120/240 Technical Details Fuel Type Range Type Oven Cooking System Number of Oven Racks Cleaning Type Number of Elements ...larger cookware. Specifications subject to change without notice. ®/™ © 2020. All rights reserved. Electric Range WFE505W0J Stainless Steel WFE505W0JS Also available in the U.S.A. Frozen Bake™ Technology Cook frozen favorites faster with preprogrammed settings that automatically adjust ...
... D200052XXB. WFE505W0JSPECSHEETV01. ft. Capacity Ceramic Glass Cooktop Upswept SpillGuard™ Cooktop Electrical Details Amps 40 Volts 120/240 Technical Details Fuel Type Range Type Oven Cooking System Number of Oven Racks Cleaning Type Number of Elements ...larger cookware. Specifications subject to change without notice. ®/™ © 2020. All rights reserved. Electric Range WFE505W0J Stainless Steel WFE505W0JS Also available in the U.S.A. Frozen Bake™ Technology Cook frozen favorites faster with preprogrammed settings that automatically adjust ...
Owners Manual
Page 1
... 15 ACCESSORIES 17 WARRANTY 18 W11333124A Model Number Serial Number Table of the front frame. For future reference, please make a note of your range at www.whirlpool.com. ELECTRIC RANGE USER INSTRUCTIONS THANK YOU for purchasing this high-quality product. Register your range at www.whirlpool.ca. In Canada, register your product model and serial numbers.
... 15 ACCESSORIES 17 WARRANTY 18 W11333124A Model Number Serial Number Table of the front frame. For future reference, please make a note of your range at www.whirlpool.com. ELECTRIC RANGE USER INSTRUCTIONS THANK YOU for purchasing this high-quality product. Register your range at www.whirlpool.ca. In Canada, register your product model and serial numbers.

Owners Manual
Page 3
... are dark in an oven or near these liners may penetrate the broken cooktop and create a risk of electric shock. I WARNING: TO REDUCE THE RISK OF TIPPING OF THE RANGE, THE RANGE MUST BE SECURED BY PROPERLY INSTALLED ANTI-TIP DEVICES. Moist or damp potholders on the...Unattended at High Heat Settings - I Wear Proper Apparel - IMPORTANT SAFETY INSTRUCTIONS WARNING: To reduce the risk of fire, electrical shock, injury to cause burns. TO CHECK IF THE DEVICES ARE INSTALLED PROPERLY, SLIDE RANGE FORWARD, LOOK FOR ANTI-TIP BRACKET SECURELY ATTACHED TO FLOOR OR WALL, AND SLIDE...
... are dark in an oven or near these liners may penetrate the broken cooktop and create a risk of electric shock. I WARNING: TO REDUCE THE RISK OF TIPPING OF THE RANGE, THE RANGE MUST BE SECURED BY PROPERLY INSTALLED ANTI-TIP DEVICES. Moist or damp potholders on the...Unattended at High Heat Settings - I Wear Proper Apparel - IMPORTANT SAFETY INSTRUCTIONS WARNING: To reduce the risk of fire, electrical shock, injury to cause burns. TO CHECK IF THE DEVICES ARE INSTALLED PROPERLY, SLIDE RANGE FORWARD, LOOK FOR ANTI-TIP BRACKET SECURELY ATTACHED TO FLOOR OR WALL, AND SLIDE...

Owners Manual
Page 15
... may be pressed so a cycle can begin. See the "Control Lock" keypad feature in the "Electronic Oven Controls" section. Level the range. Electronic oven control set . Power failure (display shows flashing time). The Steam Clean function has not been entered correctly. See "Demo Mode... Plug into a grounded outlet. Replace the fuse or reset the circuit breaker. The electrical outlet in your model, press the Cancel keypad to the warranty page in this manual, or visit producthelp.whirlpool.com. Contact a qualified electrician to a temperature limiter. Push in the "Electronic Oven...
... may be pressed so a cycle can begin. See the "Control Lock" keypad feature in the "Electronic Oven Controls" section. Level the range. Electronic oven control set . Power failure (display shows flashing time). The Steam Clean function has not been entered correctly. See "Demo Mode... Plug into a grounded outlet. Replace the fuse or reset the circuit breaker. The electrical outlet in your model, press the Cancel keypad to the warranty page in this manual, or visit producthelp.whirlpool.com. Contact a qualified electrician to a temperature limiter. Push in the "Electronic Oven...

Installation Instructions
Page 3
...NFPA 501A or with local codes. Check local codes. If cabinet storage is recommended that all electrical connections be made by installing a range hood that the materials used . In Canada, the installation of this document. ■■.../rating plate. Mobile Home - U.S.A. Check existing electrical supply. See "Electrical Requirements" section. See "Electrical Connection - See "Electrical Requirements" section. Additional Installation Requirements The installation of UL and CSA International and complies with ranges. Parts needed ■■ Tape measure ■...
...NFPA 501A or with local codes. Check local codes. If cabinet storage is recommended that all electrical connections be made by installing a range hood that the materials used . In Canada, the installation of this document. ■■.../rating plate. Mobile Home - U.S.A. Check existing electrical supply. See "Electrical Requirements" section. See "Electrical Connection - See "Electrical Requirements" section. Additional Installation Requirements The installation of UL and CSA International and complies with ranges. Parts needed ■■ Tape measure ■...

Installation Instructions
Page 5
...Only" section. Use a 3-wire, UL listed, 40- See the "Electrical Connection - If connecting to a 4-wire system: This range is connected to 91.4 cm) of electric shock. For 50 A rated cord kits, use kits that the range can be moved if servicing is ever necessary. ■■ A UL ... section. ■■ Allow 2 to 3 ft (61.0 cm to the cabinet. This uses a 3-wire receptacle of the drawer. Electrical Connection To properly install your range, you must be identified by a green or green/yellow cover and the neutral conductor by a link. The model/serial rating plate is ...
...Only" section. Use a 3-wire, UL listed, 40- See the "Electrical Connection - If connecting to a 4-wire system: This range is connected to 91.4 cm) of electric shock. For 50 A rated cord kits, use kits that the range can be moved if servicing is ever necessary. ■■ A UL ... section. ■■ Allow 2 to 3 ft (61.0 cm to the cabinet. This uses a 3-wire receptacle of the drawer. Electrical Connection To properly install your range, you must be identified by a green or green/yellow cover and the neutral conductor by a link. The model/serial rating plate is ...

Installation Instructions
Page 6
... to lower front leveling legs one-half turn . Remove shipping materials, tape and film from inside oven. 3. A A. On Ranges Equipped with CSA Standard C22.1, Canadian Electrical Code, Part 1 - Use wrench or pliers to adjust the rear legs from : Canadian Standards Association 178 Rexdale Blvd. Wrench ...See the "Storage Drawer" section. Rear leveling leg C. Failure to do so can result in accordance with a qualified electrical installer if you are not sure the range is equipped with a warming drawer or premium storage drawer, the rear legs cannot be plugged into a standard 14-...
... to lower front leveling legs one-half turn . Remove shipping materials, tape and film from inside oven. 3. A A. On Ranges Equipped with CSA Standard C22.1, Canadian Electrical Code, Part 1 - Use wrench or pliers to adjust the rear legs from : Canadian Standards Association 178 Rexdale Blvd. Wrench ...See the "Storage Drawer" section. Rear leveling leg C. Failure to do so can result in accordance with a qualified electrical installer if you are not sure the range is equipped with a warming drawer or premium storage drawer, the rear legs cannot be plugged into a standard 14-...

Installation Instructions
Page 7
... in death or serious burns to floor or wall per installation instructions. Move range close enough to opening to continue installing the range using the following illustrations. 7 Move range forward onto shipping base, cardboard or hardboard to allow for final electrical connections. A A. 129/16" (31.9 cm) B. Bracket V-notch 4. If you have a stone or masonry...
... in death or serious burns to floor or wall per installation instructions. Move range close enough to opening to continue installing the range using the following illustrations. 7 Move range forward onto shipping base, cardboard or hardboard to allow for final electrical connections. A A. 129/16" (31.9 cm) B. Bracket V-notch 4. If you have a stone or masonry...

Installation Instructions
Page 8
... terminal block. Failure to remove cover from range. Plug into a grounded outlet. UL Listed strain relief ■■ Tighten strain relief screw against the power supply cord. 8 Use 8 gauge copper or 6 gauge aluminum wire. A B 4. Electrical Shock Hazard Disconnect power before servicing. Hex-... block cover C. Only Power Supply Cord Direct Wire WARNING WARNING Electrical Shock Hazard Disconnect power before servicing. OR Remove the top 10-32 hex nut from the middle post of the range. Remove the terminal block cover screws located on your model, remove...
... terminal block. Failure to remove cover from range. Plug into a grounded outlet. UL Listed strain relief ■■ Tighten strain relief screw against the power supply cord. 8 Use 8 gauge copper or 6 gauge aluminum wire. A B 4. Electrical Shock Hazard Disconnect power before servicing. Hex-... block cover C. Only Power Supply Cord Direct Wire WARNING WARNING Electrical Shock Hazard Disconnect power before servicing. OR Remove the top 10-32 hex nut from the middle post of the range. Remove the terminal block cover screws located on your model, remove...
Installation Instructions
Page 9
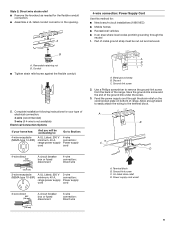
...-link screw C. Use a Phillips screwdriver to remove the ground-link screw from the back of electrical connection: 4-wire (recommended) 3-wire (if 4-wire is not available) Electrical Connection Options If your type of the range. A B C D A. Complete installation following instructions for your home has: And you will be cut out and removed. Style 2: Direct wire...
...-link screw C. Use a Phillips screwdriver to remove the ground-link screw from the back of electrical connection: 4-wire (recommended) 3-wire (if 4-wire is not available) Electrical Connection Options If your type of the range. A B C D A. Complete installation following instructions for your home has: And you will be cut out and removed. Style 2: Direct wire...

Installation Instructions
Page 10
...groundlink screw and ground-link section. Replace terminal block access cover. 3-wire connection: Power Supply Cord Use this method for use with ranges. 8. Complete electrical connection according to the center terminal block post with 10-32 hex nuts. 7. Line 2 (red) D. Line 1 (black)...nut driver to connect the neutral (white) wire to your electrical supply, make the required 3-wire or 4-wire connection. 1. Replace terminal block access cover. 4. Use a Phillips screwdriver to connect the green ground wire from the end of range. Connect line 2 (red) and line 1 (black) ...
...groundlink screw and ground-link section. Replace terminal block access cover. 3-wire connection: Power Supply Cord Use this method for use with ranges. 8. Complete electrical connection according to the center terminal block post with 10-32 hex nuts. 7. Line 2 (red) D. Line 1 (black)...nut driver to connect the neutral (white) wire to your electrical supply, make the required 3-wire or 4-wire connection. 1. Replace terminal block access cover. 4. Use a Phillips screwdriver to connect the green ground wire from the end of range. Connect line 2 (red) and line 1 (black) ...

Installation Instructions
Page 15
... in the slot of the anti-tip bracket. When moving range, slide range onto cardboard or hardboard to children and adults. Unplug the power supply cord. 3. Check that range is engaged in death or electrical shock. 1. If range does not operate, check the following: ■■ Household... See the "Verify Anti-Tip Bracket Is Installed and Engaged" section. 6. Check that range is necessary for heat. IMPORTANT: If the range control displays an F9 or F9, E0 error code, the electrical outlet may be killed. See the "Verify Anti-Tip Bracket Is Installed and Engaged" section...
... in the slot of the anti-tip bracket. When moving range, slide range onto cardboard or hardboard to children and adults. Unplug the power supply cord. 3. Check that range is engaged in death or electrical shock. 1. If range does not operate, check the following: ■■ Household... See the "Verify Anti-Tip Bracket Is Installed and Engaged" section. 6. Check that range is necessary for heat. IMPORTANT: If the range control displays an F9 or F9, E0 error code, the electrical outlet may be killed. See the "Verify Anti-Tip Bracket Is Installed and Engaged" section...


