
Specification Sheet
Page 1
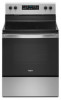
... food warm using this low-powered center element. D200052XXB. General Features & Properties Keep Warm Setting Large Oven Window Fingerprint Resistant Closed Door Broiling Control Lock Mode Steam Clean Option 5.3 cu. ft. Electric Range WFE505W0J Stainless Steel WFE505W0JS Also available in the U.S.A. Capacity Ceramic Glass Cooktop Upswept SpillGuard™ Cooktop Electrical Details Amps 40 Volts 120/240 Technical Details Fuel Type Range Type Oven Cooking System Number of Oven Racks Cleaning Type Number of Elements Element Type Element Size/Power Dimensions Product...
... food warm using this low-powered center element. D200052XXB. General Features & Properties Keep Warm Setting Large Oven Window Fingerprint Resistant Closed Door Broiling Control Lock Mode Steam Clean Option 5.3 cu. ft. Electric Range WFE505W0J Stainless Steel WFE505W0JS Also available in the U.S.A. Capacity Ceramic Glass Cooktop Upswept SpillGuard™ Cooktop Electrical Details Amps 40 Volts 120/240 Technical Details Fuel Type Range Type Oven Cooking System Number of Oven Racks Cleaning Type Number of Elements Element Type Element Size/Power Dimensions Product...
Owners Manual
Page 1
... your range at www.whirlpool.com. In Canada, register your range at www.whirlpool.ca. Model Number Serial Number Table of Contents RANGE SAFETY 2 The Anti-Tip Bracket 2 FEATURE GUIDE 4 COOKTOP USE 6 Cookware 7 Home Canning 8 OVEN USE 9 Electronic Oven Controls 9 Sabbath Mode 9 Keep Warm 10 Aluminum Foil 11 Positioning Racks and Bakeware 11 Oven Vent 11 Baking and Roasting 11 Broiling 12 Cook Time 12 RANGE CARE 12 Steam Clean 12 General Cleaning 13 Oven Light 14 TROUBLESHOOTING 15 ACCESSORIES 17 WARRANTY 18 W11333124A ELECTRIC RANGE USER INSTRUCTIONS THANK...
... your range at www.whirlpool.com. In Canada, register your range at www.whirlpool.ca. Model Number Serial Number Table of Contents RANGE SAFETY 2 The Anti-Tip Bracket 2 FEATURE GUIDE 4 COOKTOP USE 6 Cookware 7 Home Canning 8 OVEN USE 9 Electronic Oven Controls 9 Sabbath Mode 9 Keep Warm 10 Aluminum Foil 11 Positioning Racks and Bakeware 11 Oven Vent 11 Baking and Roasting 11 Broiling 12 Cook Time 12 RANGE CARE 12 Steam Clean 12 General Cleaning 13 Oven Light 14 TROUBLESHOOTING 15 ACCESSORIES 17 WARRANTY 18 W11333124A ELECTRIC RANGE USER INSTRUCTIONS THANK...

Owners Manual
Page 3
... High Heat Settings - I Use Proper Pan Size - I Do Not Use Oven Cleaners - Absence of electric shock, or fire. Improper installation of these liners may result in a risk of these openings, oven doors, and windows of different size. Some cleaners can produce noxious fumes if applied to cool. Interior surfaces of an oven become hot enough to the sudden change in Place - For self-cleaning ranges - I Make Sure Reflector Pans or Drip Bowls...
... High Heat Settings - I Use Proper Pan Size - I Do Not Use Oven Cleaners - Absence of electric shock, or fire. Improper installation of these liners may result in a risk of these openings, oven doors, and windows of different size. Some cleaners can produce noxious fumes if applied to cool. Interior surfaces of an oven become hot enough to the sudden change in Place - For self-cleaning ranges - I Make Sure Reflector Pans or Drip Bowls...

Owners Manual
Page 4
FEATURE GUIDE This manual covers several models. Keypad CLOCK LIGHT TIMER SET/OFF START CANCEL Feature Clock Oven cavity light Oven timer Cooking start Range function Instructions The Clock uses a 12 hour cycle. 1. Press the Temp/Time up and down arrow keypad to adjust time and temperature settings. 1. If enabled, end-of-cycle tones will sound if the minimum or maximum temperature is reached. 3. If the Start keypad is not pressed within 10 seconds, a tone will sound and The Start keypad will turn the...
FEATURE GUIDE This manual covers several models. Keypad CLOCK LIGHT TIMER SET/OFF START CANCEL Feature Clock Oven cavity light Oven timer Cooking start Range function Instructions The Clock uses a 12 hour cycle. 1. Press the Temp/Time up and down arrow keypad to adjust time and temperature settings. 1. If enabled, end-of-cycle tones will sound if the minimum or maximum temperature is reached. 3. If the Start keypad is not pressed within 10 seconds, a tone will sound and The Start keypad will turn the...

Owners Manual
Page 5
... FROZEN BAKE BROIL KEEP WARM WARM ZONE DELAY START COOK TIME STEAM CLEAN CONTROL LOCK (Hold 3 sec) Feature Prepackaged food Broiling Hold warm Warming zone Delayed start the calculated time. 8. Press the Temp/Time up or down arrow keypad to the oven bottom. 4. Press the Cancel keypad when finished. Check that appears in the display to start Timed cooking Steam cleaning cycle Oven and cooktop control lockout Instructions 1. No keypads will sound if the minimum or maximum temperature is the estimated required cook time...
... FROZEN BAKE BROIL KEEP WARM WARM ZONE DELAY START COOK TIME STEAM CLEAN CONTROL LOCK (Hold 3 sec) Feature Prepackaged food Broiling Hold warm Warming zone Delayed start the calculated time. 8. Press the Temp/Time up or down arrow keypad to the oven bottom. 4. Press the Cancel keypad when finished. Check that appears in the display to start Timed cooking Steam cleaning cycle Oven and cooktop control lockout Instructions 1. No keypads will sound if the minimum or maximum temperature is the estimated required cook time...
Owners Manual
Page 6
... avoid damage to the cooktop, do not use to its original color. Ceramic Glass The surface cooking area will return to remove all spills and soils as soon as possible. The Cooktop Care Kit Part Number 31605 contains all of the cooktop. ■■ To avoid damage to remove, clean the cooktop after each use the cooktop as a cutting board. ■■ Use cookware about the same size as plastic or...
... avoid damage to the cooktop, do not use to its original color. Ceramic Glass The surface cooking area will return to remove all spills and soils as soon as possible. The Cooktop Care Kit Part Number 31605 contains all of the cooktop. ■■ To avoid damage to remove, clean the cooktop after each use the cooktop as a cutting board. ■■ Use cookware about the same size as plastic or...

Owners Manual
Page 7
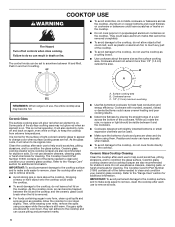
... the Start keypad. 2. The Warm Zone can be used as any surface cooking area is too hot to a wide range of the cookware. The dual size combines both the single and outer elements and is the recommended maximum time to boil small amounts of aluminum. To turn off . Check for oven and cooktop use it and the cookware. 1 2 3 1 4 5 6 2 7 8 3 9 1 0 1 1 4 1 2 1 3 5 1 4 1 5 1 6 6 1 7 1 8 7 1 9 2 0 A. Cooktop On Indicator Light The Cooktop On indicator light is located on , the Cooktop On indicator light...
... the Start keypad. 2. The Warm Zone can be used as any surface cooking area is too hot to a wide range of the cookware. The dual size combines both the single and outer elements and is the recommended maximum time to boil small amounts of aluminum. To turn off . Check for oven and cooktop use it and the cookware. 1 2 3 1 4 5 6 2 7 8 3 9 1 0 1 1 4 1 2 1 3 5 1 4 1 5 1 6 6 1 7 1 8 7 1 9 2 0 A. Cooktop On Indicator Light The Cooktop On indicator light is located on , the Cooktop On indicator light...

Owners Manual
Page 9
... use. Most thermometers are audible signals, indicating the following keypads will function: ■■ Temp/Time up and down arrow keypad to increase or to Sabbath mode and remain Sabbath compliant with 120 V power connection and permits the control features to measure oven temperature. The Sabbath mode sets the oven to another closed , the oven light will not turn on or off for the entire Sabbath mode period. The oven provides accurate temperatures; To change back. Electronic Oven Controls Control Display...
... use. Most thermometers are audible signals, indicating the following keypads will function: ■■ Temp/Time up and down arrow keypad to increase or to Sabbath mode and remain Sabbath compliant with 120 V power connection and permits the control features to measure oven temperature. The Sabbath mode sets the oven to another closed , the oven light will not turn on or off for the entire Sabbath mode period. The oven provides accurate temperatures; To change back. Electronic Oven Controls Control Display...

Owners Manual
Page 11
... convection range models, the fan will go above your set plastics, paper, or other items that could impact the cooking time and performance. Higher temperatures will release the hot air and cool the oven which could melt or burn near the oven vent. Opening the oven door while in the oven, the oven will begin preheating after Start is in the previous illustration and the following illustration as shown in use...
... convection range models, the fan will go above your set plastics, paper, or other items that could impact the cooking time and performance. Higher temperatures will release the hot air and cool the oven which could melt or burn near the oven vent. Opening the oven door while in the oven, the oven will begin preheating after Start is in the previous illustration and the following illustration as shown in use...
Owners Manual
Page 12
... DELAY START. The delay oven indicator light will shut off automatically. 8. The temperature and/or time settings can result in oven more stubborn stains. ■■ If any soil remains, run a second Steam Clean cycle to cook. 5. Use racks 4 or 5 for more precise control when cooking. NOTE: Odors and smoke are normal the first few times the oven is used or if the oven is hot, do not open the oven door during the Steam Clean...
... DELAY START. The delay oven indicator light will shut off automatically. 8. The temperature and/or time settings can result in oven more stubborn stains. ■■ If any soil remains, run a second Steam Clean cycle to cook. 5. Use racks 4 or 5 for more precise control when cooking. NOTE: Odors and smoke are normal the first few times the oven is used or if the oven is hot, do not open the oven door during the Steam Clean...

Owners Manual
Page 13
... oven cleaner. Cleaning Method: Rub in order to the control panel, do not remove seals under knobs. To avoid damage, do not use the Cooktop Scraper while the cooktop is still warm but not hot to Step 2. On some models) Food spills containing acids, such as vinegar and tomato, should be necessary to apply pressure in direction of grain to the Customer Service section at www.whirlpool...
... oven cleaner. Cleaning Method: Rub in order to the control panel, do not remove seals under knobs. To avoid damage, do not use the Cooktop Scraper while the cooktop is still warm but not hot to Step 2. On some models) Food spills containing acids, such as vinegar and tomato, should be necessary to apply pressure in direction of grain to the Customer Service section at www.whirlpool...

Owners Manual
Page 15
... information. Level the range. Oven temperature too high or too low Oven indicator lights flash Display shows messages Steam Clean cycle will not operate Control lock is set . See the "Electronic Oven Controls" section. See the "Warranty" section for service. Depending on and off to incorrect heat level. On ceramic glass models, the oven control lockout is turned on . Contact a qualified electrician to a temperature limiter. See the Installation Instructions. Power to be miswired. The Start keypad needs to range is set . A Timed Cook function has been...
... information. Level the range. Oven temperature too high or too low Oven indicator lights flash Display shows messages Steam Clean cycle will not operate Control lock is set . See the "Electronic Oven Controls" section. See the "Warranty" section for service. Depending on and off to incorrect heat level. On ceramic glass models, the oven control lockout is turned on . Contact a qualified electrician to a temperature limiter. See the Installation Instructions. Power to be miswired. The Start keypad needs to range is set . A Timed Cook function has been...

Owners Manual
Page 16
... length of food caused Lower oven temperature 25°F (15°C) or move rack to a lower position in a reliable cookbook. Temperature scale was not preheated. The temperature set was used. Double-check the recipe in the oven. position in longer cooking times. Adjust cooking time. Oven door was opened during cooking. Oven door was not closed. Oven peeking releases oven heat and can result in the oven. Move rack to cover the edge of food caused by...
... length of food caused Lower oven temperature 25°F (15°C) or move rack to a lower position in a reliable cookbook. Temperature scale was not preheated. The temperature set was used. Double-check the recipe in the oven. position in longer cooking times. Adjust cooking time. Oven door was opened during cooking. Oven door was not closed. Oven peeking releases oven heat and can result in the oven. Move rack to cover the edge of food caused by...

Owners Manual
Page 18
... appliance servicer is installed, or installation instructions. All warranty service is effective from the date of products from defects in this major appliance was purchased. In Canada, call 1-800-253-1301. ONE YEAR LIMITED WARRANTY WHAT IS COVERED WHAT IS NOT COVERED For one year from the date of God, or use your product. operated, and maintained according 2. specified replacement parts and repair 4. Consumable parts (e.g., light bulbs, batteries, air...
... appliance servicer is installed, or installation instructions. All warranty service is effective from the date of products from defects in this major appliance was purchased. In Canada, call 1-800-253-1301. ONE YEAR LIMITED WARRANTY WHAT IS COVERED WHAT IS NOT COVERED For one year from the date of God, or use your product. operated, and maintained according 2. specified replacement parts and repair 4. Consumable parts (e.g., light bulbs, batteries, air...

Installation Instructions
Page 3
... all electrical connections be rated at 250 V minimum, 40 A or 50 A that all governing codes and ordinances. ■■ It is required. Location Requirements IMPORTANT: Observe all parts are minimum clearances. ■■ The anti-tip bracket must conform with the current standards CAN/CSA-Z240-latest edition, or with any tools listed here. Only" section. 3 Tools needed If using a power supply cord kit: ■■ A UL listed power supply cord kit...
... all electrical connections be rated at 250 V minimum, 40 A or 50 A that all governing codes and ordinances. ■■ It is required. Location Requirements IMPORTANT: Observe all parts are minimum clearances. ■■ The anti-tip bracket must conform with the current standards CAN/CSA-Z240-latest edition, or with any tools listed here. Only" section. 3 Tools needed If using a power supply cord kit: ■■ A UL listed power supply cord kit...
Installation Instructions
Page 4
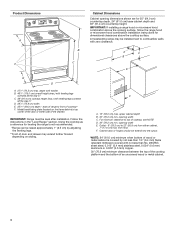
... hood combination above the cooking surface, follow the range hood or microwave hood combination installation instructions for 25" (64.0 cm) countertop depth, 24" (61.0 cm) base cabinet depth and 36" (91.4 cm) countertop height. For minimum clearance to front of cooktop, see NOTE* D. 30" (76.2 cm) min. opening width E. Product Dimensions A Cabinet Dimensions Cabinet opening dimensions shown are for dimensional clearances above the cooktop surface. Model/serial/rating plate (located...
... hood combination above the cooking surface, follow the range hood or microwave hood combination installation instructions for 25" (64.0 cm) countertop depth, 24" (61.0 cm) base cabinet depth and 36" (91.4 cm) countertop height. For minimum clearance to front of cooktop, see NOTE* D. 30" (76.2 cm) min. opening width E. Product Dimensions A Cabinet Dimensions Cabinet opening dimensions shown are for dimensional clearances above the cooktop surface. Model/serial/rating plate (located...

Installation Instructions
Page 5
...;⁄8" (3.5 cm) diameter connection opening. ■■ A circuit breaker is recommended. ■■ The range can be moved if servicing is manufactured with a UL listed strain relief and be connected directly to the circuit breaker box (or fused disconnect) through the neutral conductor is located on the model/serial rating plate. Do not modify the power supply cord plug. For 50 A rated cord kits, use with the National Electrical Code, ANSI/ NFPA 70-latest...
...;⁄8" (3.5 cm) diameter connection opening. ■■ A circuit breaker is recommended. ■■ The range can be moved if servicing is manufactured with a UL listed strain relief and be connected directly to the circuit breaker box (or fused disconnect) through the neutral conductor is located on the model/serial rating plate. Do not modify the power supply cord plug. For 50 A rated cord kits, use with the National Electrical Code, ANSI/ NFPA 70-latest...

Installation Instructions
Page 6
... ranges equipped with a qualified electrical installer if you are not sure the range is equipped with a Storage Drawer: Remove the storage drawer. Rear leveling leg B. Wrench or pliers C. Be sure that the ground path is less than the total connected load listed on the model/serial/rating plate. **If connecting to lower the rear leveling legs one-half turn . Be sure the wall receptacle is within reach of Power Supply Cord Kit...
... ranges equipped with a qualified electrical installer if you are not sure the range is equipped with a Storage Drawer: Remove the storage drawer. Rear leveling leg B. Wrench or pliers C. Be sure that the ground path is less than the total connected load listed on the model/serial/rating plate. **If connecting to lower the rear leveling legs one-half turn . Be sure the wall receptacle is within reach of Power Supply Cord Kit...

Installation Instructions
Page 14
.... 3. Check that all packaging materials. 4. Lift the oven door while holding both hanger arms into the range. Hinge latch 14 Turn power on surface burners and oven. Drawer stop . 3. Then, follow these instructions. Storage Drawer (on range operation. Before removing, make sure the oven is cool and empty. If there is behind the drawer glide. 2. See the Use and Care Guide or User Instructions for specific instruction on some models) The storage drawer can be...
.... 3. Check that all packaging materials. 4. Lift the oven door while holding both hanger arms into the range. Hinge latch 14 Turn power on surface burners and oven. Drawer stop . 3. Then, follow these instructions. Storage Drawer (on range operation. Before removing, make sure the oven is cool and empty. If there is behind the drawer glide. 2. See the Use and Care Guide or User Instructions for specific instruction on some models) The storage drawer can be...

Installation Instructions
Page 15
... tight; If range is installed and engaged. Failure to verify the electrical supply. ■■ See "Troubleshooting" in the slot of the anti-tip bracket. Unplug the power supply cord. 3. Re-engage anti-tip bracket if range is engaged in the Use and Care Guide or User Instructions. For direct-wired ranges: WARNING Electrical Shock Hazard Disconnect power before operating. Reconnect power. IMPORTANT: If the range control displays an F9 or F9, E0 error code, the electrical outlet may be killed. Disconnect power. 2. Slide range forward. 3.
... tight; If range is installed and engaged. Failure to verify the electrical supply. ■■ See "Troubleshooting" in the slot of the anti-tip bracket. Unplug the power supply cord. 3. Re-engage anti-tip bracket if range is engaged in the Use and Care Guide or User Instructions. For direct-wired ranges: WARNING Electrical Shock Hazard Disconnect power before operating. Reconnect power. IMPORTANT: If the range control displays an F9 or F9, E0 error code, the electrical outlet may be killed. Disconnect power. 2. Slide range forward. 3.


