

Installation Instructions
Page 1
U.S.A. Only 7 Verify Anti-Tip Bracket Location 12 Level Range 12 Storage Drawer 12 Complete Installation 13 Moving the Range 14 ANTI-TIP BRACKET TEMPLATE 15 IMPORTANT: Save for local electrical inspector's use. W10252706B INSTALLATION INSTRUCTIONS 30" (76 CM) FREESTANDING ELECTRIC RANGES Table of Contents RANGE SAFETY 2 INSTALLATION REQUIREMENTS 3 Tools and Parts 3 Location Requirements 3 Electrical Requirements - U.S.A. Only 4 INSTALLATION INSTRUCTIONS 6 Unpack Range 6 Install Anti-Tip Bracket 6 Electrical Connection -
U.S.A. Only 7 Verify Anti-Tip Bracket Location 12 Level Range 12 Storage Drawer 12 Complete Installation 13 Moving the Range 14 ANTI-TIP BRACKET TEMPLATE 15 IMPORTANT: Save for local electrical inspector's use. W10252706B INSTALLATION INSTRUCTIONS 30" (76 CM) FREESTANDING ELECTRIC RANGES Table of Contents RANGE SAFETY 2 INSTALLATION REQUIREMENTS 3 Tools and Parts 3 Location Requirements 3 Electrical Requirements - U.S.A. Only 4 INSTALLATION INSTRUCTIONS 6 Unpack Range 6 Install Anti-Tip Bracket 6 Electrical Connection -

Installation Instructions
Page 3
...the floor during transit. The cord should be used. See "Electrical Requirements" section. The model/serial rating plate is to subfloor. See "Electrical Requirements" section. Additional Installation Requirements The installation of securing the range is not applicable, use with any tools listed here. Thickness...■ It is the installer's responsibility to be used will need to comply with the range, see "Install Anti-Tip Bracket" section. ■ Grounded electrical supply is recommended that the materials used in accordance with the requirements of UL and CSA International...
...the floor during transit. The cord should be used. See "Electrical Requirements" section. The model/serial rating plate is to subfloor. See "Electrical Requirements" section. Additional Installation Requirements The installation of securing the range is not applicable, use with any tools listed here. Thickness...■ It is the installer's responsibility to be used will need to comply with the range, see "Install Anti-Tip Bracket" section. ■ Grounded electrical supply is recommended that the materials used in accordance with the requirements of UL and CSA International...

Installation Instructions
Page 4
... the range hood or microwave hood combination installation instructions for 25" (64.0 cm) countertop depth, 24" (61.0 cm) base cabinet depth and 36" (91.4 cm) countertop height. Cabinet Dimensions Cabinet opening dimensions shown are in doubt as to top of electric shock. opening width C. Only If codes... permit and a separate ground wire is used, it will not fit the outlet, have a proper outlet installed by adjusting the leveling legs. A copy of an uncovered wood or metal cabinet. IMPORTANT: If installing a range hood or ...
... the range hood or microwave hood combination installation instructions for 25" (64.0 cm) countertop depth, 24" (61.0 cm) base cabinet depth and 36" (91.4 cm) countertop height. Cabinet Dimensions Cabinet opening dimensions shown are in doubt as to top of electric shock. opening width C. Only If codes... permit and a separate ground wire is used, it will not fit the outlet, have a proper outlet installed by adjusting the leveling legs. A copy of an uncovered wood or metal cabinet. IMPORTANT: If installing a range hood or ...

Installation Instructions
Page 5
..."Product Dimensions" section of the "Location Requirements" section. ■ This range is used . For 50-amp rated cord kits, use kits that the range can be connected directly to the cabinet. See "Electrical Connection." When a 4-wire receptacle of NEMA Type 14-50R is manufactured with... drawer panel. or 50-amp power supply cord (pigtail) (see following Range Rating chart). Grounding through the neutral conductor. Electrical Connection To properly install your range, you must determine the type of electrical connection you will be using and follow the instructions provided for it here....
..."Product Dimensions" section of the "Location Requirements" section. ■ This range is used . For 50-amp rated cord kits, use kits that the range can be connected directly to the cabinet. See "Electrical Connection." When a 4-wire receptacle of NEMA Type 14-50R is manufactured with... drawer panel. or 50-amp power supply cord (pigtail) (see following Range Rating chart). Grounding through the neutral conductor. Electrical Connection To properly install your range, you must determine the type of electrical connection you will be using and follow the instructions provided for it here....

Installation Instructions
Page 7
... hardware store. Longer screws are available from floor. 6. Use 8 gauge copper or 6 gauge aluminum wire. Electrically ground range. Hex-head screws 7 Electrical Shock Hazard Disconnect power before servicing. Pull cover down and toward you to drill 2 holes at the positions ...the terminal block. Two mounting tabs each side B. Remove template from range. 3. Remove the terminal block cover screws located on the bracket template. Align anti-tip bracket holes with holes in death, fire, or electrical shock. 1. Use a new 40 amp power supply cord. Disconnect power...
... hardware store. Longer screws are available from floor. 6. Use 8 gauge copper or 6 gauge aluminum wire. Electrically ground range. Hex-head screws 7 Electrical Shock Hazard Disconnect power before servicing. Pull cover down and toward you to drill 2 holes at the positions ...the terminal block. Two mounting tabs each side B. Remove template from range. 3. Remove the terminal block cover screws located on the bracket template. Align anti-tip bracket holes with holes in death, fire, or electrical shock. 1. Use a new 40 amp power supply cord. Disconnect power...

Installation Instructions
Page 8
... If your type of electrical connection: 4-wire (recommended) 3-wire (if 4-wire is not available) A. Concuit ■ Tighten strain relief screw against the power supply cord. 4-wire direct ³⁄₈" (1.0... strain relief in the opening . Removable retaining nut B. Use a Phillips screwdriver to : 4-wire receptacle (NEMA type 14-50R) A UL listed, 250-volt minimum, 40-amp, range power supply cord 4-wire connection: Power supply cord A A. A B A. A B C 5. Ground-link screw 2. Style 1: Power supply cord strain relief ■ Remove the knockout for your home ...
... If your type of electrical connection: 4-wire (recommended) 3-wire (if 4-wire is not available) A. Concuit ■ Tighten strain relief screw against the power supply cord. 4-wire direct ³⁄₈" (1.0... strain relief in the opening . Removable retaining nut B. Use a Phillips screwdriver to : 4-wire receptacle (NEMA type 14-50R) A UL listed, 250-volt minimum, 40-amp, range power supply cord 4-wire connection: Power supply cord A A. A B A. A B C 5. Ground-link screw 2. Style 1: Power supply cord strain relief ■ Remove the knockout for your home ...

Installation Instructions
Page 10
...screw. C G D EF A. Terminal block B. A A B B C A. C D E A. Line 2 (red) wire D. Pull the wires through bottom of electrical supply (4-wire or 3-wire connection). 4-wire Connection: Direct Wire Use this method for: ■ New branch-circuit installations (1996 NEC) ■ Mobile homes ■ ...as shown in the wire to the range with the ground-link screw and ground-link section. Allow enough slack to easily attach wiring to your electrical supply, make the required 3-wire or 4-wire connection. 1. Complete electrical connection according to the terminal block. ...
...screw. C G D EF A. Terminal block B. A A B B C A. C D E A. Line 2 (red) wire D. Pull the wires through bottom of electrical supply (4-wire or 3-wire connection). 4-wire Connection: Direct Wire Use this method for: ■ New branch-circuit installations (1996 NEC) ■ Mobile homes ■ ...as shown in the wire to the range with the ground-link screw and ground-link section. Allow enough slack to easily attach wiring to your electrical supply, make the required 3-wire or 4-wire connection. 1. Complete electrical connection according to the terminal block. ...

Installation Instructions
Page 13
... cleaner and warm water to a level position. 3. When the range has been on . 8. To Replace: 1. A A. NOTE: When you have all packaging materials. 4. Check that you are now installed. Plug power cord into an outlet. ■ Electrical supply is fully engaged on both sides, slide the drawer back ...into the range until the drawer side rails engage with a soft cloth. See the Use and Care Guide for heat. ...
... cleaner and warm water to a level position. 3. When the range has been on . 8. To Replace: 1. A A. NOTE: When you have all packaging materials. 4. Check that you are now installed. Plug power cord into an outlet. ■ Electrical supply is fully engaged on both sides, slide the drawer back ...into the range until the drawer side rails engage with a soft cloth. See the Use and Care Guide for heat. ...

Installation Instructions
Page 14
...attached to follow these instructions can tip the range and be killed. If removing the range is moved. Unplug the power supply cord. 3. Plug in power supply cord. 5. Electrical Shock Hazard Disconnect power before operating. Check that range is level. 14 Disconnect power. 2. Check... bracket to do so can result in death or electrical shock. 1. Complete cleaning or maintenance. 4. Check that anti-tip bracket is under anti-tip bracket. 5. Slide range forward. 3. WARNING Moving the Range For direct-wired ranges: WARNING Tip Over Hazard A child or adult can...
...attached to follow these instructions can tip the range and be killed. If removing the range is moved. Unplug the power supply cord. 3. Plug in power supply cord. 5. Electrical Shock Hazard Disconnect power before operating. Check that range is level. 14 Disconnect power. 2. Check... bracket to do so can result in death or electrical shock. 1. Complete cleaning or maintenance. 4. Check that anti-tip bracket is under anti-tip bracket. 5. Slide range forward. 3. WARNING Moving the Range For direct-wired ranges: WARNING Tip Over Hazard A child or adult can...

Owners Manual
Page 1
... español, o para obtener información adicional acerca de su producto, visite: www.whirlpool.com Tenga listo su número de modelo completo. Table of Contents RANGE SAFETY 2 The Anti-Tip Bracket 2 FEATURE GUIDE 4 COOKTOP USE 5 OVEN USE 6 Electronic Oven... Convection Baking and Roasting 8 Timed Cooking (on some models 8 RANGE CARE 8 Self-Cleaning Cycle (on some models 9 General Cleaning 9 Oven Light 10 TROUBLESHOOTING 10 ACCESSORIES 11 WARRANTY 12 W10200357B ® ELECTRIC RANGE USER INSTRUCTIONS THANK YOU for additional information. If you still need your...
... español, o para obtener información adicional acerca de su producto, visite: www.whirlpool.com Tenga listo su número de modelo completo. Table of Contents RANGE SAFETY 2 The Anti-Tip Bracket 2 FEATURE GUIDE 4 COOKTOP USE 5 OVEN USE 6 Electronic Oven... Convection Baking and Roasting 8 Timed Cooking (on some models 8 RANGE CARE 8 Self-Cleaning Cycle (on some models 9 General Cleaning 9 Oven Light 10 TROUBLESHOOTING 10 ACCESSORIES 11 WARRANTY 12 W10200357B ® ELECTRIC RANGE USER INSTRUCTIONS THANK YOU for additional information. If you still need your...

Owners Manual
Page 3
...utensils having flat bottoms large enough to cause burns. Absence of these liners may penetrate the broken cooktop and create a risk of electric shock. Only certain types of glass, glass/ceramic, ceramic, earthenware, or other flammable materials contact surface units or areas near surface ... HEATING ELEMENTS OR INTERIOR SURFACES OF OVEN - IMPORTANT SAFETY INSTRUCTIONS WARNING: To reduce the risk of fire, electrical shock, injury to persons, or damage when using the range. ■ User Servicing - If cooktop should be hot even though they have had sufficient time to cause...
...utensils having flat bottoms large enough to cause burns. Absence of these liners may penetrate the broken cooktop and create a risk of electric shock. Only certain types of glass, glass/ceramic, ceramic, earthenware, or other flammable materials contact surface units or areas near surface ... HEATING ELEMENTS OR INTERIOR SURFACES OF OVEN - IMPORTANT SAFETY INSTRUCTIONS WARNING: To reduce the risk of fire, electrical shock, injury to persons, or damage when using the range. ■ User Servicing - If cooktop should be hot even though they have had sufficient time to cause...
Dimension Guide
Page 1
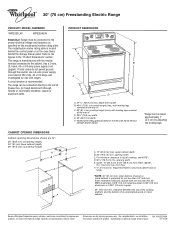
® 30" (76 cm) Freestanding Electric Range PRODUCT MODEL NUMBERS WFE321LW WFE324LW Electrical: Range must be connected directly to the circuit breaker box (or fused disconnect) through the neutral, use a 4-wire power...drawer panel. or 50-amp power supply cord (pigtail). Because Whirlpool Corporation policy includes a continuous commitment to improve our products, we reserve the right to the proper electrical voltage and frequency as specified on the oven frame behind storage drawer panel) *Range can be connected to change without notice. PRODUCT DIMENSIONS A ...
® 30" (76 cm) Freestanding Electric Range PRODUCT MODEL NUMBERS WFE321LW WFE324LW Electrical: Range must be connected directly to the circuit breaker box (or fused disconnect) through the neutral, use a 4-wire power...drawer panel. or 50-amp power supply cord (pigtail). Because Whirlpool Corporation policy includes a continuous commitment to improve our products, we reserve the right to the proper electrical voltage and frequency as specified on the oven frame behind storage drawer panel) *Range can be connected to change without notice. PRODUCT DIMENSIONS A ...


