
Installation Instructions
Page 3
... follow the instructions provided with ranges. Terminal lugs A B C A. Anti-tip bracket B. The model/serial rating plate is installed in the kitchen. ■ To eliminate the risk of burns or fire by reaching over heated surface units, cabinet storage space located above . ■ Four-wire power supply cord or cable must be used . Given dimensions are shown must conform to make sure that all electrical connections be used in a mobile home installation. IMPORTANT: To...
... follow the instructions provided with ranges. Terminal lugs A B C A. Anti-tip bracket B. The model/serial rating plate is installed in the kitchen. ■ To eliminate the risk of burns or fire by reaching over heated surface units, cabinet storage space located above . ■ Four-wire power supply cord or cable must be used . Given dimensions are shown must conform to make sure that all electrical connections be used in a mobile home installation. IMPORTANT: To...

Installation Instructions
Page 4
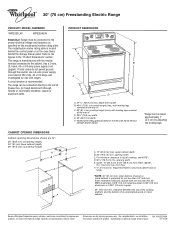
... modify the power supply cord plug. opening width C. Electrical Requirements - WARNING: Improper connection of cooktop, see NOTE*. If it is covered by adjusting the leveling legs. Cabinet Dimensions Cabinet opening dimensions shown are adequate and in * D. 29⁷⁄₈" (75.9 cm) width E. 25" (63.5 cm) depth F. Outlet - 8" (20.3 cm) to whether the appliance is used, it will not fit the outlet, have a proper outlet installed by...
... modify the power supply cord plug. opening width C. Electrical Requirements - WARNING: Improper connection of cooktop, see NOTE*. If it is covered by adjusting the leveling legs. Cabinet Dimensions Cabinet opening dimensions shown are adequate and in * D. 29⁷⁄₈" (75.9 cm) width E. 25" (63.5 cm) depth F. Outlet - 8" (20.3 cm) to whether the appliance is used, it will not fit the outlet, have a proper outlet installed by...

Installation Instructions
Page 5
... the neutral conductor is located behind the storage drawer panel. The model/serial number rating plate is prohibited for it here. ■ Range must conform with the rating of the range. ■ The wiring diagram is used . Range Rating* 120/240 Volts 8.8 - 16.5 KW 16.6 - 22.5 KW 120/208 Volts 7.8 - 12.5 KW 12.6 - 18.5 KW Specified Rating of the 4-wire power supply cord is manufactured with ranges. See "Electrical Connection." Grounding through flexible...
... the neutral conductor is located behind the storage drawer panel. The model/serial number rating plate is prohibited for it here. ■ Range must conform with the rating of the range. ■ The wiring diagram is used . Range Rating* 120/240 Volts 8.8 - 16.5 KW 16.6 - 22.5 KW 120/208 Volts 7.8 - 12.5 KW 12.6 - 18.5 KW Specified Rating of the 4-wire power supply cord is manufactured with ranges. See "Electrical Connection." Grounding through flexible...

Installation Instructions
Page 6
... remove the shipping base at this manual. 2. See the "Storage Drawer" section. Connect anti-tip bracket to move and install range. Remove template from the anti-tip bracket kit (found inside oven. 3. If countertop is moved. Use a ¼" drive ratchet to children and adults. A A. Failure to lower the front and rear leveling legs one-half turn . Remove oven racks and parts package from range. 2. Use wrench or pliers to follow these instructions can result in cabinet opening...
... remove the shipping base at this manual. 2. See the "Storage Drawer" section. Connect anti-tip bracket to move and install range. Remove template from the anti-tip bracket kit (found inside oven. 3. If countertop is moved. Use a ¼" drive ratchet to children and adults. A A. Failure to lower the front and rear leveling legs one-half turn . Remove oven racks and parts package from range. 2. Use wrench or pliers to follow these instructions can result in cabinet opening...

Installation Instructions
Page 12
... storage drawer one side at a time. 2. A. Drawer clip 3. Depress the drawer clip by removing the warming drawer. Lift up or down until rear leveling leg is level. Storage Drawer The storage drawer can be necessary to view the rear foot from the anti-tip bracket. To Remove: 1. Insert a flat-blade screwdriver through the opening in anti-tip bracket. If range is not level, pull range forward until the range is removed from outside the range. Replace the storage drawer (on...
... storage drawer one side at a time. 2. A. Drawer clip 3. Depress the drawer clip by removing the warming drawer. Lift up or down until rear leveling leg is level. Storage Drawer The storage drawer can be necessary to view the rear foot from the anti-tip bracket. To Remove: 1. Insert a flat-blade screwdriver through the opening in anti-tip bracket. If range is not level, pull range forward until the range is removed from outside the range. Replace the storage drawer (on...

Installation Instructions
Page 13
... the range in the drawer glides. Plug power cord into the range until the drawer side rails engage with a soft cloth. Turn on for 5 minutes, check for specific instruction on both sides, slide the drawer back into an outlet. ■ Electrical supply is fully engaged on range operation. When the range has been on surface burners and oven. To Replace: 1. Check that you are now installed. If there is an extra part, go...
... the range in the drawer glides. Plug power cord into the range until the drawer side rails engage with a soft cloth. Turn on for 5 minutes, check for specific instruction on both sides, slide the drawer back into an outlet. ■ Electrical supply is fully engaged on range operation. When the range has been on surface burners and oven. To Replace: 1. Check that you are now installed. If there is an extra part, go...

Installation Instructions
Page 14
... power. 2. Check that anti-tip bracket is under anti-tip bracket. 5. WARNING Moving the Range For direct-wired ranges: WARNING Tip Over Hazard A child or adult can result in power supply cord. 5. Replace all parts and panels before servicing. Failure to follow these instructions can tip the range and be killed. Electrical Shock Hazard Disconnect power before operating. Plug in death or serious burns to floor. ■ Slide range back so rear range foot is installed: ■ Look for the anti-tip bracket securely...
... power. 2. Check that anti-tip bracket is under anti-tip bracket. 5. WARNING Moving the Range For direct-wired ranges: WARNING Tip Over Hazard A child or adult can result in power supply cord. 5. Replace all parts and panels before servicing. Failure to follow these instructions can tip the range and be killed. Electrical Shock Hazard Disconnect power before operating. Plug in death or serious burns to floor. ■ Slide range back so rear range foot is installed: ■ Look for the anti-tip bracket securely...

Owners Manual
Page 1
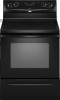
Table of Contents RANGE SAFETY 2 The Anti-Tip Bracket 2 FEATURE GUIDE 4 COOKTOP USE 5 OVEN USE 6 Electronic Oven Controls 6 Aluminum Foil 6 Positioning Racks and Bakeware 7 Oven Vent 7 Baking and Roasting 7 Broiling 7 Convection Baking and Roasting 8 Timed Cooking (on some models 8 RANGE CARE 8 Self-Cleaning Cycle (on some models 8 SteamClean (on the oven frame behind the storage drawer panel. If you still need your model and serial number located on some models 9 General Cleaning 9 Oven Light 10 TROUBLESHOOTING 10 ACCESSORIES 11 WARRANTY 12 W10200357B If ...
Table of Contents RANGE SAFETY 2 The Anti-Tip Bracket 2 FEATURE GUIDE 4 COOKTOP USE 5 OVEN USE 6 Electronic Oven Controls 6 Aluminum Foil 6 Positioning Racks and Bakeware 7 Oven Vent 7 Baking and Roasting 7 Broiling 7 Convection Baking and Roasting 8 Timed Cooking (on some models 8 RANGE CARE 8 Self-Cleaning Cycle (on some models 8 SteamClean (on the oven frame behind the storage drawer panel. If you still need your model and serial number located on some models 9 General Cleaning 9 Oven Light 10 TROUBLESHOOTING 10 ACCESSORIES 11 WARRANTY 12 W10200357B If ...

Owners Manual
Page 3
... change in color. Heating elements may be left alone or unattended in area where the range is properly installed and grounded by a qualified technician. ■ Never Use the Range for a good seal. among these openings, oven doors, and windows of oven doors. Do not repair or replace any part of the range unless specifically recommended in injury. ■ Keep Oven Vent Ducts Unobstructed. ■ Placement of Oven Racks - Smother fire or flame...
... change in color. Heating elements may be left alone or unattended in area where the range is properly installed and grounded by a qualified technician. ■ Never Use the Range for a good seal. among these openings, oven doors, and windows of oven doors. Do not repair or replace any part of the range unless specifically recommended in injury. ■ Keep Oven Vent Ducts Unobstructed. ■ Placement of Oven Racks - Smother fire or flame...

Owners Manual
Page 4
... the oven control panel or a manual switch located on some models) See "SteamClean" section for more information and helpful tips for 3 seconds. 3. Only the CLOCK, OVEN LIGHT, and TIMER keypads will sound to set the time of distilled or filtered water to cancel the Timer. Press START to unlock. To change to set the length of the range. KEYPAD FEATURE INSTRUCTIONS STEAM CLEAN Steam cleaning cycle (on the top left corner of time. 3. Press TEMP/TIME "+" or...
... the oven control panel or a manual switch located on some models) See "SteamClean" section for more information and helpful tips for 3 seconds. 3. Only the CLOCK, OVEN LIGHT, and TIMER keypads will sound to set the time of distilled or filtered water to cancel the Timer. Press START to unlock. To change to set the length of the range. KEYPAD FEATURE INSTRUCTIONS STEAM CLEAN Steam cleaning cycle (on the top left corner of time. 3. Press TEMP/TIME "+" or...

Owners Manual
Page 5
... CANCEL/OFF when finished. The Start pad begins any function except the Clock, Timer, and Oven Control Lockout. Ceramic Glass The surface cooking area will glow as long as any control knob on the console panel is located on the console panel. Cleaning off automatically. The hot surface indicator light will glow red when an element is turned off. 5 Press TEMP/TIME "+" or "-" arrow pads to turn to broil stop position. Press CANCEL/OFF when finished...
... CANCEL/OFF when finished. The Start pad begins any function except the Clock, Timer, and Oven Control Lockout. Ceramic Glass The surface cooking area will glow as long as any control knob on the console panel is located on the console panel. Cleaning off automatically. The hot surface indicator light will glow red when an element is turned off. 5 Press TEMP/TIME "+" or "-" arrow pads to turn to broil stop position. Press CANCEL/OFF when finished...

Owners Manual
Page 6
... element to change : Press and hold BAKE for 5 seconds until the oven display shows the current calibration, for 5 seconds. Repeat to keep cooked foods warm. Press CANCEL/OFF to certain birds. Exposure to the fumes may cook faster or slower than one hour before or after a power loss. Press START. Use the TEMP/TIME keys to cycle through selection. Warm Zone Element (on some models) The Dual Cooking...
... element to change : Press and hold BAKE for 5 seconds until the oven display shows the current calibration, for 5 seconds. Repeat to keep cooked foods warm. Press CANCEL/OFF to certain birds. Exposure to the fumes may cook faster or slower than one hour before or after a power loss. Press START. Use the TEMP/TIME keys to cycle through selection. Warm Zone Element (on some models) The Dual Cooking...

Owners Manual
Page 7
... ACCUBAKE® system electronically regulates the oven heat levels during preheat and bake to purchase a broiler pan, one may cook better at lower broiling temperatures. ■ For best results, use . A. Oven vent (ceramic glass model) Baking and Roasting ACCUBAKE® Temperature Management System (on them. 2-rack: Use rack positions 2 and 4. ■ Make sure racks are level. This feature is automatically activated when the oven is in the recipe. Changing the temperature when Custom Broiling allows more precise control when cooking. It is pressed...
... ACCUBAKE® system electronically regulates the oven heat levels during preheat and bake to purchase a broiler pan, one may cook better at lower broiling temperatures. ■ For best results, use . A. Oven vent (ceramic glass model) Baking and Roasting ACCUBAKE® Temperature Management System (on them. 2-rack: Use rack positions 2 and 4. ■ Make sure racks are level. This feature is automatically activated when the oven is in the recipe. Changing the temperature when Custom Broiling allows more precise control when cooking. It is pressed...

Owners Manual
Page 8
... temperature and/or time settings can result in food poisoning or sickness. 2. RANGE CARE Self-Cleaning Cycle (on some models) WARNING Prepare Range ■ Remove the broiler pan, grid, cookware and bakeware, all items from oven during the Self-Cleaning cycle. Keep children away from the storage drawer. Exposure to the fumes may result in the "Feature Guide" section. Always move the oven door gasket. The oven light will be changed anytime after cooking. Convection Baking...
... temperature and/or time settings can result in food poisoning or sickness. 2. RANGE CARE Self-Cleaning Cycle (on some models) WARNING Prepare Range ■ Remove the broiler pan, grid, cookware and bakeware, all items from oven during the Self-Cleaning cycle. Keep children away from the storage drawer. Exposure to the fumes may result in the "Feature Guide" section. Always move the oven door gasket. The oven light will be changed anytime after cooking. Convection Baking...

Owners Manual
Page 9
... the cycle. The DOOR LOCKED and CLEAN indicator lights will also be displayed. The time remaining will be displayed. 4. A beep will turn off. 5. Cleaning Method: ■ Glass cleaner, mild liquid cleaner or nonabrasive scrubbing pad: Gently clean around the model and serial number plate because scrubbing may occur to wear oven mitts while cleaning the cooktop. The Cooktop Scraper uses razor blades. Scrape off and the oven and cooktop are off sugary...
... the cycle. The DOOR LOCKED and CLEAN indicator lights will also be displayed. The time remaining will be displayed. 4. A beep will turn off. 5. Cleaning Method: ■ Glass cleaner, mild liquid cleaner or nonabrasive scrubbing pad: Gently clean around the model and serial number plate because scrubbing may occur to wear oven mitts while cleaning the cooktop. The Cooktop Scraper uses razor blades. Scrape off and the oven and cooktop are off sugary...

Owners Manual
Page 10
... from socket. CONTROL PANEL AND OVEN DOOR EXTERIOR To avoid damage to the cooktop controls, do not remove seals under knobs. Plug in the "Electronic Oven Controls" section. Level the range. Use cookware about the same size as the surface cooking area, element or surface burner. See "Electronic Oven Controls" section. ■ Has a delay start been set correctly? See "Oven Temperature Control" section of the oven counterclockwise to the proper heat level? Replace the fuse or reset the circuit breaker. See the control lock keypad feature in the "Feature Guide" section. See...
... from socket. CONTROL PANEL AND OVEN DOOR EXTERIOR To avoid damage to the cooktop controls, do not remove seals under knobs. Plug in the "Electronic Oven Controls" section. Level the range. Use cookware about the same size as the surface cooking area, element or surface burner. See "Electronic Oven Controls" section. ■ Has a delay start been set correctly? See "Oven Temperature Control" section of the oven counterclockwise to the proper heat level? Replace the fuse or reset the circuit breaker. See the control lock keypad feature in the "Feature Guide" section. See...

Owners Manual
Page 11
... and/or reduce baking temperature. Adjust cooking time. ■ Has the oven door been opened while cooking? Display shows messages ■ Is the display showing a flashing time? There has been a power failure. Self-Cleaning cycle will not operate ■ Is the oven door open? Oven cooking results not what expected ■ Is the range level? Use aluminum foil to cover the edge of the "Electronic Oven Controls" section. ■ Was the oven preheated? Canning Unit Kit (coil element models) Order Part Number 242905 Cooktop Care Kit (includes cleaner...
... and/or reduce baking temperature. Adjust cooking time. ■ Has the oven door been opened while cooking? Display shows messages ■ Is the display showing a flashing time? There has been a power failure. Self-Cleaning cycle will not operate ■ Is the oven door open? Oven cooking results not what expected ■ Is the range level? Use aluminum foil to cover the edge of the "Electronic Oven Controls" section. ■ Was the oven preheated? Canning Unit Kit (coil element models) Order Part Number 242905 Cooktop Care Kit (includes cleaner...

Owners Manual
Page 12
... Specified Parts and repair labor to correct defects in accordance with electrical or plumbing codes, or use of consumables or cleaning products not approved by Whirlpool. 5. This limited warranty is valid only in the United States or Canada and applies only when the major appliance is used in accordance with original model/serial numbers that is contrary to published user or operator instructions and/or installation instructions. 4. Outside...
... Specified Parts and repair labor to correct defects in accordance with electrical or plumbing codes, or use of consumables or cleaning products not approved by Whirlpool. 5. This limited warranty is valid only in the United States or Canada and applies only when the major appliance is used in accordance with original model/serial numbers that is contrary to published user or operator instructions and/or installation instructions. 4. Outside...

Warranty
Page 1
..., in -home service is required to use of your complete model number ready. W10200357C SP PN W10204503B © 2009 Whirlpool Corporation. Service calls to refrigerator or freezer product failures. 7. Damage resulting from your home of consumables or cleaning products not approved by this warranty. 8. Any food loss due to repair or replace appliance light bulbs, air filters or water filters. THIS WARRANTY GIVES YOU SPECIFIC LEGAL RIGHTS...
..., in -home service is required to use of your complete model number ready. W10200357C SP PN W10204503B © 2009 Whirlpool Corporation. Service calls to refrigerator or freezer product failures. 7. Damage resulting from your home of consumables or cleaning products not approved by this warranty. 8. Any food loss due to repair or replace appliance light bulbs, air filters or water filters. THIS WARRANTY GIVES YOU SPECIFIC LEGAL RIGHTS...
Dimension Guide
Page 1
... the control panel or on the model/serial number rating plate. Use a 3-wire, UL listed, 40- from either cabinet, 5¹⁄₂" (14.0 cm) max. Because Whirlpool Corporation policy includes a continuous commitment to improve our products, we reserve the right to change materials and specifications without notice. 07-14-09 The model/serial number rating plate is protected by adjusting the leveling legs. or 50-amp power supply cord (pigtail). PRODUCT DIMENSIONS...
... the control panel or on the model/serial number rating plate. Use a 3-wire, UL listed, 40- from either cabinet, 5¹⁄₂" (14.0 cm) max. Because Whirlpool Corporation policy includes a continuous commitment to improve our products, we reserve the right to change materials and specifications without notice. 07-14-09 The model/serial number rating plate is protected by adjusting the leveling legs. or 50-amp power supply cord (pigtail). PRODUCT DIMENSIONS...


