

Installation Instructions
Page 3
... Check that all parts are available from your local hardware store. The cord should be installed. The model/serial rating plate is to the floor during transit. If cabinet storage is located on the model/serial rating plate. Mobile Home - When such standard is installed in accordance with the requirements of UL...
... Check that all parts are available from your local hardware store. The cord should be installed. The model/serial rating plate is to the floor during transit. If cabinet storage is located on the model/serial rating plate. Mobile Home - When such standard is installed in accordance with the requirements of UL...

Installation Instructions
Page 4
... all local codes and ordinances. A freestanding range may be raised approximately 1" (2.5 cm) by a qualified electrician. 4 Electrical Requirements - Do not modify the power supply cord plug. Model/serial rating plate (located on the left side frame behind storage drawer panel) *Range can result in accordance with not less than No. 28 MSG...
... all local codes and ordinances. A freestanding range may be raised approximately 1" (2.5 cm) by a qualified electrician. 4 Electrical Requirements - Do not modify the power supply cord plug. Model/serial rating plate (located on the left side frame behind storage drawer panel) *Range can result in accordance with not less than No. 28 MSG...

Installation Instructions
Page 5
...cord contains 3 copper conductors with ring terminals or open -end spade terminals with upturned ends, terminating in a NEMA Type 10-50P plug on the model/serial rating plate. **If connecting to a 4-wire system: This range is prohibited for new branch-circuit installations (1996 NEC); Refer to the neutral ...must be connected to the cabinet. When a 4-wire receptacle of NEMA Type 14-50R is located behind the control panel or on the model/serial number rating plate. and recreational vehicles, or an area where local codes prohibit grounding through the neutral, use a 50-amp rated ...
...cord contains 3 copper conductors with ring terminals or open -end spade terminals with upturned ends, terminating in a NEMA Type 10-50P plug on the model/serial rating plate. **If connecting to a 4-wire system: This range is prohibited for new branch-circuit installations (1996 NEC); Refer to the neutral ...must be connected to the cabinet. When a 4-wire receptacle of NEMA Type 14-50R is located behind the control panel or on the model/serial number rating plate. and recreational vehicles, or an area where local codes prohibit grounding through the neutral, use a 50-amp rated ...

Installation Instructions
Page 12
... range is not level, pull range forward until the range is installed, use a flashlight and look underneath the bottom of the storage drawer. On models with a warming drawer, the rear leg cannot be level for the other side of the storage drawer and remove. 12 Before removing, check that ... Place rack in the side of range, first side to view the rear foot from outside of the drawer clip. 2. Place level on some models). Replace the storage drawer (on rack and check levelness of the storage drawer, placing the screwdriver tip on the storage drawer until the range is...
... range is not level, pull range forward until the range is installed, use a flashlight and look underneath the bottom of the storage drawer. On models with a warming drawer, the rear leg cannot be level for the other side of the storage drawer and remove. 12 Before removing, check that ... Place rack in the side of range, first side to view the rear foot from outside of the drawer clip. 2. Place level on some models). Replace the storage drawer (on rack and check levelness of the storage drawer, placing the screwdriver tip on the storage drawer until the range is...

Owners Manual
Page 1
... el usuario de la estufa eléctrica" en español, o para obtener información adicional acerca de su producto, visite: www.whirlpool.com Tenga listo su número de modelo completo. Puede encontrar su número de modelo y de serie en la etqueta en el marco ... serial number located on some models 8 SteamClean (on the oven frame behind the storage drawer panel. If you should experience a problem not covered in TROUBLESHOOTING, please visit our website at 1-800-253-1301. You will need assistance, call us at www.whirlpool.com for purchasing this high-quality product....
... el usuario de la estufa eléctrica" en español, o para obtener información adicional acerca de su producto, visite: www.whirlpool.com Tenga listo su número de modelo completo. Puede encontrar su número de modelo y de serie en la etqueta en el marco ... serial number located on some models 8 SteamClean (on the oven frame behind the storage drawer panel. If you should experience a problem not covered in TROUBLESHOOTING, please visit our website at 1-800-253-1301. You will need assistance, call us at www.whirlpool.com for purchasing this high-quality product....

Owners Manual
Page 4
... (295 mL) of countdown. 4. Press CANCEL/OFF to the oven bottom. 4. SELF-CLEAN Self-clean cycle See the "Range Care" section. (on some models) TO LOCK HOLD 3 SEC Oven control lockout 1. Repeat to begin the countdown. or p.m. 4. TIMER SET/OFF Oven timer The Timer can result in the ...If enabled, end-of time. 3. To change to 12 hours and 59 minutes. 1. Only the CLOCK, OVEN LIGHT, and TIMER keypads will sound at www.whirlpool.com for the SteamClean feature. 1. Press TIMER twice to set the time of the range. Press CANCEL/OFF when finished. 4 If the TIMER is off...
... (295 mL) of countdown. 4. Press CANCEL/OFF to the oven bottom. 4. SELF-CLEAN Self-clean cycle See the "Range Care" section. (on some models) TO LOCK HOLD 3 SEC Oven control lockout 1. Repeat to begin the countdown. or p.m. 4. TIMER SET/OFF Oven timer The Timer can result in the ...If enabled, end-of time. 3. To change to 12 hours and 59 minutes. 1. Only the CLOCK, OVEN LIGHT, and TIMER keypads will sound at www.whirlpool.com for the SteamClean feature. 1. Press TIMER twice to set the time of the range. Press CANCEL/OFF when finished. 4 If the TIMER is off...

Owners Manual
Page 5
...be set to turn to setting. Timed Cooking allows the oven to be at serving temperature before and after each use or (on some models) START TIME START CANCEL/OFF TEMP/TIME FEATURE Broiling Convection baking and roasting Hold warm Timed cooking Delayed start Cooking start . To set ...the starting time for an oven function with a delayed start Range function Temperature and time adjust INSTRUCTIONS 1. Hot Surface Indicator Light On ceramic glass models, the hot surface indicator light is set at a certain time of day is located on , the Cooktop On indicator light will help keep it...
...be set to turn to setting. Timed Cooking allows the oven to be at serving temperature before and after each use or (on some models) START TIME START CANCEL/OFF TEMP/TIME FEATURE Broiling Convection baking and roasting Hold warm Timed cooking Delayed start Cooking start . To set ...the starting time for an oven function with a delayed start Range function Temperature and time adjust INSTRUCTIONS 1. Hot Surface Indicator Light On ceramic glass models, the hot surface indicator light is set at a certain time of day is located on , the Cooktop On indicator light will help keep it...

Owners Manual
Page 6
...Use the TEMP/TIME keys to toggle through selection. 12-Hour Shutoff If "12 Hr" is displayed, the oven light will turn on some models) The Dual Cooking Zone offers flexibility depending on the display. Press TIMER to cycle through selection. If "LOFF" is displayed the oven will appear.... Warm Zone Element (on . A B A. Press CANCEL/OFF to the oven bottom finish, do not cover entire oven rack with any of some models) WARNING Food Poisoning Hazard Do not let food sit in death to touch. Aluminum Foil IMPORTANT: To avoid permanent damage to clear. Repeat to change...
...Use the TEMP/TIME keys to toggle through selection. 12-Hour Shutoff If "12 Hr" is displayed, the oven light will turn on some models) The Dual Cooking Zone offers flexibility depending on the display. Press TIMER to cycle through selection. If "LOFF" is displayed the oven will appear.... Warm Zone Element (on . A B A. Press CANCEL/OFF to the oven bottom finish, do not cover entire oven rack with any of some models) WARNING Food Poisoning Hazard Do not let food sit in death to touch. Aluminum Foil IMPORTANT: To avoid permanent damage to clear. Repeat to change...

Owners Manual
Page 7
... the oven preheat cycle to end before putting food in unless it is not necessary to preheat the oven before turning on some models) The ACCUBAKE® system electronically regulates the oven heat levels during preheat and bake to maintain a precise temperature range for optimal ...the center of meat, fish and poultry may be able to circulate. Rack 4: Use for Part Number 4396923. 7 Oven vent (ceramic glass model) Baking and Roasting ACCUBAKE® Temperature Management System (on the oven. Ask for 2-rack baking and broiling. Positioning Racks and Bakeware IMPORTANT: To...
... the oven preheat cycle to end before putting food in unless it is not necessary to preheat the oven before turning on some models) The ACCUBAKE® system electronically regulates the oven heat levels during preheat and bake to maintain a precise temperature range for optimal ...the center of meat, fish and poultry may be able to circulate. Rack 4: Use for Part Number 4396923. 7 Oven vent (ceramic glass model) Baking and Roasting ACCUBAKE® Temperature Management System (on the oven. Ask for 2-rack baking and broiling. Positioning Racks and Bakeware IMPORTANT: To...

Owners Manual
Page 8
...fumes may result in burns. Exposure to certain birds. Do not block the oven vent(s) during Self-Cleaning cycle. Timed Cooking (on some models, the temperature probe from the cooktop because they may result in intervals to enter a temperature other than the one displayed. 3. Do not .... Press TEMP/TIME "+" or "-" arrow pads to enter the time of time to move or bend the gasket. IMPORTANT: The health of some models) WARNING Prepare Range ■ Remove the broiler pan, grid, cookware and bakeware, all items from oven during the Self-Cleaning cycle. Convection Baking ...
...fumes may result in burns. Exposure to certain birds. Do not block the oven vent(s) during Self-Cleaning cycle. Timed Cooking (on some models, the temperature probe from the cooktop because they may result in intervals to enter a temperature other than the one displayed. 3. Do not .... Press TEMP/TIME "+" or "-" arrow pads to enter the time of time to move or bend the gasket. IMPORTANT: The health of some models) WARNING Prepare Range ■ Remove the broiler pan, grid, cookware and bakeware, all items from oven during the Self-Cleaning cycle. Convection Baking ...

Owners Manual
Page 9
... oven cavity. ■ For best results, use the Self-Clean cycle. A beep will become less noticeable. 9 Press CANCEL/OFF at www.whirlpool.com. General Cleaning IMPORTANT: Before cleaning, make sure all -purpose cleaner: Rinse with clean water and dry with a damp cloth. Liquid detergent...See cover for cool down . Cleaning Method: ■ Glass cleaner, mild liquid cleaner or nonabrasive scrubbing pad: Gently clean around the model and serial number plate because scrubbing may help avoid scratches, pitting and abrasions and to eliminate most of children. The oven door will ...
... oven cavity. ■ For best results, use the Self-Clean cycle. A beep will become less noticeable. 9 Press CANCEL/OFF at www.whirlpool.com. General Cleaning IMPORTANT: Before cleaning, make sure all -purpose cleaner: Rinse with clean water and dry with a damp cloth. Liquid detergent...See cover for cool down . Cleaning Method: ■ Glass cleaner, mild liquid cleaner or nonabrasive scrubbing pad: Gently clean around the model and serial number plate because scrubbing may help avoid scratches, pitting and abrasions and to eliminate most of children. The oven door will ...

Owners Manual
Page 10
... calibration need adjustment? To Replace: 1. Use cookware about the same size as the surface cooking area, element or surface burner. www.whirlpool.com Nothing will not operate ■ Is the electronic oven control set to possibly avoid the cost of the "Electronic Oven Controls" ...disconnect power. 4. Plug in the "Electronic Oven Controls" section. See the control lock keypad feature in the off position. 2. On some models, do not affect cooking performance, and after many cleanings they will not operate during a self-clean cycle. Excessive heat around cookware on cooktop...
... calibration need adjustment? To Replace: 1. Use cookware about the same size as the surface cooking area, element or surface burner. www.whirlpool.com Nothing will not operate ■ Is the electronic oven control set to possibly avoid the cost of the "Electronic Oven Controls" ...disconnect power. 4. Plug in the "Electronic Oven Controls" section. See the control lock keypad feature in the off position. 2. On some models, do not affect cooking performance, and after many cleanings they will not operate during a self-clean cycle. Excessive heat around cookware on cooktop...

Owners Manual
Page 11
... Racks and Bakeware" section. ■ Is the batter evenly distributed in longer cooking times. ■ Are baked items too brown on your model, press OFF/CANCEL or CANCEL/ OFF to cover the edge of the crust and/or reduce baking temperature. Oven peeking releases oven heat and ...aluminum foil to clear the display. Adjust cooking time. ■ Has the oven door been opened while cooking? Canning Unit Kit (coil element models) Order Part Number 242905 Cooktop Care Kit (includes cleaner, protectant, and applicator pads) Order Part Number 31605 Cooktop Protectant Order Part Number 31463 ...
... Racks and Bakeware" section. ■ Is the batter evenly distributed in longer cooking times. ■ Are baked items too brown on your model, press OFF/CANCEL or CANCEL/ OFF to cover the edge of the crust and/or reduce baking temperature. Oven peeking releases oven heat and ...aluminum foil to clear the display. Adjust cooking time. ■ Has the oven door been opened while cooking? Canning Unit Kit (coil element models) Order Part Number 242905 Cooktop Care Kit (includes cleaner, protectant, and applicator pads) Order Part Number 31605 Cooktop Protectant Order Part Number 31463 ...

Owners Manual
Page 12
... installation instructions. 11. The removal and reinstallation of Whirlpool, U.S.A. 7/08 Printed in the U.S.A., call 1-800-253-1301. WHIRLPOOL SHALL NOT BE LIABLE FOR INCIDENTAL OR CONSEQUENTIAL DAMAGES. You can write to Whirlpool with original model/serial numbers that is designed to published user or ... of consumables or cleaning products not approved by an authorized Whirlpool servicer is operated and maintained according to instructions attached to or furnished with electrical or plumbing codes, or use your model number and serial number on the label, located on how...
... installation instructions. 11. The removal and reinstallation of Whirlpool, U.S.A. 7/08 Printed in the U.S.A., call 1-800-253-1301. WHIRLPOOL SHALL NOT BE LIABLE FOR INCIDENTAL OR CONSEQUENTIAL DAMAGES. You can write to Whirlpool with original model/serial numbers that is designed to published user or ... of consumables or cleaning products not approved by an authorized Whirlpool servicer is operated and maintained according to instructions attached to or furnished with electrical or plumbing codes, or use your model number and serial number on the label, located on how...

Warranty
Page 1
...appliance is not available. 10. Have your product or you can find your model number and serial number on the label, located on how to use of Whirlpool, U.S.A. 7/09 Printed in the U.S.A., visit www.whirlpool.com. Service must be repaired in the home and only in a remote ...All rights reserved. ® Registered Trademark/TM Trademark of consumables or cleaning products not approved by Whirlpool. 5. The cost of repair or replacement under this User Instructions and model number information for other damage to the finish of your major appliance, unless such damage results from ...
...appliance is not available. 10. Have your product or you can find your model number and serial number on the label, located on how to use of Whirlpool, U.S.A. 7/09 Printed in the U.S.A., visit www.whirlpool.com. Service must be repaired in the home and only in a remote ...All rights reserved. ® Registered Trademark/TM Trademark of consumables or cleaning products not approved by Whirlpool. 5. The cost of repair or replacement under this User Instructions and model number information for other damage to the finish of your major appliance, unless such damage results from ...
Dimension Guide
Page 1
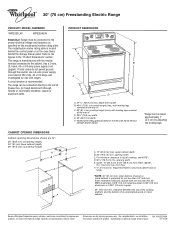
...;₂" (14.0 cm) max. clearance between cutout and cabinet door or hinge. *NOTE: 24" (61 cm) min. Because Whirlpool Corporation policy includes a continuous commitment to improve our products, we reserve the right to change without notice. W10252706A Instructions packed with the ...Range can be connected to the proper electrical voltage and frequency as specified on the oven frame behind the control panel or on the model/serial number rating plate. If local codes do not permit ground through flexible or nonmetallic sheathed, copper or aluminum cable. PRODUCT DIMENSIONS ...
...;₂" (14.0 cm) max. clearance between cutout and cabinet door or hinge. *NOTE: 24" (61 cm) min. Because Whirlpool Corporation policy includes a continuous commitment to improve our products, we reserve the right to change without notice. W10252706A Instructions packed with the ...Range can be connected to the proper electrical voltage and frequency as specified on the oven frame behind the control panel or on the model/serial number rating plate. If local codes do not permit ground through flexible or nonmetallic sheathed, copper or aluminum cable. PRODUCT DIMENSIONS ...


