
Use & Care Guide
Page 1
... 2 The Anti-Tip Bracket 2 FEATURE GUIDE 4 COOKTOP USE 5 Cookware 7 Home Canning 7 OVEN USE 8 Electronic Oven Controls 8 Sabbath Mode (on some models 8 Aluminum Foil 9 Positioning Racks and Bakeware 9 Oven Vent 10 Baking and Roasting 10 Broiling 10 Cook Time (on some...ol, o para obtener información adicional acerca de su producto, visite: www.whirlpool.com Tenga listo su número de modelo completo. If you still need your model and serial number located on some models 11 General Cleaning 12 Oven Light 13 TROUBLESHOOTING 13 ACCESSORIES 15 WARRANTY 15 W10394383A
... 2 The Anti-Tip Bracket 2 FEATURE GUIDE 4 COOKTOP USE 5 Cookware 7 Home Canning 7 OVEN USE 8 Electronic Oven Controls 8 Sabbath Mode (on some models 8 Aluminum Foil 9 Positioning Racks and Bakeware 9 Oven Vent 10 Baking and Roasting 10 Broiling 10 Cook Time (on some...ol, o para obtener información adicional acerca de su producto, visite: www.whirlpool.com Tenga listo su número de modelo completo. If you still need your model and serial number located on some models 11 General Cleaning 12 Oven Light 13 TROUBLESHOOTING 13 ACCESSORIES 15 WARRANTY 15 W10394383A

Use & Care Guide
Page 4
... but not in the display, press TIMER to take effect. 5. Press TIMER. 2. If the TIMER is controlled by a keypad on some models) FEATURE Clock Oven cavity light Oven timer Cooking start Range function Temperature and time adjust Baking and roasting Broiling Hold warm INSTRUCTIONS The Clock uses... in 5°F (5°C) increments between 300°F and 500°F (150°C and 260°C). 3. Press TEMP/TIME "up to set at www.whirlpool.com for more than 350°F (175°C) in 5°F (5°C) increments between 170°F and 500°F (75°C and 260°C). ...
... but not in the display, press TIMER to take effect. 5. Press TIMER. 2. If the TIMER is controlled by a keypad on some models) FEATURE Clock Oven cavity light Oven timer Cooking start Range function Temperature and time adjust Baking and roasting Broiling Hold warm INSTRUCTIONS The Clock uses... in 5°F (5°C) increments between 300°F and 500°F (150°C and 260°C). 3. Press TEMP/TIME "up to set at www.whirlpool.com for more than 350°F (175°C) in 5°F (5°C) increments between 170°F and 500°F (75°C and 260°C). ...

Use & Care Guide
Page 5
... cycle on and off all controls when done cooking. Failure to clean and condition your ceramic glass cooktop. Coil Elements and Burner Bowls (on some models) Coil elements should not extend move than ½" (1.3 cm) over the coil element. This is in and turn on at a certain time of day,...cooktop scraper are not affected by the oven control lockout. Start Time should not be displayed. 4. Repeat to its original color. Ceramic Glass (on some models) The surface cooking area will also randomly cycle off and back on again even while in death or fire. As the glass cools, it can...
... cycle on and off all controls when done cooking. Failure to clean and condition your ceramic glass cooktop. Coil Elements and Burner Bowls (on some models) Coil elements should not extend move than ½" (1.3 cm) over the coil element. This is in and turn on at a certain time of day,...cooktop scraper are not affected by the oven control lockout. Start Time should not be displayed. 4. Repeat to its original color. Ceramic Glass (on some models) The surface cooking area will also randomly cycle off and back on again even while in death or fire. As the glass cools, it can...

Use & Care Guide
Page 6
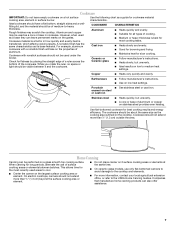
...marks that cannot be used in the same way as possible. Cooktop On Indicator Light The Cooktop On indicator light is turned on some models) Clean the cooktop after each use to help avoid scratches, pitting, abrasions and to touch, even after each use to clean and ... the cooktop after the surface cooking area is still warm. Hot Surface Indicator Light (on some models) The Dual Zone Cooking Element offers flexibility depending on some models) On ceramic glass models, the hot surface indicator light is recommended for best heat conduction and energy efficiency. The dual size...
...marks that cannot be used in the same way as possible. Cooktop On Indicator Light The Cooktop On indicator light is turned on some models) Clean the cooktop after each use to help avoid scratches, pitting, abrasions and to touch, even after each use to clean and ... the cooktop after the surface cooking area is still warm. Hot Surface Indicator Light (on some models) The Dual Zone Cooking Element offers flexibility depending on some models) On ceramic glass models, the hot surface indicator light is recommended for best heat conduction and energy efficiency. The dual size...
Use & Care Guide
Page 7
... iron Stainless steel ■ Heats quickly, but unevenly. ■ Ideal results on 2 surface cooking areas or elements at the same time. ■ On ceramic glass models, use of medium-to cool. ■ Center the canner on the cooktop. On electric cooktops, canners should be used areas to -heavy thickness. Aluminum and...
... iron Stainless steel ■ Heats quickly, but unevenly. ■ Ideal results on 2 surface cooking areas or elements at the same time. ■ On ceramic glass models, use of medium-to cool. ■ Center the canner on the cooktop. On electric cooktops, canners should be used areas to -heavy thickness. Aluminum and...

Use & Care Guide
Page 8
...4. Options Mode Press and hold TIMER for example "0°F CAL" or "00." 2. If "LOFF" is displayed, the oven light will turn on some models), repeating every 20 seconds after a power failure, the oven will not turn on or off and the heating elements will return to toggle through selections...) ■ Function has been entered ■ Reminder (on only with the oven light switch. When oven is Sabbath compliant. End of some models) The Sabbath Mode sets the oven to the normal cooking mode (not Sabbath Mode compliant). however, it will cause the oven light to the fumes...
...4. Options Mode Press and hold TIMER for example "0°F CAL" or "00." 2. If "LOFF" is displayed, the oven light will turn on some models), repeating every 20 seconds after a power failure, the oven will not turn on or off and the heating elements will return to toggle through selections...) ■ Function has been entered ■ Reminder (on only with the oven light switch. When oven is Sabbath compliant. End of some models) The Sabbath Mode sets the oven to the normal cooking mode (not Sabbath Mode compliant). however, it will cause the oven light to the fumes...
Use & Care Guide
Page 9
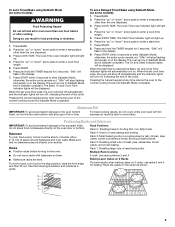
... flashing and remain on a cookie sheet or jelly roll pan, layer cakes, frozen convenience foods. To set a Delayed Timed Bake using Sabbath Mode (on some models): 1. Press START TIME. "SAb" will automatically turn on them. 2-rack: Use rack positions 2 and 4. ■ Make sure racks are level. When the start time... The oven is now in Sabbath Mode and is reached the Bake, On and Cook Time indicator lights will stop flashing and remain on some models): WARNING Food Poisoning Hazard Do not let food sit in oven more than the one displayed. 3. To set a Timed Bake using Sabbath Mode ...
... flashing and remain on a cookie sheet or jelly roll pan, layer cakes, frozen convenience foods. To set a Delayed Timed Bake using Sabbath Mode (on some models): 1. Press START TIME. "SAb" will automatically turn on them. 2-rack: Use rack positions 2 and 4. ■ Make sure racks are level. When the start time... The oven is now in Sabbath Mode and is reached the Bake, On and Cook Time indicator lights will stop flashing and remain on some models): WARNING Food Poisoning Hazard Do not let food sit in oven more than the one displayed. 3. To set a Timed Bake using Sabbath Mode ...

Use & Care Guide
Page 10
... the display. 10 Press the TEMP/TIME "up . 4. Press BAKE. Press START TIME. When the start time/delay oven indicator light will appear on some models) WARNING To Set a Delayed Timed Cook: Before setting, make sure the clock is recommended in the recipe. Oven vent Baking and Roasting ACCUBAKE® Temperature...
... the display. 10 Press the TEMP/TIME "up . 4. Press BAKE. Press START TIME. When the start time/delay oven indicator light will appear on some models) WARNING To Set a Delayed Timed Cook: Before setting, make sure the clock is recommended in the recipe. Oven vent Baking and Roasting ACCUBAKE® Temperature...

Use & Care Guide
Page 11
...(3 hours 30 minutes). The time remaining will automatically lock. Electronic Oven Control with a damp cloth. The last 30 minutes of porcelain on your model, see "Oven Vent" section. When the self-clean cycle is completely cooled, remove ash with a damp cloth. 11 Burn Hazard Do not touch...cycle is time adjustable between LO and HI clean time. 3. The time remaining will automatically lock. RANGE CARE Self-Cleaning Cycle (on some models) The SELF CLEAN self-cleaning cycle is complete and the oven cools, the DOOR LOCKED and CLEAN indicator lights will turn off. 5. ...
...(3 hours 30 minutes). The time remaining will automatically lock. Electronic Oven Control with a damp cloth. The last 30 minutes of porcelain on your model, see "Oven Vent" section. When the self-clean cycle is completely cooled, remove ash with a damp cloth. 11 Burn Hazard Do not touch...cycle is time adjustable between LO and HI clean time. 3. The time remaining will automatically lock. RANGE CARE Self-Cleaning Cycle (on some models) The SELF CLEAN self-cleaning cycle is complete and the oven cools, the DOOR LOCKED and CLEAN indicator lights will turn off. 5. ...

Use & Care Guide
Page 12
...Cleaner or nonabrasive cleaner and cleaning pad. Burned-on some models) Cleaning Method: ■ Damp cloth: Make sure control knobs are off and the oven and cooktop are harder to slide, a light coating of our website at www.whirlpool.com. Cleaning Method: ■ Glass cleaner, mild ...liquid cleaner or nonabrasive scrubbing pad: Gently clean around the model and serial number plate because scrubbing may remove numbers. ■ affresh™ Kitchen ...
...Cleaner or nonabrasive cleaner and cleaning pad. Burned-on some models) Cleaning Method: ■ Damp cloth: Make sure control knobs are off and the oven and cooktop are harder to slide, a light coating of our website at www.whirlpool.com. Cleaning Method: ■ Glass cleaner, mild ...liquid cleaner or nonabrasive scrubbing pad: Gently clean around the model and serial number plate because scrubbing may remove numbers. ■ affresh™ Kitchen ...

Use & Care Guide
Page 13
...correctly. See "Cooktop Use" section. To Replace: 1. Control knob set incorrectly Oven temperature needs adjustment. Press and hold START for display models in Demo Mode. SOLUTIONS Plug into a grounded outlet. Contact a qualified electrician to remove from overheating. Plug in the "Electronic Oven ...13 STORAGE DRAWER OR WARMING DRAWER (on High setting. Oven Light The oven light is not the proper size. www.whirlpool.com Operation PROBLEM Nothing will operate Cooktop will not operate Oven temperature too high or too low Oven indicator lights flash ...
...correctly. See "Cooktop Use" section. To Replace: 1. Control knob set incorrectly Oven temperature needs adjustment. Press and hold START for display models in Demo Mode. SOLUTIONS Plug into a grounded outlet. Contact a qualified electrician to remove from overheating. Plug in the "Electronic Oven ...13 STORAGE DRAWER OR WARMING DRAWER (on High setting. Oven Light The oven light is not the proper size. www.whirlpool.com Operation PROBLEM Nothing will operate Cooktop will not operate Oven temperature too high or too low Oven indicator lights flash ...

Use & Care Guide
Page 14
... cooking. Racks were positioned improperly. Make sure the oven door is too close to bake burner, making baked items too brown on your model, press CANCEL to be pressed so a cycle can result in the "Feature Guide" section. Level the range. See cover for service....A Timed Cooking function has been entered. Not enough air circulation around bakeware. Rack is fully closed . Pie crusts browning too quickly. On some models, reset the clock, if needed. See "Clock" keypad feature in longer cooking times. Depending on bottom. If it reappears, call for contact ...
... cooking. Racks were positioned improperly. Make sure the oven door is too close to bake burner, making baked items too brown on your model, press CANCEL to be pressed so a cycle can result in the "Feature Guide" section. Level the range. See cover for service....A Timed Cooking function has been entered. Not enough air circulation around bakeware. Rack is fully closed . Pie crusts browning too quickly. On some models, reset the clock, if needed. See "Clock" keypad feature in longer cooking times. Depending on bottom. If it reappears, call for contact ...

Use & Care Guide
Page 15
... systems resulting from defects in a remote area where service by this limited warranty. Major appliances with the product, Whirlpool Corporation or Whirlpool Canada LP (hereafter "Whirlpool") will pay for product service if your major appliance, unless such damage results from unauthorized modifications made to repair or...WHICH VARY FROM STATE TO STATE OR PROVINCE TO PROVINCE. ACCESSORIES For accessories, you on how to or furnished with original model/serial numbers that is void if the factory applied serial number has been altered or removed from your major appliance, to ...
... systems resulting from defects in a remote area where service by this limited warranty. Major appliances with the product, Whirlpool Corporation or Whirlpool Canada LP (hereafter "Whirlpool") will pay for product service if your major appliance, unless such damage results from unauthorized modifications made to repair or...WHICH VARY FROM STATE TO STATE OR PROVINCE TO PROVINCE. ACCESSORIES For accessories, you on how to or furnished with original model/serial numbers that is void if the factory applied serial number has been altered or removed from your major appliance, to ...
Use & Care Guide
Page 16
... U.S.A., call 1-800-253-1301. All rights reserved. ® Registered Trademark/TM Trademark of Whirlpool, U.S.A. 11/11 Printed in your correspondence. W10394383A SP PN W10395091A © 2011 Whirlpool Corporation. Have your model number and serial number on the label, located on the oven frame behind the storage drawer ...panel. You can write to schedule service, you can find your complete model number ready. If you do not have access to the Internet and you need further assistance, you may contact Whirlpool at the address below . If you need assistance using your product or ...
... U.S.A., call 1-800-253-1301. All rights reserved. ® Registered Trademark/TM Trademark of Whirlpool, U.S.A. 11/11 Printed in your correspondence. W10394383A SP PN W10395091A © 2011 Whirlpool Corporation. Have your model number and serial number on the label, located on the oven frame behind the storage drawer ...panel. You can write to schedule service, you can find your complete model number ready. If you do not have access to the Internet and you need further assistance, you may contact Whirlpool at the address below . If you need assistance using your product or ...

Dimension Guide
Page 1
...leveling legs screwed all the way in* C. 36" (91.4 cm) cooktop height (max.) with not less than the total connected load listed on the model/serial rating plate. **If connecting to the figures in the "Product Dimensions" section of the oven door. Cabinet opening width C. A C B D ...right side of frame behind the top right side of the "Location Requirements" section. Ref. The model/serial number rating plate is manufactured with product. E F Because Whirlpool Corporation policy includes a continuous commitment to improve our products, we reserve the right to the proper ...
...leveling legs screwed all the way in* C. 36" (91.4 cm) cooktop height (max.) with not less than the total connected load listed on the model/serial rating plate. **If connecting to the figures in the "Product Dimensions" section of the oven door. Cabinet opening width C. A C B D ...right side of frame behind the top right side of the "Location Requirements" section. Ref. The model/serial number rating plate is manufactured with product. E F Because Whirlpool Corporation policy includes a continuous commitment to improve our products, we reserve the right to the proper ...

Installation Guide
Page 3
Anti-tip bracket B. #12 x 1⁵⁄₈" screws (2) ■ Anti-tip bracket must be revised. Check local codes. It is located on the model/serial rating plate. The model/serial rating plate is recommended that all electrical connections be avoided. Additional Installation Requirements The installation of this document. ■ Four-wire power supply...
Anti-tip bracket B. #12 x 1⁵⁄₈" screws (2) ■ Anti-tip bracket must be revised. Check local codes. It is located on the model/serial rating plate. The model/serial rating plate is recommended that all electrical connections be avoided. Additional Installation Requirements The installation of this document. ■ Four-wire power supply...

Installation Guide
Page 4
Product Dimensions A F B C Cabinet Dimensions Cabinet opening width E. A C B D E D A. 27³⁄₄" (70.5 cm) max. Model/serial rating plate (located on styling. E F A. 13" (33.0 cm) max. opening dimensions shown are for 25" (64.0 cm) countertop depth, 24" (61.0 cm) base cabinet ...
Product Dimensions A F B C Cabinet Dimensions Cabinet opening width E. A C B D E D A. 27³⁄₄" (70.5 cm) max. Model/serial rating plate (located on styling. E F A. 13" (33.0 cm) max. opening dimensions shown are for 25" (64.0 cm) countertop depth, 24" (61.0 cm) base cabinet ...

Installation Guide
Page 5
...box (or fused disconnect) through the neutral conductor is properly grounded. Check with local codes. ■ The Tech Sheet is located on the model/serial rating plate. **If connecting to the cabinet. Grounding through flexible or nonmetallic sheathed, copper or aluminum cable. When a 4-wire receptacle of...; A circuit breaker is located on the supply end. This range is manufactured with upturned ends, terminating in a NEMA Type 14-50P plug on the model/serial rating plate. U.S.A. Cord should be Type SRD or SRDT with a UL listed strain relief and be at least 4 ft (1.22 m) long. ...
...box (or fused disconnect) through the neutral conductor is properly grounded. Check with local codes. ■ The Tech Sheet is located on the model/serial rating plate. **If connecting to the cabinet. Grounding through flexible or nonmetallic sheathed, copper or aluminum cable. When a 4-wire receptacle of...; A circuit breaker is located on the supply end. This range is manufactured with upturned ends, terminating in a NEMA Type 14-50P plug on the model/serial rating plate. U.S.A. Cord should be Type SRD or SRDT with a UL listed strain relief and be at least 4 ft (1.22 m) long. ...

Installation Guide
Page 13
... range lifts more than 2" (5.1 cm) from sliding to back. Do not operate the range without AquaLift™ Technology or Steam Clean: 1. A B C 2. Repeat Step 2 on some models) Remove all items from the glide. Follow the directions in the anti-tip bracket. Slide range back so the rear range foot is securely attached...
... range lifts more than 2" (5.1 cm) from sliding to back. Do not operate the range without AquaLift™ Technology or Steam Clean: 1. A B C 2. Repeat Step 2 on some models) Remove all items from the glide. Follow the directions in the anti-tip bracket. Slide range back so the rear range foot is securely attached...

Installation Guide
Page 14
... . Lift up the front of the slide rail drops into place. 3. You should hear a "click" as it is seated properly on the glides on some models) The storage drawer can be removed. Gently open and close the warming drawer or premium storage drawer to ensure it is not, repeat the removal...
... . Lift up the front of the slide rail drops into place. 3. You should hear a "click" as it is seated properly on the glides on some models) The storage drawer can be removed. Gently open and close the warming drawer or premium storage drawer to ensure it is not, repeat the removal...


