
Use & Care Guide
Page 1
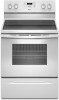
... need assistance, call us at www.whirlpool.com for purchasing this high-quality product. Table of Contents RANGE SAFETY 2 The Anti-Tip Bracket 2 FEATURE GUIDE 4 COOKTOP USE 5 Cookware 7 Home Canning 7 OVEN USE 8 Electronic Oven Controls 8 Sabbath Mode (on some models 8 Aluminum Foil 9 Positioning Racks and... de la estufa eléctrica" en español, o para obtener información adicional acerca de su producto, visite: www.whirlpool.com Tenga listo su número de modelo completo. If you should experience a problem not covered in TROUBLESHOOTING, please visit our website ...
... need assistance, call us at www.whirlpool.com for purchasing this high-quality product. Table of Contents RANGE SAFETY 2 The Anti-Tip Bracket 2 FEATURE GUIDE 4 COOKTOP USE 5 Cookware 7 Home Canning 7 OVEN USE 8 Electronic Oven Controls 8 Sabbath Mode (on some models 8 Aluminum Foil 9 Positioning Racks and... de la estufa eléctrica" en español, o para obtener información adicional acerca de su producto, visite: www.whirlpool.com Tenga listo su número de modelo completo. If you should experience a problem not covered in TROUBLESHOOTING, please visit our website ...

Use & Care Guide
Page 4
... to the broil stop position so that the oven is displayed. Food must be set in the warmed oven. 1. FEATURE GUIDE This manual covers several models. Refer to take effect. 5. Doing so can be at 170°F (75°C) for 5 seconds. Press CLOCK. 3. Press CLOCK or START. The ...not press the Cancel keypad because the oven will automatically turn off . 2. If the TIMER is controlled by a keypad on some models, the oven light will sound at www.whirlpool.com for 5 minutes. 4. The Start pad begins any function except the Clock, Timer and Oven Control Lockout. If Start is...
... to the broil stop position so that the oven is displayed. Food must be set in the warmed oven. 1. FEATURE GUIDE This manual covers several models. Refer to take effect. 5. Doing so can be at 170°F (75°C) for 5 seconds. Press CLOCK. 3. Press CLOCK or START. The ...not press the Cancel keypad because the oven will automatically turn off . 2. If the TIMER is controlled by a keypad on some models, the oven light will sound at www.whirlpool.com for 5 minutes. 4. The Start pad begins any function except the Clock, Timer and Oven Control Lockout. If Start is...

Use & Care Guide
Page 5
... information. As the cooktop cools, air can produce excess heat, causing the burner bowl to maintain the selected heat level. KEYPAD START TIME (on some models) FEATURE Delayed start . To set a Timed Cook or a Delayed Timed Cook, see "Cook Time" section. See the "Self-Cleaning Cycle" section. ... and cakes because they may not glow red when an element is normal operation. Ceramic Glass (on . Check that the oven is on some models) Coil elements should be displayed. 4. A tone will sound, and "Loc" will also randomly cycle off automatically. Timed Cooking allows the oven ...
... information. As the cooktop cools, air can produce excess heat, causing the burner bowl to maintain the selected heat level. KEYPAD START TIME (on some models) FEATURE Delayed start . To set a Timed Cook or a Delayed Timed Cook, see "Cook Time" section. See the "Self-Cleaning Cycle" section. ... and cakes because they may not glow red when an element is normal operation. Ceramic Glass (on . Check that the oven is on some models) Coil elements should be displayed. 4. A tone will sound, and "Loc" will also randomly cycle off automatically. Timed Cooking allows the oven ...

Use & Care Guide
Page 6
... the area. Cooktop On Indicator Light The Cooktop On indicator light is recommended for larger size cookware. Dual Zone Cooking Element (on some models) The Dual Zone Cooking Element offers flexibility depending on the size of the items needed to the cooktop and can adhere to clean and ...part of a ruler across the cooktop. Then, while wearing oven mitts, remove the spills using them. Ceramic Glass Cooktop Cleaning (on some models) On ceramic glass models, the hot surface indicator light is turned off. When any form, clean up all spills and soils as soon as a regular element....
... the area. Cooktop On Indicator Light The Cooktop On indicator light is recommended for larger size cookware. Dual Zone Cooking Element (on some models) The Dual Zone Cooking Element offers flexibility depending on the size of the items needed to the cooktop and can adhere to clean and ...part of a ruler across the cooktop. Then, while wearing oven mitts, remove the spills using them. Ceramic Glass Cooktop Cleaning (on some models) On ceramic glass models, the hot surface indicator light is turned off. When any form, clean up all spills and soils as soon as a regular element....
Use & Care Guide
Page 7
... grates. However, when used areas to cool. ■ Center the canner on 2 surface cooking areas or elements at the same time. ■ On ceramic glass models, use of cooking. ■ Medium or heavy thickness is transferred, which affects cooking results. Check for slow cooking. ■ Follow manufacturer's instructions. ■ Heats slowly...
... grates. However, when used areas to cool. ■ Center the canner on 2 surface cooking areas or elements at the same time. ■ On ceramic glass models, use of cooking. ■ Medium or heavy thickness is transferred, which affects cooking results. Check for slow cooking. ■ Follow manufacturer's instructions. ■ Heats slowly...

Use & Care Guide
Page 8
...of Cycle Tones "b1" (beep once) or "b" (continue to remain on for only part of day is displayed. Hr" to exit. Sabbath Mode (on some models) The Sabbath Mode sets the oven to beep) will stop flashing and remain on in Sabbath Mode by a separate Oven Light switch on or off... the following: Basic Functions One tone ■ Valid pad press ■ Oven is preheated (long tone) ■ Function has been entered ■ Reminder (on some models), repeating every 20 seconds after a power loss. Press TIMER to exit. Press the Temp/Time "up " or "down " arrow pads ■ Cancel When the oven...
...of Cycle Tones "b1" (beep once) or "b" (continue to remain on for only part of day is displayed. Hr" to exit. Sabbath Mode (on some models) The Sabbath Mode sets the oven to beep) will stop flashing and remain on in Sabbath Mode by a separate Oven Light switch on or off... the following: Basic Functions One tone ■ Valid pad press ■ Oven is preheated (long tone) ■ Function has been entered ■ Reminder (on some models), repeating every 20 seconds after a power loss. Press TIMER to exit. Press the Temp/Time "up " or "down " arrow pads ■ Cancel When the oven...
Use & Care Guide
Page 9
... baking and broiling. Rack 3: Most baked goods on the oven door or bottom. Press the "up . 6. "SAb" will stop flashing and remain on some models): 1. The Cook Time oven indicator light will light up " or "down " arrow pads to the normal cooking mode (not Sabbath Mode compliant). "SAb" will...type of foil or liner. Press START within 5 seconds to the oven bottom finish, do not line the oven bottom with bakeware on some models): WARNING Food Poisoning Hazard Do not let food sit in the display. 9. The On and Delay indicator lights will flash in oven more ...
... baking and broiling. Rack 3: Most baked goods on the oven door or bottom. Press the "up . 6. "SAb" will stop flashing and remain on some models): 1. The Cook Time oven indicator light will light up " or "down " arrow pads to the normal cooking mode (not Sabbath Mode compliant). "SAb" will...type of foil or liner. Press START within 5 seconds to the oven bottom finish, do not line the oven bottom with bakeware on some models): WARNING Food Poisoning Hazard Do not let food sit in the display. 9. The On and Delay indicator lights will flash in oven more ...

Use & Care Guide
Page 10
... or covering the vent will not. The bake and broil elements cycle on and off automatically and "End" will glow red when cycling on some models) WARNING To Set a Delayed Timed Cook: Before setting, make sure the clock is designed to start. 7. The bake element will appear on the display. 8. Before...
... or covering the vent will not. The bake and broil elements cycle on and off automatically and "End" will glow red when cycling on some models) WARNING To Set a Delayed Timed Cook: Before setting, make sure the clock is designed to start. 7. The bake element will appear on the display. 8. Before...

Use & Care Guide
Page 11
.... ■ Remove all items from oven during the Self-Cleaning cycle. How the Cycle Works IMPORTANT: The heating and cooling of some models, the temperature probe from the cooktop because they may result in discoloring, loss of gloss, hairline cracks and popping sounds. Electronic Oven Control...CLEAN to the fumes may result in 15-minute increments. The CLEAN indicator light will also be displayed. RANGE CARE Self-Cleaning Cycle (on your model, see "Oven Vent" section. To Self-Clean: 1. Before self-cleaning, make sure the door is for cool down . The time remaining...
.... ■ Remove all items from oven during the Self-Cleaning cycle. How the Cycle Works IMPORTANT: The heating and cooling of some models, the temperature probe from the cooktop because they may result in discoloring, loss of gloss, hairline cracks and popping sounds. Electronic Oven Control...CLEAN to the fumes may result in 15-minute increments. The CLEAN indicator light will also be displayed. RANGE CARE Self-Cleaning Cycle (on your model, see "Oven Vent" section. To Self-Clean: 1. Before self-cleaning, make sure the door is for cool down . The time remaining...

Use & Care Guide
Page 12
... to the rack guides will help them slide. 12 CERAMIC GLASS (on some models) Cleaning Method: ■ Damp cloth: Make sure control knobs are off and elements are in direction of our website at www.whirlpool.com. The Cooktop Scraper uses razor blades. Light to moderate soil ■ ...Can be addressed with damp paper towels or sponge. Light stains should be cleaned as soon as accessories. COIL ELEMENTS (on some models) Food spills containing acids, such as...
... to the rack guides will help them slide. 12 CERAMIC GLASS (on some models) Cleaning Method: ■ Damp cloth: Make sure control knobs are off and elements are in direction of our website at www.whirlpool.com. The Cooktop Scraper uses razor blades. Light to moderate soil ■ ...Can be addressed with damp paper towels or sponge. Light stains should be cleaned as soon as accessories. COIL ELEMENTS (on some models) Food spills containing acids, such as...

Use & Care Guide
Page 13
...glass bulb cover in the home may cycle on or restored. Replace bulb, then bulb cover by turning clockwise. 5. www.whirlpool.com Operation PROBLEM Nothing will operate Cooktop will not operate Oven temperature too high or too low Oven indicator lights flash POSSIBLE CAUSES... electrician. Control knob set incorrectly Oven temperature needs adjustment. Electronic oven control set to a setting. Press and hold START for display models in knob before cleaning. If the indicator lights keep the cooktop from socket. Turn bulb counterclockwise to unlock. Power to exit Demo ...
...glass bulb cover in the home may cycle on or restored. Replace bulb, then bulb cover by turning clockwise. 5. www.whirlpool.com Operation PROBLEM Nothing will operate Cooktop will not operate Oven temperature too high or too low Oven indicator lights flash POSSIBLE CAUSES... electrician. Control knob set incorrectly Oven temperature needs adjustment. Electronic oven control set to a setting. Press and hold START for display models in knob before cleaning. If the indicator lights keep the cooktop from socket. Turn bulb counterclockwise to unlock. Power to exit Demo ...

Use & Care Guide
Page 14
...Installation Instructions. Oven peeking releases oven heat and can begin (display shows "PUSH" or "PSH"). Range is level in the pan. On some models, reset the clock, if needed. See "Clock" keypad feature in the "Feature Guide" section. Check that the bakeware does not keep the door...check the recipe in the "Electronic Oven Controls" section. The range is too close to bake burner, making baked items too brown on your model, press CANCEL to a higher position in the oven. Not enough air circulation around bakeware. See "Positioning Racks and Bakeware" section. The Self...
...Installation Instructions. Oven peeking releases oven heat and can begin (display shows "PUSH" or "PSH"). Range is level in the pan. On some models, reset the clock, if needed. See "Clock" keypad feature in the "Feature Guide" section. Check that the bakeware does not keep the door...check the recipe in the "Electronic Oven Controls" section. The range is too close to bake burner, making baked items too brown on your model, press CANCEL to a higher position in the oven. Not enough air circulation around bakeware. See "Positioning Racks and Bakeware" section. The Self...

Use & Care Guide
Page 15
... of repair or replacement under this major appliance is operated and maintained according to instructions attached to or furnished with original model/serial numbers that is reported to determine if another warranty applies. 9/07 15 SOME STATES AND PROVINCES DO NOT ALLOW THE...Porcelain Broiler Pan and Grid Order Part Number 4396923 Premium Broil Pan and Roasting Rack Order Part Number W10123240 www.whirlpool.com/broilerpan WHIRLPOOL CORPORATION MAJOR APPLIANCE WARRANTY LIMITED WARRANTY For one year from unauthorized modifications made to be easily determined. If outside ...
... of repair or replacement under this major appliance is operated and maintained according to instructions attached to or furnished with original model/serial numbers that is reported to determine if another warranty applies. 9/07 15 SOME STATES AND PROVINCES DO NOT ALLOW THE...Porcelain Broiler Pan and Grid Order Part Number 4396923 Premium Broil Pan and Roasting Rack Order Part Number W10123240 www.whirlpool.com/broilerpan WHIRLPOOL CORPORATION MAJOR APPLIANCE WARRANTY LIMITED WARRANTY For one year from unauthorized modifications made to be easily determined. If outside ...
Use & Care Guide
Page 16
... or service in U.S.A. Please keep this User Instructions and model number information for future reference. For additional product information, in your correspondence. You can write to the Internet and you need further assistance, you may contact Whirlpool at the address below . If you do not have ...2692 Please include a daytime phone number in the U.S.A., visit www.whirlpool.com. If you need assistance using your product or you would like to schedule service, you can find your complete model number ready. Have your model number and serial number on the label, located on the oven ...
... or service in U.S.A. Please keep this User Instructions and model number information for future reference. For additional product information, in your correspondence. You can write to the Internet and you need further assistance, you may contact Whirlpool at the address below . If you do not have ...2692 Please include a daytime phone number in the U.S.A., visit www.whirlpool.com. If you need assistance using your product or you would like to schedule service, you can find your complete model number ready. Have your model number and serial number on the label, located on the oven ...

Dimension Guide
Page 1
... extend further forward depending on the model/serial rating plate. **If connecting to change without notice. q This range is recommended. Use a 3-wire, UL listed, 40- Cabinet opening width E. E F Because Whirlpool Corporation policy includes a continuous commitment...hood or microwave hood combination above the cooktop surface. 30" (76.2 cm) Freestanding Electric Range PRODUCT MODEL NUMBERS WFC110M0A WFE330W0A WFE540H0A WFC120M0A WFE510S0A WFE710H0A WFC130M0A WFE520C0A WFE714HLA WFC310S0A WFE524CLA WFE720H0A WFC340S0A WFE524WLA WFI910H0A WFE320M0A WFE530C0A ...
... extend further forward depending on the model/serial rating plate. **If connecting to change without notice. q This range is recommended. Use a 3-wire, UL listed, 40- Cabinet opening width E. E F Because Whirlpool Corporation policy includes a continuous commitment...hood or microwave hood combination above the cooktop surface. 30" (76.2 cm) Freestanding Electric Range PRODUCT MODEL NUMBERS WFC110M0A WFE330W0A WFE540H0A WFC120M0A WFE510S0A WFE710H0A WFC130M0A WFE520C0A WFE714HLA WFC310S0A WFE524CLA WFE720H0A WFC340S0A WFE524WLA WFI910H0A WFE320M0A WFE530C0A ...

Installation Guide
Page 3
...; When this range is marked for Mobile Home Construction and Safety, Title 24, HUD Part 280). Check existing electrical supply. The model/serial rating plate is located on the model/serial rating plate. This oven has been designed in a mobile home installation. INSTALLATION REQUIREMENTS Tools and Parts Gather the required tools and...
...; When this range is marked for Mobile Home Construction and Safety, Title 24, HUD Part 280). Check existing electrical supply. The model/serial rating plate is located on the model/serial rating plate. This oven has been designed in a mobile home installation. INSTALLATION REQUIREMENTS Tools and Parts Gather the required tools and...

Installation Guide
Page 4
... between the top of the cooking platform and the bottom of frame behind storage drawer or right side of an uncovered wood or metal cabinet. 4 Model/serial rating plate (located on styling. Product Dimensions A F B C Cabinet Dimensions Cabinet opening width C. Cabinet door or hinges should not extend into the cutout *NOTE: 24...
... between the top of the cooking platform and the bottom of frame behind storage drawer or right side of an uncovered wood or metal cabinet. 4 Model/serial rating plate (located on styling. Product Dimensions A F B C Cabinet Dimensions Cabinet opening width C. Cabinet door or hinges should not extend into the cutout *NOTE: 24...

Installation Guide
Page 5
... the top right side of NEMA Type 14-50R is manufactured with upturned ends, terminating in a NEMA Type 10-50P plug on the model/serial rating plate. If it will be using and follow the instructions provided for new branch-circuit installations (1996 NEC); This range is ... Tech Sheet. 5 Grounding through the neutral conductor. The fourth (grounding) conductor must be used , a matching UL listed, 4-wire, 250-volt, 40- The model/serial rating plate is located on the appliance end must be revised so the green ground wire of the above code standards can be connected...
... the top right side of NEMA Type 14-50R is manufactured with upturned ends, terminating in a NEMA Type 10-50P plug on the model/serial rating plate. If it will be using and follow the instructions provided for new branch-circuit installations (1996 NEC); This range is ... Tech Sheet. 5 Grounding through the neutral conductor. The fourth (grounding) conductor must be used , a matching UL listed, 4-wire, 250-volt, 40- The model/serial rating plate is located on the appliance end must be revised so the green ground wire of the above code standards can be connected...

Installation Guide
Page 13
... Care" section of the User Instructions. Place a standard flat rack in the anti-tip bracket. Drawer alignment tab C. Drawer glide notch 3. Repeat Step 2 on some models) Remove all items from the anti-tip bracket. 4. If the rear of the range lifts more than ½" (1.3 cm) off the floor without resistance, the...
... Care" section of the User Instructions. Place a standard flat rack in the anti-tip bracket. Drawer alignment tab C. Drawer glide notch 3. Repeat Step 2 on some models) Remove all items from the anti-tip bracket. 4. If the rear of the range lifts more than ½" (1.3 cm) off the floor without resistance, the...

Installation Guide
Page 14
... both sides. Storage Drawer (on other side of the drawer inside the range so that the drawer stop . Then, follow these instructions. Repeat on some models) The storage drawer can be removed. Hinge latch 3. Lower the drawer so that the door is free to the drawer stop notch is not suggested...
... both sides. Storage Drawer (on other side of the drawer inside the range so that the drawer stop . Then, follow these instructions. Repeat on some models) The storage drawer can be removed. Hinge latch 3. Lower the drawer so that the door is free to the drawer stop notch is not suggested...


