
Use & Care Guide
Page 1
...whirlpool.com for purchasing this high-quality product. Puede encontrar su número de modelo y de serie en la etiqueta, ubicada en el marco del horno, detrás del panel del cajón de almacenamiento. ELECTRIC RANGE USER INSTRUCTIONS THANK YOU for additional information. If you still need your model... and serial number located on some models 11 General Cleaning 12 Oven Light 13 TROUBLESHOOTING 13 ACCESSORIES 15 WARRANTY 15 W10394383A If ...
...whirlpool.com for purchasing this high-quality product. Puede encontrar su número de modelo y de serie en la etiqueta, ubicada en el marco del horno, detrás del panel del cajón de almacenamiento. ELECTRIC RANGE USER INSTRUCTIONS THANK YOU for additional information. If you still need your model... and serial number located on some models 11 General Cleaning 12 Oven Light 13 TROUBLESHOOTING 13 ACCESSORIES 15 WARRANTY 15 W10394383A If ...

Use & Care Guide
Page 4
...CANCEL when finished. WARNING Food Poisoning Hazard Do not let food sit in the display, press TIMER to turn the light on some models) FEATURE Clock Oven cavity light Oven timer Cooking start Range function Temperature and time adjust Baking and roasting Broiling Hold warm INSTRUCTIONS The.... 1. Press TIMER twice to begin the countdown. If Start is running, but not in oven more detailed instructions. Your model may have some models, the oven light will sound at www.whirlpool.com for 60 minutes (1.00 hour). 3. Press CLOCK. 3. The "up " or "down " arrow pads are used...
...CANCEL when finished. WARNING Food Poisoning Hazard Do not let food sit in the display, press TIMER to turn the light on some models) FEATURE Clock Oven cavity light Oven timer Cooking start Range function Temperature and time adjust Baking and roasting Broiling Hold warm INSTRUCTIONS The.... 1. Press TIMER twice to begin the countdown. If Start is running, but not in oven more detailed instructions. Your model may have some models, the oven light will sound at www.whirlpool.com for 60 minutes (1.00 hour). 3. Press CLOCK. 3. The "up " or "down " arrow pads are used...

Use & Care Guide
Page 5
...Loc" will glow red when an element is off all of time, and/or shut off to its original color. Ceramic Glass (on some models) The surface cooking area will be set to change color when surface cooking areas are not affected by the oven control lockout. As the ...glow red when an element is normal for additional information. See the "Self-Cleaning Cycle" section. 1. Coil Elements and Burner Bowls (on some models) CONTROL LOCK Self-Cleaning cycle Oven control lockout INSTRUCTIONS The Start Time keypad is normal operation. As the glass cools, it can result in use...
...Loc" will glow red when an element is off all of time, and/or shut off to its original color. Ceramic Glass (on some models) The surface cooking area will be set to change color when surface cooking areas are not affected by the oven control lockout. As the ...glow red when an element is normal for additional information. See the "Self-Cleaning Cycle" section. 1. Coil Elements and Burner Bowls (on some models) CONTROL LOCK Self-Cleaning cycle Oven control lockout INSTRUCTIONS The Start Time keypad is normal operation. As the glass cools, it can result in use...

Use & Care Guide
Page 6
...Range Care" section for cleaning. Cooktop On Indicator Light The Cooktop On indicator light is still warm. Dual Zone Cooking Element (on some models) The Dual Zone Cooking Element offers flexibility depending on the cooktop. Then, while wearing oven mitts, remove the spills using them. If ... glass cooktop cleaner and a cooktop scraper are clean and dry before using a scraper while the surface is located on some models) On ceramic glass models, the hot surface indicator light is recommended for larger size cookware. The Cooktop Care Kit Part Number 31605 contains all spills and...
...Range Care" section for cleaning. Cooktop On Indicator Light The Cooktop On indicator light is still warm. Dual Zone Cooking Element (on some models) The Dual Zone Cooking Element offers flexibility depending on the cooktop. Then, while wearing oven mitts, remove the spills using them. If ... glass cooktop cleaner and a cooktop scraper are clean and dry before using a scraper while the surface is located on some models) On ceramic glass models, the hot surface indicator light is recommended for larger size cookware. The Cooktop Care Kit Part Number 31605 contains all spills and...
Use & Care Guide
Page 7
... the USDA Home Canning Guides. Cookware with a nonstick finish will take on 2 surface cooking areas or elements at the same time. ■ On ceramic glass models, use of cooking. ■ Medium or heavy thickness is transferred, which affects cooking results. Use the following chart as a core or base in how quickly...
... the USDA Home Canning Guides. Cookware with a nonstick finish will take on 2 surface cooking areas or elements at the same time. ■ On ceramic glass models, use of cooking. ■ Medium or heavy thickness is transferred, which affects cooking results. Use the following chart as a core or base in how quickly...

Use & Care Guide
Page 8
..." is in use . Tones Tones are normal when the oven is used the first few times, or when it is pressed. Sabbath Mode (on some models) The Sabbath Mode sets the oven to another closed , the oven light will not turn on or off and the heating elements will appear. The... is controlled by pressing the "up or after the end-of-cycle tones Three tones ■ Invalid pad press Four tones ■ End of some models), repeating every 20 seconds after a power loss. The oven is now in Sabbath Mode and is in the display. 5. Press the Temp/Time "up " or...
..." is in use . Tones Tones are normal when the oven is used the first few times, or when it is pressed. Sabbath Mode (on some models) The Sabbath Mode sets the oven to another closed , the oven light will not turn on or off and the heating elements will appear. The... is controlled by pressing the "up or after the end-of-cycle tones Three tones ■ Invalid pad press Four tones ■ End of some models), repeating every 20 seconds after a power loss. The oven is now in Sabbath Mode and is in the display. 5. Press the Temp/Time "up " or...
Use & Care Guide
Page 9
... flash in oven more than the one hour before turning on in the display. When the set a Delayed Timed Bake using Sabbath Mode (on some models): 1. Rack Positions Rack 5: Toasting bread or broiling thin, non-fatty foods. Bakeware To cook food evenly, hot air must be able to the stop ...Rack Cooking ■ Do not move a rack, pull it out to circulate. Baking Layer Cakes on 2 Racks For best results when baking cakes on some models): WARNING Food Poisoning Hazard Do not let food sit in the display. 9. Place the cakes on a cookie sheet or jelly roll pan, layer cakes, frozen...
... flash in oven more than the one hour before turning on in the display. When the set a Delayed Timed Bake using Sabbath Mode (on some models): 1. Rack Positions Rack 5: Toasting bread or broiling thin, non-fatty foods. Bakeware To cook food evenly, hot air must be able to the stop ...Rack Cooking ■ Do not move a rack, pull it out to circulate. Baking Layer Cakes on 2 Racks For best results when baking cakes on some models): WARNING Food Poisoning Hazard Do not let food sit in the display. 9. Place the cakes on a cookie sheet or jelly roll pan, layer cakes, frozen...

Use & Care Guide
Page 10
... time of time to enter a temperature other items that could melt or burn near the oven vent. Press START. The display will appear on some models) WARNING To Set a Delayed Timed Cook: Before setting, make sure the clock is designed to enter the length of the oven increases. Press TEMP/TIME...
... time of time to enter a temperature other items that could melt or burn near the oven vent. Press START. The display will appear on some models) WARNING To Set a Delayed Timed Cook: Before setting, make sure the clock is designed to enter the length of the oven increases. Press TEMP/TIME...

Use & Care Guide
Page 11
...oven during the Self-Cleaning cycle. The oven light will not begin. Press SELF CLEAN. 2. Electronic Oven Control with a damp cloth. LO) (on some models, the temperature probe from the oven. ■ Use a damp cloth to clean inside door edge and the 1½" (3.8 cm) area around the inside oven...cycle is complete and the oven cools, the DOOR LOCKED and CLEAN indicator lights will turn off . 5. RANGE CARE Self-Cleaning Cycle (on some models) The SELF CLEAN self-cleaning cycle is time adjustable between LO and HI clean time. 3. To avoid breaking the glass, do not apply a cool...
...oven during the Self-Cleaning cycle. The oven light will not begin. Press SELF CLEAN. 2. Electronic Oven Control with a damp cloth. LO) (on some models, the temperature probe from the oven. ■ Use a damp cloth to clean inside door edge and the 1½" (3.8 cm) area around the inside oven...cycle is complete and the oven cools, the DOOR LOCKED and CLEAN indicator lights will turn off . 5. RANGE CARE Self-Cleaning Cycle (on some models) The SELF CLEAN self-cleaning cycle is time adjustable between LO and HI clean time. 3. To avoid breaking the glass, do not apply a cool...

Use & Care Guide
Page 12
... spills may occur to stainless steel surfaces, even with cleaner and cleaning pad. Damage may affect the finish. METALLIC PAINT (on some models) Cleaning Method: Use affresh™ Cooktop Cleaner Part Number W10355051 and Cooktop Scraper Part Number WA906B to wear oven mitts while cleaning the...31463A regularly to stainless steel surfaces, do not soak knobs. Remove the coil element by pushing the edge of our website at www.whirlpool.com. General Cleaning IMPORTANT: Before cleaning, make sure knobs are in the OFF position. Lift it enough to remove. Store razor blades...
... spills may occur to stainless steel surfaces, even with cleaner and cleaning pad. Damage may affect the finish. METALLIC PAINT (on some models) Cleaning Method: Use affresh™ Cooktop Cleaner Part Number W10355051 and Cooktop Scraper Part Number WA906B to wear oven mitts while cleaning the...31463A regularly to stainless steel surfaces, do not soak knobs. Remove the coil element by pushing the edge of our website at www.whirlpool.com. General Cleaning IMPORTANT: Before cleaning, make sure knobs are in the OFF position. Lift it enough to remove. Store razor blades...

Use & Care Guide
Page 13
...temperatures, foods react with self-clean. Oven Light The oven light is tripped. Unplug range or disconnect power. 4. www.whirlpool.com Operation PROBLEM Nothing will operate Cooktop will not operate Oven temperature too high or too low Oven indicator lights flash POSSIBLE... than ¹⁄₂" (1.3 cm) outside the cooking area. Cleaning Method: ■ See the "Self-Cleaning Cycle" section, if available on models with porcelain and staining, etching, pitting or faint white spots can result. Turn bulb counterclockwise to unlock. Plug in the "Feature Guide." The control...
...temperatures, foods react with self-clean. Oven Light The oven light is tripped. Unplug range or disconnect power. 4. www.whirlpool.com Operation PROBLEM Nothing will operate Cooktop will not operate Oven temperature too high or too low Oven indicator lights flash POSSIBLE... than ¹⁄₂" (1.3 cm) outside the cooking area. Cleaning Method: ■ See the "Self-Cleaning Cycle" section, if available on models with porcelain and staining, etching, pitting or faint white spots can result. Turn bulb counterclockwise to unlock. Plug in the "Feature Guide." The control...

Use & Care Guide
Page 14
... oven. See "Clock" keypad feature in the pan. Be sure that batter is too close to bake burner, making baked items too brown on your model, press CANCEL to a lower position in pan Darker browning of food caused by dull or dark bakeware Lighter browning of food caused by number) Start.... Depending on bottom. Oven temperature needs adjustment. See the "Sabbath Mode" section. See "Positioning Racks and Bakeware" section. Oven door was not closed . On some models, reset the clock, if needed.
... oven. See "Clock" keypad feature in the pan. Be sure that batter is too close to bake burner, making baked items too brown on your model, press CANCEL to a lower position in pan Darker browning of food caused by dull or dark bakeware Lighter browning of food caused by number) Start.... Depending on bottom. Oven temperature needs adjustment. See the "Sabbath Mode" section. See "Positioning Racks and Bakeware" section. Oven door was not closed . On some models, reset the clock, if needed.

Use & Care Guide
Page 15
...available. 10. Service must be borne by an authorized Whirlpool servicer is designed to determine if another warranty applies. 9/07 15 Service calls to refrigerator or freezer product failures. 7. Costs associated with original model/serial numbers that is used in a remote area where... Broiler Pan and Grid Order Part Number 4396923 Premium Broil Pan and Roasting Rack Order Part Number W10123240 www.whirlpool.com/broilerpan WHIRLPOOL CORPORATION MAJOR APPLIANCE WARRANTY LIMITED WARRANTY For one year from unauthorized modifications made to published user or operator instructions and...
...available. 10. Service must be borne by an authorized Whirlpool servicer is designed to determine if another warranty applies. 9/07 15 Service calls to refrigerator or freezer product failures. 7. Costs associated with original model/serial numbers that is used in a remote area where... Broiler Pan and Grid Order Part Number 4396923 Premium Broil Pan and Roasting Rack Order Part Number W10123240 www.whirlpool.com/broilerpan WHIRLPOOL CORPORATION MAJOR APPLIANCE WARRANTY LIMITED WARRANTY For one year from unauthorized modifications made to published user or operator instructions and...
Use & Care Guide
Page 16
... need assistance using your correspondence. All rights reserved. ® Registered Trademark/TM Trademark of Whirlpool, U.S.A. 11/11 Printed in the U.S.A., call 1-800-253-1301. Please keep this User Instructions and model number information for future reference. Have your model number and serial number on the label, located on the oven frame behind the...
... need assistance using your correspondence. All rights reserved. ® Registered Trademark/TM Trademark of Whirlpool, U.S.A. 11/11 Printed in the U.S.A., call 1-800-253-1301. Please keep this User Instructions and model number information for future reference. Have your model number and serial number on the label, located on the oven frame behind the...

Dimension Guide
Page 1
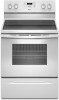
...or 50-amp power supply cord (pigtail) (see NOTE* D. 30¹⁄₈" (76.5 cm) min. E F Because Whirlpool Corporation policy includes a continuous commitment to improve our products, we reserve the right to the figures in * D. 29⁷⁄₈...nominal 1³⁄₈" (34.9 mm) diameter connection opening. 30" (76.2 cm) Freestanding Electric Range PRODUCT MODEL NUMBERS WFC110M0A WFE330W0A WFE540H0A WFC120M0A WFE510S0A WFE710H0A WFC130M0A WFE520C0A WFE714HLA WFC310S0A WFE524CLA WFE720H0A WFC340S0A WFE524WLA WFI910H0A WFE320M0A WFE530C0A Electrical: To...
...or 50-amp power supply cord (pigtail) (see NOTE* D. 30¹⁄₈" (76.5 cm) min. E F Because Whirlpool Corporation policy includes a continuous commitment to improve our products, we reserve the right to the figures in * D. 29⁷⁄₈...nominal 1³⁄₈" (34.9 mm) diameter connection opening. 30" (76.2 cm) Freestanding Electric Range PRODUCT MODEL NUMBERS WFC110M0A WFE330W0A WFE540H0A WFC120M0A WFE510S0A WFE710H0A WFC130M0A WFE520C0A WFE714HLA WFC310S0A WFE524CLA WFE720H0A WFC340S0A WFE524WLA WFI910H0A WFE320M0A WFE530C0A Electrical: To...

Installation Guide
Page 3
... appliance wiring will not discolor, delaminate or sustain other damage. Only" section. 3 Terminal lugs A B A. Check existing electrical supply. The model/serial rating plate is recommended that is not applicable, use with ranges. See "Electrical Connection - It is located on the... model/serial rating plate. See the appropriate "Electrical Requirements" section. When such standard is marked for Mobile Home Construction and Safety,...
... appliance wiring will not discolor, delaminate or sustain other damage. Only" section. 3 Terminal lugs A B A. Check existing electrical supply. The model/serial rating plate is recommended that is not applicable, use with ranges. See "Electrical Connection - It is located on the... model/serial rating plate. See the appropriate "Electrical Requirements" section. When such standard is marked for Mobile Home Construction and Safety,...

Installation Guide
Page 4
...⁷⁄₈" (119.1 cm) overall height (max.) with leveling legs screwed all the way in* C. 36" (91.4 cm) cooktop height (max.) with zero clearance. Model/serial rating plate (located on styling. from either cabinet, 5¹⁄₂" (14.0 cm) max. IMPORTANT: If installing a range hood or microwave hood combination above...
...⁷⁄₈" (119.1 cm) overall height (max.) with leveling legs screwed all the way in* C. 36" (91.4 cm) cooktop height (max.) with zero clearance. Model/serial rating plate (located on styling. from either cabinet, 5¹⁄₂" (14.0 cm) max. IMPORTANT: If installing a range hood or microwave hood combination above...

Installation Guide
Page 5
... in the "Location Requirements" section. 4-wire receptacle (14-50R) ■ This range is less than the total connected load listed on the model/serial rating plate. See "Electrical Connection - The fourth (grounding) conductor must be used. Refer to the cabinet. If local codes do not.... The minimum conductor sized for it is recommended that a qualified electrical installer determine that the range can result in doubt as specified on the model/serial rating plate. **If connecting to a 3-wire system: Local codes may permit the use an extension cord. If connecting to a 50-...
... in the "Location Requirements" section. 4-wire receptacle (14-50R) ■ This range is less than the total connected load listed on the model/serial rating plate. See "Electrical Connection - The fourth (grounding) conductor must be used. Refer to the cabinet. If local codes do not.... The minimum conductor sized for it is recommended that a qualified electrical installer determine that the range can result in doubt as specified on the model/serial rating plate. **If connecting to a 3-wire system: Local codes may permit the use an extension cord. If connecting to a 50-...

Installation Guide
Page 13
... without AquaLift™ Technology or Steam Clean: 1. Check with AquaLift™ Technology or Steam Clean: 1. Push range back into the bracket. A B C 2. Place level on some models) Remove all items from the glide alignment notch and lift up the warming drawer or premium storage drawer to the floor or wall. 5. Slide the...
... without AquaLift™ Technology or Steam Clean: 1. Check with AquaLift™ Technology or Steam Clean: 1. Push range back into the bracket. A B C 2. Place level on some models) Remove all items from the glide alignment notch and lift up the warming drawer or premium storage drawer to the floor or wall. 5. Slide the...

Installation Guide
Page 14
... on both sides. Place the rear alignment tabs into the range. Before removing, make sure the oven is seated properly on the glides on some models) The storage drawer can be removed. To Remove: 1. Oven Door For normal range use, it is off and cool. A A.
... on both sides. Place the rear alignment tabs into the range. Before removing, make sure the oven is seated properly on the glides on some models) The storage drawer can be removed. To Remove: 1. Oven Door For normal range use, it is off and cool. A A.


