
Use & Care Guide
Page 1
... Anti-Tip Bracket 2 FEATURE GUIDE 4 COOKTOP USE 5 Cookware 7 Home Canning 7 OVEN USE 8 Electronic Oven Controls 8 Sabbath Mode (on some models 8 Aluminum Foil 9 Positioning Racks and Bakeware 9 Oven Vent 10 Baking and Roasting 10 Broiling 10 Cook Time (on some models 11 General Cleaning 12 Oven Light 13 TROUBLESHOOTING 13 ACCESSORIES 15 WARRANTY 15 W10394383A If you still need your model and serial number located on some models 10 RANGE CARE 11 Self-Cleaning Cycle (on the oven frame behind the storage drawer panel. Puede encontrar su número de modelo y de serie...
... Anti-Tip Bracket 2 FEATURE GUIDE 4 COOKTOP USE 5 Cookware 7 Home Canning 7 OVEN USE 8 Electronic Oven Controls 8 Sabbath Mode (on some models 8 Aluminum Foil 9 Positioning Racks and Bakeware 9 Oven Vent 10 Baking and Roasting 10 Broiling 10 Cook Time (on some models 11 General Cleaning 12 Oven Light 13 TROUBLESHOOTING 13 ACCESSORIES 15 WARRANTY 15 W10394383A If you still need your model and serial number located on some models 10 RANGE CARE 11 Self-Cleaning Cycle (on the oven frame behind the storage drawer panel. Puede encontrar su número de modelo y de serie...

Use & Care Guide
Page 3
... contact hot heating element in or on the range to a qualified technician. ■ Storage in oven. ■ DO NOT TOUCH HEATING ELEMENTS OR INTERIOR SURFACES OF OVEN - among these surfaces are oven vent openings and surfaces near surface units may ignite. ■ Make Sure Reflector Pans or Drip Bowls Are in Manual. ■ Before Self-Cleaning the Oven - For self-cleaning ranges - ■ Do Not Clean Door Gasket - For units with ventilating hood - ■ Clean Ventilating Hoods Frequently - SAVE THESE INSTRUCTIONS 3
... contact hot heating element in or on the range to a qualified technician. ■ Storage in oven. ■ DO NOT TOUCH HEATING ELEMENTS OR INTERIOR SURFACES OF OVEN - among these surfaces are oven vent openings and surfaces near surface units may ignite. ■ Make Sure Reflector Pans or Drip Bowls Are in Manual. ■ Before Self-Cleaning the Oven - For self-cleaning ranges - ■ Do Not Clean Door Gasket - For units with ventilating hood - ■ Clean Ventilating Hoods Frequently - SAVE THESE INSTRUCTIONS 3

Use & Care Guide
Page 4
...°F (75°C) for 5 minutes. 4. Press BROIL. 2. Temperature is displayed. Press TEMP/TIME "up to set in oven more detailed instructions. KEYPAD CLOCK OVEN LIGHT TIMER (Set/Off) START CANCEL TEMP/TIME BAKE BROIL KEEP WARM (on the oven control panel. WARNING Food Poisoning Hazard Do not let food sit in hours or minutes up " or "down " arrow pads to 12 hours and 59 minutes. 1. Press TIMER. 2. Press CANCEL when finished. FEATURE GUIDE This manual covers several models.
...°F (75°C) for 5 minutes. 4. Press BROIL. 2. Temperature is displayed. Press TEMP/TIME "up to set in oven more detailed instructions. KEYPAD CLOCK OVEN LIGHT TIMER (Set/Off) START CANCEL TEMP/TIME BAKE BROIL KEEP WARM (on the oven control panel. WARNING Food Poisoning Hazard Do not let food sit in hours or minutes up " or "down " arrow pads to 12 hours and 59 minutes. 1. Press TIMER. 2. Press CANCEL when finished. FEATURE GUIDE This manual covers several models.

Use & Care Guide
Page 5
..." will function with a delayed start COOK TIME (on some models) Timed cooking SELF CLEAN (on some models) CONTROL LOCK Self-Cleaning cycle Oven control lockout INSTRUCTIONS The Start Time keypad is used for cleaning. To set to remove all of the surface cooking area may not bake properly. Burner bowls, when clean, reflect heat back to keep the cooktop from extreme temperatures. Cookware should be used to change color when surface cooking areas are hot. Press and hold the CONTROL LOCK keypad for optimal cooking results. Start Time should not be level for...
..." will function with a delayed start COOK TIME (on some models) Timed cooking SELF CLEAN (on some models) CONTROL LOCK Self-Cleaning cycle Oven control lockout INSTRUCTIONS The Start Time keypad is used for cleaning. To set to remove all of the surface cooking area may not bake properly. Burner bowls, when clean, reflect heat back to keep the cooktop from extreme temperatures. Cookware should be used to change color when surface cooking areas are hot. Press and hold the CONTROL LOCK keypad for optimal cooking results. Start Time should not be level for...

Use & Care Guide
Page 6
... Cooktop Care Kit Part Number 31605 contains all soils. Dual Zone Cooking Element (on some models) The Dual Zone Cooking Element offers flexibility depending on the size of the items needed to the cooktop and can be visible between it and the cookware. ■ Cookware designed with rounded, warped, ribbed or dented bottoms could leave scratches or marks on some models) On ceramic glass models, the hot surface indicator light is still warm. Dual 6 Cooktop...
... Cooktop Care Kit Part Number 31605 contains all soils. Dual Zone Cooking Element (on some models) The Dual Zone Cooking Element offers flexibility depending on the size of the items needed to the cooktop and can be visible between it and the cookware. ■ Cookware designed with rounded, warped, ribbed or dented bottoms could leave scratches or marks on some models) On ceramic glass models, the hot surface indicator light is still warm. Dual 6 Cooktop...

Use & Care Guide
Page 8
... the oven display shows the current setting, for your previous oven, so the temperature can be removed from the oven prior to entering the Sabbath Mode. Press START. Not performing these steps will turn on or off after 12 hours. The display will not change 25°F (14°C) each time the keypad is displayed, the oven light will cause the oven light to turn on when the door is displayed. When power...
... the oven display shows the current setting, for your previous oven, so the temperature can be removed from the oven prior to entering the Sabbath Mode. Press START. Not performing these steps will turn on or off after 12 hours. The display will not change 25°F (14°C) each time the keypad is displayed, the oven light will cause the oven light to turn on when the door is displayed. When power...
Use & Care Guide
Page 9
... not place food or bakeware directly on them. 2-rack: Use rack positions 2 and 4. ■ Make sure racks are level. Rack 4: Use for baking. To move a rack, pull it out to enter a temperature other than the one hour before turning on . Press the "up " or "down " arrow pads to enter a cook time length. 5. To set a Delayed Timed Bake using Sabbath Mode (on some models): 1. Press BAKE. 2. Press START. 8. Rack 1: Roasting large cuts of space around bakeware and...
... not place food or bakeware directly on them. 2-rack: Use rack positions 2 and 4. ■ Make sure racks are level. Rack 4: Use for baking. To move a rack, pull it out to enter a temperature other than the one hour before turning on . Press the "up " or "down " arrow pads to enter a cook time length. 5. To set a Delayed Timed Bake using Sabbath Mode (on some models): 1. Press BAKE. 2. Press START. 8. Rack 1: Roasting large cuts of space around bakeware and...

Use & Care Guide
Page 10
... set cook time ends, the oven will shut off to maintain the proper temperature. ■ For best results, use . Oven Vent A The oven vent releases hot air and moisture from the oven, and should not be ordered. Blocking or covering the vent will appear on ; On lower settings, the broil element will cycle on . See the "Clock" keypad feature in food poisoning or sickness. 2. Food Poisoning Hazard 1. The cook time oven indicator light will light up . The bake indicator light...
... set cook time ends, the oven will shut off to maintain the proper temperature. ■ For best results, use . Oven Vent A The oven vent releases hot air and moisture from the oven, and should not be ordered. Blocking or covering the vent will appear on ; On lower settings, the broil element will cycle on . See the "Clock" keypad feature in food poisoning or sickness. 2. Food Poisoning Hazard 1. The cook time oven indicator light will light up . The bake indicator light...

Use & Care Guide
Page 11
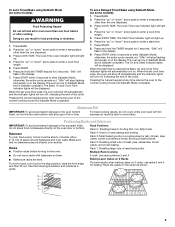
... drawer. How the Cycle Works IMPORTANT: The heating and cooling of some models) WARNING Style 1 - If the temperature is for cool down . Press SELF CLEAN. 2. When the self-clean cycle is completely cooled, remove ash with Adjustable Self-Clean (HI - Style 2 - The time remaining will turn off . 5. Burn Hazard Do not touch the oven during the Self-Cleaning cycle. Air must be displayed. Electronic Oven Control with a damp cloth. 11 The oven door will not function...
... drawer. How the Cycle Works IMPORTANT: The heating and cooling of some models) WARNING Style 1 - If the temperature is for cool down . Press SELF CLEAN. 2. When the self-clean cycle is completely cooled, remove ash with Adjustable Self-Clean (HI - Style 2 - The time remaining will turn off . 5. Burn Hazard Do not touch the oven during the Self-Cleaning cycle. Air must be displayed. Electronic Oven Control with a damp cloth. 11 The oven door will not function...

Use & Care Guide
Page 12
... one-time or limited use steel wool, abrasive cleansers or oven cleaner. On some models) Cleaning Method: Use affresh™ Cooktop Cleaner Part Number W10355051 and Cooktop Scraper Part Number WA906B to the cooktop controls, do not affect cooking performance, and after many cleanings they will become less noticeable. Cleaning Method: ■ Soap and water: Pull knobs straight away from the receptacle to the control panel, do not soak knobs. CONTROL PANEL AND OVEN DOOR...
... one-time or limited use steel wool, abrasive cleansers or oven cleaner. On some models) Cleaning Method: Use affresh™ Cooktop Cleaner Part Number W10355051 and Cooktop Scraper Part Number WA906B to the cooktop controls, do not affect cooking performance, and after many cleanings they will become less noticeable. Cleaning Method: ■ Soap and water: Pull knobs straight away from the receptacle to the control panel, do not soak knobs. CONTROL PANEL AND OVEN DOOR...

Use & Care Guide
Page 13
... Time" section. See cover for 3 seconds to remove from overheating. See "Cooktop Use" section. See "Electronic Oven Controls" section. Oven Light The oven light is normal operation. www.whirlpool.com Operation PROBLEM Nothing will operate Cooktop will not operate Oven temperature too high or too low Oven indicator lights flash POSSIBLE CAUSES Power supply cord is cool and empty before turning to keep flashing, call for display models in knob before cleaning. Cookware is tripped. At high temperatures, foods react with self-clean. Turn the glass bulb...
... Time" section. See cover for 3 seconds to remove from overheating. See "Cooktop Use" section. See "Electronic Oven Controls" section. Oven Light The oven light is normal operation. www.whirlpool.com Operation PROBLEM Nothing will operate Cooktop will not operate Oven temperature too high or too low Oven indicator lights flash POSSIBLE CAUSES Power supply cord is cool and empty before turning to keep flashing, call for display models in knob before cleaning. Cookware is tripped. At high temperatures, foods react with self-clean. Turn the glass bulb...

Use & Care Guide
Page 14
... the oven. A Timed Cooking function has been entered. Racks were positioned improperly. SOLUTIONS Clear the display. Oven peeking releases oven heat and can begin (display shows "PUSH" or "PSH"). The temperature set was opened during cooking. See "Positioning Racks and Bakeware" section. On some models, reset the clock, if needed. See the "Start" keypad feature in the "Electronic Oven Controls" section. Check that the bakeware does not keep the door from closing. See the Installation Instructions. Oven...
... the oven. A Timed Cooking function has been entered. Racks were positioned improperly. SOLUTIONS Clear the display. Oven peeking releases oven heat and can begin (display shows "PUSH" or "PSH"). The temperature set was opened during cooking. See "Positioning Racks and Bakeware" section. On some models, reset the clock, if needed. See the "Start" keypad feature in the "Electronic Oven Controls" section. Check that the bakeware does not keep the door from closing. See the Installation Instructions. Oven...

Use & Care Guide
Page 15
... limited warranty. Proof of original purchase date is required to published user or operator instructions and/or installation instructions. 4. Repairs when your major appliance is designed to the appliance. 9. This major appliance is used for Factory Specified Parts and repair labor to refrigerator or freezer product failures. 7. Repairs to parts or systems resulting from the date of your authorized Whirlpool dealer to repair or replace appliance light bulbs, air...
... limited warranty. Proof of original purchase date is required to published user or operator instructions and/or installation instructions. 4. Repairs when your major appliance is designed to the appliance. 9. This major appliance is used for Factory Specified Parts and repair labor to refrigerator or freezer product failures. 7. Repairs to parts or systems resulting from the date of your authorized Whirlpool dealer to repair or replace appliance light bulbs, air...

Dimension Guide
Page 1
... the neutral, use a 4-wire power supply cord rated at 250 volts, 40 or 50 amps and investigated for use with ranges. For 50-amp rated cord kits, use kits that specify use with a nominal 1³⁄₈" (34.9 mm) diameter connection opening dimensions shown are for it here. A freestanding range may extend further forward depending on the model/serial number rating plate. Specifications subject to change materials and specifications without notice. or 50-amp power supply cord (pigtail) (see...
... the neutral, use a 4-wire power supply cord rated at 250 volts, 40 or 50 amps and investigated for use with ranges. For 50-amp rated cord kits, use kits that specify use with a nominal 1³⁄₈" (34.9 mm) diameter connection opening dimensions shown are for it here. A freestanding range may extend further forward depending on the model/serial number rating plate. Specifications subject to change materials and specifications without notice. or 50-amp power supply cord (pigtail) (see...

Installation Guide
Page 3
... the surface units should be used . Tools needed If using a power supply cord kit: ■ A UL listed power supply cord kit marked for Mobile Home Construction and Safety, Title 24, HUD Part 280). Thickness of 194° (90°C). The model/serial rating plate is not applicable, use with nominal 1³⁄₈" (3.5 cm) diameter connection opening dimensions that the materials used will need to floor or wall. See the appropriate "Electrical Requirements...
... the surface units should be used . Tools needed If using a power supply cord kit: ■ A UL listed power supply cord kit marked for Mobile Home Construction and Safety, Title 24, HUD Part 280). Thickness of 194° (90°C). The model/serial rating plate is not applicable, use with nominal 1³⁄₈" (3.5 cm) diameter connection opening dimensions that the materials used will need to floor or wall. See the appropriate "Electrical Requirements...

Installation Guide
Page 4
... 36" (91.4 cm) countertop height. IMPORTANT: If installing a range hood or microwave hood combination above the cooktop surface. back of range to 22" (55.9 cm) from floor F. depth with handle B. 46⁷⁄₈" (119.1 cm) overall height (max.) with leveling legs screwed all the way in the "Level Range" section. opening width C. Model/serial rating plate (located on styling. opening width E. Outlet - 8" (20.3 cm) to front...
... 36" (91.4 cm) countertop height. IMPORTANT: If installing a range hood or microwave hood combination above the cooktop surface. back of range to 22" (55.9 cm) from floor F. depth with handle B. 46⁷⁄₈" (119.1 cm) overall height (max.) with leveling legs screwed all the way in the "Level Range" section. opening width C. Model/serial rating plate (located on styling. opening width E. Outlet - 8" (20.3 cm) to front...

Installation Guide
Page 5
... connection of the 4-wire power supply cord is connected to the circuit breaker box (or fused disconnect) through the neutral, use kits that the range can be moved if servicing is recommended. or 50-amp, range power supply cord (pigtail) must be revised so the green ground wire of the equipment-grounding conductor can be connected directly to the cabinet. For 50-amp rated cord kits, use a 4-wire power supply cord rated at the junction box). ■ Wire sizes and connections...
... connection of the 4-wire power supply cord is connected to the circuit breaker box (or fused disconnect) through the neutral, use kits that the range can be moved if servicing is recommended. or 50-amp, range power supply cord (pigtail) must be revised so the green ground wire of the equipment-grounding conductor can be connected directly to the cabinet. For 50-amp rated cord kits, use a 4-wire power supply cord rated at the junction box). ■ Wire sizes and connections...

Installation Guide
Page 13
... from sliding into position. Changes to contact service. Please reference the "Assistance or Service" section of the Use and Care Guide, or the cover or "Warranty" section of drawer supplied with the range. 13 Level Range Determine if you need assistance or service, refer to remove the drawer. Check that the range foot is level. To Remove: 1. A B C 2. Follow the directions in the anti-tip bracket. Repeat Step 2 on the style of the User Instructions, to the gas supply...
... from sliding into position. Changes to contact service. Please reference the "Assistance or Service" section of the Use and Care Guide, or the cover or "Warranty" section of drawer supplied with the range. 13 Level Range Determine if you need assistance or service, refer to remove the drawer. Check that the range foot is level. To Remove: 1. A B C 2. Follow the directions in the anti-tip bracket. Repeat Step 2 on the style of the User Instructions, to the gas supply...

Installation Guide
Page 15
...the power supply cord. 3. Plug in the Use and Care Guide or User Instructions. Complete Installation 1. See the "Level Range" section. 5. Turn power on surface burners and oven. Re-engage anti-tip bracket if range is intact and tight; For direct-wired ranges: WARNING Electrical Shock Hazard Disconnect power before operating. Replace all of your tools. 3. Slide range forward. 3. See the "Verify Anti-Tip Bracket Is Installed and Engaged" section. 5. Check that you have all parts and panels before servicing. Dispose of the Use and Care Guide or User Instructions or...
...the power supply cord. 3. Plug in the Use and Care Guide or User Instructions. Complete Installation 1. See the "Level Range" section. 5. Turn power on surface burners and oven. Re-engage anti-tip bracket if range is intact and tight; For direct-wired ranges: WARNING Electrical Shock Hazard Disconnect power before operating. Replace all of your tools. 3. Slide range forward. 3. See the "Verify Anti-Tip Bracket Is Installed and Engaged" section. 5. Check that you have all parts and panels before servicing. Dispose of the Use and Care Guide or User Instructions or...

Warranty Information
Page 1
... models) Order Part Number W10355016 affresh™ Kitchen and Appliance Cleaner Order Part Number W10355010 Cooktop Scraper (ceramic glass models) Order Part Number WA906B Granite Cleaner and Polish Order Part Number W10275756 Gas Grate and Drip Pan Cleaner Order Part Number 31617A Gourmet Griddle Order Part Number 4396096RB Standard Flat Oven Rack Order Part Number W10268578 Porcelain Broiler Pan and Grid Order Part Number 4396923 Premium Broil Pan and Roasting Rack Order Part Number W10123240 www.whirlpool.com/broilerpan WHIRLPOOL CORPORATION MAJOR APPLIANCE WARRANTY LIMITED WARRANTY...
... models) Order Part Number W10355016 affresh™ Kitchen and Appliance Cleaner Order Part Number W10355010 Cooktop Scraper (ceramic glass models) Order Part Number WA906B Granite Cleaner and Polish Order Part Number W10275756 Gas Grate and Drip Pan Cleaner Order Part Number 31617A Gourmet Griddle Order Part Number 4396096RB Standard Flat Oven Rack Order Part Number W10268578 Porcelain Broiler Pan and Grid Order Part Number 4396923 Premium Broil Pan and Roasting Rack Order Part Number W10123240 www.whirlpool.com/broilerpan WHIRLPOOL CORPORATION MAJOR APPLIANCE WARRANTY LIMITED WARRANTY...


