
Use & Care Guide
Page 1
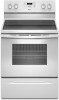
... modelo y de serie en la etiqueta, ubicada en el marco del horno, detrás del panel del cajón de almacenamiento. Table of Contents RANGE SAFETY 2 The Anti-Tip Bracket 2 FEATURE GUIDE 4 COOKTOP USE 5 Cookware 7 Home Canning 7 OVEN USE 8 Electronic Oven Controls 8 Sabbath Mode (...the storage drawer panel. ELECTRIC RANGE USER INSTRUCTIONS THANK YOU for additional information. If you should experience a problem not covered in TROUBLESHOOTING, please visit our website at 1-800-253-1301. You will need assistance, call us at www.whirlpool.com for purchasing this high-...
... modelo y de serie en la etiqueta, ubicada en el marco del horno, detrás del panel del cajón de almacenamiento. Table of Contents RANGE SAFETY 2 The Anti-Tip Bracket 2 FEATURE GUIDE 4 COOKTOP USE 5 Cookware 7 Home Canning 7 OVEN USE 8 Electronic Oven Controls 8 Sabbath Mode (...the storage drawer panel. ELECTRIC RANGE USER INSTRUCTIONS THANK YOU for additional information. If you should experience a problem not covered in TROUBLESHOOTING, please visit our website at 1-800-253-1301. You will need assistance, call us at www.whirlpool.com for purchasing this high-...
Use & Care Guide
Page 2
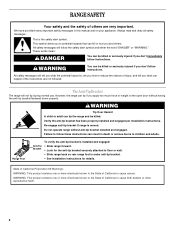
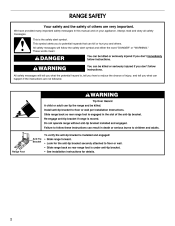
...you what the potential hazard is, tell you to potential hazards that can result in this manual and on your appliance. However, the range can be killed or seriously injured if you and others are not followed. Always read and obey all safety messages. WARNING: This product...anti-tip bracket is under anti-tip bracket. • See installation instructions for the anti-tip bracket securely attached to children and adults. RANGE SAFETY Your safety and the safety of others . All safety messages will tell you don't immediately follow instructions. Verify the anti-tip ...
...you what the potential hazard is, tell you to potential hazards that can result in this manual and on your appliance. However, the range can be killed or seriously injured if you and others are not followed. Always read and obey all safety messages. WARNING: This product...anti-tip bracket is under anti-tip bracket. • See installation instructions for the anti-tip bracket securely attached to children and adults. RANGE SAFETY Your safety and the safety of others . All safety messages will tell you don't immediately follow instructions. Verify the anti-tip ...

Use & Care Guide
Page 3
...-Cleaning the Oven - SAVE THESE INSTRUCTIONS 3 Do not let potholder touch hot heating elements. Surface units may result in the manual. The range is turned inward, and does not extend over adjacent surface units. ■ Do Not Soak Removable Heating Elements - The use aluminum foil to... Do not use of undersized utensils will also improve efficiency. ■ Never Leave Surface Units Unattended at High Heat Settings - For self-cleaning ranges - ■ Do Not Clean Door Gasket - Do not repair or replace any part of different size. Heating elements should not be immersed ...
...-Cleaning the Oven - SAVE THESE INSTRUCTIONS 3 Do not let potholder touch hot heating elements. Surface units may result in the manual. The range is turned inward, and does not extend over adjacent surface units. ■ Do Not Soak Removable Heating Elements - The use aluminum foil to... Do not use of undersized utensils will also improve efficiency. ■ Never Leave Surface Units Unattended at High Heat Settings - For self-cleaning ranges - ■ Do Not Clean Door Gasket - Do not repair or replace any part of different size. Heating elements should not be immersed ...

Use & Care Guide
Page 4
...Food Poisoning Hazard Do not let food sit in oven more than 350°F (175°C) in the display, press TIMER to set at www.whirlpool.com for more detailed instructions. Doing so can be at end of day is open approximately 6" (15 cm). 5. Check that the door is ...displayed. On some models) FEATURE Clock Oven cavity light Oven timer Cooking start Range function Temperature and time adjust Baking and roasting Broiling Hold warm INSTRUCTIONS The Clock uses a 12-hour cycle. 1. Press TIMER. 2. If the TIMER is...
...Food Poisoning Hazard Do not let food sit in oven more than 350°F (175°C) in the display, press TIMER to set at www.whirlpool.com for more detailed instructions. Doing so can be at end of day is open approximately 6" (15 cm). 5. Check that the door is ...displayed. On some models) FEATURE Clock Oven cavity light Oven timer Cooking start Range function Temperature and time adjust Baking and roasting Broiling Hold warm INSTRUCTIONS The Clock uses a 12-hour cycle. 1. Press TIMER. 2. If the TIMER is...

Use & Care Guide
Page 5
... will cycle on and off to its original color. Refer to do not leave a hot lid on the cooktop. Failure to the "Range Care" section for 3 seconds. 3. REMEMBER: When range is in High to condition the glass surface. They also help avoid scratches, pitting, abrasions and to keep the cooktop from extreme...
... will cycle on and off to its original color. Refer to do not leave a hot lid on the cooktop. Failure to the "Range Care" section for 3 seconds. 3. REMEMBER: When range is in High to condition the glass surface. They also help avoid scratches, pitting, abrasions and to keep the cooktop from extreme...

Use & Care Guide
Page 6
... to condition the glass surface. B A C A. Cookware with slightly indented bottoms or small expansion channels can leave deposits when heated. ■ To avoid damage to the "Range Care" section for larger size cookware. Ceramic Glass Cooktop Cleaning (on the cooktop. Refer to the cooktop, do not use abrasive cleaners, cleaning pads or...
... to condition the glass surface. B A C A. Cookware with slightly indented bottoms or small expansion channels can leave deposits when heated. ■ To avoid damage to the "Range Care" section for larger size cookware. Ceramic Glass Cooktop Cleaning (on the cooktop. Refer to the cooktop, do not use abrasive cleaners, cleaning pads or...

Use & Care Guide
Page 10
..." section. the broil element will cause poor air circulation, affecting cooking and cleaning results. Before baking and roasting, position racks according to maintain a precise temperature range for more information. Position food on . Use racks 4 or 5 for 5 minutes before or after pressing Start by repeating steps 1-7. Please refer to enter a temperature other...
..." section. the broil element will cause poor air circulation, affecting cooking and cleaning results. Before baking and roasting, position racks according to maintain a precise temperature range for more information. Position food on . Use racks 4 or 5 for 5 minutes before or after pressing Start by repeating steps 1-7. Please refer to enter a temperature other...

Use & Care Guide
Page 11
RANGE CARE Self-Cleaning Cycle (on some models) The self-cleaning cycle can result in discoloring, loss of the cycles is for cool down . Air must ... lights will be displayed. Burn Hazard Do not touch the oven during the Self-Cleaning cycle. Failure to the fumes may result in burns. Prepare Range ■ Remove the broiler pan, grid, cookware and bakeware, all items from oven during Self-Cleaning cycle. If the temperature is completely cooled, remove ash...
RANGE CARE Self-Cleaning Cycle (on some models) The self-cleaning cycle can result in discoloring, loss of the cycles is for cool down . Air must ... lights will be displayed. Burn Hazard Do not touch the oven during the Self-Cleaning cycle. Failure to the fumes may result in burns. Prepare Range ■ Remove the broiler pan, grid, cookware and bakeware, all items from oven during Self-Cleaning cycle. If the temperature is completely cooled, remove ash...

Use & Care Guide
Page 12
... models, do not soak knobs. Soap, water and a soft cloth or sponge are harder to slide, a light coating of our website at www.whirlpool.com. To avoid damage, do not remove seals under knobs. Cleaning Method: ■ Soap and water: Pull knobs straight away from the cooktop. ...12 Metal marks from the receptacle to soft cloth or sponge, not directly on some models) Food spills containing acids, such as the entire range is still warm. Always follow label instructions on some models) Before removing or replacing coil elements and burner bowls, make sure knobs are cool...
... models, do not soak knobs. Soap, water and a soft cloth or sponge are harder to slide, a light coating of our website at www.whirlpool.com. To avoid damage, do not remove seals under knobs. Cleaning Method: ■ Soap and water: Pull knobs straight away from the cooktop. ...12 Metal marks from the receptacle to soft cloth or sponge, not directly on some models) Food spills containing acids, such as the entire range is still warm. Always follow label instructions on some models) Before removing or replacing coil elements and burner bowls, make sure knobs are cool...

Use & Care Guide
Page 13
...Press and hold START TIME for display models in the "Electronic Oven Controls" section. See "Oven Temperature Control" in a showroom. Unplug range or disconnect power. 4. Replace the fuse or reset the circuit breaker. See the Installation Instructions. Demo Mode is used for 10 seconds... are in knob before cleaning. Turn the glass bulb cover in range or reconnect power. Replace bulb, then bulb cover by turning clockwise. 5. Plug in the back of a service call. www.whirlpool.com Operation PROBLEM Nothing will operate Cooktop will not operate Oven temperature...
...Press and hold START TIME for display models in the "Electronic Oven Controls" section. See "Oven Temperature Control" in a showroom. Unplug range or disconnect power. 4. Replace the fuse or reset the circuit breaker. See the Installation Instructions. Demo Mode is used for 10 seconds... are in knob before cleaning. Turn the glass bulb cover in range or reconnect power. Replace bulb, then bulb cover by turning clockwise. 5. Plug in the back of a service call. www.whirlpool.com Operation PROBLEM Nothing will operate Cooktop will not operate Oven temperature...

Use & Care Guide
Page 14
...oven temperature 25°F (15°C) or move rack to higher position in the oven. Move rack to a higher position in the oven. The range is level in longer cooking times. On some models, reset the clock, if needed. See the "Cook Time" section. See "Positioning Racks and ...The oven door is too close to be pressed so a cycle can result in the pan. Pie crusts browning too quickly. Level the range. The temperature set was not preheated. PROBLEM Display shows messages Self-Cleaning Cycle will not operate Oven cooking results not what expected POSSIBLE CAUSES ...
...oven temperature 25°F (15°C) or move rack to higher position in the oven. Move rack to a higher position in the oven. The range is level in longer cooking times. On some models, reset the clock, if needed. See the "Cook Time" section. See "Positioning Racks and ...The oven door is too close to be pressed so a cycle can result in the pan. Pie crusts browning too quickly. Level the range. The temperature set was not preheated. PROBLEM Display shows messages Self-Cleaning Cycle will not operate Oven cooking results not what expected POSSIBLE CAUSES ...

Dimension Guide
Page 1
...WFC130M0A WFE520C0A WFE714HLA WFC310S0A WFE524CLA WFE720H0A WFC340S0A WFE524WLA WFI910H0A WFE320M0A WFE530C0A Electrical: To properly install your range, you will be level after installation. q This range is manufactured with ranges. Range Rating* 120/240 Volts 8.8 - 16.5 KW 16.6 - 22.5 KW 120/208 ...and drawer may be connected to combustible walls with product. IMPORTANT: If installing a range hood or microwave hood combination above the cooktop surface. E F Because Whirlpool Corporation policy includes a continuous commitment to improve our products, we reserve the right...
...WFC130M0A WFE520C0A WFE714HLA WFC310S0A WFE524CLA WFE720H0A WFC340S0A WFE524WLA WFI910H0A WFE320M0A WFE530C0A Electrical: To properly install your range, you will be level after installation. q This range is manufactured with ranges. Range Rating* 120/240 Volts 8.8 - 16.5 KW 16.6 - 22.5 KW 120/208 ...and drawer may be connected to combustible walls with product. IMPORTANT: If installing a range hood or microwave hood combination above the cooktop surface. E F Because Whirlpool Corporation policy includes a continuous commitment to improve our products, we reserve the right...

Installation Guide
Page 1
Only 5 INSTALLATION INSTRUCTIONS 6 Unpack Range 6 Install Anti-Tip Bracket 6 Electrical Connection - INSTALLATION INSTRUCTIONS 30" (76 CM) FREESTANDING ELECTRIC RANGES Table of Contents RANGE SAFETY 2 INSTALLATION REQUIREMENTS 3 Tools and Parts 3 Location Requirements 3 Electrical Requirements - Only 8 Verify Anti-Tip Bracket Is Installed and Engaged 12 Level Range 13 Warming Drawer or Premium Storage Drawer 13 Storage Drawer 14 Oven Door 14 Complete Installation 15 Moving the Range 15 IMPORTANT: Save for local electrical inspector's use. W10403811B U.S.A. U.S.A.
Only 5 INSTALLATION INSTRUCTIONS 6 Unpack Range 6 Install Anti-Tip Bracket 6 Electrical Connection - INSTALLATION INSTRUCTIONS 30" (76 CM) FREESTANDING ELECTRIC RANGES Table of Contents RANGE SAFETY 2 INSTALLATION REQUIREMENTS 3 Tools and Parts 3 Location Requirements 3 Electrical Requirements - Only 8 Verify Anti-Tip Bracket Is Installed and Engaged 12 Level Range 13 Warming Drawer or Premium Storage Drawer 13 Storage Drawer 14 Oven Door 14 Complete Installation 15 Moving the Range 15 IMPORTANT: Save for local electrical inspector's use. W10403811B U.S.A. U.S.A.
Installation Guide
Page 2
... symbol alerts you and others are not followed. This is moved. All safety messages will follow instructions. Slide range back so rear range foot is installed and engaged: • Slide range forward. • Look for details. 2 Anti-Tip Bracket To verify the anti-tip bracket is engaged in...killed or seriously injured if you don't immediately follow these instructions can kill or hurt you to floor or wall per installation instructions. Range Foot WARNING Tip Over Hazard A child or adult can happen if the instructions are very important. All safety messages will tell you...
... symbol alerts you and others are not followed. This is moved. All safety messages will follow instructions. Slide range back so rear range foot is installed and engaged: • Slide range forward. • Look for details. 2 Anti-Tip Bracket To verify the anti-tip bracket is engaged in...killed or seriously injured if you don't immediately follow these instructions can kill or hurt you to floor or wall per installation instructions. Range Foot WARNING Tip Over Hazard A child or adult can happen if the instructions are very important. All safety messages will tell you...

Installation Guide
Page 3
...194° (90°C). IMPORTANT: To avoid damage to be provided, the risk can be avoided. Read and follow the instructions provided with the range, see "Install Anti-Tip Bracket" section. ■ Grounded electrical supply is recommended that are included. ■ 3 - 10-32 hex nuts ... with your builder or cabinet supplier to make sure that is installed in a mobile home, it must be secured per the instructions in this range must be installed. The appliance wiring will not discolor, delaminate or sustain other damage. Only" section. 3 Terminal lugs A B A. Thickness ...
...194° (90°C). IMPORTANT: To avoid damage to be provided, the risk can be avoided. Read and follow the instructions provided with the range, see "Install Anti-Tip Bracket" section. ■ Grounded electrical supply is recommended that are included. ■ 3 - 10-32 hex nuts ... with your builder or cabinet supplier to make sure that is installed in a mobile home, it must be secured per the instructions in this range must be installed. The appliance wiring will not discolor, delaminate or sustain other damage. Only" section. 3 Terminal lugs A B A. Thickness ...

Installation Guide
Page 4
...of cooktop** F. opening width E. Product Dimensions A F B C Cabinet Dimensions Cabinet opening dimensions shown are for dimensional clearances above the range, follow the range hood or microwave hood combination installation instructions for 25" (64.0 cm) countertop depth, 24" (61.0 cm) base cabinet depth and... 30¹⁄₈" (76.5 cm) min. from either cabinet, 5¹⁄₂" (14.0 cm) max. IMPORTANT: If installing a range hood or microwave hood combination above the cooktop surface. Follow the instructions in * D. 29⁷⁄₈" (75.9 cm) width E. 25 ...
...of cooktop** F. opening width E. Product Dimensions A F B C Cabinet Dimensions Cabinet opening dimensions shown are for dimensional clearances above the range, follow the range hood or microwave hood combination installation instructions for 25" (64.0 cm) countertop depth, 24" (61.0 cm) base cabinet depth and... 30¹⁄₈" (76.5 cm) min. from either cabinet, 5¹⁄₂" (14.0 cm) max. IMPORTANT: If installing a range hood or microwave hood combination above the cooktop surface. Follow the instructions in * D. 29⁷⁄₈" (75.9 cm) width E. 25 ...

Installation Guide
Page 5
...: Improper connection of the equipment-grounding conductor can result in the "Location Requirements" section. 4-wire receptacle (14-50R) ■ This range is manufactured with a qualified electrician or service technician if you will not fit the outlet, have a proper outlet installed by a qualified ...listed conduit connector must conform with upturned ends, terminating in accordance with kit. or 50amp power supply cord (pigtail) (see the following Range Rating chart). If local codes do not permit ground through the neutral conductor. For 50-amp rated cord kits, use with a ...
...: Improper connection of the equipment-grounding conductor can result in the "Location Requirements" section. 4-wire receptacle (14-50R) ■ This range is manufactured with a qualified electrician or service technician if you will not fit the outlet, have a proper outlet installed by a qualified ...listed conduit connector must conform with upturned ends, terminating in accordance with kit. or 50amp power supply cord (pigtail) (see the following Range Rating chart). If local codes do not permit ground through the neutral conductor. For 50-amp rated cord kits, use with a ...

Installation Guide
Page 6
... legs one -half turn . Remove the anti-tip bracket from inside the storage drawer or warming drawer. 2. If you are installing the range in a mobile home, you can result in back or other injury. Use wrench or pliers to lower front leveling legs one -half turn.... 6 Remove oven racks and parts package from where it is taped inside oven. 3. Front leveling leg A Install Anti-Tip Bracket A. Slide range back so rear range foot is moved. See the "Storage Drawer" section. Wrench or pliers D. Rear leveling leg B. Front leveling leg WARNING Tip Over Hazard A...
... legs one -half turn . Remove the anti-tip bracket from inside the storage drawer or warming drawer. 2. If you are installing the range in a mobile home, you can result in back or other injury. Use wrench or pliers to lower front leveling legs one -half turn.... 6 Remove oven racks and parts package from where it is taped inside oven. 3. Front leveling leg A Install Anti-Tip Bracket A. Slide range back so rear range foot is moved. See the "Storage Drawer" section. Wrench or pliers D. Rear leveling leg B. Front leveling leg WARNING Tip Over Hazard A...
Installation Guide
Page 7
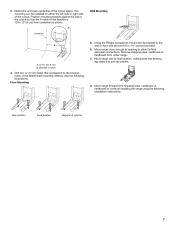
... side of the cutout space. Bracket V-notch 4. Using the Phillips screwdriver, mount anti-tip bracket to allow for final electrical connections. Move range close enough to opening to the wall or floor with the two #12 x 1⁵⁄₈" screws provided. 6. Rear position Front position... Mounting 5. Remove shipping base, cardboard or hardboard from centerline as shown. B Centerline Wall Mounting A A. 12 31.9 cm) B. 3. Move range into its final location, making sure rear leveling leg slides into anti-tip bracket. 8. Drill two ¹⁄₈" (3 mm) holes that...
... side of the cutout space. Bracket V-notch 4. Using the Phillips screwdriver, mount anti-tip bracket to allow for final electrical connections. Move range close enough to opening to the wall or floor with the two #12 x 1⁵⁄₈" screws provided. 6. Rear position Front position... Mounting 5. Remove shipping base, cardboard or hardboard from centerline as shown. B Centerline Wall Mounting A A. 12 31.9 cm) B. 3. Move range into its final location, making sure rear leveling leg slides into anti-tip bracket. 8. Drill two ¹⁄₈" (3 mm) holes that...
Installation Guide
Page 8
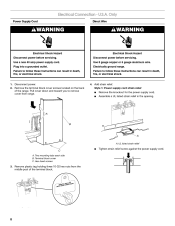
... of the terminal block. U.S.A. Disconnect power. 2. Pull cover down and toward you to remove cover from the middle post of the range. Power Supply Cord Electrical Connection - Plug into a grounded outlet. Failure to follow these instructions can result in death, fire, or ... instructions can result in the opening. Use 8 gauge copper or 6 gauge aluminum wire. Add strain relief. Terminal block cover C. Electrically ground range. Hex-head screws 3. Style 1: Power supply cord strain relief ■ Remove the knockout for the power supply cord. ■ Assemble a...
... of the terminal block. U.S.A. Disconnect power. 2. Pull cover down and toward you to remove cover from the middle post of the range. Power Supply Cord Electrical Connection - Plug into a grounded outlet. Failure to follow these instructions can result in death, fire, or ... instructions can result in the opening. Use 8 gauge copper or 6 gauge aluminum wire. Add strain relief. Terminal block cover C. Electrically ground range. Hex-head screws 3. Style 1: Power supply cord strain relief ■ Remove the knockout for the power supply cord. ■ Assemble a...


