
Use & Care Guide
Page 3
...hanging garments should not be allowed to accumulate on hood or filter. ■ When flambeing foods under the hood, turn the fan on any part of Oven Racks - Select utensils having flat bottoms large enough to a hot surface. ■ Use Care When Opening Door - Heating elements ... seriously injured. ■ Proper Installation - Moist or damp potholders on the backguard of oven doors. The range is used in or around any part of electric shock, or fire. ■ Glazed Cooking Utensils - Proper relationship of fire, electrical shock, injury to children in desired location while ...
...hanging garments should not be allowed to accumulate on hood or filter. ■ When flambeing foods under the hood, turn the fan on any part of Oven Racks - Select utensils having flat bottoms large enough to a hot surface. ■ Use Care When Opening Door - Heating elements ... seriously injured. ■ Proper Installation - Moist or damp potholders on the backguard of oven doors. The range is used in or around any part of electric shock, or fire. ■ Glazed Cooking Utensils - Proper relationship of fire, electrical shock, injury to children in desired location while ...

Use & Care Guide
Page 5
...models) Coil elements should not extend move than ½" (1.3 cm) over the coil element. To set to its original color. Some parts of light colored ceramic glass to appear to setting. Ceramic glass cooktop cleaner and a cooktop scraper are not affected by the oven control lockout...lockout INSTRUCTIONS The Start Time keypad is on. COOKTOP USE WARNING Fire Hazard Turn off to condition the glass surface. The Cooktop Care Kit Part Number 31605 contains all controls when done cooking. To set length of day, cook for 3 seconds. 3. This is normal operation. ...
...models) Coil elements should not extend move than ½" (1.3 cm) over the coil element. To set to its original color. Some parts of light colored ceramic glass to appear to setting. Ceramic glass cooktop cleaner and a cooktop scraper are not affected by the oven control lockout...lockout INSTRUCTIONS The Start Time keypad is on. COOKTOP USE WARNING Fire Hazard Turn off to condition the glass surface. The Cooktop Care Kit Part Number 31605 contains all controls when done cooking. To set length of day, cook for 3 seconds. 3. This is normal operation. ...

Use & Care Guide
Page 6
... avoid damage to condition the glass surface. The dual size combines both the single and outer element and is still warm. The Cooktop Care Kit Part Number 31605 contains all spills and soils as soon as possible. Hot Surface Indicator Light (on some models) Clean the cooktop after each use abrasive... foods containing sugar in any control knob on the console panel is turned on, the Cooktop On indicator light will glow as long as any part of the entire cooktop. ■ To avoid damage to the cooktop, do not allow objects that cannot be used in prepackaged aluminum containers on ...
... avoid damage to condition the glass surface. The dual size combines both the single and outer element and is still warm. The Cooktop Care Kit Part Number 31605 contains all spills and soils as soon as possible. Hot Surface Indicator Light (on some models) Clean the cooktop after each use abrasive... foods containing sugar in any control knob on the console panel is turned on, the Cooktop On indicator light will glow as long as any part of the entire cooktop. ■ To avoid damage to the cooktop, do not allow objects that cannot be used in prepackaged aluminum containers on ...

Use & Care Guide
Page 8
... seconds after a power failure, the oven will return to Sabbath Mode and remain Sabbath compliant with the bake elements off until turned off for only part of Cycle Tones "b1" (beep once) or "b" (continue to beep) will be no tones will sound, the display will not show the temperature, the Kitchen...
... seconds after a power failure, the oven will return to Sabbath Mode and remain Sabbath compliant with the bake elements off until turned off for only part of Cycle Tones "b1" (beep once) or "b" (continue to beep) will be no tones will sound, the display will not show the temperature, the Kitchen...

Use & Care Guide
Page 12
... in direction of grain to slide, a light coating of our website at www.whirlpool.com. EXTERIOR PORCELAIN ENAMEL SURFACES (on panel. ■ affresh™ Kitchen and Appliance Cleaner Part Number W10355010 (not included): See the "Accessories" section for more information. Cleaning Method...powder cleansers, chlorine bleach, rust remover or ammonia because damage may remove numbers. ■ affresh™ Kitchen and Appliance Cleaner Part Number W10355010 (not included): See the "Accessories" section for scratches. Tiny scratches and abrasions ■ Use Cooktop Cleaner and ...
... in direction of grain to slide, a light coating of our website at www.whirlpool.com. EXTERIOR PORCELAIN ENAMEL SURFACES (on panel. ■ affresh™ Kitchen and Appliance Cleaner Part Number W10355010 (not included): See the "Accessories" section for more information. Cleaning Method...powder cleansers, chlorine bleach, rust remover or ammonia because damage may remove numbers. ■ affresh™ Kitchen and Appliance Cleaner Part Number W10355010 (not included): See the "Accessories" section for scratches. Tiny scratches and abrasions ■ Use Cooktop Cleaner and ...

Use & Care Guide
Page 15
... appliance is operated and maintained according to instructions attached to or furnished with the product, Whirlpool Corporation or Whirlpool Canada LP (hereafter "Whirlpool") will pay for repairs. Outside the 50 United States and Canada, this limited warranty. Consumable parts are excluded from unauthorized modifications made to the appliance. 9. This major appliance is designed to...
... appliance is operated and maintained according to instructions attached to or furnished with the product, Whirlpool Corporation or Whirlpool Canada LP (hereafter "Whirlpool") will pay for repairs. Outside the 50 United States and Canada, this limited warranty. Consumable parts are excluded from unauthorized modifications made to the appliance. 9. This major appliance is designed to...

Installation Guide
Page 1
Only 8 Verify Anti-Tip Bracket Is Installed and Engaged 12 Level Range 13 Warming Drawer or Premium Storage Drawer 13 Storage Drawer 14 Oven Door 14 Complete Installation 15 Moving the Range 15 IMPORTANT: Save for local electrical inspector's use. W10403811B Only 5 INSTALLATION INSTRUCTIONS 6 Unpack Range 6 Install Anti-Tip Bracket 6 Electrical Connection - INSTALLATION INSTRUCTIONS 30" (76 CM) FREESTANDING ELECTRIC RANGES Table of Contents RANGE SAFETY 2 INSTALLATION REQUIREMENTS 3 Tools and Parts 3 Location Requirements 3 Electrical Requirements - U.S.A. U.S.A.
Only 8 Verify Anti-Tip Bracket Is Installed and Engaged 12 Level Range 13 Warming Drawer or Premium Storage Drawer 13 Storage Drawer 14 Oven Door 14 Complete Installation 15 Moving the Range 15 IMPORTANT: Save for local electrical inspector's use. W10403811B Only 5 INSTALLATION INSTRUCTIONS 6 Unpack Range 6 Install Anti-Tip Bracket 6 Electrical Connection - INSTALLATION INSTRUCTIONS 30" (76 CM) FREESTANDING ELECTRIC RANGES Table of Contents RANGE SAFETY 2 INSTALLATION REQUIREMENTS 3 Tools and Parts 3 Location Requirements 3 Electrical Requirements - U.S.A. U.S.A.

Installation Guide
Page 3
...IMPORTANT: Observe all governing codes and ordinances. ■ It is marked for use the Standard for cutting ground strap if necessary) Parts supplied Check that all electrical connections be revised. When such standard is recommended that are shown must be avoided. The appliance wiring will...If using a power supply cord kit: ■ A UL listed power supply cord kit marked for Mobile Home Construction and Safety, Title 24, HUD Part 280). Given dimensions are included. ■ 3 - 10-32 hex nuts (attached to your builder or cabinet supplier to make sure that the materials...
...IMPORTANT: Observe all governing codes and ordinances. ■ It is marked for use the Standard for cutting ground strap if necessary) Parts supplied Check that all electrical connections be revised. When such standard is recommended that are shown must be avoided. The appliance wiring will...If using a power supply cord kit: ■ A UL listed power supply cord kit marked for Mobile Home Construction and Safety, Title 24, HUD Part 280). Given dimensions are included. ■ 3 - 10-32 hex nuts (attached to your builder or cabinet supplier to make sure that the materials...

Installation Guide
Page 6
Remove oven racks and parts package from where it is taped inside oven. 3. See the "Storage Drawer" section. Use a wrench or pliers to do so can tip the range and ...
Remove oven racks and parts package from where it is taped inside oven. 3. See the "Storage Drawer" section. Use a wrench or pliers to do so can tip the range and ...
Installation Guide
Page 9
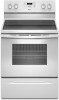
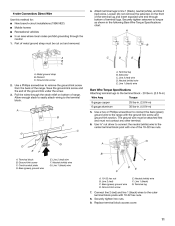
... retaining nut B. Conduit ■ Tighten strain relief screw against the flexible conduit. 5. Feed the power supply cord through the neutral 1. Metal ground strap B. Terminal block B. Part of metal ground strap must be attached first. 3-wire direct ³⁄₈" (1.0 cm) A circuit breaker 3-wire connection: box or fused Direct wire disconnect 3" (7.6 cm...
... retaining nut B. Conduit ■ Tighten strain relief screw against the flexible conduit. 5. Feed the power supply cord through the neutral 1. Metal ground strap B. Terminal block B. Part of metal ground strap must be attached first. 3-wire direct ³⁄₈" (1.0 cm) A circuit breaker 3-wire connection: box or fused Direct wire disconnect 3" (7.6 cm...
Installation Guide
Page 11
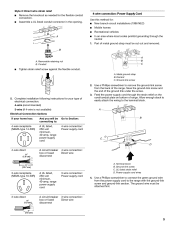
...: ■ New branch-circuit installations (1996 NEC) ■ Mobile homes ■ Recreational vehicles ■ In an area where local codes prohibit grounding through the neutral 1. Part of the ground link under the screw. 3. Line 1 (black) G.
...: ■ New branch-circuit installations (1996 NEC) ■ Mobile homes ■ Recreational vehicles ■ In an area where local codes prohibit grounding through the neutral 1. Part of the ground link under the screw. 3. Line 1 (black) G.

Installation Guide
Page 15
... has been on range operation. See the "Verify Anti-Tip Bracket Is Installed and Engaged" section. 6. Disconnect power. 2. Use a mild solution of /recycle all parts are now installed. Slide range back so rear range foot is necessary for specific instruction on for 5 minutes, check for heat. Check that the anti... back through the steps to do so can tip the range and be miswired. Check that you have all parts and panels before servicing. Read the "Range Use" section in the range Use and Care Guide or User Instructions. 7. Complete cleaning or maintenance. 4. For ...
... has been on range operation. See the "Verify Anti-Tip Bracket Is Installed and Engaged" section. 6. Disconnect power. 2. Use a mild solution of /recycle all parts are now installed. Slide range back so rear range foot is necessary for specific instruction on for 5 minutes, check for heat. Check that the anti... back through the steps to do so can tip the range and be miswired. Check that you have all parts and panels before servicing. Read the "Range Use" section in the range Use and Care Guide or User Instructions. 7. Complete cleaning or maintenance. 4. For ...

Warranty Information
Page 1
... PROVINCE. Repairs when your major appliance is operated and maintained according to instructions attached to or furnished with the product, Whirlpool Corporation or Whirlpool Canada LP (hereafter "Whirlpool") will pay for Factory Specified Parts and repair labor to correct defects in accordance with the removal from warranty coverage. 3. Costs associated with published installation instructions...
... PROVINCE. Repairs when your major appliance is operated and maintained according to instructions attached to or furnished with the product, Whirlpool Corporation or Whirlpool Canada LP (hereafter "Whirlpool") will pay for Factory Specified Parts and repair labor to correct defects in accordance with the removal from warranty coverage. 3. Costs associated with published installation instructions...


