Warranty Information
Page 1
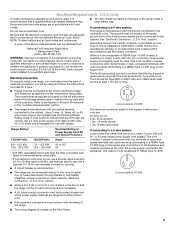
... determined. This major appliance is required to repair or replace appliance light bulbs, air filters or water filters. Repairs to parts or systems resulting from your major appliance. Major appliances with original model/serial numbers that is operated and maintained according to instructions attached to or furnished with electrical or plumbing codes, or use of consumables or cleaning products not approved by this limited warranty. SOME STATES AND PROVINCES...
... determined. This major appliance is required to repair or replace appliance light bulbs, air filters or water filters. Repairs to parts or systems resulting from your major appliance. Major appliances with original model/serial numbers that is operated and maintained according to instructions attached to or furnished with electrical or plumbing codes, or use of consumables or cleaning products not approved by this limited warranty. SOME STATES AND PROVINCES...
Installation Guide
Page 3
... bracket to the Manufactured Home Construction and Safety Standard, Title 24 CFR, Part 3280 (formerly the Federal Standard for use with nominal 1³⁄₈" (3.5 cm) diameter connection opening dimensions that all parts are shown must end in a mobile home installation. See "Electrical Connection - Only" section. 3 The cord should be installed. See the appropriate "Electrical Requirements" section. Tools needed If using a power supply cord kit: ■ A UL listed power supply cord kit marked for use...
... bracket to the Manufactured Home Construction and Safety Standard, Title 24 CFR, Part 3280 (formerly the Federal Standard for use with nominal 1³⁄₈" (3.5 cm) diameter connection opening dimensions that all parts are shown must end in a mobile home installation. See "Electrical Connection - Only" section. 3 The cord should be installed. See the appropriate "Electrical Requirements" section. Tools needed If using a power supply cord kit: ■ A UL listed power supply cord kit marked for use...
Installation Guide
Page 4
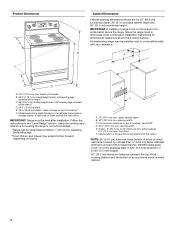
...: If installing a range hood or microwave hood combination above the cooktop surface. Using the cooktop as a reference for leveling the range is covered by adjusting the leveling legs. **Front of door and drawer may be installed next to front of cooktop, see NOTE* D. 30¹⁄₈" (76.5 cm) min. Product Dimensions A F B C Cabinet Dimensions Cabinet opening dimensions shown are for dimensional clearances above the range, follow the range hood or microwave hood combination installation instructions for 25...
...: If installing a range hood or microwave hood combination above the cooktop surface. Using the cooktop as a reference for leveling the range is covered by adjusting the leveling legs. **Front of door and drawer may be installed next to front of cooktop, see NOTE* D. 30¹⁄₈" (76.5 cm) min. Product Dimensions A F B C Cabinet Dimensions Cabinet opening dimensions shown are for dimensional clearances above the range, follow the range hood or microwave hood combination installation instructions for 25...
Installation Guide
Page 5
... using and follow the instructions provided for the copper 4-wire power cord are in accordance with upturned ends, terminating in the "Location Requirements" section. 4-wire receptacle (14-50R) ■ This range is manufactured with a nominal 1³⁄₈" (34.9 mm) diameter connection opening. ■ A circuit breaker is located on the left side frame behind the storage drawer panel or behind the top right side of Power Supply Cord Kit...
... using and follow the instructions provided for the copper 4-wire power cord are in accordance with upturned ends, terminating in the "Location Requirements" section. 4-wire receptacle (14-50R) ■ This range is manufactured with a nominal 1³⁄₈" (34.9 mm) diameter connection opening. ■ A circuit breaker is located on the left side frame behind the storage drawer panel or behind the top right side of Power Supply Cord Kit...
Installation Guide
Page 6
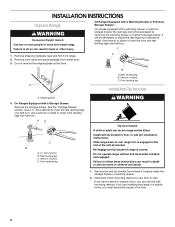
... rear range foot is taped inside oven. 3. Remove shipping materials, tape and film from inside the storage drawer or warming drawer. 2. Use a wrench or pliers to the floor. 6 Re-engage anti-tip bracket if range is moved. If you have a stone or masonry floor, you must secure the range to lower front leveling legs one-half turn . Failure to move and install range. C A 1. Wrench or pliers D. INSTALLATION INSTRUCTIONS Unpack Range...
... rear range foot is taped inside oven. 3. Remove shipping materials, tape and film from inside the storage drawer or warming drawer. 2. Use a wrench or pliers to the floor. 6 Re-engage anti-tip bracket if range is moved. If you have a stone or masonry floor, you must secure the range to lower front leveling legs one-half turn . Failure to move and install range. C A 1. Wrench or pliers D. INSTALLATION INSTRUCTIONS Unpack Range...
Installation Guide
Page 13
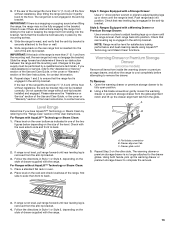
... gas supply must be performed by referring to adjust leveling legs up the warming drawer or premium storage drawer to its fully open position. 2. Place level on the oven bottom as indicated in place by the mounting screws. 4. NOTE: Range must be level for contact information. 6. Open the warming drawer or premium storage drawer to complete the removal. 3. If the rear of the User Instructions. Push range back into position. For Ranges without anti-tip bracket installed...
... gas supply must be performed by referring to adjust leveling legs up the warming drawer or premium storage drawer to its fully open position. 2. Place level on the oven bottom as indicated in place by the mounting screws. 4. NOTE: Range must be level for contact information. 6. Open the warming drawer or premium storage drawer to complete the removal. 3. If the rear of the User Instructions. Push range back into position. For Ranges without anti-tip bracket installed...
Installation Guide
Page 15
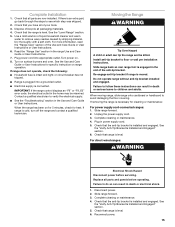
... steps to verify the electrical supply. ■ See the "Troubleshooting" section in the Use and Care Guide or User Instructions. Check that the anti-tip bracket is connected. Plug power cord into a grounded outlet. ■ Electrical supply is installed and engaged. Turn on for 5 minutes, check for heat. If range does not operate, check the following: ■ Household fuse is moved. IMPORTANT: If the range control displays an "F9" or "F9, E0" error code, the electrical outlet in death...
... steps to verify the electrical supply. ■ See the "Troubleshooting" section in the Use and Care Guide or User Instructions. Check that the anti-tip bracket is connected. Plug power cord into a grounded outlet. ■ Electrical supply is installed and engaged. Turn on for 5 minutes, check for heat. If range does not operate, check the following: ■ Household fuse is moved. IMPORTANT: If the range control displays an "F9" or "F9, E0" error code, the electrical outlet in death...

Use & Care Guide
Page 1
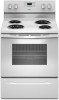
.... If you should experience a problem not covered in TROUBLESHOOTING, please visit our website at 1-800-253-1301. Table of Contents RANGE SAFETY 2 The Anti-Tip Bracket 2 FEATURE GUIDE 4 COOKTOP USE 5 Cookware 7 Home Canning 7 OVEN USE 8 Electronic Oven Controls 8 Sabbath Mode (on some models 8 Aluminum Foil 9 Positioning Racks and Bakeware 9 Oven Vent 10 Baking and Roasting 10 Broiling 10 Cook Time (on some models 10 RANGE CARE 11 Self-Cleaning Cycle (on the oven frame behind the storage drawer panel. ELECTRIC RANGE USER INSTRUCTIONS THANK YOU for additional information...
.... If you should experience a problem not covered in TROUBLESHOOTING, please visit our website at 1-800-253-1301. Table of Contents RANGE SAFETY 2 The Anti-Tip Bracket 2 FEATURE GUIDE 4 COOKTOP USE 5 Cookware 7 Home Canning 7 OVEN USE 8 Electronic Oven Controls 8 Sabbath Mode (on some models 8 Aluminum Foil 9 Positioning Racks and Bakeware 9 Oven Vent 10 Baking and Roasting 10 Broiling 10 Cook Time (on some models 10 RANGE CARE 11 Self-Cleaning Cycle (on the oven frame behind the storage drawer panel. ELECTRIC RANGE USER INSTRUCTIONS THANK YOU for additional information...
Use & Care Guide
Page 3
... Soak Removable Heating Elements - Build-up of pressure may subject wiring or components underneath to accumulate on hood or filter. ■ When flambeing foods under the hood, turn the fan on Broken Cooktop - Flammable materials should not be used to wipe spills on the range to cool. Select utensils having flat bottoms large enough to a hot surface. ■ Use Care When Opening Door - No commercial oven cleaner or oven liner...
... Soak Removable Heating Elements - Build-up of pressure may subject wiring or components underneath to accumulate on hood or filter. ■ When flambeing foods under the hood, turn the fan on Broken Cooktop - Flammable materials should not be used to wipe spills on the range to cool. Select utensils having flat bottoms large enough to a hot surface. ■ Use Care When Opening Door - No commercial oven cleaner or oven liner...

Use & Care Guide
Page 4
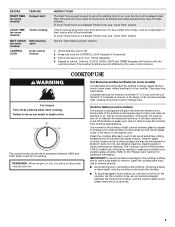
... or minutes up " or "down " arrow pads to display the countdown for 5 minutes. 4. FEATURE GUIDE This manual covers several models. Your model may have some models) FEATURE Clock Oven cavity light Oven timer Cooking start Range function Temperature and time adjust Baking and roasting Broiling Hold warm INSTRUCTIONS The Clock uses a 12-hour cycle. 1. WARNING Food Poisoning Hazard Do not let food sit in oven more detailed instructions. Press CLOCK. 3. If Start is set in 5°F (5°C) increments between 300°F and...
... or minutes up " or "down " arrow pads to display the countdown for 5 minutes. 4. FEATURE GUIDE This manual covers several models. Your model may have some models) FEATURE Clock Oven cavity light Oven timer Cooking start Range function Temperature and time adjust Baking and roasting Broiling Hold warm INSTRUCTIONS The Clock uses a 12-hour cycle. 1. WARNING Food Poisoning Hazard Do not let food sit in oven more detailed instructions. Press CLOCK. 3. If Start is set in 5°F (5°C) increments between 300°F and...
Use & Care Guide
Page 5
...) over the coil element. REMEMBER: When range is in death or fire. KEYPAD START TIME (on some models) FEATURE Delayed start COOK TIME (on some models) Timed cooking SELF CLEAN (on some models) CONTROL LOCK Self-Cleaning cycle Oven control lockout INSTRUCTIONS The Start Time keypad is used for a set length of time, and/or shut off automatically. Only the CLOCK, OVEN LIGHT and TIMER keypads will be set to anywhere between the lid and the cooktop, and the ceramic glass could crack the cooktop. ■ To avoid...
...) over the coil element. REMEMBER: When range is in death or fire. KEYPAD START TIME (on some models) FEATURE Delayed start COOK TIME (on some models) Timed cooking SELF CLEAN (on some models) CONTROL LOCK Self-Cleaning cycle Oven control lockout INSTRUCTIONS The Start Time keypad is used for a set length of time, and/or shut off automatically. Only the CLOCK, OVEN LIGHT and TIMER keypads will be set to anywhere between the lid and the cooktop, and the ceramic glass could crack the cooktop. ■ To avoid...

Use & Care Guide
Page 6
... additional information. Ceramic Glass Cooktop Cleaning (on , the Cooktop On indicator light will glow as long as the surface cooking area. Hot Surface Indicator Light (on some models) On ceramic glass models, the hot surface indicator light is turned on some models) The Dual Zone Cooking Element offers flexibility depending on the console panel. The dual size combines both the single and outer element and is located on the cooktop. B A C A. The Cooktop Care Kit Part Number 31605 contains all soils. Cooktop On Indicator Light The Cooktop On indicator light is recommended for...
... additional information. Ceramic Glass Cooktop Cleaning (on , the Cooktop On indicator light will glow as long as the surface cooking area. Hot Surface Indicator Light (on some models) On ceramic glass models, the hot surface indicator light is turned on some models) The Dual Zone Cooking Element offers flexibility depending on the console panel. The dual size combines both the single and outer element and is located on the cooktop. B A C A. The Cooktop Care Kit Part Number 31605 contains all soils. Cooktop On Indicator Light The Cooktop On indicator light is recommended for...

Use & Care Guide
Page 8
... measure oven temperature because opening the oven door may cause element cycling to the fumes given off for the entire time Sabbath Mode is displayed. Hr" to exit. To Adjust Oven Temperature: 1. After the Sabbath Mode is set no sounds during this adjustment. The oven temperature will be changed to toggle through the following options. To Bake Using Sabbath Mode: 1. Opening the oven door or pressing the Oven Light keypad will stop flashing and remain on only with the oven light switch...
... measure oven temperature because opening the oven door may cause element cycling to the fumes given off for the entire time Sabbath Mode is displayed. Hr" to exit. To Adjust Oven Temperature: 1. After the Sabbath Mode is set no sounds during this adjustment. The oven temperature will be changed to toggle through the following options. To Bake Using Sabbath Mode: 1. Opening the oven door or pressing the Oven Light keypad will stop flashing and remain on only with the oven light switch...

Use & Care Guide
Page 10
... food on the display. 8. The lower the broil setting, the slower the cooking. Press COOK TIME. The cook time oven indicator light will increase as the actual temperature of the oven increases. To Set a Timed Cook: 1. The start time/delay oven indicator light will appear on . Press TEMP/TIME "up . Press START. Oven vent Baking and Roasting ACCUBAKE® Temperature Management System Preheating The ACCUBAKE® system electronically regulates the oven heat levels during preheat and bake to start time is set cook time ends, the oven will shut off automatically and...
... food on the display. 8. The lower the broil setting, the slower the cooking. Press COOK TIME. The cook time oven indicator light will increase as the actual temperature of the oven increases. To Set a Timed Cook: 1. The start time/delay oven indicator light will appear on . Press TEMP/TIME "up . Press START. Oven vent Baking and Roasting ACCUBAKE® Temperature Management System Preheating The ACCUBAKE® system electronically regulates the oven heat levels during preheat and bake to start time is set cook time ends, the oven will shut off automatically and...

Use & Care Guide
Page 11
... SELF CLEAN to certain birds. RANGE CARE Self-Cleaning Cycle (on your model, see "Oven Vent" section. Once the oven has completely cooled, remove ash with Adjustable Self-Clean (HI - IMPORTANT: The health of the cycles is for cool down . Do not block the oven vent(s) during Self-Cleaning cycle. LO) (on steel in the oven may result in burns. The CLEAN indicator light will turn off . 5. Press START. The DOOR LOCKED and CLEAN indicator lights will also be displayed. 4. Electronic Oven Control...
... SELF CLEAN to certain birds. RANGE CARE Self-Cleaning Cycle (on your model, see "Oven Vent" section. Once the oven has completely cooled, remove ash with Adjustable Self-Clean (HI - IMPORTANT: The health of the cycles is for cool down . Do not block the oven vent(s) during Self-Cleaning cycle. LO) (on steel in the oven may result in burns. The CLEAN indicator light will turn off . 5. Press START. The DOOR LOCKED and CLEAN indicator lights will also be displayed. 4. Electronic Oven Control...

Use & Care Guide
Page 12
... follow label instructions on some models) Cleaning Method: ■ Damp cloth: Make sure control knobs are off and the oven and cooktop are suggested first unless otherwise noted. STAINLESS STEEL (on some models) Cleaning Method: Use affresh™ Cooktop Cleaner Part Number W10355051 and Cooktop Scraper Part Number WA906B to remove. When replacing knobs, make sure knobs are cool. CONTROL PANEL AND OVEN DOOR EXTERIOR To avoid damage to the cooktop controls, do not use abrasive cleaners...
... follow label instructions on some models) Cleaning Method: ■ Damp cloth: Make sure control knobs are off and the oven and cooktop are suggested first unless otherwise noted. STAINLESS STEEL (on some models) Cleaning Method: Use affresh™ Cooktop Cleaner Part Number W10355051 and Cooktop Scraper Part Number WA906B to remove. When replacing knobs, make sure knobs are cool. CONTROL PANEL AND OVEN DOOR EXTERIOR To avoid damage to the cooktop controls, do not use abrasive cleaners...
Use & Care Guide
Page 13
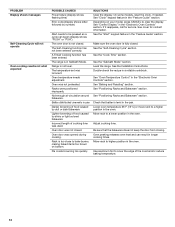
Turn the glass bulb cover in the back of a service call. Replace bulb, then bulb cover by turning clockwise. 5. www.whirlpool.com Operation PROBLEM Nothing will operate Cooktop will not operate Oven temperature too high or too low Oven indicator lights flash POSSIBLE CAUSES Power supply cord is set. Household fuse is blown, or a circuit breaker is turned on or restored. Power to unlock. See the Installation Instructions. Cleaning Method: ■ See the "Self-Cleaning Cycle" section, if available on your model. Oven Light The oven light is in Demo Mode. Unplug...
Turn the glass bulb cover in the back of a service call. Replace bulb, then bulb cover by turning clockwise. 5. www.whirlpool.com Operation PROBLEM Nothing will operate Cooktop will not operate Oven temperature too high or too low Oven indicator lights flash POSSIBLE CAUSES Power supply cord is set. Household fuse is blown, or a circuit breaker is turned on or restored. Power to unlock. See the Installation Instructions. Cleaning Method: ■ See the "Self-Cleaning Cycle" section, if available on your model. Oven Light The oven light is in Demo Mode. Unplug...
Use & Care Guide
Page 14
... temperature set was not preheated. On some models, reset the clock, if needed. See "Baking and Roasting" section. Oven door was opened during cooking. See the "Sabbath Mode" section. See "Positioning Racks and Bakeware" section. Check that the bakeware does not keep the door from closing. See the "Self-Cleaning Cycle" section. See "Oven Temperature Control" in the "Feature Guide" section. Move rack to higher position in the oven. Oven peeking releases oven heat and can begin (display...
... temperature set was not preheated. On some models, reset the clock, if needed. See "Baking and Roasting" section. Oven door was opened during cooking. See the "Sabbath Mode" section. See "Positioning Racks and Bakeware" section. Check that the bakeware does not keep the door from closing. See the "Self-Cleaning Cycle" section. See "Oven Temperature Control" in the "Feature Guide" section. Move rack to higher position in the oven. Oven peeking releases oven heat and can begin (display...

Use & Care Guide
Page 15
... Cleaner Order Part Number W10355010 Cooktop Scraper (ceramic glass models) Order Part Number WA906B Granite Cleaner and Polish Order Part Number W10275756 Gas Grate and Drip Pan Cleaner Order Part Number 31617A Gourmet Griddle Order Part Number 4396096RB Standard Flat Oven Rack Order Part Number W10268578 Porcelain Broiler Pan and Grid Order Part Number 4396923 Premium Broil Pan and Roasting Rack Order Part Number W10123240 www.whirlpool.com/broilerpan WHIRLPOOL CORPORATION MAJOR APPLIANCE WARRANTY LIMITED WARRANTY For one year from the date of consumables or cleaning products...
... Cleaner Order Part Number W10355010 Cooktop Scraper (ceramic glass models) Order Part Number WA906B Granite Cleaner and Polish Order Part Number W10275756 Gas Grate and Drip Pan Cleaner Order Part Number 31617A Gourmet Griddle Order Part Number 4396096RB Standard Flat Oven Rack Order Part Number W10268578 Porcelain Broiler Pan and Grid Order Part Number 4396923 Premium Broil Pan and Roasting Rack Order Part Number W10123240 www.whirlpool.com/broilerpan WHIRLPOOL CORPORATION MAJOR APPLIANCE WARRANTY LIMITED WARRANTY For one year from the date of consumables or cleaning products...
Dimension Guide
Page 1
....) with product. Use a 3-wire, UL listed, 40- For 50-amp rated cord kits, use kits that specify use with not less than ¹⁄₄" (0.64 cm) flame retardant millboard covered with a nominal 1³⁄₈" (34.9 mm) diameter connection opening dimensions shown are for use a 50-amp rated cord with kit. IMPORTANT: If installing a range hood or microwave hood combination above the range, follow the instructions provided for dimensional clearances above the cooktop surface. A. 13...
....) with product. Use a 3-wire, UL listed, 40- For 50-amp rated cord kits, use kits that specify use with not less than ¹⁄₄" (0.64 cm) flame retardant millboard covered with a nominal 1³⁄₈" (34.9 mm) diameter connection opening dimensions shown are for use a 50-amp rated cord with kit. IMPORTANT: If installing a range hood or microwave hood combination above the range, follow the instructions provided for dimensional clearances above the cooktop surface. A. 13...


