Warranty Information
Page 1
... W10275756 Gas Grate and Drip Pan Cleaner Order Part Number 31617A Gourmet Griddle Order Part Number 4396096RB Standard Flat Oven Rack Order Part Number W10268578 Porcelain Broiler Pan and Grid Order Part Number 4396923 Premium Broil Pan and Roasting Rack Order Part Number W10123240 www.whirlpool.com/broilerpan WHIRLPOOL CORPORATION MAJOR APPLIANCE WARRANTY LIMITED WARRANTY For one...
... W10275756 Gas Grate and Drip Pan Cleaner Order Part Number 31617A Gourmet Griddle Order Part Number 4396096RB Standard Flat Oven Rack Order Part Number W10268578 Porcelain Broiler Pan and Grid Order Part Number 4396923 Premium Broil Pan and Roasting Rack Order Part Number W10123240 www.whirlpool.com/broilerpan WHIRLPOOL CORPORATION MAJOR APPLIANCE WARRANTY LIMITED WARRANTY For one...
Installation Guide
Page 1
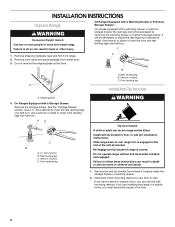
Only 8 Verify Anti-Tip Bracket Is Installed and Engaged 12 Level Range 13 Warming Drawer or Premium Storage Drawer 13 Storage Drawer 14 Oven Door 14 Complete Installation 15 Moving the Range 15 IMPORTANT: Save for local electrical inspector's use. W10403811B U.S.A. U.S.A. INSTALLATION INSTRUCTIONS 30" (76 CM) FREESTANDING ELECTRIC RANGES Table of Contents RANGE SAFETY 2 INSTALLATION REQUIREMENTS 3 Tools and Parts 3 Location Requirements 3 Electrical Requirements - Only 5 INSTALLATION INSTRUCTIONS 6 Unpack Range 6 Install Anti-Tip Bracket 6 Electrical Connection -
Only 8 Verify Anti-Tip Bracket Is Installed and Engaged 12 Level Range 13 Warming Drawer or Premium Storage Drawer 13 Storage Drawer 14 Oven Door 14 Complete Installation 15 Moving the Range 15 IMPORTANT: Save for local electrical inspector's use. W10403811B U.S.A. U.S.A. INSTALLATION INSTRUCTIONS 30" (76 CM) FREESTANDING ELECTRIC RANGES Table of Contents RANGE SAFETY 2 INSTALLATION REQUIREMENTS 3 Tools and Parts 3 Location Requirements 3 Electrical Requirements - Only 5 INSTALLATION INSTRUCTIONS 6 Unpack Range 6 Install Anti-Tip Bracket 6 Electrical Connection -
Installation Guide
Page 3
... be secured per the instructions in this range must be installed. See the appropriate "Electrical Requirements" section. Mobile Home - It is required. Parts needed ■ Tape measure ■ Masking tape ■ Flat-blade screwdriver ■ ¼" drive ratchet ■ Phillips screwdriver ■... bit (for wood floors) ■ Tin snips or large wire cutters (for Mobile Home Construction and Safety, Title 24, HUD Part 280). Terminal lugs A B A. Check existing electrical supply. This oven has been designed in accordance with the requirements of UL and...
... be secured per the instructions in this range must be installed. See the appropriate "Electrical Requirements" section. Mobile Home - It is required. Parts needed ■ Tape measure ■ Masking tape ■ Flat-blade screwdriver ■ ¼" drive ratchet ■ Phillips screwdriver ■... bit (for wood floors) ■ Tin snips or large wire cutters (for Mobile Home Construction and Safety, Title 24, HUD Part 280). Terminal lugs A B A. Check existing electrical supply. This oven has been designed in accordance with the requirements of UL and...
Installation Guide
Page 6
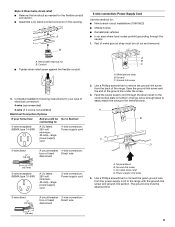
... to do so can use : floor or wall. Use wrench or pliers to lower the rear leveling legs one-half turn. Remove oven racks and parts package from range. 2. Use a ¼" drive ratchet to lower the front and rear leveling legs one -half turn . AD C B A. ¼" drive ratchet B. If you can...
... to do so can use : floor or wall. Use wrench or pliers to lower the rear leveling legs one-half turn. Remove oven racks and parts package from range. 2. Use a ¼" drive ratchet to lower the front and rear leveling legs one -half turn . AD C B A. ¼" drive ratchet B. If you can...
Installation Guide
Page 9
... 4-wire connection: Power Supply Cord Use this method for the flexible conduit connection. ■ Assemble a UL listed conduit connector in the opening. Removable retaining nut B. Part of range. A B A.
... 4-wire connection: Power Supply Cord Use this method for the flexible conduit connection. ■ Assemble a UL listed conduit connector in the opening. Removable retaining nut B. Part of range. A B A.
Installation Guide
Page 11
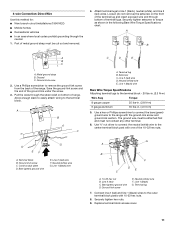
... wire end through the neutral 1. Cord/conduit plate D. Line 2 (red) wire F. Line 1 (black) wire G A B F DE C A. 10-32 hex nut B. Replace terminal block access cover. 11 Part of terminal lugs. Allow enough slack to easily attach wiring to line 1 (black), neutral (white), and line 2 (red) wires. Terminal lug B. Setscrew C. The ground wire...
... wire end through the neutral 1. Cord/conduit plate D. Line 2 (red) wire F. Line 1 (black) wire G A B F DE C A. 10-32 hex nut B. Replace terminal block access cover. 11 Part of terminal lugs. Allow enough slack to easily attach wiring to line 1 (black), neutral (white), and line 2 (red) wires. Terminal lug B. Setscrew C. The ground wire...
Installation Guide
Page 15
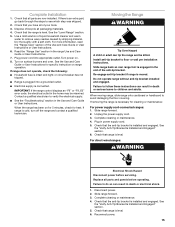
... the Use and Care Guide or User Instructions. Re-engage anti-tip bracket if range is necessary for heat. Check that all parts and panels before servicing. Replace all parts are now installed. Complete cleaning or maintenance. 4. Complete Installation 1. If there is intact and tight; See the "Level Range... "Range Use" section in the home may be killed. If range does not operate, check the following: ■ Household fuse is an extra part, go back through the steps to remove waxy residue caused by shipping material. When the range has been on . 8. Moving the Range WARNING Tip...
... the Use and Care Guide or User Instructions. Re-engage anti-tip bracket if range is necessary for heat. Check that all parts and panels before servicing. Replace all parts are now installed. Complete cleaning or maintenance. 4. Complete Installation 1. If there is intact and tight; See the "Level Range... "Range Use" section in the home may be killed. If range does not operate, check the following: ■ Household fuse is an extra part, go back through the steps to remove waxy residue caused by shipping material. When the range has been on . 8. Moving the Range WARNING Tip...
Use & Care Guide
Page 3
... to a qualified technician. ■ Storage in injury. ■ Keep Oven Vent Ducts Unobstructed. ■ Placement of the oven. ■ Clean Only Parts Listed in oven. ■ DO NOT TOUCH HEATING ELEMENTS OR INTERIOR SURFACES OF OVEN - For units with one or more surface units of these openings... burns. Grease should never be referred to accumulate on hood or filter. ■ When flambeing foods under the hood, turn the fan on any part of electric shock, or fire. ■ Glazed Cooking Utensils - among these liners may become hot enough to rub, damage, or move the gasket...
... to a qualified technician. ■ Storage in injury. ■ Keep Oven Vent Ducts Unobstructed. ■ Placement of the oven. ■ Clean Only Parts Listed in oven. ■ DO NOT TOUCH HEATING ELEMENTS OR INTERIOR SURFACES OF OVEN - For units with one or more surface units of these openings... burns. Grease should never be referred to accumulate on hood or filter. ■ When flambeing foods under the hood, turn the fan on any part of electric shock, or fire. ■ Glazed Cooking Utensils - among these liners may become hot enough to rub, damage, or move the gasket...
Use & Care Guide
Page 5
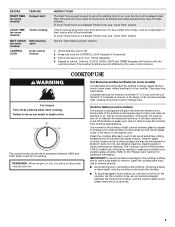
...TIMER keypads will cycle on . COOKTOP USE WARNING Fire Hazard Turn off and back on some models) Coil elements should be displayed. 4. Some parts of the items needed to unlock. IMPORTANT: To avoid permanent damage to the cooktop surface and to make soils easier to remove, clean the cooktop... Timed Cook, see "Cook Time" section. Check that the oven is normal operation. Coil Elements and Burner Bowls (on . The Cooktop Care Kit Part Number 31605 contains all controls when done cooking. Dropping a heavy or hard object onto the cooktop could break when the lid is on some models...
...TIMER keypads will cycle on . COOKTOP USE WARNING Fire Hazard Turn off and back on some models) Coil elements should be displayed. 4. Some parts of the items needed to unlock. IMPORTANT: To avoid permanent damage to the cooktop surface and to make soils easier to remove, clean the cooktop... Timed Cook, see "Cook Time" section. Check that the oven is normal operation. Coil Elements and Burner Bowls (on . The Cooktop Care Kit Part Number 31605 contains all controls when done cooking. Dropping a heavy or hard object onto the cooktop could break when the lid is on some models...

Use & Care Guide
Page 6
... the cooktop. Ceramic glass cooktop cleaner and a cooktop scraper are allowed to cool down slightly. The Cooktop Care Kit Part Number 31605 contains all spills and soils as soon as any part of the cookware. The dual size combines both the single and outer element and is located on the cooktop. Dual...
... the cooktop. Ceramic glass cooktop cleaner and a cooktop scraper are allowed to cool down slightly. The Cooktop Care Kit Part Number 31605 contains all spills and soils as soon as any part of the cookware. The dual size combines both the single and outer element and is located on the cooktop. Dual...

Use & Care Guide
Page 8
... Open "LOn" indicates that the oven light will be decided if the oven light is Sabbath compliant. Options Mode Press and hold TIMER for only part of the Sabbath. Press CANCEL to cycle through the following options. The adjustment can be adjusted to personalize it will be changed in Sabbath Mode...
... Open "LOn" indicates that the oven light will be decided if the oven light is Sabbath compliant. Options Mode Press and hold TIMER for only part of the Sabbath. Press CANCEL to cycle through the following options. The adjustment can be adjusted to personalize it will be changed in Sabbath Mode...

Use & Care Guide
Page 12
... (on some models, do not use . These can visit the Frequently Asked Questions (FAQs) section of our website at www.whirlpool.com. Light stains should be addressed with Cooktop Cleaner or nonabrasive cleaner and cleaning pad. Heavy soil, dark streaks, specks and discoloration...for scratches. Pull the coil element straight away from the cooktop. Burned-on panel. ■ affresh™ Kitchen and Appliance Cleaner Part Number W10355010 (not included): See the "Accessories" section for more information. Scratches and abrasions do not use abrasive cleaners, cleaners with ...
... (on some models, do not use . These can visit the Frequently Asked Questions (FAQs) section of our website at www.whirlpool.com. Light stains should be addressed with Cooktop Cleaner or nonabrasive cleaner and cleaning pad. Heavy soil, dark streaks, specks and discoloration...for scratches. Pull the coil element straight away from the cooktop. Burned-on panel. ■ affresh™ Kitchen and Appliance Cleaner Part Number W10355010 (not included): See the "Accessories" section for more information. Scratches and abrasions do not use abrasive cleaners, cleaners with ...

Use & Care Guide
Page 15
... in materials or workmanship. Service calls to correct the installation of your major appliance, to instruct you can visit our website at www.whirlpool.com/cookingaccessories. Repairs to parts or systems resulting from your home of original purchase date is contrary to published user or operator instructions and/or installation instructions. 4. Expenses...
... in materials or workmanship. Service calls to correct the installation of your major appliance, to instruct you can visit our website at www.whirlpool.com/cookingaccessories. Repairs to parts or systems resulting from your home of original purchase date is contrary to published user or operator instructions and/or installation instructions. 4. Expenses...


