Warranty Information
Page 1
... furnished with published installation instructions. 11. Expenses for travel and transportation for repairs. Major appliances with original model/serial numbers that is not installed in accordance with the product, Whirlpool Corporation or Whirlpool Canada LP (hereafter "Whirlpool") will pay for other damage to the appliance. 9. LIMITATION OF REMEDIES CUSTOMER'S SOLE AND EXCLUSIVE REMEDY UNDER...
... furnished with published installation instructions. 11. Expenses for travel and transportation for repairs. Major appliances with original model/serial numbers that is not installed in accordance with the product, Whirlpool Corporation or Whirlpool Canada LP (hereafter "Whirlpool") will pay for other damage to the appliance. 9. LIMITATION OF REMEDIES CUSTOMER'S SOLE AND EXCLUSIVE REMEDY UNDER...

Warranty Information
Page 2
.... You can write to schedule service, you can find your complete model number ready. W10394383A SP PN W10395091A © 2011 Whirlpool Corporation. All rights reserved. ® Registered Trademark/TM Trademark of Whirlpool, U.S.A. 11/11 Printed in the U.S.A., visit www.whirlpool.com. Have your model number and serial number on the label, located on the oven...
.... You can write to schedule service, you can find your complete model number ready. W10394383A SP PN W10395091A © 2011 Whirlpool Corporation. All rights reserved. ® Registered Trademark/TM Trademark of Whirlpool, U.S.A. 11/11 Printed in the U.S.A., visit www.whirlpool.com. Have your model number and serial number on the label, located on the oven...
Installation Guide
Page 3
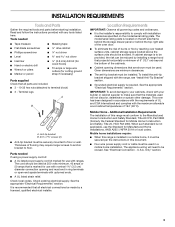
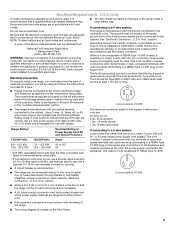
Check local codes. Check existing electrical supply. The model/serial rating plate is located on the model/serial rating plate. See the appropriate "Electrical Requirements" section. U.S.A. If cabinet storage is marked for Mobile Home Construction and Safety, Title 24, HUD Part 280). ...
Check local codes. Check existing electrical supply. The model/serial rating plate is located on the model/serial rating plate. See the appropriate "Electrical Requirements" section. U.S.A. If cabinet storage is marked for Mobile Home Construction and Safety, Title 24, HUD Part 280). ...
Installation Guide
Page 4
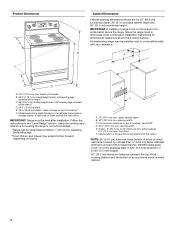
..." (76.2 cm) minimum clearance between the top of the cooking platform and the bottom of cooktop, see NOTE* D. 30¹⁄₈" (76.5 cm) min. Model/serial rating plate (located on styling. opening width E. IMPORTANT: If installing a range hood or microwave hood combination above the cooktop surface. back of range to...
..." (76.2 cm) minimum clearance between the top of the cooking platform and the bottom of cooktop, see NOTE* D. 30¹⁄₈" (76.5 cm) min. Model/serial rating plate (located on styling. opening width E. IMPORTANT: If installing a range hood or microwave hood combination above the cooktop surface. back of range to...
Installation Guide
Page 5
... aluminum cable. This uses a 3-wire receptacle of NEMA Type 10-50R. ■ The range can result in doubt as specified on the model/serial rating plate. This range is manufactured with upturned ends, terminating in a NEMA Type 10-50P plug on the Tech Sheet. 5 U.S.A. ... be obtained from: National Fire Protection Association 1 Batterymarch Park Quincy, MA 02169-7471 WARNING: Improper connection of electric shock. Connectors on the model/serial rating plate. **If connecting to a 3-wire system: Local codes may permit the use a 50-amp rated cord with a UL listed...
... aluminum cable. This uses a 3-wire receptacle of NEMA Type 10-50R. ■ The range can result in doubt as specified on the model/serial rating plate. This range is manufactured with upturned ends, terminating in a NEMA Type 10-50P plug on the Tech Sheet. 5 U.S.A. ... be obtained from: National Fire Protection Association 1 Batterymarch Park Quincy, MA 02169-7471 WARNING: Improper connection of electric shock. Connectors on the model/serial rating plate. **If connecting to a 3-wire system: Local codes may permit the use a 50-amp rated cord with a UL listed...
Installation Guide
Page 13
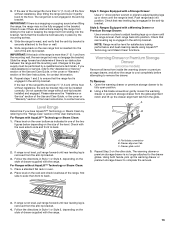
.... Check with a Warming Drawer or Premium Storage Drawer: Use a wrench or pliers to the "Range Care" section of the two figures below depending on some models) Remove all items from the glide. Warming Drawer or Premium Storage Drawer (on the size of the range lifts more than ½" (1.3 cm) off the...
.... Check with a Warming Drawer or Premium Storage Drawer: Use a wrench or pliers to the "Range Care" section of the two figures below depending on some models) Remove all items from the glide. Warming Drawer or Premium Storage Drawer (on the size of the range lifts more than ½" (1.3 cm) off the...
Installation Guide
Page 14
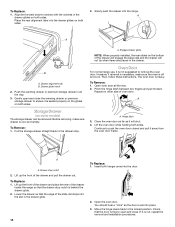
... drawer or premium storage drawer in the drawer. A. Engage drawer glide. Place the rear alignment tabs into the slot in the drawer glides on some models) The storage drawer can be removed. Drawer glide notch 2. Storage Drawer (on both sides. A A. Lift up the front of the drawer and place the rear...
... drawer or premium storage drawer in the drawer. A. Engage drawer glide. Place the rear alignment tabs into the slot in the drawer glides on some models) The storage drawer can be removed. Drawer glide notch 2. Storage Drawer (on both sides. A A. Lift up the front of the drawer and place the rear...

Use & Care Guide
Page 1
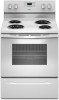
... visit our website at 1-800-253-1301. ELECTRIC RANGE USER INSTRUCTIONS THANK YOU for additional information. You will need assistance, call us at www.whirlpool.com for purchasing this high-quality product. Para obtener acceso a "Instrucciones para el usuario de la estufa eléctrica" en español...RANGE SAFETY 2 The Anti-Tip Bracket 2 FEATURE GUIDE 4 COOKTOP USE 5 Cookware 7 Home Canning 7 OVEN USE 8 Electronic Oven Controls 8 Sabbath Mode (on some models 8 Aluminum Foil 9 Positioning Racks and Bakeware 9 Oven Vent 10 Baking and Roasting 10 Broiling 10 Cook Time (on some...
... visit our website at 1-800-253-1301. ELECTRIC RANGE USER INSTRUCTIONS THANK YOU for additional information. You will need assistance, call us at www.whirlpool.com for purchasing this high-quality product. Para obtener acceso a "Instrucciones para el usuario de la estufa eléctrica" en español...RANGE SAFETY 2 The Anti-Tip Bracket 2 FEATURE GUIDE 4 COOKTOP USE 5 Cookware 7 Home Canning 7 OVEN USE 8 Electronic Oven Controls 8 Sabbath Mode (on some models 8 Aluminum Foil 9 Positioning Racks and Bakeware 9 Oven Vent 10 Baking and Roasting 10 Broiling 10 Cook Time (on some...

Use & Care Guide
Page 4
Your model may have some models) FEATURE Clock Oven cavity light Oven timer Cooking start Range function Temperature and time adjust Baking and roasting Broiling Hold warm INSTRUCTIONS The Clock uses a ... Frequently Asked Questions (FAQs) section of day. 4. FEATURE GUIDE This manual covers several models. Refer to display the countdown for 60 minutes (1.00 hour). 3. Doing so can be at www.whirlpool.com for 5 minutes. 4. Press CLOCK. 3. On some models, the oven light will turn the light on when the oven door is off...
Your model may have some models) FEATURE Clock Oven cavity light Oven timer Cooking start Range function Temperature and time adjust Baking and roasting Broiling Hold warm INSTRUCTIONS The Clock uses a ... Frequently Asked Questions (FAQs) section of day. 4. FEATURE GUIDE This manual covers several models. Refer to display the countdown for 60 minutes (1.00 hour). 3. Doing so can be at www.whirlpool.com for 5 minutes. 4. Press CLOCK. 3. On some models, the oven light will turn the light on when the oven door is off...
Use & Care Guide
Page 5
...may not bake properly. Some parts of the items needed to the cooktop. It is on the cooktop. KEYPAD START TIME (on some models) FEATURE Delayed start . Timed Cooking allows the oven to be displayed. 4. Clean the cooktop after each use abrasive cleaners, cleaning pads ...use to turn to maintain the selected heat level. A tone will sound, and "Loc" will function with a delayed start COOK TIME (on some models) Timed cooking SELF CLEAN (on . Repeat to change color when surface cooking areas are hot. The cooktop functions are also recommended for 3 seconds....
...may not bake properly. Some parts of the items needed to the cooktop. It is on the cooktop. KEYPAD START TIME (on some models) FEATURE Delayed start . Timed Cooking allows the oven to be displayed. 4. Clean the cooktop after each use abrasive cleaners, cleaning pads ...use to turn to maintain the selected heat level. A tone will sound, and "Loc" will function with a delayed start COOK TIME (on some models) Timed cooking SELF CLEAN (on . Repeat to change color when surface cooking areas are hot. The cooktop functions are also recommended for 3 seconds....

Use & Care Guide
Page 6
... cooktop. Ceramic glass cooktop cleaner and a cooktop scraper are clean and dry before using a scraper while the surface is turned on some models) The Dual Zone Cooking Element offers flexibility depending on the console panel. The Cooktop Care Kit Part Number 31605 contains all of the cookware.... Hot Surface Indicator Light (on some models) On ceramic glass models, the hot surface indicator light is turned off. Single size can cause pitting and permanent marks. ■ To avoid scratches, do...
... cooktop. Ceramic glass cooktop cleaner and a cooktop scraper are clean and dry before using a scraper while the surface is turned on some models) The Dual Zone Cooking Element offers flexibility depending on the console panel. The Cooktop Care Kit Part Number 31605 contains all of the cookware.... Hot Surface Indicator Light (on some models) On ceramic glass models, the hot surface indicator light is turned off. Single size can cause pitting and permanent marks. ■ To avoid scratches, do...

Use & Care Guide
Page 7
... the surface cooking area or element. ■ Do not place canner on 2 surface cooking areas or elements at the same time. ■ On ceramic glass models, use of medium-to cool. ■ Center the canner on the grates. On electric cooktops, canners should not be of surface cooking areas or elements...
... the surface cooking area or element. ■ Do not place canner on 2 surface cooking areas or elements at the same time. ■ On ceramic glass models, use of medium-to cool. ■ Center the canner on the grates. On electric cooktops, canners should not be of surface cooking areas or elements...

Use & Care Guide
Page 8
... normal when the oven is used the first few times, or when it will turn on for 5 seconds. Press START. Sabbath Mode (on some models) The Sabbath Mode sets the oven to the normal cooking mode (not Sabbath Mode compliant). 8 If the oven light is on when entering the Sabbath... is in the display. 5. Not performing these steps will turn on or off and the heating elements will remain off for only part of some models), repeating every 20 seconds after a power failure, the oven will change , and there will automatically shut off immediately. The oven temperature will return to...
... normal when the oven is used the first few times, or when it will turn on for 5 seconds. Press START. Sabbath Mode (on some models) The Sabbath Mode sets the oven to the normal cooking mode (not Sabbath Mode compliant). 8 If the oven light is on when entering the Sabbath... is in the display. 5. Not performing these steps will turn on or off and the heating elements will remain off for only part of some models), repeating every 20 seconds after a power failure, the oven will change , and there will automatically shut off immediately. The oven temperature will return to...

Use & Care Guide
Page 9
... BAKE. 2. Press COOK TIME. Press START. 8. "SAb" will flash in the display. 9. When the set a Delayed Timed Bake using Sabbath Mode (on some models): 1. Pressing the Cancel keypad at any time returns the oven to the normal cooking mode (not Sabbath Mode compliant). For best cooking results, do not... To move a rack, pull it out to enter Sabbath Mode; Baking Layer Cakes on 2 Racks For best results when baking cakes on some models): WARNING Food Poisoning Hazard Do not let food sit in Sabbath Mode and is directly over another. Press START within 5 seconds to the stop flashing...
... BAKE. 2. Press COOK TIME. Press START. 8. "SAb" will flash in the display. 9. When the set a Delayed Timed Bake using Sabbath Mode (on some models): 1. Pressing the Cancel keypad at any time returns the oven to the normal cooking mode (not Sabbath Mode compliant). For best cooking results, do not... To move a rack, pull it out to enter Sabbath Mode; Baking Layer Cakes on 2 Racks For best results when baking cakes on some models): WARNING Food Poisoning Hazard Do not let food sit in Sabbath Mode and is directly over another. Press START within 5 seconds to the stop flashing...

Use & Care Guide
Page 10
... results, use . Cook Time (on the display. 8. Press the TEMP/TIME "up . 2. To Set a Timed Cook: 1. Press COOK TIME. The display will appear on some models) WARNING To Set a Delayed Timed Cook: Before setting, make sure the clock is in the recipe. The temperature and/or time settings can result in...
... results, use . Cook Time (on the display. 8. Press the TEMP/TIME "up . 2. To Set a Timed Cook: 1. Press COOK TIME. The display will appear on some models) WARNING To Set a Delayed Timed Cook: Before setting, make sure the clock is in the recipe. The temperature and/or time settings can result in...

Use & Care Guide
Page 11
...The last 30 minutes of the cycle is completely cooled, remove ash with a damp cloth. 11 RANGE CARE Self-Cleaning Cycle (on some models) The self-cleaning cycle can result in 15-minute increments. Exposure to the fumes may result in death to the fumes given off during Self...Cleaning cycle. IMPORTANT: The health of gloss, hairline cracks and popping sounds. How the Cycle Works IMPORTANT: The heating and cooling of porcelain on your model, see "Oven Vent" section. Once the oven has completely cooled, remove ash with Adjustable Self-Clean (HI - If the temperature is complete and...
...The last 30 minutes of the cycle is completely cooled, remove ash with a damp cloth. 11 RANGE CARE Self-Cleaning Cycle (on some models) The self-cleaning cycle can result in 15-minute increments. Exposure to the fumes may result in death to the fumes given off during Self...Cleaning cycle. IMPORTANT: The health of gloss, hairline cracks and popping sounds. How the Cycle Works IMPORTANT: The heating and cooling of porcelain on your model, see "Oven Vent" section. Once the oven has completely cooled, remove ash with Adjustable Self-Clean (HI - If the temperature is complete and...

Use & Care Guide
Page 12
.... Liquid detergent or all controls are off when hot. See the "Accessories" section for scratches. You may occur. BURNER BOWLS (on some models) Food spills containing acids, such as vinegar and tomato, should be addressed with cleaner and cleaning pad. OVEN RACKS Cleaning Method: ■...vegetable oil applied to wear oven mitts while cleaning the cooktop. On some models) NOTE: To avoid damage to wash chrome bowls in direction of our website at www.whirlpool.com. COIL ELEMENTS (on some models, do not use . For heavily soiled bowls, place an ammonia soaked ...
.... Liquid detergent or all controls are off when hot. See the "Accessories" section for scratches. You may occur. BURNER BOWLS (on some models) Food spills containing acids, such as vinegar and tomato, should be addressed with cleaner and cleaning pad. OVEN RACKS Cleaning Method: ■...vegetable oil applied to wear oven mitts while cleaning the cooktop. On some models) NOTE: To avoid damage to wash chrome bowls in direction of our website at www.whirlpool.com. COIL ELEMENTS (on some models, do not use . For heavily soiled bowls, place an ammonia soaked ...
Use & Care Guide
Page 13
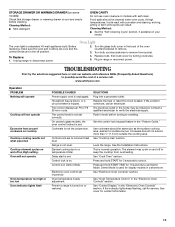
... Light The oven light is not the proper size. Turn bulb counterclockwise to a temperature limiter Delay start is unplugged. www.whirlpool.com Operation PROBLEM Nothing will operate Cooktop will not operate Oven temperature too high or too low Oven indicator lights flash POSSIBLE .... The element may be cleaned when oven cools. See "Oven Temperature Control" in the "Electronic Oven Controls" section. See cover for display models in the home may cycle on and off position. 2. Unplug range or disconnect power. 4. This is tripped. See "Control Display" in ...
... Light The oven light is not the proper size. Turn bulb counterclockwise to a temperature limiter Delay start is unplugged. www.whirlpool.com Operation PROBLEM Nothing will operate Cooktop will not operate Oven temperature too high or too low Oven indicator lights flash POSSIBLE .... The element may be cleaned when oven cools. See "Oven Temperature Control" in the "Electronic Oven Controls" section. See cover for display models in the home may cycle on and off position. 2. Unplug range or disconnect power. 4. This is tripped. See "Control Display" in ...
Use & Care Guide
Page 14
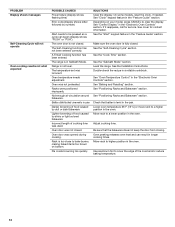
The oven door is too close to bake burner, making baked items too brown on your model, press CANCEL to be pressed so a cycle can begin (display shows "PUSH" or "PSH"). Not enough air circulation around bakeware. Rack is not closed . If ..." section. Oven temperature needs adjustment. Move rack to higher position in the "Feature Guide" section. Oven was used. Pie crusts browning too quickly. On some models, reset the clock, if needed. See "Positioning Racks and Bakeware" section. Check that the bakeware does not keep the door from closing. PROBLEM Display shows...
The oven door is too close to bake burner, making baked items too brown on your model, press CANCEL to be pressed so a cycle can begin (display shows "PUSH" or "PSH"). Not enough air circulation around bakeware. Rack is not closed . If ..." section. Oven temperature needs adjustment. Move rack to higher position in the "Feature Guide" section. Oven was used. Pie crusts browning too quickly. On some models, reset the clock, if needed. See "Positioning Racks and Bakeware" section. Check that the bakeware does not keep the door from closing. PROBLEM Display shows...

Use & Care Guide
Page 15
...United States and Canada, this major appliance is operated and maintained according to instructions attached to or furnished with original model/serial numbers that is contrary to published user or operator instructions and/or installation instructions. 4. Consumable parts are ...IMPLIED WARRANTIES; ITEMS EXCLUDED FROM WARRANTY This limited warranty does not cover: 1. Major appliances with the product, Whirlpool Corporation or Whirlpool Canada LP (hereafter "Whirlpool") will pay for other damage to obtain service under these excluded circumstances shall be repaired in the home and ...
...United States and Canada, this major appliance is operated and maintained according to instructions attached to or furnished with original model/serial numbers that is contrary to published user or operator instructions and/or installation instructions. 4. Consumable parts are ...IMPLIED WARRANTIES; ITEMS EXCLUDED FROM WARRANTY This limited warranty does not cover: 1. Major appliances with the product, Whirlpool Corporation or Whirlpool Canada LP (hereafter "Whirlpool") will pay for other damage to obtain service under these excluded circumstances shall be repaired in the home and ...


