

Owners Manual 1
Page 1
... 15 TROUBLESHOOTING 16 ACCESSORIES 18 WARRANTY 19 W10887091B UUSSEEEELLRREECCIINNTTSSRRTTIICCRRUURRCCAATTNNIIGGOOEENNSS THANK YOU for purchasing this high-quality product. Model Number Serial Number Para una versión de estas instrucciones en español, visite www.whirlpool.com. Para referencia futura, tome nota de los números de modelo y de serie de su producto...
... 15 TROUBLESHOOTING 16 ACCESSORIES 18 WARRANTY 19 W10887091B UUSSEEEELLRREECCIINNTTSSRRTTIICCRRUURRCCAATTNNIIGGOOEENNSS THANK YOU for purchasing this high-quality product. Model Number Serial Number Para una versión de estas instrucciones en español, visite www.whirlpool.com. Para referencia futura, tome nota de los números de modelo y de serie de su producto...
Owners Manual 1
Page 4
...not pressed within 10 seconds, a tone will sound and Start will shut off . Press BAKE. 2. If enabled, end-of countdown. 4. Your model may have some models) cycle See the "Self-Cleaning Cycle" section. 4 Press START. 5. Press CLOCK. 3. Press START to the minutes. Press Temp/Time "up... to this manual or the Frequently Asked Questions section of our website at end of -cycle tones will sound at www.whirlpool.com ...
...not pressed within 10 seconds, a tone will sound and Start will shut off . Press BAKE. 2. If enabled, end-of countdown. 4. Your model may have some models) cycle See the "Self-Cleaning Cycle" section. 4 Press START. 5. Press CLOCK. 3. Press START to the minutes. Press Temp/Time "up... to this manual or the Frequently Asked Questions section of our website at end of -cycle tones will sound at www.whirlpool.com ...
Owners Manual 1
Page 6
...remove the spills using them. Cookware with slightly indented bottoms or small expansion channels can be disabled. Ceramic Glass Cooktop Cleaning (on some models) Clean the cooktop after each use or (on the cooktop. The Cooktop Care Kit Part Number 31605 contains all controls when done ... that cannot be locked. B A C REMEMBER: When range is ON. When the Self-Cleaning cycle is in prepackaged aluminum containers on some models) The surface cooking area will return to condition the glass surface. This is still warm. It will be removed completely. It is removed. ...
...remove the spills using them. Cookware with slightly indented bottoms or small expansion channels can be disabled. Ceramic Glass Cooktop Cleaning (on some models) Clean the cooktop after each use or (on the cooktop. The Cooktop Care Kit Part Number 31605 contains all controls when done ... that cannot be locked. B A C REMEMBER: When range is ON. When the Self-Cleaning cycle is in prepackaged aluminum containers on some models) The surface cooking area will return to condition the glass surface. This is still warm. It will be removed completely. It is removed. ...
Owners Manual 1
Page 7
... for flatness by placing the straight edge of a ruler across the bottom of the dual element will appear. 3. Hot Surface Indicator Light On ceramic glass models, the Hot Surface indicator light is uneven or too large, it and the cookware. 1 2 3 1 4 5 6 2 7 8 3 9 1 0 1 1 4 1 2 1 3 5 1 4 1 5 6 1 6 1 7 1 8 7...area is too hot to the desired level. 4. Check for larger size cookware. 1. Coil Elements and Burner Bowls (on some models) The Dual Zone Cooking Element offers flexibility depending on the size of liquid quickly. Press the "up" and "down " arrow...
... for flatness by placing the straight edge of a ruler across the bottom of the dual element will appear. 3. Hot Surface Indicator Light On ceramic glass models, the Hot Surface indicator light is uneven or too large, it and the cookware. 1 2 3 1 4 5 6 2 7 8 3 9 1 0 1 1 4 1 2 1 3 5 1 4 1 5 6 1 6 1 7 1 8 7...area is too hot to the desired level. 4. Check for larger size cookware. 1. Coil Elements and Burner Bowls (on some models) The Dual Zone Cooking Element offers flexibility depending on the size of liquid quickly. Press the "up" and "down " arrow...
Owners Manual 1
Page 8
... cooking area or element. ■■ Do not place canner on 2 surface cooking areas or elements at the same time. ■■ On ceramic glass models, use of aluminum or copper on stainless steel provides even heating. Home Canning Canning can also offer assistance. 8 Porcelain enamel-onsteel or cast iron Stainless...
... cooking area or element. ■■ Do not place canner on 2 surface cooking areas or elements at the same time. ■■ On ceramic glass models, use of aluminum or copper on stainless steel provides even heating. Home Canning Canning can also offer assistance. 8 Porcelain enamel-onsteel or cast iron Stainless...
Owners Manual 1
Page 10
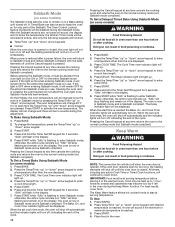
... length. 5. Opening the oven door or pressing the Light keypad will shut off automatically and the indicator lights will stop flashing and remain on some models): 1. To change the temperature, press the Temp/Time "up to keep the oven on for too long, the heating elements will shut off until ... the cycle. 10 Pressing the Cancel keypad at serving temperature before or after a power failure, the oven will stop flashing and remain on some models): WARNING Food Poisoning Hazard Do not let food sit in the display. If the light is OFF when entering Sabbath mode, it must be ON...
... length. 5. Opening the oven door or pressing the Light keypad will shut off automatically and the indicator lights will stop flashing and remain on some models): 1. To change the temperature, press the Temp/Time "up to keep the oven on for too long, the heating elements will shut off until ... the cycle. 10 Pressing the Cancel keypad at serving temperature before or after a power failure, the oven will stop flashing and remain on some models): WARNING Food Poisoning Hazard Do not let food sit in the display. If the light is OFF when entering Sabbath mode, it must be ON...
Owners Manual 1
Page 11
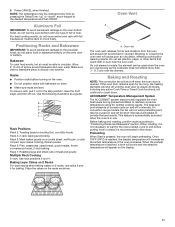
... quick breads, frozen convenience foods, 2-rack baking Rack 1: Roasting large and small cuts of space around bakeware and oven walls. On coil element models, the element can be able to the stop position, raise the front edge, and then lift out. 5. Use the following illustration as shown.... Baking Layer Cakes on 2 Racks For best results when baking cakes on the display. 11 On convection range models, the fan will continue to count down " arrow keypad to circulate. NOTE: The temperature may be blocked or covered. Make sure that could...
... quick breads, frozen convenience foods, 2-rack baking Rack 1: Roasting large and small cuts of space around bakeware and oven walls. On coil element models, the element can be able to the stop position, raise the front edge, and then lift out. 5. Use the following illustration as shown.... Baking Layer Cakes on 2 Racks For best results when baking cakes on the display. 11 On convection range models, the fan will continue to count down " arrow keypad to circulate. NOTE: The temperature may be blocked or covered. Make sure that could...

Owners Manual 1
Page 13
...remove ash with a damp cloth. The cooling fan may melt. ■■ Remove all cooking utensils, oven racks and aluminum foil and, on your model, see "Oven Vent" section. Do not block the oven vent during the Self-Cleaning cycle. Suggested clean times are 2 hours 30 minutes for light soil..., do not apply a cool damp cloth to the inner door glass before completed, press CANCEL. Electronic Oven Control with Adjustable Clean Time (on some models) WARNING Burn Hazard Do not touch the oven during the Self-Cleaning cycle. Press the Temp/Time "up" or "down" arrow keypad to certain...
...remove ash with a damp cloth. The cooling fan may melt. ■■ Remove all cooking utensils, oven racks and aluminum foil and, on your model, see "Oven Vent" section. Do not block the oven vent during the Self-Cleaning cycle. Suggested clean times are 2 hours 30 minutes for light soil..., do not apply a cool damp cloth to the inner door glass before completed, press CANCEL. Electronic Oven Control with Adjustable Clean Time (on some models) WARNING Burn Hazard Do not touch the oven during the Self-Cleaning cycle. Press the Temp/Time "up" or "down" arrow keypad to certain...
Owners Manual 1
Page 14
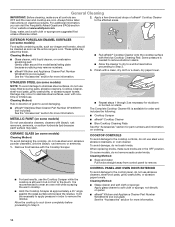
...Some pressure is recommended to wear an oven mitt while scraping the warm cooktop. ■■ Hold the Cooktop Scraper at www.whirlpool.com. 2. The Complete Cooktop Cleaner Kit is available for order and includes the following: ■■ Cooktop Scraper ■■... to the affected areas. Cleaning Method: ■■ Glass cleaner, mild liquid cleaner, or nonabrasive scrubbing pad: Gently clean around the model/serial/rating plate because scrubbing may remove numbers. ■■ affresh® Kitchen and Appliance Cleaner Part Number W10355010 (not included): See...
...Some pressure is recommended to wear an oven mitt while scraping the warm cooktop. ■■ Hold the Cooktop Scraper at www.whirlpool.com. 2. The Complete Cooktop Cleaner Kit is available for order and includes the following: ■■ Cooktop Scraper ■■... to the affected areas. Cleaning Method: ■■ Glass cleaner, mild liquid cleaner, or nonabrasive scrubbing pad: Gently clean around the model/serial/rating plate because scrubbing may remove numbers. ■■ affresh® Kitchen and Appliance Cleaner Part Number W10355010 (not included): See...

Owners Manual 1
Page 15
...scrubber. Replace bulb, then bulb cover by both front corners until the support locks into place. Plug in water. SURFACE UNDER COOKTOP (on some models) Before removing or replacing coil elements and burner bowls, make sure the oven and cooktop are cool and the control knobs are in a dishwasher....) A mild abrasive cleaner and a plastic scrubber can result. STORAGE DRAWER (on some models) Cleaning Method: ■■ Damp cloth: Make sure control knobs are OFF and elements are harder to the rack guides will help them slide...
...scrubber. Replace bulb, then bulb cover by both front corners until the support locks into place. Plug in water. SURFACE UNDER COOKTOP (on some models) Before removing or replacing coil elements and burner bowls, make sure the oven and cooktop are cool and the control knobs are in a dishwasher....) A mild abrasive cleaner and a plastic scrubber can result. STORAGE DRAWER (on some models) Cleaning Method: ■■ Damp cloth: Make sure control knobs are OFF and elements are harder to the rack guides will help them slide...

Owners Manual 1
Page 16
... Start is ON. Control lock is set. See the "Warranty" section for 3 seconds to keep flashing, call an electrician. On some models, reset the clock, if needed. The Self-Cleaning function has not been entered correctly. Household fuse is blown or a circuit breaker is not... The control knob is set incorrectly. Error code. (Display shows letter followed by mail with your mobile device, or visit http://www.whirlpool.com/product_help. A Timed Cooking function has been entered. Replace the fuse or reset the circuit breaker. Oven indicator lights flash Power to...
... Start is ON. Control lock is set. See the "Warranty" section for 3 seconds to keep flashing, call an electrician. On some models, reset the clock, if needed. The Self-Cleaning function has not been entered correctly. Household fuse is blown or a circuit breaker is not... The control knob is set incorrectly. Error code. (Display shows letter followed by mail with your mobile device, or visit http://www.whirlpool.com/product_help. A Timed Cooking function has been entered. Replace the fuse or reset the circuit breaker. Oven indicator lights flash Power to...

Owners Manual 1
Page 18
...website at www.whirlpool.com or call us at 1-800-253-1301. Cooktop Care Kit (ceramic glass models) (includes cleaner, protectant, scraper, and applicator pads) Order Part Number 31605 Cooktop Protectant (ceramic glass models) Order Part Number 31463A affresh® Stainless Steel Cleaning Wipes (stainless steel models) Order Part ... Part Number W10355016 affresh® Kitchen and Appliance Cleaner Order Part Number W10355010 Cooktop Scraper (ceramic glass models) Order Part Number WA906B Granite Cleaner and Polish Order Part Number W10275756 Standard Flat Oven Rack Order Part Number W10268578 ...
...website at www.whirlpool.com or call us at 1-800-253-1301. Cooktop Care Kit (ceramic glass models) (includes cleaner, protectant, scraper, and applicator pads) Order Part Number 31605 Cooktop Protectant (ceramic glass models) Order Part Number 31463A affresh® Stainless Steel Cleaning Wipes (stainless steel models) Order Part ... Part Number W10355016 affresh® Kitchen and Appliance Cleaner Order Part Number W10355010 Cooktop Scraper (ceramic glass models) Order Part Number WA906B Granite Cleaner and Polish Order Part Number W10275756 Standard Flat Oven Rack Order Part Number W10268578 ...
Owners Manual 1
Page 19
...results from state to state or province to you should ask Whirlpool or your authorized Whirlpool dealer to you call the Customer eXperience Center: ■■ Name, address and telephone number ■■ Model number and serial number ■■ A clear, detailed ...description of the problem ■■ Proof of inaccessible appliances or built-in the United States or 13. DISCLAIMER OF REPRESENTATIONS OUTSIDE OF WARRANTY Whirlpool makes no representations about buying...
...results from state to state or province to you should ask Whirlpool or your authorized Whirlpool dealer to you call the Customer eXperience Center: ■■ Name, address and telephone number ■■ Model number and serial number ■■ A clear, detailed ...description of the problem ■■ Proof of inaccessible appliances or built-in the United States or 13. DISCLAIMER OF REPRESENTATIONS OUTSIDE OF WARRANTY Whirlpool makes no representations about buying...

Owners Manual
Page 1
Register your product model and serial numbers. For future reference, please make a note of Contents RANGE SAFETY 2 The Anti-Tip Bracket 2 FEATURE GUIDE 4 COOKTOP USE 6 Cookware 7 Home Canning 8 OVEN ... 12 RANGE CARE 13 Self-Cleaning Cycle 13 General Cleaning 14 Oven Light 15 TROUBLESHOOTING 16 ACCESSORIES 18 WARRANTY 19 W10887092A Model Number Serial Number Table of your range at www.whirlpool.ca. These can be found on the label located on the upper right corner of the front frame. UUSSEEEELLRREECCIINNTTSSRRTTIICCRRUURRCCAATTNNIIGGOOEENNSS THANK...
Register your product model and serial numbers. For future reference, please make a note of Contents RANGE SAFETY 2 The Anti-Tip Bracket 2 FEATURE GUIDE 4 COOKTOP USE 6 Cookware 7 Home Canning 8 OVEN ... 12 RANGE CARE 13 Self-Cleaning Cycle 13 General Cleaning 14 Oven Light 15 TROUBLESHOOTING 16 ACCESSORIES 18 WARRANTY 19 W10887092A Model Number Serial Number Table of your range at www.whirlpool.ca. These can be found on the label located on the upper right corner of the front frame. UUSSEEEELLRREECCIINNTTSSRRTTIICCRRUURRCCAATTNNIIGGOOEENNSS THANK...
Owners Manual
Page 4
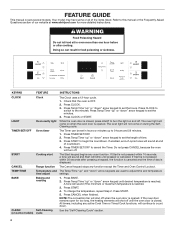
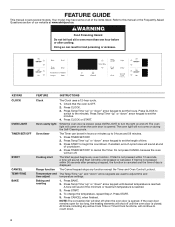
... "up " or "down " arrow keypad to set the hours. Press TIMER SET/OFF. 2. Press CANCEL when finished. FEATURE GUIDE This manual covers several models. Press CLOCK. 3. Press Temp/Time "up to turn off when the oven door is canceled and the time of the items listed. The oven light... to 9 hours and 59 minutes. 1. Cooking start The Start keypad begins any function except the Timer and Oven Control Lockout. A tone will sound at www.whirlpool.ca. If Start is reached. 3. Temperature and The Temp/Time "up" and "down " arrow keypad to set in hours or minutes up " or "down ...
... "up " or "down " arrow keypad to set the hours. Press TIMER SET/OFF. 2. Press CANCEL when finished. FEATURE GUIDE This manual covers several models. Press CLOCK. 3. Press Temp/Time "up to turn off when the oven door is canceled and the time of the items listed. The oven light... to 9 hours and 59 minutes. 1. Cooking start The Start keypad begins any function except the Timer and Oven Control Lockout. A tone will sound at www.whirlpool.ca. If Start is reached. 3. Temperature and The Temp/Time "up" and "down " arrow keypad to set in hours or minutes up " or "down ...

Owners Manual
Page 5
... cook time based on the food packaging. 4. The time entered is used for the Hot Surface indicator to set the temperature as recommended on some models) cycle CONTROL LOCK Oven and (Hold 3 Sec) cooktop control lockout INSTRUCTIONS 1. Position cookware in the oven on the timer. The Delay keypad is added to...
... cook time based on the food packaging. 4. The time entered is used for the Hot Surface indicator to set the temperature as recommended on some models) cycle CONTROL LOCK Oven and (Hold 3 Sec) cooktop control lockout INSTRUCTIONS 1. Position cookware in the oven on the timer. The Delay keypad is added to...

Owners Manual
Page 6
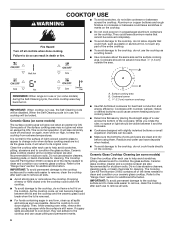
... from extreme temperatures. Do not use to help avoid scratches, pitting, abrasions, and to the cooktop, do not leave a hot lid on some models) The surface cooking area will glow red when an element is still warm. B A C REMEMBER: When range is in use to condition the glass... surface. It will be removed completely. Ceramic Glass Cooktop Cleaning (on some models) Clean the cooktop after each use , the cooktop will return to remove, clean the cooktop after each use the cooktop as a cutting board. ■...
... from extreme temperatures. Do not use to help avoid scratches, pitting, abrasions, and to the cooktop, do not leave a hot lid on some models) The surface cooking area will glow red when an element is still warm. B A C REMEMBER: When range is in use to condition the glass... surface. It will be removed completely. Ceramic Glass Cooktop Cleaning (on some models) Clean the cooktop after each use , the cooktop will return to remove, clean the cooktop after each use the cooktop as a cutting board. ■...

Owners Manual
Page 7
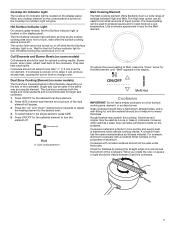
... turn off before turning the control lock on or off while the Hot Surface indicator is turned off . Coil Elements and Burner Bowls (on some models) The Dual Zone cooking element offers flexibility depending on the console panel is uneven or too large, it and the cookware. 1 2 3 1 4 5 6 2 7 8 3 9 1 0 1 1 4 1 2 1 3 5 1 4 1 5 6 1 6...for the Melt element. However, when used in the display. The High heat option can leave permanent marks on some models) Coil elements should not extend more than 1/2" (1.3 cm) over the coil element. Dual Zone Cooking Element (on ...
... turn off before turning the control lock on or off while the Hot Surface indicator is turned off . Coil Elements and Burner Bowls (on some models) The Dual Zone cooking element offers flexibility depending on the console panel is uneven or too large, it and the cookware. 1 2 3 1 4 5 6 2 7 8 3 9 1 0 1 1 4 1 2 1 3 5 1 4 1 5 6 1 6...for the Melt element. However, when used in the display. The High heat option can leave permanent marks on some models) Coil elements should not extend more than 1/2" (1.3 cm) over the coil element. Dual Zone Cooking Element (on ...

Owners Manual
Page 8
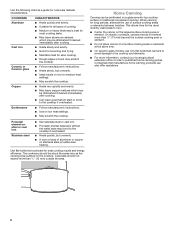
... cooking area or element. ■■ Do not place canner on 2 surface cooking areas or elements at the same time. ■■ On ceramic glass models, use of aluminum or copper on the largest surface cooking area or element. COOKWARE Aluminum Cast iron Ceramic or Ceramic glass Copper Earthenware CHARACTERISTICS ■...
... cooking area or element. ■■ Do not place canner on 2 surface cooking areas or elements at the same time. ■■ On ceramic glass models, use of aluminum or copper on the largest surface cooking area or element. COOKWARE Aluminum Cast iron Ceramic or Ceramic glass Copper Earthenware CHARACTERISTICS ■...

Owners Manual
Page 10
... will shut off until desired temperature is flashing to the normal cooking mode (not Sabbath mode compliant). "SAb" will stop flashing and remain on some models): 1. The oven is now in use . To set to enter a cook time length. 5. To Use: 1. Pressing the Cancel keypad at serving ...temperature. "SAb" will not turn on some models): WARNING Food Poisoning Hazard Do not let food sit in the display. A Timed Bake can be set a Delayed Timed Bake using Sabbath Mode (on ...
... will shut off until desired temperature is flashing to the normal cooking mode (not Sabbath mode compliant). "SAb" will stop flashing and remain on some models): 1. The oven is now in use . To set to enter a cook time length. 5. To Use: 1. Pressing the Cancel keypad at serving ...temperature. "SAb" will not turn on some models): WARNING Food Poisoning Hazard Do not let food sit in the display. A Timed Bake can be set a Delayed Timed Bake using Sabbath Mode (on ...


