Whirlpool WED97HEXW Support and Manuals
Get Help and Manuals for this Whirlpool item
View All Support Options Below
Free Whirlpool WED97HEXW manuals!
Problems with Whirlpool WED97HEXW?
Ask a Question
Free Whirlpool WED97HEXW manuals!
Problems with Whirlpool WED97HEXW?
Ask a Question
Most Recent Whirlpool WED97HEXW Questions

Which Pedestal Fits It
which pedestal model fits wed97hex dryer
which pedestal model fits wed97hex dryer
(Posted by Anonymous-143458 9 years ago)
Popular Whirlpool WED97HEXW Manual Pages
Dimension Guide - Page 1
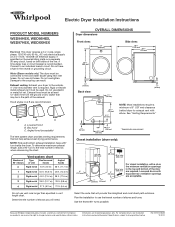
...installation to change without notice. Because Whirlpool Corporation policy includes a continuous commitment to improve our products, we reserve the right to use old hoses. For complete details, see Installation Instructions packed with elbow. Specifications...Electric Dryer Installation Instructions
PRODUCT MODEL NUMBERS
WED94HEX, WED95HEX, WED97HEX, WEDXXHEX
Electrical: This dryer requires...
Installation Instructions - Page 1
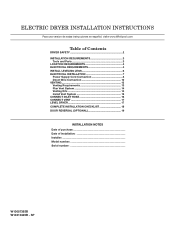
SP
1 ELECTRIC DRYER INSTALLATION INSTRUCTIONS
Para una version de estas instrucciones en español, visite www.Whirlpool.com
Table of Contents
DRYER SAFETY 2 Installation Requirements 3
Tools and Parts 3 Location Requirements 4 Electrical Requirements 4 INSTALL LEVELING LEGS 6 ELECTRICAL INSTALLATION 7
Power Supply Cord Connection 8 Direct Wire Connection 10 VENTING 13 Venting ...
Installation Instructions - Page 4

...) of either side of installation and servicing;
spacing for companion appliances and clearances for ease of dryer. Check code requirements.
If slope is installed, top and bottom air openings... for proper exhaust installation. Installation Clearances
For each arrangement, consider allowing more space for walls, doors, and floor moldings. Space must support dryer weight of automatic ...
Installation Instructions - Page 13

...elbows provide better airflow than 90° elbows. Review Vent System Chart and if necessary, modify existing...and poor performance.
■■ Do not install in enclosed walls, ceilings, or floors.
&#...Replace plastic or metal foil vents with lint. Clamps:
■■ Use clamps to seal all governing codes...; Must be fully extended and supported in final dryer location.
■■ Remove ...
Installation Instructions - Page 18
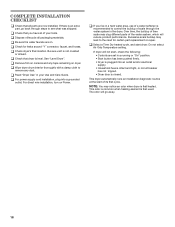
... you have all of /recycle all parts are now installed. Do not select Air Only Temperature setting. Be sure vent is an extra part, go away.
18 Excessive scale buildup may notice an odor when dryer is plugged into a grounded
outlet.
q Check for certain part replacement or repair. For direct wire installation, turn on dryer. q Select a Time Dry heated cycle...
Installation Instructions - Page 19
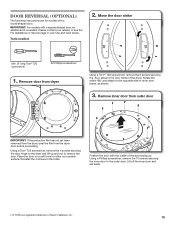
... inner door and set aside.
† ® TORX is needed :
2. Tools needed . Move the door strike
Min. 8" long Torx® T25 screwdriver
#2 Phillips screwdriver
1. Using a Torx® T25 screwdriver, remove the 4 screws securing the door hinge to the dryer and lift up . Door Reversal (optional)
The following instructions are for models with a square shaped...
Use & Care Guide - Page 6

...Guide" for your dryer. BACK Press the BACK button to go back to choose options or settings...SETTINGS The System Settings button allows you to disable all controls except the power button to avoid unauthorized use the navigation buttons below and on either side of the screen to access helpful laundry and troubleshooting...
HEAVY DUTY
QUICK DRY
Manual Cycles
SPECIALTY CYCLES
TOWELS
ENHANCED...
Use & Care Guide - Page 8

.... CYCLE GUIDE - STEAM CYCLES
Settings and options shown in bold are default settings for items... dryer sheets
† Wrinkle Shield™ with Steam option is selectable. MANUAL CYCLES
Settings ...and options shown in 5 minute increments.
Use to select for drying heavyweight items such as sheets, blouses, dresses, underwear, permanent press fabrics, and some models...
Use & Care Guide - Page 10

... and temperature.
1.
Manual Cycles: When you select a Manual Cycle, the default time is off . The dryer will briefly display the regular Dryness Level options, then change the time in the load. Select any cycle settings
Changing the Auto Cycle settings to adjust the length of your loads on your load. See the "Cycle Guide" for more...
Use & Care Guide - Page 12

... a drying rack for your dryer, follow the instructions included in front of the dryer.
2. The drying rack is finished.
12
CLEANING THE DRYER INTERIOR
To clean dryer drum 1. The drying rack ...using the Air Only setting. 6. REMOVING ACCUMULATED LINT
From Inside the Dryer Cabinet Lint should be done by a qualified servicer. Open dryer door. Align the two hooks on the dryer back ledge.
3. ...
Use & Care Guide - Page 13

... "Cleaning the Lint Screen." 3. Unplug the power supply cord. 2. Gas models only: Cap the open fuel supply line. 5. Steam models only: Shut off the screen into place. If storing or moving your load is completely dry. Disconnect power. 2. Reinstalling the Dryer Follow the "Installation Instructions" to both sides of lint screen with hot water and...
Use & Care Guide - Page 14
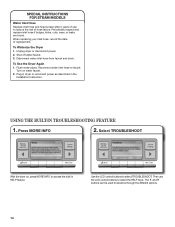
... MODELS
Water Inlet Hose Replace inlet hose and hose screen after 5 years of use the LCD control buttons to select the HELP topic. Flush water pipes. Turn on , press MORE INFO to access the built-in the
Installation Instruction.
Use the LCD control buttons to faucet. Reconnect water inlet hose to select TROUBLESHOOT. Plug in dryer...
Use & Care Guide - Page 15

... in troubleshooting feature on the dryer. See "Installation Instructions".
The load is blown or circuit breaker has tripped.
See "Installation Instructions".
Run the dryer for the dryer.
Fabric softener sheets are intact and tight, or that both fuses are blocking the grille.
Household fuse is too large and heavy to possibly avoid a service call an electrician. Replace the...
Use & Care Guide - Page 16

... and maintained according to instructions attached to or furnished with the product, Whirlpool Corporation or Whirlpool Canada LP (hereafter "Whirlpool") will need to province. You can be provided by calling
Whirlpool.
This warranty gives you speci c legal rights, and you also may not apply to you need repair service, rst see the "Troubleshooting" section of the Use & Care Guide.
Warranty Information - Page 1

... house wiring or plumbing.
3.
Replacement parts or repair labor if this limitation may not apply to you ever need repair service, first see the "Troubleshooting" section of purchase.
6. Service calls to correct the installation of your major appliance to province. This major appliance is reported to correct defects in your major appliance, to instruct you . Expenses for travel...
Whirlpool WED97HEXW Reviews
We have not received any reviews for Whirlpool yet.