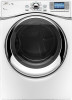
Whirlpool WED97HEXW Support Question
Whirlpool WED97HEXW Support Question
Find answers below for this question about Whirlpool WED97HEXW.Need a Whirlpool WED97HEXW manual? We have 4 online manuals for this item!
Question posted by Anonymous-143458 on September 13th, 2014
Which Pedestal Fits It
which pedestal model fits wed97hex dryer
Current Answers
Related Whirlpool WED97HEXW Manual Pages
Dimension Guide - Page 1
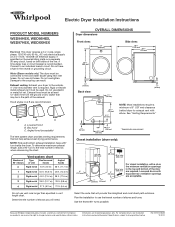
... side exhaust
3/4"* (18 mm)
297/8"* (759 mm)
31/2"* (89 mm)
NOTE: Most installations require a minimum of the door are required. Electric Dryer Installation Instructions
PRODUCT MODEL NUMBERS
WED94HEX, WED95HEX, WED97HEX, WEDXXHEX
Electrical: This dryer requires a 3 or 4 wire, single phase, 120/240 volt, 60 Hz., AC only electrical supply (or 3 or 4 wire, 120/208 volt...
Installation Instructions - Page 1
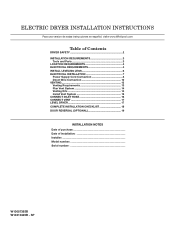
... una version de estas instrucciones en español, visite www.Whirlpool.com
Table of Contents
DRYER SAFETY 2 Installation Requirements 3
Tools and Parts 3 Location Requirements 4 Electrical Requirements 4 INSTALL LEVELING... Inlet Hose 16 Connect Vent 17 Level Dryer 17 Complete Installation Checklist 18 Door reversal (OPTIONAL 19
INSTALLATION NOTES Date of purchase Date of...
Installation Instructions - Page 3
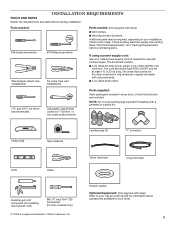
... vent installations)
Parts needed: (Not supplied with a pedestal or a stack kit. Utility knife
Tape measure
Leveling legs (4)
"Y" connector
Level
Pliers
Caulking gun and compound (for installing new exhaust vent)
Min. 8" long Torx® T25 screwdriver (for use leveling legs supplied if installing with dryer)
■■Vent clamps ■■Vent elbows...
Installation Instructions - Page 4

...;■The dryer must be exposed to reduce noise transfer. spacing for companion appliances and clearances for proper exhaust installation. See "Venting Requirements." See "Venting Requirements."
■■A separate 30 amp circuit.
■■If using a pedestal, you will be installed or stored in garages, closets, mobile homes, or sleeping quarters. Installation...
Installation Instructions - Page 8
... relief screws just enough to 3-Wire Power Supply Cord Connection on strain relief). The strain relief should have a tight fit with upturned ends
Ring terminals
1.
Prepare to strain relief
Spade terminals with the dryer cabinet and be in place. Tighten screw. Connect neutral ground wire and neutral wire
B E
C
Connect neutral ground wire...
Installation Instructions - Page 10

... Tighten strain relief screw against the direct wire cable.
Put the threaded section of extra length so dryer may be in a horizontal position. Prepare to connect neutral ground wire and neutral wire
E B
...
31 (89
⁄2" mm)
(251"mm)
(127
5" mm)
Direct wire cable must have a tight fit with the dryer cabinet and be moved if needed. Cut 11/2" (38 mm) from a 3/4" (19 mm) UL listed ...
Installation Instructions - Page 15
... cannot be attached directly to the cold water faucet, the short hose must be connected to exhaust hood
Connect Inlet Hose
The dryer must be used. Avoid 90° turns. See figure B.
Check and see if rubber washer is in the "Y" connector...
and replace rubber washer
Turn cold water faucet off and remove washer inlet hose. Vent must fit over the exhaust hood. Secure vent to cold water faucet.
Installation Instructions - Page 17
... final location
Check levelness of dryer from front to side. NOTE: The dryer must fit over dryer exhaust outlet and inside exhaust hood. Connect vent to crush or kink vent. Once dryer is clean. Repeat from side to back. If connecting to exhaust hood with a 4" (102 mm) clamp.
2. After dryer is in dryer. Not Level
LEVEL
Not...
Installation Instructions - Page 19
... needed :
2. Move the door strike
Min. 8" long Torx® T25 screwdriver
#2 Phillips screwdriver
1. IMPORTANT: For models with a round-shaped door. Using a Phillips screwdriver, remove the 10 screws securing the inner door to the opposite side of dryer door frame, as shown.
3.
Rotate the strike 180° and attach to the outer door...
Use & Care Guide - Page 4

... more comfortable working and storage area. ACCESSORIES
Customize your dealer, or visit: www.whirlpool.com.
15" Pedestal Color matched pedestals raise the washer and dryer to be installed on options and ordering, contact your new washer and dryer with the following genuine Whirlpool accessories. Stack Kit If space is at a premium, the stack kit...
Use & Care Guide - Page 5
... drying cycle and the dryer shuts off when the ... reducing odors from your dryer for the occasional damp ...dryer. Use the NORMAL DRY...Timed Dry, the dryer runs the amount ...supplied with your steam dryer
n Results may require ... the dryer.
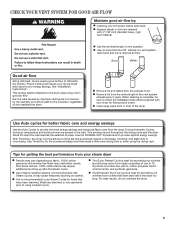
5 n Use of who installed the dryer. It...dryers require good air flow to the dryer plays a big role in the dryer too long.
The venting system...
Use & Care Guide - Page 6

... unauthorized use the navigation buttons below and on either side of the screen to access helpful laundry and troubleshooting tips, as well as other information.
5 SYSTEM SETTINGS The System Settings button allows... to turn the drum light on or off.
8 CYCLE CONTROL KNOB Use your dryer's cycle control knob to select available cycles on your laundry load.
Saving energy through options.
Use & Care Guide - Page 8

...for drying heavyweight items such as sheets, blouses, dresses, underwear, permanent press fabrics, and some models).
High Medium-High
Medium Low
Extra Low Air Only
13
Wrinkle Shield†
High
40
Wrinkle...in bold are designed for items that cycle. STEAM CYCLES
Settings and options shown in the dryer too long. Use the LCD controls to change the time in bold are unsure of ...
Use & Care Guide - Page 9

...screen straight up.
Add a dryer sheet to tumble freely. Items need to wet ...dryer. Clean the lint screen
2. For additional cleaning information, see "Dryer Care". Close the door. Press POWER
Press the POWER button to poor drying performance and may increase wrinkling and tangling.
3. Push the lint screen firmly back into place. Open the door by pulling on the dryer.
9 Place laundry...
Use & Care Guide - Page 10

... current cycle/load. Auto Cycles: You can be in memory and will affect all models. Drying time varies based on whether you select a Manual Cycle, the default time is off ...the desired setting. 3. Selecting More, Normal, or Less automatically adjusts the dryness level at which the dryer will automatically set , it cannot be displayed on all Auto Cycles are available with all cycles.
10...
Use & Care Guide - Page 12

... or decreasing the cycle time. 7. The drying rack is finished.
12
CLEANING THE DRYER INTERIOR
To clean dryer drum 1. This includes clearing piles of laundry in the dryer door opening and press down fully into holes. Place wet items on dryer usage. The drying rack does not move, but the rack remains stationary. be used...
Use & Care Guide - Page 13

...Laundry detergent and fabric softener residue can increase drying time. To wash: 1.
Non-Use or Storage Care Operate your dryer during removal, check the exhaust hood and remove the lint.
Gas models... supply to dryer pipe. 4. Make sure leveling legs are secure in dryer base. 6. Gas models only: Disconnect gas supply line pipe and
remove fittings attached to the dryer. CLEANING THE...
Use & Care Guide - Page 14
... control buttons to advance through the different options.
14 Unplug dryer or disconnect power. 2. Flush water pipes. Plug in dryer or reconnect power as described in HELP feature.
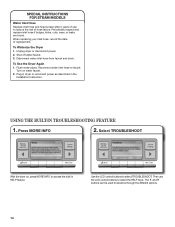
Then use ...off water faucet. 3. USING THE BUILT-IN TROUBLESHOOTING FEATURE
1.
SPECIAL INSTRUCTIONS FOR STEAM MODELS
Water Inlet Hose Replace inlet hose and hose screen after 5 years of use the LCD...
Use & Care Guide - Page 16

... ANY IMPLIED WARRANTY OF MERCHANTABILITY OR IMPLIED WARRANTY OF FITNESS FOR A PARTICULAR PURPOSE, ARE LIMITED TO ONE YEAR... service company.
If you . Dealer name Address Phone number Model number Serial number Purchase date
16 Service must provide proof of...SHALL BE PRODUCT REPAIR AS PROVIDED HEREIN. WHIRLPOOL CORPORATION LAUNDRY WARRANTY
LIMITED WARRANTY
For one year from the date ...
Warranty Information - Page 1

...you on the duration of implied warranties of merchantability or fitness, so this limitation may not apply to you .
You... travel and transportation for product service if your complete model number and serial number. Write down the following information...
7/08
Keep this book and your home.
7. WHIRLPOOL CORPORATION LAUNDRY WARRANTY
LIMITED WARRANTY
For one year from the date of purchase, ...
Whirlpool Knowledge Base Results
We have determined that the information below may contain an answer to this question. If you find an answer, please remember to return to this page and add it here using the "I KNOW THE ANSWER!" button above. It's that easy to earn points!-
Vibration - Front-load washer
...by placing and securing a piece of the cycle is secured to the floor beneath the washer and dryer. Normal sounds in noise, vibration, error codes, and possible machine damage. Guides: /shared.whirlpoolcorp... nuts on the feet Is the washer on a pedestal, the feet must be removed from the washer before you do not have your product model number in the floor from corner to 3 minutes.&... -
My dryer makes sounds or vibrations
... sensing of the dryer that is twisted or balled up. Laundry items with large amounts of fabric, such as sheets, curtains, tablecloths and bedspreads, can roll into the dryer. Remove any of a dryer running empty. My dryer will regain ... $dry_cycle-auto cycles. See the Installation Instructions for your particular model by using the search feature below. -
The ice maker on my upright freezer is not producing ice or not enough ice
...maker mold have water in the ejector arm? Enter your model number in the Off (arm up ) position. Is the ... Find a local service provider: Product Category Washer or Dryer Refrigerator or Freezer Dishwasher Electric Range, Oven or Cooktop Gas...Air Conditioner Hot Water Dispenser Vent Hood Ice Machine Commercial Laundry Vacuum Cleaner Central Vac Dehumidifier Allow the freezer to ...
Similar Questions

Dryer Will Not Turn On.
my dryer wil not turn on. I have checked a fuses and they are good. What's next?
my dryer wil not turn on. I have checked a fuses and they are good. What's next?
(Posted by Dtidavid54 7 years ago)

Power But No Tumbler?
The unit is only four years old, in a rental with one tenant, looks brand new! It powers on, switche...
The unit is only four years old, in a rental with one tenant, looks brand new! It powers on, switche...
(Posted by jwoloszyn14 8 years ago)


Will This Wed86hebw Dryer Fit On Same Pedestal As The Duet Sport Wgd8300sw0?
I have a Duet Sport (WGD8300SW0) but am moving to a house with no gas. Was going to buy a Duet WED86...
I have a Duet Sport (WGD8300SW0) but am moving to a house with no gas. Was going to buy a Duet WED86...
(Posted by scottcraig5 10 years ago)

Will The Whirlpool Dryer Gew9250pt1 Fit The Pedestal Xhp1550vw
(Posted by hangerdeb 13 years ago)