Installation Instructions
Page 1
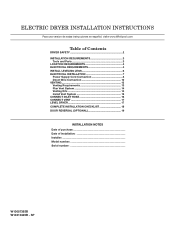
ELECTRIC DRYER INSTALLATION INSTRUCTIONS Para una version de estas instrucciones en español, visite www.Whirlpool.com Table of Contents DRYER SAFETY 2 Installation Requirements 3 Tools and Parts 3 Location Requirements 4 Electrical Requirements 4 INSTALL LEVELING LEGS 6 ...Connection 10 VENTING 13 Venting Requirements 13 Plan Vent System 14 Venting Kits 14 Install Vent System 15 Connect Inlet Hose 16 Connect Vent 17 Level Dryer 17 Complete Installation Checklist 18 Door reversal (OPTIONAL 19 INSTALLATION NOTES Date of purchase Date of installation Installer Model...
ELECTRIC DRYER INSTALLATION INSTRUCTIONS Para una version de estas instrucciones en español, visite www.Whirlpool.com Table of Contents DRYER SAFETY 2 Installation Requirements 3 Tools and Parts 3 Location Requirements 4 Electrical Requirements 4 INSTALL LEVELING LEGS 6 ...Connection 10 VENTING 13 Venting Requirements 13 Plan Vent System 14 Venting Kits 14 Install Vent System 15 Connect Inlet Hose 16 Connect Vent 17 Level Dryer 17 Complete Installation Checklist 18 Door reversal (OPTIONAL 19 INSTALLATION NOTES Date of purchase Date of installation Installer Model...
Installation Instructions
Page 3
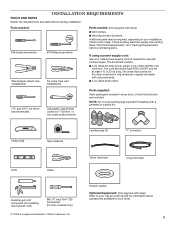
... your Use and Care Guide for information about accessories available for door reversal only) ® TORX is located in your dryer. 3 Read "Electrical Requirements" and "Venting Requirements" before starting installation. If using a power supply cord: Use a UL listed power supply cord kit marked for use leveling legs supplied if installing with clothes dryers...
... your Use and Care Guide for information about accessories available for door reversal only) ® TORX is located in your dryer. 3 Read "Electrical Requirements" and "Venting Requirements" before starting installation. If using a power supply cord: Use a UL listed power supply cord kit marked for use leveling legs supplied if installing with clothes dryers...
Installation Instructions
Page 19
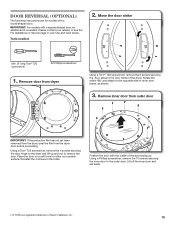
...: For models with a square shaped door, an additional kit is a registered trademark of the door facing up and out to the outer door. Please contact your Use and Care Guide. Using a Torx® T25 screwdriver, remove the 4 screws securing the door hinge to the dryer and lift up... . Using a Phillips screwdriver, remove the 10 screws securing the inner door to remove the door. Place the door on a soft towel or other non-scratch surface. Door Reversal (optional) The following instructions are for models...
...: For models with a square shaped door, an additional kit is a registered trademark of the door facing up and out to the outer door. Please contact your Use and Care Guide. Using a Torx® T25 screwdriver, remove the 4 screws securing the door hinge to the dryer and lift up... . Using a Phillips screwdriver, remove the 10 screws securing the inner door to remove the door. Place the door on a soft towel or other non-scratch surface. Door Reversal (optional) The following instructions are for models...


