Dimension Guide
Page 1
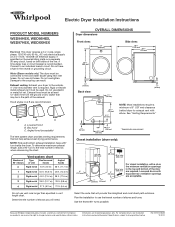
... 90° turns possible. Electric Dryer Installation Instructions PRODUCT MODEL NUMBERS WED94HEX, WED95HEX, WED97HEX, WEDXXHEX Electrical: This dryer requires a 3 or 4 wire, single phase, 120/240 volt, 60 Hz., AC only electrical supply (or 3 or 4 wire, 120/208 volt electrical supply, if specified on the...mm) clearance behind dryer for planning purposes only. Determine the number of the line. Louvered doors with equivalent air ventilation openings are for exhaust vent with product. A time-delay fuse or circuit breaker is required. Because Whirlpool Corporation policy includes ...
... 90° turns possible. Electric Dryer Installation Instructions PRODUCT MODEL NUMBERS WED94HEX, WED95HEX, WED97HEX, WEDXXHEX Electrical: This dryer requires a 3 or 4 wire, single phase, 120/240 volt, 60 Hz., AC only electrical supply (or 3 or 4 wire, 120/208 volt electrical supply, if specified on the...mm) clearance behind dryer for planning purposes only. Determine the number of the line. Louvered doors with equivalent air ventilation openings are for exhaust vent with product. A time-delay fuse or circuit breaker is required. Because Whirlpool Corporation policy includes ...
Installation Instructions
Page 1
... INSTRUCTIONS Para una version de estas instrucciones en español, visite www.Whirlpool.com Table of Contents DRYER SAFETY 2 Installation Requirements 3 Tools and Parts 3 Location Requirements 4 Electrical Requirements 4 INSTALL LEVELING LEGS 6 ELECTRICAL INSTALLATION 7 Power Supply Cord Connection 8 Direct Wire Connection 10 VENTING 13 Venting Requirements 13 Plan Vent System 14 Venting Kits 14...
... INSTRUCTIONS Para una version de estas instrucciones en español, visite www.Whirlpool.com Table of Contents DRYER SAFETY 2 Installation Requirements 3 Tools and Parts 3 Location Requirements 4 Electrical Requirements 4 INSTALL LEVELING LEGS 6 ELECTRICAL INSTALLATION 7 Power Supply Cord Connection 8 Direct Wire Connection 10 VENTING 13 Venting Requirements 13 Plan Vent System 14 Venting Kits 14...
Installation Instructions
Page 3
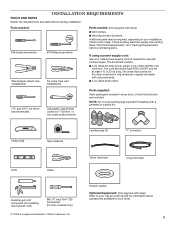
... screwdriver #2 Phillips screwdriver Wire stripper (direct wire installations) Tin snips (new vent installations) Parts needed: (Not supplied with clothes dryers. Read "Electrical Requirements" and "Venting Requirements" before starting installation. If using a power supply cord: Use a UL listed power supply cord kit...only) ® TORX is located in dryer drum. NOTE: Do not use with dryer) ■■Vent clamps ■■Vent elbows and ductwork Additional parts may be at least 4 ft. (1.22 m) long. Check existing electrical supply and venting. Utility knife Tape ...
... screwdriver #2 Phillips screwdriver Wire stripper (direct wire installations) Tin snips (new vent installations) Parts needed: (Not supplied with clothes dryers. Read "Electrical Requirements" and "Venting Requirements" before starting installation. If using a power supply cord: Use a UL listed power supply cord kit...only) ® TORX is located in dryer drum. NOTE: Do not use with dryer) ■■Vent clamps ■■Vent elbows and ductwork Additional parts may be at least 4 ft. (1.22 m) long. Check existing electrical supply and venting. Utility knife Tape ...

Installation Instructions
Page 4
...a closet door or louvered door is greater than 1" (25 mm), install Extended Dryer Feet Kit, Part Number 279810. spacing for companion appliances and clearances for your washer using power supply cord, a grounded electrical outlet located within 4 ft. (1.2 m) of the water fill valves, and water ...Power supply cord/cable Vent Water inlet 297/8"* (759 mm) 31/2"* (89 mm) 3/4"* (18 mm) 61/8"* (156 mm) 4 * Approx. See "Electrical Requirements." ■■Floor must not be large enough to allow door to water, weather, or at temperatures below 40° F (4° C). See "Venting...
...a closet door or louvered door is greater than 1" (25 mm), install Extended Dryer Feet Kit, Part Number 279810. spacing for companion appliances and clearances for your washer using power supply cord, a grounded electrical outlet located within 4 ft. (1.2 m) of the water fill valves, and water ...Power supply cord/cable Vent Water inlet 297/8"* (759 mm) 31/2"* (89 mm) 3/4"* (18 mm) 61/8"* (156 mm) 4 * Approx. See "Electrical Requirements." ■■Floor must not be large enough to allow door to water, weather, or at temperatures below 40° F (4° C). See "Venting...
Installation Instructions
Page 5
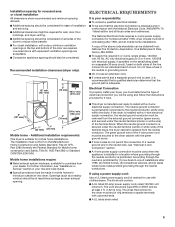
... in a location where grounding through the neutral conductor is prohibited. Recommended installation clearances (dryer only): 18" min. (457 mm) 3" (76 mm) 48 in.2 min. (310 cm2) ELECTRICAL REQUIREMENTS It is your dryer, you will be using a power supply cord: Use a UL listed power supply ...neutral or grounding circuit. ■■Do not use with a 4-wire electrical supply connection, the neutral ground conductor must be at least twice as large as dryer exhaust opening. ■■This dryer is prohibited for (1) new branch-circuit installations after 1996, and all local...
... in a location where grounding through the neutral conductor is prohibited. Recommended installation clearances (dryer only): 18" min. (457 mm) 3" (76 mm) 48 in.2 min. (310 cm2) ELECTRICAL REQUIREMENTS It is your dryer, you will be using a power supply cord: Use a UL listed power supply ...neutral or grounding circuit. ■■Do not use with a 4-wire electrical supply connection, the neutral ground conductor must be at least twice as large as dryer exhaust opening. ■■This dryer is prohibited for (1) new branch-circuit installations after 1996, and all local...
Installation Instructions
Page 12
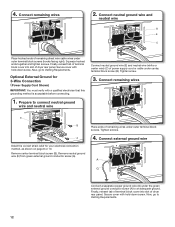
Optional External Ground for your electrical connection method, as shown on page 8 or 10. Tighten screws. Remove center terminal block screw (B). Remove neutral ground wire (E) from green external ground conductor screw (A). Finally, reinsert tab of terminal block cover into slot of dryer rear panel. Secure cover with a qualified electrician that this grounding method... (hooks facing right). Now, go to connect neutral ground wire and neutral wire Connect neutral ground wire (E) and neutral wire (white or center wire) (C) of dryer rear panel.
Optional External Ground for your electrical connection method, as shown on page 8 or 10. Tighten screws. Remove center terminal block screw (B). Remove neutral ground wire (E) from green external ground conductor screw (A). Finally, reinsert tab of terminal block cover into slot of dryer rear panel. Secure cover with a qualified electrician that this grounding method... (hooks facing right). Now, go to connect neutral ground wire and neutral wire Connect neutral ground wire (E) and neutral wire (white or center wire) (C) of dryer rear panel.
Installation Instructions
Page 18
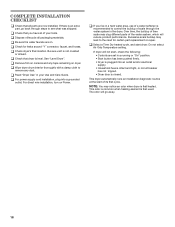
... an installation diagnostic routine at the start dryer. q Wipe dryer drum interior thoroughly with a damp cloth to the need for leaks around "Y" connector, faucet, and hoses. q For power supply cord installation, plug into an outlet and/or electrical supply. • Household fuse is intact... and tight, or circuit breaker has not tripped. • Dryer door is first used. Over time, the buildup of scale through the water system in ...
... an installation diagnostic routine at the start dryer. q Wipe dryer drum interior thoroughly with a damp cloth to the need for leaks around "Y" connector, faucet, and hoses. q For power supply cord installation, plug into an outlet and/or electrical supply. • Household fuse is intact... and tight, or circuit breaker has not tripped. • Dryer door is first used. Over time, the buildup of scale through the water system in ...
Owners Manual
Page 10
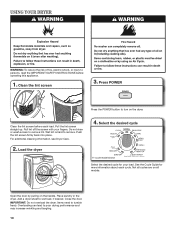
USING YOUR DRYER WARNING: To reduce the risk of fire, electric shock, or injury to remove lint. Roll lint off the screen with your load. Do not rinse or wash screen to persons, read the IMPORTANT ... shown Select the desired cycle for more information about each load. Open the door by pulling on all models. Place laundry in the dryer. IMPORTANT: Do not overload the dryer. Items need to wet load, if desired. Clean the lint screen 3. Clean the lint screen before operating this appliance. 1. Not all cycles...
USING YOUR DRYER WARNING: To reduce the risk of fire, electric shock, or injury to remove lint. Roll lint off the screen with your load. Do not rinse or wash screen to persons, read the IMPORTANT ... shown Select the desired cycle for more information about each load. Open the door by pulling on all models. Place laundry in the dryer. IMPORTANT: Do not overload the dryer. Items need to wet load, if desired. Clean the lint screen 3. Clean the lint screen before operating this appliance. 1. Not all cycles...
Owners Manual
Page 15
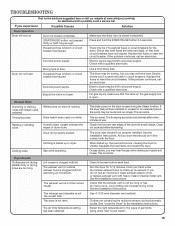
...Electric dryers require 240-volt power supply. Replace the fuses or reset the circuit breaker. The thumping sound should be in dryer. The dryer may vibrate if not properly installed. See "Level the Dryer" in a while. TROUBLESHOOTING First try the solutions suggested here or visit our website at www.whirlpool... Separate the load items and restart the dryer. Electric dryers use . Incorrect power supply. When balled up in firm contact with lint, restricting air movement. See the Installation Instructions. Dryer isn't properly leveled. See the Installation ...
...Electric dryers require 240-volt power supply. Replace the fuses or reset the circuit breaker. The thumping sound should be in dryer. The dryer may vibrate if not properly installed. See "Level the Dryer" in a while. TROUBLESHOOTING First try the solutions suggested here or visit our website at www.whirlpool... Separate the load items and restart the dryer. Electric dryers use . Incorrect power supply. When balled up in firm contact with lint, restricting air movement. See the Installation Instructions. Dryer isn't properly leveled. See the Installation ...
Owners Manual
Page 17
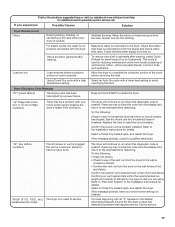
... here or visit our website at www.whirlpool.com/help for assistance and to avoid overdrying the load. Select an Auto Dry cycle with the dryer. "F# E#" (F1 E1, F3 E1, etc.) The dryer is turned on . Alternating between F# and E#, the dryer control has detected a problem that water ..." in need of cycle complete. Electric dryers use two household fuses or breakers. Select a Timed Dry heated cycle, and restart the dryer. The dryer will continue to run from turning on . Confirm your home power supply keeping the dryer's heater from the dryer to the wall is free of lint...
... here or visit our website at www.whirlpool.com/help for assistance and to avoid overdrying the load. Select an Auto Dry cycle with the dryer. "F# E#" (F1 E1, F3 E1, etc.) The dryer is turned on . Alternating between F# and E#, the dryer control has detected a problem that water ..." in need of cycle complete. Electric dryers use two household fuses or breakers. Select a Timed Dry heated cycle, and restart the dryer. The dryer will continue to run from turning on . Confirm your home power supply keeping the dryer's heater from the dryer to the wall is free of lint...


