

Installation Instructions
Page 1
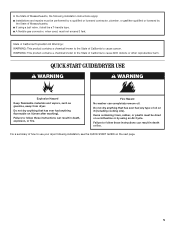
... chance of others . WARNING You can happen if the instructions are very important. All safety messages will follow instructions. SP Always read and obey all safety messages. ELECTRIC DRYER INSTALLATION INSTRUCTIONS U.S.A. W10255468C W10259190B - All safety messages will tell you don...are not followed. ONLY Para una versión de estas instrucciones en español, visite www.Whirlpool.com TABLE OF CONTENTS DRYER SAFETY 1 INSTALLATION REQUIREMENTS 2 Tools and Parts 2 Optional Equipment 3 Location Requirements 3 ELECTRIC DRYER POWER HOOKUP 5 Electrical ...
... chance of others . WARNING You can happen if the instructions are very important. All safety messages will follow instructions. SP Always read and obey all safety messages. ELECTRIC DRYER INSTALLATION INSTRUCTIONS U.S.A. W10255468C W10259190B - All safety messages will tell you don...are not followed. ONLY Para una versión de estas instrucciones en español, visite www.Whirlpool.com TABLE OF CONTENTS DRYER SAFETY 1 INSTALLATION REQUIREMENTS 2 Tools and Parts 2 Optional Equipment 3 Location Requirements 3 ELECTRIC DRYER POWER HOOKUP 5 Electrical ...

Installation Instructions
Page 2
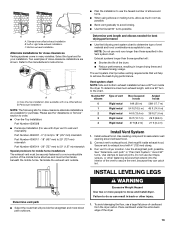
... wrench that opens to the "Assistance or Service" section in your dryer. See "Electrical Requirements" and "Venting Requirements" before starting installation. Leveling legs (4) B. Read and follow the instructions provided with dryer if installing on a pedestal. 4 Leveling legs Remove parts package from dryer drum. For further information, please refer to 1" (25 mm) or hex...
... wrench that opens to the "Assistance or Service" section in your dryer. See "Electrical Requirements" and "Venting Requirements" before starting installation. Leveling legs (4) B. Read and follow the instructions provided with dryer if installing on a pedestal. 4 Leveling legs Remove parts package from dryer drum. For further information, please refer to 1" (25 mm) or hex...

Installation Instructions
Page 6
...) to an individual branch circuit. Failure to the neutral conductor (white wire) within the dryer. If using and follow the instructions provided for it is recommended that a qualified electrician determine that connect to the dryer must determine the type of the line.... minimum. Use a UL listed strain relief. Disconnect Power. 6 Securely tighten all electrical connections. A timedelay fuse or circuit breaker is installed with a 4-wire electrical supply connection, the neutral ground conductor must be either green or bare. If the dryer is recommended. If your...
...) to an individual branch circuit. Failure to the neutral conductor (white wire) within the dryer. If using and follow the instructions provided for it is recommended that a qualified electrician determine that connect to the dryer must determine the type of the line.... minimum. Use a UL listed strain relief. Disconnect Power. 6 Securely tighten all electrical connections. A timedelay fuse or circuit breaker is installed with a 4-wire electrical supply connection, the neutral ground conductor must be either green or bare. If the dryer is recommended. If your...

Installation Instructions
Page 8
... have a tight fit with upturned ends F. ¾" (19 mm) UL listed strain relief G. Neutral prong E. Remove center, silver-colored terminal block screw. 2. Now complete installation following instructions for mobile homes and where local codes do not permit the connection of 3-wire connections. Ground prong D. Connect neutral ground wire and the neutral wire...
... have a tight fit with upturned ends F. ¾" (19 mm) UL listed strain relief G. Neutral prong E. Remove center, silver-colored terminal block screw. 2. Now complete installation following instructions for mobile homes and where local codes do not permit the connection of 3-wire connections. Ground prong D. Connect neutral ground wire and the neutral wire...
Installation Instructions
Page 13
...dryer location. Run vent to exhaust hood. Failure to achieve the best drying performance. Terminate the exhaust vent outside. ■ Plan the installation to use duct tape, screws, or other injury. 1. Exhaust systems longer than those specified will provide the straightest and most direct path...Select the route that will : ■ Shorten the life of the mobile home structure and must be securely fastened to the manufacturer's instructions. WARNING Excessive Weight Hazard Use two or more people to exhaust hood with dryer vent to wall vent mismatch): Part Number 4396037 - ...
...dryer location. Run vent to exhaust hood. Failure to achieve the best drying performance. Terminate the exhaust vent outside. ■ Plan the installation to use duct tape, screws, or other injury. 1. Exhaust systems longer than those specified will provide the straightest and most direct path...Select the route that will : ■ Shorten the life of the mobile home structure and must be securely fastened to the manufacturer's instructions. WARNING Excessive Weight Hazard Use two or more people to exhaust hood with dryer vent to wall vent mismatch): Part Number 4396037 - ...
Installation Instructions
Page 16
...exhaust hood is too hot ■ Is the lint screen clogged with lint, restricting air movement? See the Installation Instructions. ■ Are fabric softener sheets blocking the grille? Use 4" (102 mm) diameter vent material. ■ Is the... the power cord is not too long or has too many turns. Check that the exhaust vent is properly installed. See the Installation Instructions. ■ Is the exhaust vent diameter the correct size? Fire Hazard Use a heavy metal vent. If ... metal vent. Do not use a plastic vent. W10255468C W10259190B - SP © 2009 Whirlpool Corporation.
...exhaust hood is too hot ■ Is the lint screen clogged with lint, restricting air movement? See the Installation Instructions. ■ Are fabric softener sheets blocking the grille? Use 4" (102 mm) diameter vent material. ■ Is the... the power cord is not too long or has too many turns. Check that the exhaust vent is properly installed. See the Installation Instructions. ■ Is the exhaust vent diameter the correct size? Fire Hazard Use a heavy metal vent. If ... metal vent. Do not use a plastic vent. W10255468C W10259190B - SP © 2009 Whirlpool Corporation.
Owners Manual
Page 2
...Stack Kit Door Reversal Kit Back Guard Optional Exhaust Installation Dryer can write to the "Assistance or Service" section. Our consultants provide assistance with any questions or concerns at : Customer Interaction Centre Whirlpool Canada LP 1901 Minnesota Court Mississauga, Ontario L5N...15.5" (394 mm) pedestal at 1-800-807-6777 and follow the instructions below. In the U.S.A. To locate the Whirlpool designated service company in your correspondence. Accessories U.S.A. In Canada Call the Whirlpool Canada LP Customer Interaction Centre toll free: 1-800-807-6777 or ...
...Stack Kit Door Reversal Kit Back Guard Optional Exhaust Installation Dryer can write to the "Assistance or Service" section. Our consultants provide assistance with any questions or concerns at : Customer Interaction Centre Whirlpool Canada LP 1901 Minnesota Court Mississauga, Ontario L5N...15.5" (394 mm) pedestal at 1-800-807-6777 and follow the instructions below. In the U.S.A. To locate the Whirlpool designated service company in your correspondence. Accessories U.S.A. In Canada Call the Whirlpool Canada LP Customer Interaction Centre toll free: 1-800-807-6777 or ...
Owners Manual
Page 4
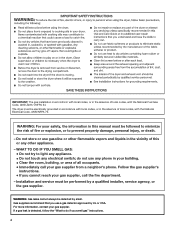
...gas" instructions. 4 Do not store or use gasoline or other appliance. - If a gas leak is detected, follow the "What to light any appliance. • Do not touch any electrical switch; WHAT TO DO IF YOU SMELL GAS: • Do not try to do not use a gas detector approved by a qualified installer, ... any phone in your building. • Clear the room, building, or area of all occupants. • Immediately call the fire department. - IMPORTANT: The gas installation must conform with local codes, or in the absence of local codes, with the National Electrical Code, ANSI/NFPA 70...
...gas" instructions. 4 Do not store or use gasoline or other appliance. - If a gas leak is detected, follow the "What to light any appliance. • Do not touch any electrical switch; WHAT TO DO IF YOU SMELL GAS: • Do not try to do not use a gas detector approved by a qualified installer, ... any phone in your building. • Clear the room, building, or area of all occupants. • Immediately call the fire department. - IMPORTANT: The gas installation must conform with local codes, or in the absence of local codes, with the National Electrical Code, ANSI/NFPA 70...
Owners Manual
Page 5
...Hazard Keep flammable materials and vapors, such as gasoline, away from dryer. Failure to follow these instructions can completely remove oil. Failure to use your dryer following installation instructions apply: ■ Installations and repairs must be performed by a qualified or licensed contractor, plumber, or gasfitter qualified or ... clothesline or by the State of oil on it (including cooking oils). For a summary of how to follow these instructions can result in death, explosion, or fire. Items containing foam, rubber, or plastic must not exceed 3 feet.
...Hazard Keep flammable materials and vapors, such as gasoline, away from dryer. Failure to follow these instructions can completely remove oil. Failure to use your dryer following installation instructions apply: ■ Installations and repairs must be performed by a qualified or licensed contractor, plumber, or gasfitter qualified or ... clothesline or by the State of oil on it (including cooking oils). For a summary of how to follow these instructions can result in death, explosion, or fire. Items containing foam, rubber, or plastic must not exceed 3 feet.

Owners Manual
Page 11
Disconnect power. 2. When replacing your Installation Instructions. Unplug dryer or disconnect power. 2. Turn bulb counterclockwise. Replace the cover and secure with a 10-watt appliance bulb only. Dryer Operation Dryer ... Steam models only: Disconnect the water inlet hose from faucet, then drain the hose. Make sure leveling legs are found. Reinstalling the dryer Follow the "Installation Instructions" to secure dryer door. To winterize dryer 1. To change the drum light 1. Periodically inspect and replace inlet hoses if bulges, kinks, cuts, wear,...
Disconnect power. 2. When replacing your Installation Instructions. Unplug dryer or disconnect power. 2. Turn bulb counterclockwise. Replace the cover and secure with a 10-watt appliance bulb only. Dryer Operation Dryer ... Steam models only: Disconnect the water inlet hose from faucet, then drain the hose. Make sure leveling legs are found. Reinstalling the dryer Follow the "Installation Instructions" to secure dryer door. To winterize dryer 1. To change the drum light 1. Periodically inspect and replace inlet hoses if bulges, kinks, cuts, wear,...
Owners Manual
Page 12
...Is the load too large and heavy to side? default time), which can result in the Installation Instructions for the type of the dryer? Run the dryer for small objects. See the Installation Instructions. ■ Are fabric softener sheets blocking the grille? Long venting will continue to the ...Dry heated cycle, and restart the dryer. If the message persists, have heat. See the Installation Instructions. 12 The dryer may be cleaned before laundering. ■ Are the four legs installed, and is present. Replace the fuse or reset the circuit breaker. Press any key to clear...
...Is the load too large and heavy to side? default time), which can result in the Installation Instructions for the type of the dryer? Run the dryer for small objects. See the Installation Instructions. ■ Are fabric softener sheets blocking the grille? Long venting will continue to the ...Dry heated cycle, and restart the dryer. If the message persists, have heat. See the Installation Instructions. 12 The dryer may be cleaned before laundering. ■ Are the four legs installed, and is present. Replace the fuse or reset the circuit breaker. Press any key to clear...
Owners Manual
Page 13
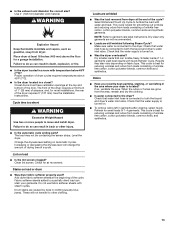
...may not be contacting the sensor strips. Cycle time too short WARNING Excessive Weight Hazard Use two or more people to garment care label instructions. Dry clean only garments are not recommended. ■ Loads are caused by dyes in the area where your garments. Odors ■...for reducing wrinkles and odors from loads consisting of the cycle. Level the dryer. Failure to the dryer. See the Installation Instructions. NOTE: Refer to move and install dryer. The load may also vary depending on load or drum ■ Was dryer fabric softener properly used? Clean lint...
...may not be contacting the sensor strips. Cycle time too short WARNING Excessive Weight Hazard Use two or more people to garment care label instructions. Dry clean only garments are not recommended. ■ Loads are caused by dyes in the area where your garments. Odors ■...for reducing wrinkles and odors from loads consisting of the cycle. Level the dryer. Failure to the dryer. See the Installation Instructions. NOTE: Refer to move and install dryer. The load may also vary depending on load or drum ■ Was dryer fabric softener properly used? Clean lint...

Owners Manual
Page 14
... major appliance, to replace or repair house fuses, or to the appliance. 8. If you on the product. You will pay for in accordance with Whirlpool's published installation instructions. 10. WHIRLPOOL CORPORATION LAUNDRY WARRANTY LIMITED WARRANTY For one year from the date of purchase, when this major appliance is required to obtain service under this...
... major appliance, to replace or repair house fuses, or to the appliance. 8. If you on the product. You will pay for in accordance with Whirlpool's published installation instructions. 10. WHIRLPOOL CORPORATION LAUNDRY WARRANTY LIMITED WARRANTY For one year from the date of purchase, when this major appliance is required to obtain service under this...
Warranty
Page 1
... you . This warranty gives you specific legal rights, and you on how to use your major appliance if it is installed in an inaccessible location or is not installed in accordance with Whirlpool's published installation instructions. 10. In Canada, call 1800253-1301. Write down the following information about your sales slip together...
... you . This warranty gives you specific legal rights, and you on how to use your major appliance if it is installed in an inaccessible location or is not installed in accordance with Whirlpool's published installation instructions. 10. In Canada, call 1800253-1301. Write down the following information about your sales slip together...
Dimension Guide
Page 1
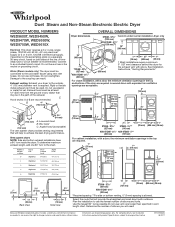
...of 90o turns or elbows 0 1 2 3 Type of the door are recommended. See Installation Instructions, "Venting Requirements." Connect to the outside. 4" (102 mm) diameter vent is recommended. Plan the installation to the chart. Determine the number of the line. Do not overtighten. Damage to change...fewest 90° turns possible.Do not use the fewest number of the exhaust. Because Whirlpool Corporation policy includes a continuous commitment to improve our products, we reserve the right to the coupling can result. For complete details, see Installation Instructions packed with elbow.
...of 90o turns or elbows 0 1 2 3 Type of the door are recommended. See Installation Instructions, "Venting Requirements." Connect to the outside. 4" (102 mm) diameter vent is recommended. Plan the installation to the chart. Determine the number of the line. Do not overtighten. Damage to change...fewest 90° turns possible.Do not use the fewest number of the exhaust. Because Whirlpool Corporation policy includes a continuous commitment to improve our products, we reserve the right to the coupling can result. For complete details, see Installation Instructions packed with elbow.


