

Use & Care Guide
Page 10
...a clothesline or by increasing or decreasing the cycle time. 7. Rest the rear support on top of the drying rack with the holes in your dryer drum. Open the dryer door. Select Timed Dry. Select the Air Only, Low or Extra Low Temp setting. When the cycle is finished. 10 3. Replace the cover... DRYING RACK To obtain a drying rack for items that you do not want to tumble dry, such as sweaters and tennis shoes. Replace all parts and panels before operating. be used with the Timed Dry Cycles only. Make sure items do not hang over the edges or between items and...
...a clothesline or by increasing or decreasing the cycle time. 7. Rest the rear support on top of the drying rack with the holes in your dryer drum. Open the dryer door. Select Timed Dry. Select the Air Only, Low or Extra Low Temp setting. When the cycle is finished. 10 3. Replace the cover... DRYING RACK To obtain a drying rack for items that you do not want to tumble dry, such as sweaters and tennis shoes. Replace all parts and panels before operating. be used with the Timed Dry Cycles only. Make sure items do not hang over the edges or between items and...

Use & Care Guide
Page 12
.... Failure to secure dryer door. Unplug dryer or disconnect power. 2. This helps to avoid unintended flooding (due to locate, level, and connect the dryer. 12 Replace all parts and panels before servicing. For direct-wired dryers: 1. Non-Use or Storage Care Operate your dryer only when you are... secure in the hose, freezing can result in dryer base. 6. Gas models only: Cap the open...
.... Failure to secure dryer door. Unplug dryer or disconnect power. 2. This helps to avoid unintended flooding (due to locate, level, and connect the dryer. 12 Replace all parts and panels before servicing. For direct-wired dryers: 1. Non-Use or Storage Care Operate your dryer only when you are... secure in the hose, freezing can result in dryer base. 6. Gas models only: Cap the open...

Installation Guide
Page 3
...supplied with any tools listed here. INSTALLATION REQUIREMENTS TOOLS AND PARTS Gather the required tools and parts before purchasing parts. For further information, please refer to the "Assistance or Service" section in dryer drum. Check that opens to your "Use and Care ... nut driver (recommended) Tape measure 5' (1.52 m) inlet hose Rubber washer Parts package is located in your dryer. Tools needed : (Not supplied with riser Leveling legs (4) for models without riser Parts supplied (steam models): Adjustable wrench that all models): Flat-blade screwdriver #2 Phillips...
...supplied with any tools listed here. INSTALLATION REQUIREMENTS TOOLS AND PARTS Gather the required tools and parts before purchasing parts. For further information, please refer to the "Assistance or Service" section in dryer drum. Check that opens to your "Use and Care ... nut driver (recommended) Tape measure 5' (1.52 m) inlet hose Rubber washer Parts package is located in your dryer. Tools needed : (Not supplied with riser Leveling legs (4) for models without riser Parts supplied (steam models): Adjustable wrench that all models): Flat-blade screwdriver #2 Phillips...

Installation Guide
Page 5
.../NFPA 70 - The wires that the electrical connection is manufactured ready to the neutral conductor (white wire) within the dryer. Mobile home - If the dryer is suitable for (1) new branch-circuit installations, (2) mobile homes, (3) recreational vehicles, and (4) areas where local codes...Part 280) or Standard CAN/CSAZ240 MH. Electrical Connection To properly install your dealer. The kit should be using a power supply cord: Use a UL listed power supply cord kit marked for homes built after 1996, and all local codes and ordinances. Additional installation requirements: This dryer...
.../NFPA 70 - The wires that the electrical connection is manufactured ready to the neutral conductor (white wire) within the dryer. Mobile home - If the dryer is suitable for (1) new branch-circuit installations, (2) mobile homes, (3) recreational vehicles, and (4) areas where local codes...Part 280) or Standard CAN/CSAZ240 MH. Electrical Connection To properly install your dealer. The kit should be using a power supply cord: Use a UL listed power supply cord kit marked for homes built after 1996, and all local codes and ordinances. Additional installation requirements: This dryer...
Installation Guide
Page 13
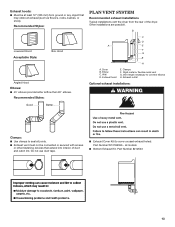
... W10186596 - Do not use duct tape. ■■ Exhaust Cover Kit (to connect elbows H. Part Number 8212503 13 Other installations are possible. Exhaust outlet Optional exhaust installations: Good Better Clamps: ■■ Use clamps to seal all models ■■ ...). Exhaust hood E. Recommended Styles: Louvered Hood Acceptable Style: Box Hood Angled Hood Elbows: ■■ 45° elbows provide better airflow than 90° elbows. Dryer B. all joints. ■■ Exhaust vent must not be at least 12" (305 mm) from the rear of duct and catch lint.
... W10186596 - Do not use duct tape. ■■ Exhaust Cover Kit (to connect elbows H. Part Number 8212503 13 Other installations are possible. Exhaust outlet Optional exhaust installations: Good Better Clamps: ■■ Use clamps to seal all models ■■ ...). Exhaust hood E. Recommended Styles: Louvered Hood Acceptable Style: Box Hood Angled Hood Elbows: ■■ 45° elbows provide better airflow than 90° elbows. Dryer B. all joints. ■■ Exhaust vent must not be at least 12" (305 mm) from the rear of duct and catch lint.

Installation Guide
Page 14
... installation NOTE: The following Vent System Chart to determine type of vent material and hood combinations acceptable to a noncombustible portion of dryer. ■■ Reduce performance, resulting in longer drying times and increased energy usage. Select the type best for purchase. NOTE...are available for your local dealer. ■■ Over-the-Top Installation: Part Number 4396028 ■■ Periscope Installation (For use vent runs longer than those specified in many varieties. Whirlpool Vent System Chart Number of 90° elbows Type of elbows and turns. ...
... installation NOTE: The following Vent System Chart to determine type of vent material and hood combinations acceptable to a noncombustible portion of dryer. ■■ Reduce performance, resulting in longer drying times and increased energy usage. Select the type best for purchase. NOTE...are available for your local dealer. ■■ Over-the-Top Installation: Part Number 4396028 ■■ Periscope Installation (For use vent runs longer than those specified in many varieties. Whirlpool Vent System Chart Number of 90° elbows Type of elbows and turns. ...

Installation Guide
Page 18
... of scale through steps to remove any tape remaining on console and any dust. Excessive scale buildup may notice an odor when dryer is an extra part, go away. If dryer will not start, check the following: • Controls are on a flat, covered surface, with you have all packaging materials. If you live...
... of scale through steps to remove any tape remaining on console and any dust. Excessive scale buildup may notice an odor when dryer is an extra part, go away. If dryer will not start, check the following: • Controls are on a flat, covered surface, with you have all packaging materials. If you live...


