
Owners Manual
Page 11
.... 5. Moving care For power supply cord-connected dryers: 1. Use masking tape to locate, level, and connect the dryer. 3. Unplug dryer or disconnect power. 2. Replace all parts and panels before servicing. however, if replacement is used. Clean lint screen. Use masking tape to faucet. Vacation or Storage Care Operate your dryer only...
.... 5. Moving care For power supply cord-connected dryers: 1. Use masking tape to locate, level, and connect the dryer. 3. Unplug dryer or disconnect power. 2. Replace all parts and panels before servicing. however, if replacement is used. Clean lint screen. Use masking tape to faucet. Vacation or Storage Care Operate your dryer only...
Owners Manual
Page 15
... installed in an inaccessible location or is operated and maintained according to instructions attached to or furnished with the product, Whirlpool Corporation or Whirlpool Canada LP (hereafter "Whirlpool") will need repair service, first see the "Troubleshooting" section of the Use & Care Guide. Write down the... your major appliance is located in a remote area where service by Whirlpool. 5. You will pay for in-warranty service. Service must provide proof of purchase or installation date for Factory Specified Parts and repair labor to better help can find this limitation may not ...
... installed in an inaccessible location or is operated and maintained according to instructions attached to or furnished with the product, Whirlpool Corporation or Whirlpool Canada LP (hereafter "Whirlpool") will need repair service, first see the "Troubleshooting" section of the Use & Care Guide. Write down the... your major appliance is located in a remote area where service by Whirlpool. 5. You will pay for in-warranty service. Service must provide proof of purchase or installation date for Factory Specified Parts and repair labor to better help can find this limitation may not ...

Warranty
Page 1
... God, improper installation, installation not in accordance with electrical or plumbing codes, or use of products not approved by calling Whirlpool. Repairs to parts or systems resulting from warranty coverage. 4. Replacement parts or repair labor on how to use or when it is installed in materials or workmanship that vary from state to...
... God, improper installation, installation not in accordance with electrical or plumbing codes, or use of products not approved by calling Whirlpool. Repairs to parts or systems resulting from warranty coverage. 4. Replacement parts or repair labor on how to use or when it is installed in materials or workmanship that vary from state to...
Installation Guide
Page 3
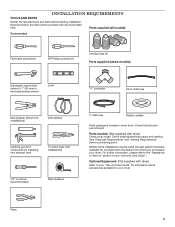
...". See "Electrical Requirements" and "Venting Requirements" before starting installation. Parts needed : Flat-blade screwdriver #2 Phillips screwdriver Leveling legs (4) Parts supplied (steam models): Adjustable wrench that all parts are included. Pliers 3 Mobile home installations require metal exhuast system hardware...) Refer to the "Assistance or Service" section in dryer drum. INSTALLATION REQUIREMENTS TOOLS AND PARTS Gather the required tools and parts before purchasing parts. For further information, please refer to your "Use and Care Guide" for information about ...
...". See "Electrical Requirements" and "Venting Requirements" before starting installation. Parts needed : Flat-blade screwdriver #2 Phillips screwdriver Leveling legs (4) Parts supplied (steam models): Adjustable wrench that all parts are included. Pliers 3 Mobile home installations require metal exhuast system hardware...) Refer to the "Assistance or Service" section in dryer drum. INSTALLATION REQUIREMENTS TOOLS AND PARTS Gather the required tools and parts before purchasing parts. For further information, please refer to your "Use and Care Guide" for information about ...
Installation Guide
Page 4
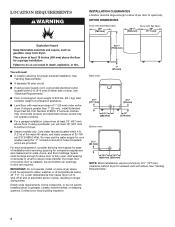
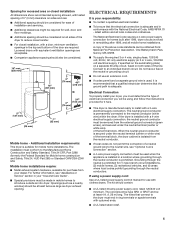
..., resulting in garages, closets, mobile homes, or sleeping quarters. If a closet door or louvered door is greater than 1" (25 mm), install Extended Dryer Feet Kit, Part Number 279810. See "Venting Requirements." ■■ A separate 30 amp circuit. ■■ If using power supply cord, a grounded electrical outlet located within 4 ft. (1.2 m) of...
..., resulting in garages, closets, mobile homes, or sleeping quarters. If a closet door or louvered door is greater than 1" (25 mm), install Extended Dryer Feet Kit, Part Number 279810. See "Venting Requirements." ■■ A separate 30 amp circuit. ■■ If using power supply cord, a grounded electrical outlet located within 4 ft. (1.2 m) of...
Installation Guide
Page 5
... ground conductor must be sure that connect to the Manufactured Home Construction and Safety Standard, Title 24 CFR, Part 3280 (formerly the Federal Standard for Mobile home construction and Safety, Title 24, HUD Part 280) or Standard CAN/CSA-Z240 MH. Mobile home installations require: ■■ Metal exhaust system hardware, available...
... ground conductor must be sure that connect to the Manufactured Home Construction and Safety Standard, Title 24 CFR, Part 3280 (formerly the Federal Standard for Mobile home construction and Safety, Title 24, HUD Part 280) or Standard CAN/CSA-Z240 MH. Mobile home installations require: ■■ Metal exhaust system hardware, available...
Installation Guide
Page 13
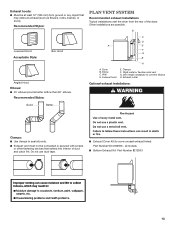
...outlet Optional exhaust installations: Good Better Clamps: ■■ Use clamps to connect elbows H. Exhaust hood E. Part Number 8212503 13 Recommended Styles: Plan Vent System Recommended exhaust installations Typical installations vent the dryer from ground or ... to seal all models ■■ Bottom Exhaust Kit- Dryer B. Do not use duct tape. ■■ Exhaust Cover Kit (to cover unused exhaust holes): Part Number W10186596 - B C D A E F G B H A. Rigid metal or flexible metal vent G. all joints. ■■ Exhaust vent must not be ...
...outlet Optional exhaust installations: Good Better Clamps: ■■ Use clamps to connect elbows H. Exhaust hood E. Part Number 8212503 13 Recommended Styles: Plan Vent System Recommended exhaust installations Typical installations vent the dryer from ground or ... to seal all models ■■ Bottom Exhaust Kit- Dryer B. Do not use duct tape. ■■ Exhaust Cover Kit (to cover unused exhaust holes): Part Number W10186596 - B C D A E F G B H A. Rigid metal or flexible metal vent G. all joints. ■■ Exhaust vent must not be ...

Installation Guide
Page 14
... Alternate installations for close clearance alternate installations are shown. Contact your local dealer. ■■ Over-the-Top Installation: Part Number 4396028 ■■ Periscope Installation (For use vent runs longer than those specified in Vent System Chart. The Vent... that will help achieve best drying performance. Two close-clearance installations are available for your local dealer to exhaust through the bottom. Whirlpool Vent System Chart Number of 90° elbows Type of dryer. ■■ Reduce performance, resulting in many varieties. Terminate ...
... Alternate installations for close clearance alternate installations are shown. Contact your local dealer. ■■ Over-the-Top Installation: Part Number 4396028 ■■ Periscope Installation (For use vent runs longer than those specified in Vent System Chart. The Vent... that will help achieve best drying performance. Two close-clearance installations are available for your local dealer to exhaust through the bottom. Whirlpool Vent System Chart Number of 90° elbows Type of dryer. ■■ Reduce performance, resulting in many varieties. Terminate ...
Installation Guide
Page 17
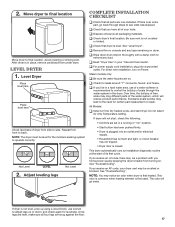
...now installed. q Check that dryer is first used. Be sure vent is closed. If dryer will not start dryer. NOTE: You may clog different parts of your "Use and Care Guide". Avoid crushing or kinking vent. All Models: q Select a Time Dry heated cycle, and start , check the ...circuit breaker has not tripped. • Dryer door is not crushed or kinked. Do not select Air Only Temperature setting. q Check for certain part replacement or repair. NOTE: The dryer must be crushed or blocked. See "Troubleshooting". See "Troubleshooting". Once legs are level, make sure all ...
...now installed. q Check that dryer is first used. Be sure vent is closed. If dryer will not start dryer. NOTE: You may clog different parts of your "Use and Care Guide". Avoid crushing or kinking vent. All Models: q Select a Time Dry heated cycle, and start , check the ...circuit breaker has not tripped. • Dryer door is not crushed or kinked. Do not select Air Only Temperature setting. q Check for certain part replacement or repair. NOTE: The dryer must be crushed or blocked. See "Troubleshooting". See "Troubleshooting". Once legs are level, make sure all ...


