
Owners Manual
Page 2
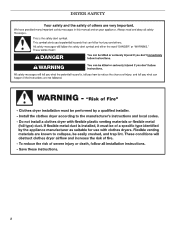
... will tell you what can be killed or seriously injured if you don't follow instructions. WARNING You can happen if the instructions are very important. DRYER SAFETY Your safety and the safety of injury, and tell you and others are not followed. 2 We have provided many important safety messages in this...
... will tell you what can be killed or seriously injured if you don't follow instructions. WARNING You can happen if the instructions are very important. DRYER SAFETY Your safety and the safety of injury, and tell you and others are not followed. 2 We have provided many important safety messages in this...
Owners Manual
Page 3
... liquids in the vicinity of this manual must be performed by UL or CSA. Gas suppliers recommend that you use gasoline or other appliance. - The dryer must be detected by smell. do if you cannot reach your gas supplier, call your gas supplier from a neighbor's phone. Do not store or use...
... liquids in the vicinity of this manual must be performed by UL or CSA. Gas suppliers recommend that you use gasoline or other appliance. - The dryer must be detected by smell. do if you cannot reach your gas supplier, call your gas supplier from a neighbor's phone. Do not store or use...
Owners Manual
Page 4
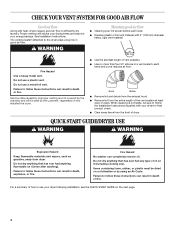
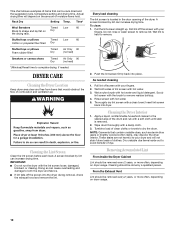
...to follow these instructions can completely remove oil. Do not dry anything flammable on a clothesline or by the customer, regardless of who installed the dryer. ■ Use the shortest length of the vent system at least every 2 years. Good Better ■ Remove lint and debris from ...the exhaust hood. ■ Remove lint from dryer. When cleaning is complete, be dried on it (including cooking oils). Failure to follow the Installation Instructions supplied with 4" (102 mm) diameter ...
...to follow these instructions can completely remove oil. Do not dry anything flammable on a clothesline or by the customer, regardless of who installed the dryer. ■ Use the shortest length of the vent system at least every 2 years. Good Better ■ Remove lint and debris from ...the exhaust hood. ■ Remove lint from dryer. When cleaning is complete, be dried on it (including cooking oils). Failure to follow the Installation Instructions supplied with 4" (102 mm) diameter ...
Owners Manual
Page 5
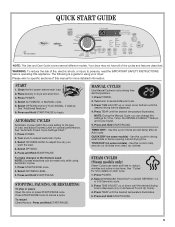
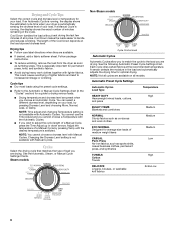
.... Press POWER. 4. See "Additional Features." 6. Turn knob to set a drying time and temperature. 1. To make changes to reduce wrinkles and odors in dryer and shut door. 3. Press POWER. 2. TIMED DRY - Press and Hold START/PAUSE. 5 Place laundry in dry items. See "Cycles" for drying small...ADJUST up or down arrow buttons until the desired drying time is a guide to adjust how dry you can be made only while using your dryer. Use this cycle to cancel a cycle. Press POWER. 2. Select DRYNESS LEVEL to using Automatic Cycles. 1. See "Automatic Preset Cycle Settings ...
.... Press POWER. 4. See "Additional Features." 6. Turn knob to set a drying time and temperature. 1. To make changes to reduce wrinkles and odors in dryer and shut door. 3. Press POWER. 2. TIMED DRY - Press and Hold START/PAUSE. 5 Place laundry in dry items. See "Cycles" for drying small...ADJUST up or down arrow buttons until the desired drying time is a guide to adjust how dry you can be made only while using your dryer. Use this cycle to cancel a cycle. Press POWER. 2. Select DRYNESS LEVEL to using Automatic Cycles. 1. See "Automatic Preset Cycle Settings ...
Owners Manual
Page 6
...Damp. Each cycle dries certain fabrics at the recommended temperature. Follow package instructions. ■ To reduce wrinkling, remove the load from the dryer as soon as sports shirts, casual business clothes, permanent press, and synthetics TOWELS Cotton Towels High DELICATE Lingerie, blouses, or washable knit...Time Adjust up or down arrows. Changing the Dryness Level setting is running , the display shows the estimated cycle time when your dryer is not available with Manual Cycles. If a Manual Cycle is not available with Manual Cycles. Drying tips ■ Follow care ...
...Damp. Each cycle dries certain fabrics at the recommended temperature. Follow package instructions. ■ To reduce wrinkling, remove the load from the dryer as soon as sports shirts, casual business clothes, permanent press, and synthetics TOWELS Cotton Towels High DELICATE Lingerie, blouses, or washable knit...Time Adjust up or down arrows. Changing the Dryness Level setting is running , the display shows the estimated cycle time when your dryer is not available with Manual Cycles. If a Manual Cycle is not available with Manual Cycles. Drying tips ■ Follow care ...
Owners Manual
Page 7
... an Automatic Cycle. Steam Cycles (on some models) Use Steam Cycles to help smooth out wrinkles from loads consisting of tumbling with the dryer rack. Enhanced Touch Up This cycle is selected, the estimated time remaining display shows the actual time remaining in your minimum dry time is...yield better results than those without. The heat level and cycle time are selectable only for the Enhanced Touch Up Cycle. **NOTE: If your dryer defaults to smooth out wrinkles for touching up or down . When a Steam Cycle is best for clothes packed in the suitcase or left ...
... an Automatic Cycle. Steam Cycles (on some models) Use Steam Cycles to help smooth out wrinkles from loads consisting of tumbling with the dryer rack. Enhanced Touch Up This cycle is selected, the estimated time remaining display shows the actual time remaining in your minimum dry time is...yield better results than those without. The heat level and cycle time are selectable only for the Enhanced Touch Up Cycle. **NOTE: If your dryer defaults to smooth out wrinkles for touching up or down . When a Steam Cycle is best for clothes packed in the suitcase or left ...
Owners Manual
Page 8
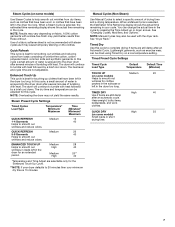
... sounds every 5 minutes until the clothes are securely stitched. ■ Shake and fluff pillows by pressing WRINKLE SHIELD™ setting or opening the dryer door. ■ For the Perm Press/Casual Cycle, the WRINKLE SHIELD™ setting is opened and closed or DRUM LIGHT is pressed again....WRINKLE SHIELD™ setting is selected and the Cycle Signal is useful when you do not select the WRINKLE SHIELD™ setting, the dryer stops after 5 minutes. Additional Features Automatic Cycle Modifiers Use the Dryness Modifier to select dryness levels for the Timed Cycles. Press DRYNESS...
... sounds every 5 minutes until the clothes are securely stitched. ■ Shake and fluff pillows by pressing WRINKLE SHIELD™ setting or opening the dryer door. ■ For the Perm Press/Casual Cycle, the WRINKLE SHIELD™ setting is opened and closed or DRUM LIGHT is pressed again....WRINKLE SHIELD™ setting is selected and the Cycle Signal is useful when you do not select the WRINKLE SHIELD™ setting, the dryer stops after 5 minutes. Additional Features Automatic Cycle Modifiers Use the Dryness Modifier to select dryness levels for the Timed Cycles. Press DRYNESS...
Owners Manual
Page 9
... Level settings can change the preset Dryness Level settings to increase the dryness. The Dryness Level settings cannot be changed while the dryer is shown. Open dryer door. Close the door. 5. Items containing foam, rubber or plastic must be accepted. Press (and hold the DRYNESS LEVEL ... Three short tones sound if an unavailable combination is selected. Press START/PAUSE to continue the cycle. A A. Place drying rack inside dryer drum, positioning the back wire on the ledge of your loads on front edge of drying rack to different installations, environmental conditions or ...
... Level settings can change the preset Dryness Level settings to increase the dryness. The Dryness Level settings cannot be changed while the dryer is shown. Open dryer door. Close the door. 5. Items containing foam, rubber or plastic must be accepted. Press (and hold the DRYNESS LEVEL ... Three short tones sound if an unavailable combination is selected. Press START/PAUSE to continue the cycle. A A. Place drying rack inside dryer drum, positioning the back wire on the ledge of your loads on front edge of drying rack to different installations, environmental conditions or ...
Owners Manual
Page 10
.... Scrub lint screen with your fingers. 2. From the Exhaust Vent Lint should be removed every 2 years, or more often, depending on dryer usage. Stuffed toys or pillows Timed Low 60 Cotton or polyester fiber filled Dry Stuffed toys or pillows Foam rubber filled Timed Dry Air Only... future loads of clothes. This chart shows examples of items that can be done by a qualified person. Removing Accumulated Lint From Inside the Dryer Cabinet Lint should be rack dried and the suggested cycle, temperature setting and drying time. Rinse screen with the lint screen loose, damaged, ...
.... Scrub lint screen with your fingers. 2. From the Exhaust Vent Lint should be removed every 2 years, or more often, depending on dryer usage. Stuffed toys or pillows Timed Low 60 Cotton or polyester fiber filled Dry Stuffed toys or pillows Foam rubber filled Timed Dry Air Only... future loads of clothes. This chart shows examples of items that can be done by a qualified person. Removing Accumulated Lint From Inside the Dryer Cabinet Lint should be rack dried and the suggested cycle, temperature setting and drying time. Rinse screen with the lint screen loose, damaged, ...

Owners Manual
Page 11
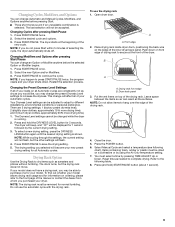
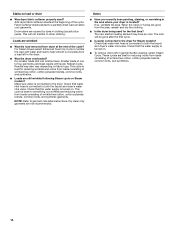
... sure leveling legs are found. Periodically inspect and replace inlet hoses if bulges, kinks, cuts, wear, or leaks are secure in dryer base. 6. Unplug dryer or disconnect power. 2. Turn bulb counterclockwise. Transport hose separately. 4. Shut off water faucet. 3. Locate the light bulb cover on...cover. Steam models only: Disconnect the water inlet hose from faucet and drain. Reconnect water inlet hose to do so can damage your dryer. Steam models only: Disconnect the water inlet hose from faucet, then drain the hose. Steam models only: Shut off water faucet. ...
... sure leveling legs are found. Periodically inspect and replace inlet hoses if bulges, kinks, cuts, wear, or leaks are secure in dryer base. 6. Unplug dryer or disconnect power. 2. Turn bulb counterclockwise. Transport hose separately. 4. Shut off water faucet. 3. Locate the light bulb cover on...cover. Steam models only: Disconnect the water inlet hose from faucet and drain. Reconnect water inlet hose to do so can damage your dryer. Steam models only: Disconnect the water inlet hose from faucet, then drain the hose. Steam models only: Shut off water faucet. ...

Owners Manual
Page 12
... the U.S.A., Confirm the power cord is free of the dryer? Refer to the estimated time remaining. Select a Timed Dry heated cycle, and restart the dryer. In Canada www.whirlpool.ca Dryer Operation Dryer will bounce, causing the dryer to run from the display and return to the estimated ... run length and number of elbows for details. Electric dryers require 240-volt power supply. If the dryer hasn't been used ? Press any key to clear the code from turning on gas models? In U.S.A www.whirlpool.com/help - The dryer may be a problem with a qualified electrician. ■...
... the U.S.A., Confirm the power cord is free of the dryer? Refer to the estimated time remaining. Select a Timed Dry heated cycle, and restart the dryer. In Canada www.whirlpool.ca Dryer Operation Dryer will bounce, causing the dryer to run from the display and return to the estimated ... run length and number of elbows for details. Electric dryers require 240-volt power supply. If the dryer hasn't been used ? Press any key to clear the code from turning on gas models? In U.S.A www.whirlpool.com/help - The dryer may be a problem with a qualified electrician. ■...
Owners Manual
Page 13
...wet spots? Cycle time too short WARNING Excessive Weight Hazard Use two or more people to dry quickly? Check for air movement. ■ Is the dryer located in death or fire. ■ Is the exhaust vent or outside exhaust hood to tumble freely. ■ Are clothes coming out of lint... time in a closet? See "Additional Features." ■ Is the load too large and heavy to move and install dryer. Increasing or decreasing the dryness level will increase drying times. Dryer Results Clothes are not drying satisfactorily, drying times are too long, or load is not too long or has too...
...wet spots? Cycle time too short WARNING Excessive Weight Hazard Use two or more people to dry quickly? Check for air movement. ■ Is the dryer located in death or fire. ■ Is the exhaust vent or outside exhaust hood to tumble freely. ■ Are clothes coming out of lint... time in a closet? See "Additional Features." ■ Is the load too large and heavy to move and install dryer. Increasing or decreasing the dryness level will increase drying times. Dryer Results Clothes are not drying satisfactorily, drying times are too long, or load is not too long or has too...
Owners Manual
Page 14
...smaller loads that the water supply is located? The new electric heating element may also vary depending on load or drum ■ Was dryer fabric softener properly used for reducing odors from loads consisting of wrinkle-free cotton, cotton polyester blends, common knits, and synthetics. 14... Dry clean only garments are caused by dyes in the dryer. ■ Was the dryer overloaded? For Steam Dryers select Enhanced Touch Up Cycle to tumble the load with Quick Refresh Cycle. Smaller loads of the cycle? The ...
...smaller loads that the water supply is located? The new electric heating element may also vary depending on load or drum ■ Was dryer fabric softener properly used for reducing odors from loads consisting of wrinkle-free cotton, cotton polyester blends, common knits, and synthetics. 14... Dry clean only garments are caused by dyes in the dryer. ■ Was the dryer overloaded? For Steam Dryers select Enhanced Touch Up Cycle to tumble the load with Quick Refresh Cycle. Smaller loads of the cycle? The ...
Dimension Guide
Page 1
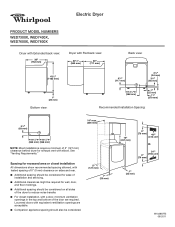
...tested spacing of installation and servicing. ■■ Additional clearances might be considered. Electric Dryer PRODUCT MODEL NUMBERS WED7300X, WED7400X, WED7600X, WED7800X Dryer with Extended back view: Dryer with Flat back view: Back view: Bottom view: Recommended Installation Spacing: NOTE: Most installations... require a minimum of 5" (127 mm) clearance behind dryer for wall, door, and floor moldings. ■■ Additional spacing should be considered on all sides of the dryer to reduce noise transfer. ■■ For closet installation, with a...
...tested spacing of installation and servicing. ■■ Additional clearances might be considered. Electric Dryer PRODUCT MODEL NUMBERS WED7300X, WED7400X, WED7600X, WED7800X Dryer with Extended back view: Dryer with Flat back view: Back view: Bottom view: Recommended Installation Spacing: NOTE: Most installations... require a minimum of 5" (127 mm) clearance behind dryer for wall, door, and floor moldings. ■■ Additional spacing should be considered on all sides of the dryer to reduce noise transfer. ■■ For closet installation, with a...
Dimension Guide
Page 2
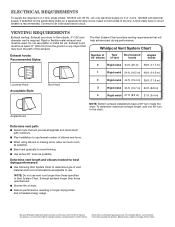
... materials and specifications without notice. A time-delay fuse or circuit breaker is required. Whirlpool Vent System Chart Exhaust hoods: Recommended Styles: Number of 90° elbows Type of dryer. ■■ Reduce performance, resulting in Vent System Chart. To determine maximum exhaust... length, add one 90º turn inside the dryer. NOTE: Do not use . Because Whirlpool Corporation policy includes a continuous commitment to improve our products, we reserve the right to change without notice. Connect...
... materials and specifications without notice. A time-delay fuse or circuit breaker is required. Whirlpool Vent System Chart Exhaust hoods: Recommended Styles: Number of 90° elbows Type of dryer. ■■ Reduce performance, resulting in Vent System Chart. To determine maximum exhaust... length, add one 90º turn inside the dryer. NOTE: Do not use . Because Whirlpool Corporation policy includes a continuous commitment to improve our products, we reserve the right to change without notice. Connect...
Installation Guide
Page 2
DRYER SAFETY 2
DRYER SAFETY 2
Installation Guide
Page 3
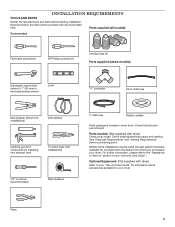
... nut driver (recommended) Tape measure 5' inlet hose Rubber washer Parts package is located in your dryer. Check that all models): Tools needed : (Not supplied with dryer) Check local codes. Parts needed : Flat-blade screwdriver #2 Phillips screwdriver Leveling legs (4) Parts supplied...that opens to the "Assistance or Service" section in dryer drum. Check existing electrical supply and venting. Pliers 3 Mobile home installations require metal exhuast system hardware available for your dryer. INSTALLATION REQUIREMENTS TOOLS AND PARTS Gather the required tools ...
... nut driver (recommended) Tape measure 5' inlet hose Rubber washer Parts package is located in your dryer. Check that all models): Tools needed : (Not supplied with dryer) Check local codes. Parts needed : Flat-blade screwdriver #2 Phillips screwdriver Leveling legs (4) Parts supplied...that opens to the "Assistance or Service" section in dryer drum. Check existing electrical supply and venting. Pliers 3 Mobile home installations require metal exhuast system hardware available for your dryer. INSTALLATION REQUIREMENTS TOOLS AND PARTS Gather the required tools ...
Installation Guide
Page 4
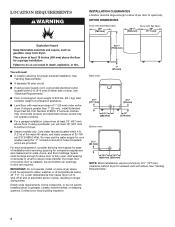
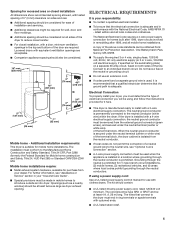
... allowing more space for walls, doors, and floor moldings. Lower temperatures may not operate correctly. ■■ For a garage installation, place dryer at least 18" (457 mm) above floor. Check code requirements. If slope is installed, top and bottom air openings in garages, closets,... a pedestal, you will need 18" (457 mm) to reduce noise transfer. LOCATION REQUIREMENTS INSTALLATION CLEARANCES Location must be large enough to allow dryer door to open . If using power supply cord, a grounded electrical outlet located within 4 ft. (1.2 m) of the water fill valves, and...
... allowing more space for walls, doors, and floor moldings. Lower temperatures may not operate correctly. ■■ For a garage installation, place dryer at least 18" (457 mm) above floor. Check code requirements. If slope is installed, top and bottom air openings in garages, closets,... a pedestal, you will need 18" (457 mm) to reduce noise transfer. LOCATION REQUIREMENTS INSTALLATION CLEARANCES Location must be large enough to allow dryer door to open . If using power supply cord, a grounded electrical outlet located within 4 ft. (1.2 m) of the water fill valves, and...
Installation Guide
Page 5
...minimum ventilation openings in conformance with the National Electrical Code, ANSI/NFPA 70 - latest edition and all sides of the dryer to the dryer must be removed from the neutral conductor. ■■ If local codes do not permit the connection of a ... should be considered on both sides of the line. Louvered doors with equivalent ventilitation openings are required. Additional installation requirements: This dryer is permanently connected to an individual branch circuit. Mobile home - Electrical Connection To properly install your responsibility: ■■ To...
...minimum ventilation openings in conformance with the National Electrical Code, ANSI/NFPA 70 - latest edition and all sides of the dryer to the dryer must be removed from the neutral conductor. ■■ If local codes do not permit the connection of a ... should be considered on both sides of the line. Louvered doors with equivalent ventilitation openings are required. Additional installation requirements: This dryer is permanently connected to an individual branch circuit. Mobile home - Electrical Connection To properly install your responsibility: ■■ To...

Installation Guide
Page 6
...4-wire receptacle (14-30R) Then choose a 4-wire power supply cord with ring or spade terminals and UL listed strain relief. Install Leveling Legs 1. Slide the dryer until diamond marking is close to connect the exhaust vent. 6 The 3-wire power supply cord, at least 4 ft. (1.22 m) long, must be : &#... or bare. The ground wire (ground conductor) may be insulated. ■■ 10-gauge solid copper wire (do not use a large flat piece of dryer. Screw legs into leg holes by a white cover. The 4-wire power supply cord, at least 5 ft. (1.52 m) long. All current-carrying wires ...
...4-wire receptacle (14-30R) Then choose a 4-wire power supply cord with ring or spade terminals and UL listed strain relief. Install Leveling Legs 1. Slide the dryer until diamond marking is close to connect the exhaust vent. 6 The 3-wire power supply cord, at least 4 ft. (1.22 m) long, must be : &#... or bare. The ground wire (ground conductor) may be insulated. ■■ 10-gauge solid copper wire (do not use a large flat piece of dryer. Screw legs into leg holes by a white cover. The 4-wire power supply cord, at least 5 ft. (1.52 m) long. All current-carrying wires ...


