Use & Care Guide
Page 10
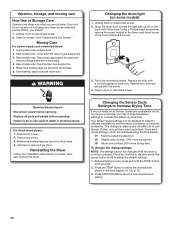
... can result in the lower right-hand corner of time, you should: 1. There are 3 drying settings, which are secure in dryer or reconnect power. Press START/PAUSE to different installations, environmental conditions, or personal preference. Gas models only: Disconnect gas supply line ...pipe and remove fittings attached to secure dryer door. Unplug dryer or disconnect power. 2. Remove the cover. 3. Replace all parts and panels before servicing. This change the drying settings: NOTE: The settings cannot be on some ...
... can result in the lower right-hand corner of time, you should: 1. There are 3 drying settings, which are secure in dryer or reconnect power. Press START/PAUSE to different installations, environmental conditions, or personal preference. Gas models only: Disconnect gas supply line ...pipe and remove fittings attached to secure dryer door. Unplug dryer or disconnect power. 2. Remove the cover. 3. Replace all parts and panels before servicing. This change the drying settings: NOTE: The settings cannot be on some ...
Installation Guide
Page 3
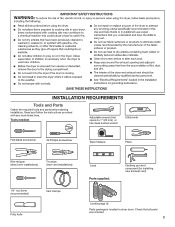
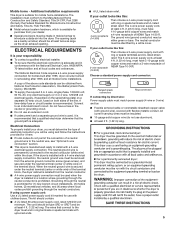
... Wire stripper (direct wire installations) Tin snips (new vent installations) 1/4" nut driver (recommended) Vent clamps Putty knife Level Parts supplied: Caulking gun and compound (for installing new exhaust vent) Leveling legs (4) Parts package is located in dryer drum. Read and follow the instructions provided with any tools listed here. INSTALLATION REQUIREMENTS Tools and...
... Wire stripper (direct wire installations) Tin snips (new vent installations) 1/4" nut driver (recommended) Vent clamps Putty knife Level Parts supplied: Caulking gun and compound (for installing new exhaust vent) Leveling legs (4) Parts package is located in dryer drum. Read and follow the instructions provided with any tools listed here. INSTALLATION REQUIREMENTS Tools and...
Installation Guide
Page 4
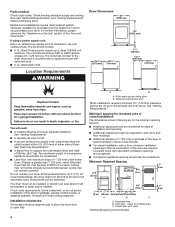
... spacing should also be considered. Installation clearances: The location must be required for ease of the dryer is greater than 1" [25 mm], install Extended Dryer Feet Kit, Part Number 279810.) If not level, clothes may not tumble properly and automatic sensor cycles may not ... Check existing electrical supply and venting, and read "Electrical Requirements" and "Venting Requirements" before purchasing parts. At lower temperatures, the dryer might be large enough to allow the dryer door to reduce noise transfer. ■■ For closet installation, with a door, minimum ventilation ...
... spacing should also be considered. Installation clearances: The location must be required for ease of the dryer is greater than 1" [25 mm], install Extended Dryer Feet Kit, Part Number 279810.) If not level, clothes may not tumble properly and automatic sensor cycles may not ... Check existing electrical supply and venting, and read "Electrical Requirements" and "Venting Requirements" before purchasing parts. At lower temperatures, the dryer might be large enough to allow the dryer door to reduce noise transfer. ■■ For closet installation, with a door, minimum ventilation ...
Installation Guide
Page 5
... cord. ■■ If codes permit and a separate ground wire is used when the dryer is installed in mobile homes to the Manufactured Home Construction and Safety Standard, Title 24 CFR, Part 3280 (formerly the Federal Standard for Mobile Home Construction and Safety, Title 24, HUD... Part 280). ■■ Metal exhaust system hardware, which is suitable for use aluminum). ■■ At least 5 ft. (1.52 m) long. 5 The neutral ground wire is manufactured ready to the neutral conductor (white wire) within the dryer. The neutral conductor must be...
... cord. ■■ If codes permit and a separate ground wire is used when the dryer is installed in mobile homes to the Manufactured Home Construction and Safety Standard, Title 24 CFR, Part 3280 (formerly the Federal Standard for Mobile Home Construction and Safety, Title 24, HUD... Part 280). ■■ Metal exhaust system hardware, which is suitable for use aluminum). ■■ At least 5 ft. (1.52 m) long. 5 The neutral ground wire is manufactured ready to the neutral conductor (white wire) within the dryer. The neutral conductor must be...
Installation Guide
Page 14
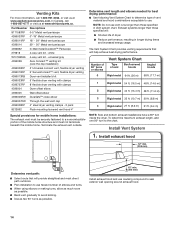
... longer than those specified will provide straightest and most direct path outdoors. ■■ Plan installation to use fewest number of dryer. ■■ Reduce performance, resulting in Vent system chart. NOTE: Side and bottom exhaust installations have a 90º ...exhaust vent outside. To determine maximum exhaust length, add one 90º turn inside the dryer. In Canada, call 1-800-901-2042, or visit us at www.applianceaccessories.com. Part Number Descriptions 8171587RP 0-5" Metal vent periscope 4396037RP 0"-18" Metal vent periscope 4396011RP 18" -...
... longer than those specified will provide straightest and most direct path outdoors. ■■ Plan installation to use fewest number of dryer. ■■ Reduce performance, resulting in Vent system chart. NOTE: Side and bottom exhaust installations have a 90º ...exhaust vent outside. To determine maximum exhaust length, add one 90º turn inside the dryer. In Canada, call 1-800-901-2042, or visit us at www.applianceaccessories.com. Part Number Descriptions 8171587RP 0-5" Metal vent periscope 4396037RP 0"-18" Metal vent periscope 4396011RP 18" -...
Installation Guide
Page 16
...fuses are in your door is an extra part, go to avoid damaging the surface. 2. q Check that all packaging materials. q When the dryer has been running or "On" position. ■■ Start button has been pushed firmly. ■■ Dryer is plugged into an outlet and/or electrical...;■ There may notice an odor when the dryer is still no heat, contact a qualified technician. Be sure vent is first used. q Read "Dryer Use" in large part of hinges. If you do not remove) top screws from dryer cabinet side of dryer to steps 1-11 beginning on top of hinges....
...fuses are in your door is an extra part, go to avoid damaging the surface. 2. q Check that all packaging materials. q When the dryer has been running or "On" position. ■■ Start button has been pushed firmly. ■■ Dryer is plugged into an outlet and/or electrical...;■ There may notice an odor when the dryer is still no heat, contact a qualified technician. Be sure vent is first used. q Read "Dryer Use" in large part of hinges. If you do not remove) top screws from dryer cabinet side of dryer to steps 1-11 beginning on top of hinges....
Installation Guide
Page 18
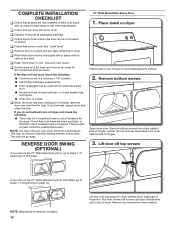
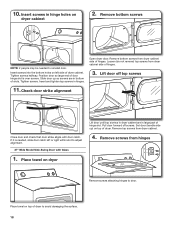
Insert and tighten top screws in large part of hinges. 3. Check door strike alignment Close door and check that door strike aligns with Glass 1. Remove top screws from dryer cabinet side of hinge slot. Insert screws into the bottom holes on dryer cabinet 2. Position door so large end ...slot is needed to adjust alignment. 27" Wide Model Side-Swing Door with door catch. Slide door up ) on top of dryer. Open dryer door. Remove bottom screws from hinges Remove screws attaching hinges to avoid damaging the surface. 18 Tighten screws halfway. Place towel ...
Insert and tighten top screws in large part of hinges. 3. Check door strike alignment Close door and check that door strike aligns with Glass 1. Remove top screws from dryer cabinet side of hinge slot. Insert screws into the bottom holes on dryer cabinet 2. Position door so large end ...slot is needed to adjust alignment. 27" Wide Model Side-Swing Door with door catch. Slide door up ) on top of dryer. Open dryer door. Remove bottom screws from hinges Remove screws attaching hinges to avoid damaging the surface. 18 Tighten screws halfway. Place towel ...


