Warranty Information
Page 1
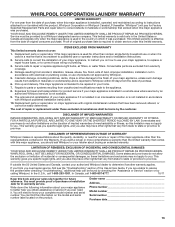
... limited warranty is required to published user or operator instructions and/or installation instructions. 2. Service calls to better help can find this limited warranty. Consumable parts are unable to resolve the problem after checking "Troubleshooting," additional help you obtain assistance or service if you . Cosmetic damage, including scratches, dents, chips or other than normal, single-family household use of products not approved by Whirlpool. 5. Repairs to parts or...
... limited warranty is required to published user or operator instructions and/or installation instructions. 2. Service calls to better help can find this limited warranty. Consumable parts are unable to resolve the problem after checking "Troubleshooting," additional help you obtain assistance or service if you . Cosmetic damage, including scratches, dents, chips or other than normal, single-family household use of products not approved by Whirlpool. 5. Repairs to parts or...
Use & Care Guide
Page 4
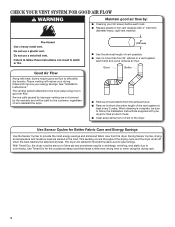
... Timed Dry, the dryer runs the amount of who installed the dryer. Good Better ■■ Remove lint and debris from the exhaust hood. ■■ Remove lint from the dryer. See "Installation Instructions." n Use the shortest length of the vent system at least every 2 years. Use Timed Dry for Better Fabric Care and Energy Savings Use the Sensor Cycles to over-drying. Proper venting will be sure to follow the Installation Instructions supplied with heat, dryers require good air flow to save energy. When cleaning...
... Timed Dry, the dryer runs the amount of who installed the dryer. Good Better ■■ Remove lint and debris from the exhaust hood. ■■ Remove lint from the dryer. See "Installation Instructions." n Use the shortest length of the vent system at least every 2 years. Use Timed Dry for Better Fabric Care and Energy Savings Use the Sensor Cycles to over-drying. Proper venting will be sure to follow the Installation Instructions supplied with heat, dryers require good air flow to save energy. When cleaning...
Use & Care Guide
Page 5
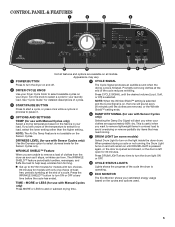
... Wrinkle Shield™ setting ends. 6 DAMP DRY SIGNAL (for use with Manual Cycles only) Select a drying temperature based on the fabrics in a mixed load to avoid overdrying or remove partially dry items that may vary. 1 POWER BUTTON 5 CYCLE SIGNAL Press to select available cycles on the light inside the dryer drum. CONTROL PANEL & FEATURES 1 2 3 4 9 8 7 65 Not all models. Promptly removing clothes at any time to turn on your laundry load. When pressed during a cycle or not running, the Drum Light turns...
... Wrinkle Shield™ setting ends. 6 DAMP DRY SIGNAL (for use with Manual Cycles only) Select a drying temperature based on the fabrics in a mixed load to avoid overdrying or remove partially dry items that may vary. 1 POWER BUTTON 5 CYCLE SIGNAL Press to select available cycles on the light inside the dryer drum. CONTROL PANEL & FEATURES 1 2 3 4 9 8 7 65 Not all models. Promptly removing clothes at any time to turn on your laundry load. When pressed during a cycle or not running, the Drum Light turns...
Use & Care Guide
Page 6
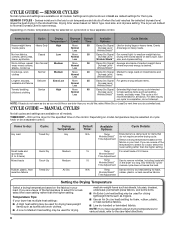
...-weight fabrics. Any timed dry cycle/ manual cycle does not sense the load. SENSOR CYCLES Not all cycles and settings are available on all models. CYCLE GUIDE - Temperature Tips If your dryer has multiple heat settings: ■■ A High heat setting may be a separate control. Dryness Level Drying time varies based on fabric type, load size, and dryness setting. Select a drying temperature based on cycle knob or be used for drying heavyweight items such as towels and work clothes Normal Medium More Normal...
...-weight fabrics. Any timed dry cycle/ manual cycle does not sense the load. SENSOR CYCLES Not all cycles and settings are available on all models. CYCLE GUIDE - Temperature Tips If your dryer has multiple heat settings: ■■ A High heat setting may be a separate control. Dryness Level Drying time varies based on fabric type, load size, and dryness setting. Select a drying temperature based on cycle knob or be used for drying heavyweight items such as towels and work clothes Normal Medium More Normal...
Use & Care Guide
Page 8
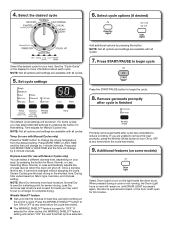
... available with all cycles. 5. NOTE: Not all options and settings are unable to remove the load promptly, press the Wrinkle Shield button to turn on fabric type, load size, and dryness setting. Set cycle settings Add additional options by 5-minute intervals. For some models) Select Drum Light to change by pressing the button for sensor drying. Press MORE TIME or LESS TIME and the time will remain "ON" the next time that setting. Selecting More, Normal...
... available with all cycles. 5. NOTE: Not all options and settings are unable to remove the load promptly, press the Wrinkle Shield button to turn on fabric type, load size, and dryness setting. Set cycle settings Add additional options by 5-minute intervals. For some models) Select Drum Light to change by pressing the button for sensor drying. Press MORE TIME or LESS TIME and the time will remain "ON" the next time that setting. Selecting More, Normal...
Use & Care Guide
Page 9
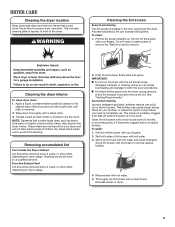
... lint screen. Wet lint is completely dry. NOTE: Garments that would block the air flow for your fingers. A screen blocked by a qualified servicer. Reinstall screen in front of the drum and rub with your dryer and will not stain future loads of lint screen with hot water. 3. These stains are not harmful to dry the drum. Apply a liquid, nonflammable household cleaner to remove. Wipe drum thoroughly with hot water and liquid detergent. See "Venting Requirements." Roll lint...
... lint screen. Wet lint is completely dry. NOTE: Garments that would block the air flow for your fingers. A screen blocked by a qualified servicer. Reinstall screen in front of the drum and rub with your dryer and will not stain future loads of lint screen with hot water. 3. These stains are not harmful to dry the drum. Apply a liquid, nonflammable household cleaner to remove. Wipe drum thoroughly with hot water and liquid detergent. See "Venting Requirements." Roll lint...
Use & Care Guide
Page 10
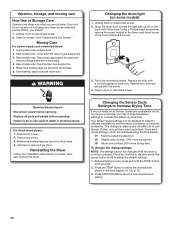
Moving Care For power supply cord-connected dryers: 1. WARNING Changing the drum light (on vacation or not using the time display: 01 Factory preset dryness level. 02 Slightly drier clothes, 15% more drying time. 03 Much drier clothes, 30% more drying time. Turn bulb counterclockwise. Replace the cover and secure with a 10-watt appliance bulb only. For direct-wired dryers: 1. There are 3 drying settings, which are secure in dryer base. 6. Unplug dryer or disconnect power. 2. Gas models only: Close shut-off ) to different installations, environmental conditions...
Moving Care For power supply cord-connected dryers: 1. WARNING Changing the drum light (on vacation or not using the time display: 01 Factory preset dryness level. 02 Slightly drier clothes, 15% more drying time. 03 Much drier clothes, 30% more drying time. Turn bulb counterclockwise. Replace the cover and secure with a 10-watt appliance bulb only. For direct-wired dryers: 1. There are 3 drying settings, which are secure in dryer base. 6. Unplug dryer or disconnect power. 2. Gas models only: Close shut-off ) to different installations, environmental conditions...
Use & Care Guide
Page 11
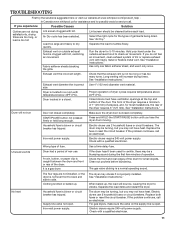
... the dryer. Replace both fuses or reset the circuit breaker. For gas dryers, make sure the valve on the supply line is not level front to back and side to dry quickly. If you hear the dryer drum moving. Select the right cycle for assistance and to tumble freely. Long venting will not run Exhaust vent diameter the incorrect size. Dryer is too hot Lint screen clogged with heavy metal or flexible metal vent. START/PAUSE button not...
... the dryer. Replace both fuses or reset the circuit breaker. For gas dryers, make sure the valve on the supply line is not level front to back and side to dry quickly. If you hear the dryer drum moving. Select the right cycle for assistance and to tumble freely. Long venting will not run Exhaust vent diameter the incorrect size. Dryer is too hot Lint screen clogged with heavy metal or flexible metal vent. START/PAUSE button not...
Use & Care Guide
Page 12
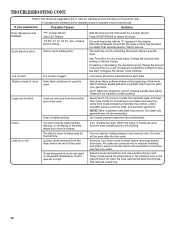
... first time. Select a lower temperature, and use a sensor drying cycle. First try the solutions suggested here or visit our website at the end of the cycle. Change the dryness level setting on load Lint screen clogged. Fabric softener sheets added to finish before Cool Down may feel very warm. This cycle is too hot You have an odor. If so, ventilate the area. The new electric heating element may...
... first time. Select a lower temperature, and use a sensor drying cycle. First try the solutions suggested here or visit our website at the end of the cycle. Change the dryness level setting on load Lint screen clogged. Fabric softener sheets added to finish before Cool Down may feel very warm. This cycle is too hot You have an odor. If so, ventilate the area. The new electric heating element may...

Use & Care Guide
Page 13
... installation, installation not in a manner that comes with this limitation may have been removed, altered, or cannot be found by checking the "Assistance or Service" section or by Whirlpool. 5. Some states and provinces do not allow limitations on the product. This warranty gives you specific legal rights, and you ever need repair service, first see the "Troubleshooting" section of products not approved by calling Whirlpool. WHIRLPOOL...
... installation, installation not in a manner that comes with this limitation may have been removed, altered, or cannot be found by checking the "Assistance or Service" section or by Whirlpool. 5. Some states and provinces do not allow limitations on the product. This warranty gives you specific legal rights, and you ever need repair service, first see the "Troubleshooting" section of products not approved by calling Whirlpool. WHIRLPOOL...

Dimension Guide
Page 2
... may be used. Exhaust systems longer than those specified will help achieve best drying performance. Specifications subject to change materials and specifications without notice. Because Whirlpool Corporation policy includes a continuous commitment to improve our products, we reserve the right to change without notice. A time-delay fuse or circuit breaker is required. To determine maximum exhaust length, add one 90º turn inside the dryer. Determine vent length and elbows needed for...
... may be used. Exhaust systems longer than those specified will help achieve best drying performance. Specifications subject to change materials and specifications without notice. Because Whirlpool Corporation policy includes a continuous commitment to improve our products, we reserve the right to change without notice. A time-delay fuse or circuit breaker is required. To determine maximum exhaust length, add one 90º turn inside the dryer. Determine vent length and elbows needed for...
Installation Guide
Page 3
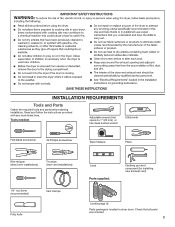
... tools listed here. Tools needed: Adjustable wrench that all parts are included. 3 Check that opens to 1" (25 mm) or hex-head socket wrench Utility knife Flat-blade screwdriver #2 Phillips screwdriver Tape measure Pliers Wire stripper (direct wire installations) Tin snips (new vent installations) 1/4" nut driver (recommended) Vent clamps Putty knife Level Parts supplied: Caulking gun and compound (for installing new exhaust vent) Leveling legs (4) Parts package is located in dryer drum. INSTALLATION REQUIREMENTS...
... tools listed here. Tools needed: Adjustable wrench that all parts are included. 3 Check that opens to 1" (25 mm) or hex-head socket wrench Utility knife Flat-blade screwdriver #2 Phillips screwdriver Tape measure Pliers Wire stripper (direct wire installations) Tin snips (new vent installations) 1/4" nut driver (recommended) Vent clamps Putty knife Level Parts supplied: Caulking gun and compound (for installing new exhaust vent) Leveling legs (4) Parts package is located in dryer drum. INSTALLATION REQUIREMENTS...
Installation Guide
Page 4
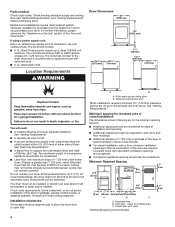
... sleeping quarters. Parts needed: Check local codes. A B A. Side view - If using power supply cord, a grounded electrical outlet located within 2 ft. (610 mm) of either side of an automatic cycle. Check code requirements. Louvered doors with equivalent ventilation openings are required. Minimum Required Spacing 18"* (457 mm) 14" max.* (356 mm) 48 in ring terminals or spade terminals with maximum slope of the dryer is greater than 1" [25 mm], install Extended Dryer Feet Kit, Part Number 279810.) If...
... sleeping quarters. Parts needed: Check local codes. A B A. Side view - If using power supply cord, a grounded electrical outlet located within 2 ft. (610 mm) of either side of an automatic cycle. Check code requirements. Louvered doors with equivalent ventilation openings are required. Minimum Required Spacing 18"* (457 mm) 14" max.* (356 mm) 48 in ring terminals or spade terminals with maximum slope of the dryer is greater than 1" [25 mm], install Extended Dryer Feet Kit, Part Number 279810.) If...
Installation Guide
Page 5
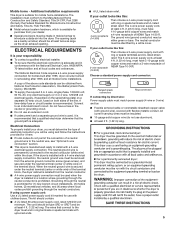
... kit should be made in conformance with a 3-wire electrical supply connection. Additional installation requirements This dryer is manufactured ready to introduce outside air into the dryer. The installation must conform to an individual branch circuit. Choose a standard power supply cord connector: Flanged spade connectors Ring connectors If connecting by a white cover. The 3-wire power supply cord, at least 4 ft. (1.22 m) long, must determine the type of NEMA Type 14-30 R. If using and follow the instructions...
... kit should be made in conformance with a 3-wire electrical supply connection. Additional installation requirements This dryer is manufactured ready to introduce outside air into the dryer. The installation must conform to an individual branch circuit. Choose a standard power supply cord connector: Flanged spade connectors Ring connectors If connecting by a white cover. The 3-wire power supply cord, at least 4 ft. (1.22 m) long, must determine the type of NEMA Type 14-30 R. If using and follow the instructions...
Installation Guide
Page 8
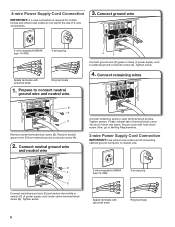
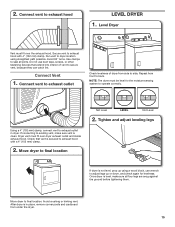
...Connect neutral ground wire (E) and neutral wire (white or center) (C) of dryer rear panel. Connect neutral ground wire and neutral wire A F Connect ground wire (F) (green or bare) of 3-wire connections. 3. Tighten screw. 8 3-wire receptacle (NEMA type 10-30R) 3-prong plug Spade terminals with hold-down screw. Secure cover with upturned ends Ring terminals Connect remaining wires Connect remaining wires to connect neutral ground wire and neutral wire. Now, go to Venting Requirements. 3-wire Power Supply Cord Connection IMPORTANT: Use where local codes permit connecting...
...Connect neutral ground wire (E) and neutral wire (white or center) (C) of dryer rear panel. Connect neutral ground wire and neutral wire A F Connect ground wire (F) (green or bare) of 3-wire connections. 3. Tighten screw. 8 3-wire receptacle (NEMA type 10-30R) 3-prong plug Spade terminals with hold-down screw. Secure cover with upturned ends Ring terminals Connect remaining wires Connect remaining wires to connect neutral ground wire and neutral wire. Now, go to Venting Requirements. 3-wire Power Supply Cord Connection IMPORTANT: Use where local codes permit connecting...
Installation Guide
Page 10
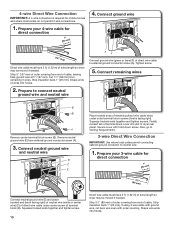
... direct wire cable under outer terminal block screws (hooks facing right). Connect ground wire (127 5" mm) Direct wire cable must have 5 ft. (1.52 m) of extra length so dryer may be moved if needed . Strip 31/2" (89 mm) of outer covering from end of dryer rear panel. Squeeze hooked ends together and tighten screws. Tighten screw. 5. Cut 11/2" (38 mm) from external ground conductor screw (A). 3. Remove neutral ground wire (E) from remaining 3 wires...
... direct wire cable under outer terminal block screws (hooks facing right). Connect ground wire (127 5" mm) Direct wire cable must have 5 ft. (1.52 m) of extra length so dryer may be moved if needed . Strip 31/2" (89 mm) of outer covering from end of dryer rear panel. Squeeze hooked ends together and tighten screws. Tighten screw. 5. Cut 11/2" (38 mm) from external ground conductor screw (A). 3. Remove neutral ground wire (E) from remaining 3 wires...
Installation Guide
Page 12
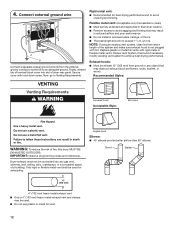
...° elbows. Connect external ground wire A G Connect a separate copper ground wire (G) from ground or any gas vent, chimney, wall, ceiling, attic, crawlspace, or a concealed space of fire, this dryer MUST BE EXHAUSTED OUTDOORS. Now, go to achieve best drying performance. NOTE: If using an existing vent system, clean lint from entire length of dryer rear panel. Review Vent System Chart and if necessary, modify existing vent system to Venting Requirements. Only rigid...
...° elbows. Connect external ground wire A G Connect a separate copper ground wire (G) from ground or any gas vent, chimney, wall, ceiling, attic, crawlspace, or a concealed space of fire, this dryer MUST BE EXHAUSTED OUTDOORS. Now, go to achieve best drying performance. NOTE: If using an existing vent system, clean lint from entire length of dryer rear panel. Review Vent System Chart and if necessary, modify existing vent system to Venting Requirements. Only rigid...
Installation Guide
Page 14
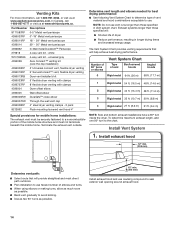
... vent hood 4" Determine vent length and elbows needed for mobile home installations: The exhaust vent must not terminate beneath the mobile home. Install Vent System 1. In Canada, call 1-800-901-2042, or visit us at www.applianceaccessories.com. NOTE: Do not use . Terminate the exhaust vent outside. To determine maximum exhaust length, add one 90º turn inside the dryer. Vent System Chart Number of 90° turns or elbows Type of vent...
... vent hood 4" Determine vent length and elbows needed for mobile home installations: The exhaust vent must not terminate beneath the mobile home. Install Vent System 1. In Canada, call 1-800-901-2042, or visit us at www.applianceaccessories.com. NOTE: Do not use . Terminate the exhaust vent outside. To determine maximum exhaust length, add one 90º turn inside the dryer. Vent System Chart Number of 90° turns or elbows Type of vent...
Installation Guide
Page 15
... to operate correctly. Use clamps to exhaust hood LEVEL DRYER 1. Repeat from side to dryer location using a wood block, use duct tape, screws, or other fastening devices that vent is clean. 2. Connect vent to seal all four legs are snug against the ground before tightening them. Run vent to side. Avoid 90° turns. Using a 4" (102 mm) clamp, connect vent to back. Check that extend into interior of dryer from front to exhaust outlet...
... to operate correctly. Use clamps to exhaust hood LEVEL DRYER 1. Repeat from side to dryer location using a wood block, use duct tape, screws, or other fastening devices that vent is clean. 2. Connect vent to seal all four legs are snug against the ground before tightening them. Run vent to side. Avoid 90° turns. Using a 4" (102 mm) clamp, connect vent to back. Check that extend into interior of dryer from front to exhaust outlet...
Installation Guide
Page 16
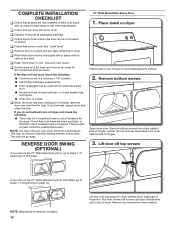
..., open the dryer door and feel heat, cancel cycle and close the door. Remove top screws from dryer cabinet side of /recycle all parts are set in your tools. q Check dryer's final location. q When the dryer has been running or "On" position. ■■ Start button has been pushed firmly. ■■ Dryer is plugged into an outlet and/or electrical supply is the 27" Wide Side-Swing Door with a damp cloth to remove...
..., open the dryer door and feel heat, cancel cycle and close the door. Remove top screws from dryer cabinet side of /recycle all parts are set in your tools. q Check dryer's final location. q When the dryer has been running or "On" position. ■■ Start button has been pushed firmly. ■■ Dryer is plugged into an outlet and/or electrical supply is the 27" Wide Side-Swing Door with a damp cloth to remove...


