
Dimension Guide
Page 1
.... To determine maximum exhaust length, add one 90° turn inside the dryer. A timedelay fuse or circuit breaker is required. Minimum required spacing For cabinet installation, with a door, the minimum ventilation openings in the path of elbows you will provide the straightest and most direct path outdoors. Do not use plastic or metal foil vent. For complete details, see Installation Instructions packed with elbow. See "Venting Requirements" in the...
.... To determine maximum exhaust length, add one 90° turn inside the dryer. A timedelay fuse or circuit breaker is required. Minimum required spacing For cabinet installation, with a door, the minimum ventilation openings in the path of elbows you will provide the straightest and most direct path outdoors. Do not use plastic or metal foil vent. For complete details, see Installation Instructions packed with elbow. See "Venting Requirements" in the...

Installation Instructions
Page 3
... the Dryer User Instructions. The kit should be type SRD or SRDT and be at least 4 ft. (1.22 m) long. Location Requirements Adjustable wrench that opens to the dryer must end in dryer drum. Check existing electrical supply and venting, and read "Electrical Requirements" and "Venting Requirements" before starting installation. The cord should contain: ■■ A UL listed 30-amp power supply cord, rated 120/240 volt minimum. The wires that all parts are included. Mobile home installations require metal exhaust system...
... the Dryer User Instructions. The kit should be type SRD or SRDT and be at least 4 ft. (1.22 m) long. Location Requirements Adjustable wrench that opens to the dryer must end in dryer drum. Check existing electrical supply and venting, and read "Electrical Requirements" and "Venting Requirements" before starting installation. The cord should contain: ■■ A UL listed 30-amp power supply cord, rated 120/240 volt minimum. The wires that all parts are included. Mobile home installations require metal exhaust system...

Installation Instructions
Page 4
...], install Extended Dryer Feet Kit, Part Number 279810.) If not level, clothes may not tumble properly and automatic sensor cycles may not operate correctly. A copy of the door are required. Wide opening side-swing door B. closet or confined area C. The National Electrical Code requires a 4-wire power supply connection for mobile home installations. See "Electrical Requirements." ■■ A sturdy floor to an individual branch circuit. The dryer must conform to introduce outside air into the dryer. Dryer Dimensions 43...
...], install Extended Dryer Feet Kit, Part Number 279810.) If not level, clothes may not tumble properly and automatic sensor cycles may not operate correctly. A copy of the door are required. Wide opening side-swing door B. closet or confined area C. The National Electrical Code requires a 4-wire power supply connection for mobile home installations. See "Electrical Requirements." ■■ A sturdy floor to an individual branch circuit. The dryer must conform to introduce outside air into the dryer. Dryer Dimensions 43...

Installation Instructions
Page 5
... instructions provided for it here. ■■ If local codes do not use with ring or spade terminals and UL listed strain relief. The neutral conductor must be at least 4 ft. (1.22 m) long, must have 4 10-gauge solid copper wires and match a 4-wire receptacle of NEMA Type 14-30 R. If the dryer is installed with a 4-wire electrical supply connection, the neutral ground wire must be removed...
... instructions provided for it here. ■■ If local codes do not use with ring or spade terminals and UL listed strain relief. The neutral conductor must be at least 4 ft. (1.22 m) long, must have 4 10-gauge solid copper wires and match a 4-wire receptacle of NEMA Type 14-30 R. If the dryer is installed with a 4-wire electrical supply connection, the neutral ground wire must be removed...
Installation Instructions
Page 10
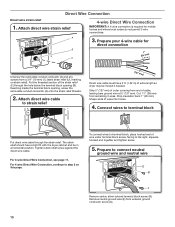
... needed. A 3. Strip 5" (127 mm) of extra length so dryer may be in a horizontal position. Tighten strain relief screw against the direct wire cable. Attach direct wire cable to terminal block Put direct wire cable through the hole below the terminal block opening , screw the removable conduit connector (A) onto the strain relief threads. 2. Direct Wire Connection Direct wire strain relief 1. Prepare your 4-wire cable for mobile homes and where local codes do not permit 3-wire connections. Remove...
... needed. A 3. Strip 5" (127 mm) of extra length so dryer may be in a horizontal position. Tighten strain relief screw against the direct wire cable. Attach direct wire cable to terminal block Put direct wire cable through the hole below the terminal block opening , screw the removable conduit connector (A) onto the strain relief threads. 2. Direct Wire Connection Direct wire strain relief 1. Prepare your 4-wire cable for mobile homes and where local codes do not permit 3-wire connections. Remove...
Installation Instructions
Page 12
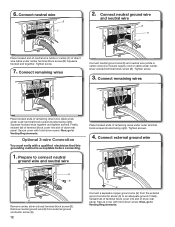
... terminal block screw (B). Tighten screw. 3. Optional 3-wire Connection You must verify with hold -down screw. Remove neutral ground wire (E) from external ground conductor screw (A). 12 A G Connect a separate copper ground wire (G) from the external ground conductor screw (A) to connect neutral ground wire and neutral wire Place hooked ends of direct wire cable under outer terminal block screws (hooks facing right). Connect neutral wire B C 2. Finally, reinsert tab of terminal block cover into slot of dryer rear panel. Secure cover...
... terminal block screw (B). Tighten screw. 3. Optional 3-wire Connection You must verify with hold -down screw. Remove neutral ground wire (E) from external ground conductor screw (A). 12 A G Connect a separate copper ground wire (G) from the external ground conductor screw (A) to connect neutral ground wire and neutral wire Place hooked ends of direct wire cable under outer terminal block screws (hooks facing right). Connect neutral wire B C 2. Finally, reinsert tab of terminal block cover into slot of dryer rear panel. Secure cover...

Installation Instructions
Page 13
... to follow these instructions can cause moisture and lint to collect indoors, which may obstruct exhaust (such as flowers, rocks, bushes, or snow). Improper venting can result in final dryer location. ■■ Remove excess to seal all governing codes and ordinances. NOTE: If using an existing vent system, clean lint from ground or any object that extend into any gas vent, chimney, wall...
... to follow these instructions can cause moisture and lint to collect indoors, which may obstruct exhaust (such as flowers, rocks, bushes, or snow). Improper venting can result in final dryer location. ■■ Remove excess to seal all governing codes and ordinances. NOTE: If using an existing vent system, clean lint from ground or any object that extend into any gas vent, chimney, wall...
Installation Instructions
Page 14
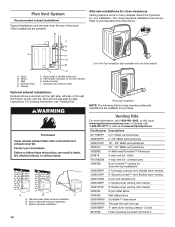
...-807-6777 or visit us at www.whirlpoolparts.ca. Select the type best for close elbow 4396007RW Through-the-wall vent cap 4396008RP 4" steel dryer venting clamps - 2 pack 8212662 Flush mounting louvered vent hood 4" Refer to connect elbows H. Exhaust hood E. Left or right side exhaust installation C. B Alternate installations for your installation. For ordering information, see "Venting Kits". Dryer B. Standard rear offset exhaust installation B. Each kit includes step-by-step instructions. Exhaust outlet I H F.
...-807-6777 or visit us at www.whirlpoolparts.ca. Select the type best for close elbow 4396007RW Through-the-wall vent cap 4396008RP 4" steel dryer venting clamps - 2 pack 8212662 Flush mounting louvered vent hood 4" Refer to connect elbows H. Exhaust hood E. Left or right side exhaust installation C. B Alternate installations for your installation. For ordering information, see "Venting Kits". Dryer B. Standard rear offset exhaust installation B. Each kit includes step-by-step instructions. Exhaust outlet I H F.
Installation Instructions
Page 15
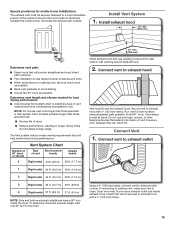
Install Vent System 1. Avoid 90° turns. Connect Vent 1. Dryer vent must fit over dryer exhaust outlet and inside the dryer. The Vent system chart provides venting requirements that vent is clean. Connect vent to exhaust hood Vent must fit over the exhaust hood. Secure vent to exhaust outlet in Vent system chart. Terminate the exhaust vent outside. NOTE: Do not use fewest number of elbows and turns. ■■ When using straightest path possible. Connect vent to exhaust outlet Using a 4" (102 mm) clamp, connect vent to exhaust hood with a 4" (102...
Install Vent System 1. Avoid 90° turns. Connect Vent 1. Dryer vent must fit over dryer exhaust outlet and inside the dryer. The Vent system chart provides venting requirements that vent is clean. Connect vent to exhaust hood Vent must fit over the exhaust hood. Secure vent to exhaust outlet in Vent system chart. Terminate the exhaust vent outside. NOTE: Do not use fewest number of elbows and turns. ■■ When using straightest path possible. Connect vent to exhaust outlet Using a 4" (102 mm) clamp, connect vent to exhaust hood with a 4" (102...

Installation Instructions
Page 16
... installed. Move dryer to final location. Repeat from side to see what was skipped. Complete Installation Checklist q Check that both fuses are set in your tools. Be sure vent is closed. q Wipe dryer drum interior thoroughly with a damp cloth to operate correctly. q When the dryer has been running or "On" position. ■■ Start button has been pushed firmly. ■■ Dryer is plugged into an outlet and/or electrical...
... installed. Move dryer to final location. Repeat from side to see what was skipped. Complete Installation Checklist q Check that both fuses are set in your tools. Be sure vent is closed. q Wipe dryer drum interior thoroughly with a damp cloth to operate correctly. q When the dryer has been running or "On" position. ■■ Start button has been pushed firmly. ■■ Dryer is plugged into an outlet and/or electrical...
Owners Manual
Page 3
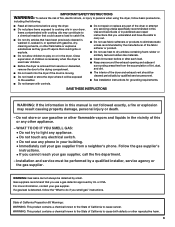
... not allow children to light any appliance. • Do not touch any electrical switch. • Do not use a gas detector approved by qualified service personnel. ■ See installation instructions for grounding requirements. WHAT TO DO IF YOU SMELL GAS: • Do not try to play on or in published user-repair instructions that you use any servicing unless specifically recommended in this manual is removed from a neighbor's phone...
... not allow children to light any appliance. • Do not touch any electrical switch. • Do not use a gas detector approved by qualified service personnel. ■ See installation instructions for grounding requirements. WHAT TO DO IF YOU SMELL GAS: • Do not try to play on or in published user-repair instructions that you use any servicing unless specifically recommended in this manual is removed from a neighbor's phone...
Owners Manual
Page 4
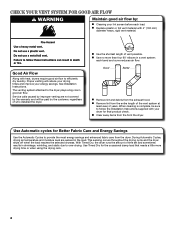
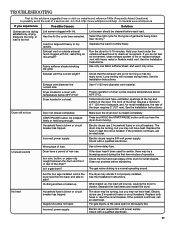
... are not covered by the warranty and will reduce your drying times and improve your lint screen before each bend and curve reduces air flow. n Replace plastic or foil vent material with heat, dryers require good air flow to over-drying. See Installation Instructions. n Remove lint from the dryer. each load. Good Better n Remove lint and debris from the front the dryer. CHECK YOUR VENT SYSTEM FOR GOOD AIR FLOW Maintain good air flow by the customer, regardless of time set and sometimes...
... are not covered by the warranty and will reduce your drying times and improve your lint screen before each bend and curve reduces air flow. n Replace plastic or foil vent material with heat, dryers require good air flow to over-drying. See Installation Instructions. n Remove lint from the dryer. each load. Good Better n Remove lint and debris from the front the dryer. CHECK YOUR VENT SYSTEM FOR GOOD AIR FLOW Maintain good air flow by the customer, regardless of time set and sometimes...

Owners Manual
Page 5
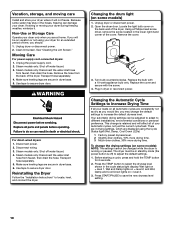
... vary based on your laundry load. NOTE: The Air Dry Temp Feature is finished. Press the WRINKLE SHIELD™ button to turn the dryer on and off ) is on, the tone will depend on fabric type, load size, and dryness setting. 3 START/PAUSE BUTTON Press to start a cycle, or press once while a cycle is useful when you are removed, or the Wrinkle Shield™ setting ends. 5 DAMP DRY SIGNAL (for your dryer model.
... vary based on your laundry load. NOTE: The Air Dry Temp Feature is finished. Press the WRINKLE SHIELD™ button to turn the dryer on and off ) is on, the tone will depend on fabric type, load size, and dryness setting. 3 START/PAUSE BUTTON Press to start a cycle, or press once while a cycle is useful when you are removed, or the Wrinkle Shield™ setting ends. 5 DAMP DRY SIGNAL (for your dryer model.
Owners Manual
Page 6
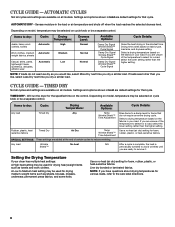
TIMED DRY Not all cycles and settings are available on all models. Use a no heat (air dry) setting for that cycle. AUTOMATIC CYCLES Not all cycles and settings are available on all models. AUTOMATIC DRY - Items to dry: Jeans, heavy work clothes. NOTE: If loads do not require an entire drying cycle. Settings and options shown in your load. Will run the dryer for drying heavyweight items such as sheets, blouses, dresses, underwear, permanent press fabrics, and some knits. NOTE...
TIMED DRY Not all cycles and settings are available on all models. Use a no heat (air dry) setting for that cycle. AUTOMATIC CYCLES Not all cycles and settings are available on all models. AUTOMATIC DRY - Items to dry: Jeans, heavy work clothes. NOTE: If loads do not require an entire drying cycle. Settings and options shown in your load. Will run the dryer for drying heavyweight items such as sheets, blouses, dresses, underwear, permanent press fabrics, and some knits. NOTE...

Owners Manual
Page 9
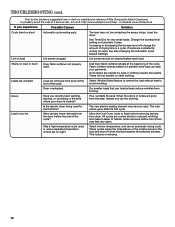
... exhaust hood and remove the lint. n If lint falls off while the screen is located in dryer. 9 This buildup can cause overheating and damage to both sides of clean cloths or towels to remove residue buildup. 4. To wash: 1. Rinse screen with the brush to dry the drum. See "Venting Requirements." Scrub lint screen with hot water. 5. Do not rinse or wash screen to avoid drum staining. NOTE: Garments that would block the air flow...
... exhaust hood and remove the lint. n If lint falls off while the screen is located in dryer. 9 This buildup can cause overheating and damage to both sides of clean cloths or towels to remove residue buildup. 4. To wash: 1. Rinse screen with the brush to dry the drum. See "Venting Requirements." Scrub lint screen with hot water. 5. Do not rinse or wash screen to avoid drum staining. NOTE: Garments that would block the air flow...
Owners Manual
Page 10
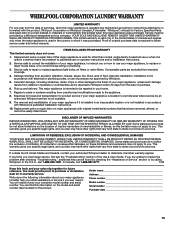
... setting. 10 Steam models only: Shut off water faucet. 3. Unplug dryer or disconnect power. 2. Replace the cover and secure with a 10-watt appliance bulb only. Non-Use or Storage Care Operate your dryer only when you are consistently not as dry as you would like, you should: 1. Clean lint screen. See "Cleaning the Lint Screen." Moving Care For power supply cord-connected dryers: 1. For direct-wired dryers: 1. Steam models only: Disconnect the water inlet hose from the back of the cover. Using a Phillips-head screw driver, remove...
... setting. 10 Steam models only: Shut off water faucet. 3. Unplug dryer or disconnect power. 2. Replace the cover and secure with a 10-watt appliance bulb only. Non-Use or Storage Care Operate your dryer only when you are consistently not as dry as you would like, you should: 1. Clean lint screen. See "Cleaning the Lint Screen." Moving Care For power supply cord-connected dryers: 1. For direct-wired dryers: 1. Steam models only: Disconnect the water inlet hose from the back of the cover. Using a Phillips-head screw driver, remove...
Owners Manual
Page 11
... the valve open . Supply line valve not open on the supply line. Electric dryers use . If the problem continues, call an electrician. For gas dryers, is a normal operating sound. Electric dryers require 240-volt power supply. Check with temperature below 45ºF (7ºC)? Run the dryer for the types of garments being dried. Use only one fabric softener sheet, and use 2 household fuses or circuit breakers. Exhaust vent the correct length? Check that the exhaust vent is blown or circuit breaker has tripped. Exhaust vent diameter the correct size. Dryer located in...
... the valve open . Supply line valve not open on the supply line. Electric dryers use . If the problem continues, call an electrician. For gas dryers, is a normal operating sound. Electric dryers require 240-volt power supply. Check with temperature below 45ºF (7ºC)? Run the dryer for the types of garments being dried. Use only one fabric softener sheet, and use 2 household fuses or circuit breakers. Exhaust vent the correct length? Check that the exhaust vent is blown or circuit breaker has tripped. Exhaust vent diameter the correct size. Dryer located in...
Owners Manual
Page 12
... drying cycle. This reduces overdrying. 12 Add dryer fabric softener sheets at the end of the cycle? Items removed before each load. Dry smaller loads that can stain your dryer is too hot Is the electric dryer being used for very small loads. Change the dryness level setting on load Lint screen clogged. If so, ventilate the area. Lint on Automatic Cycles. If loads are gone from forming. Drum stains are cooled slowly to reduced wrinkling...
... drying cycle. This reduces overdrying. 12 Add dryer fabric softener sheets at the end of the cycle? Items removed before each load. Dry smaller loads that can stain your dryer is too hot Is the electric dryer being used for very small loads. Change the dryness level setting on load Lint screen clogged. If so, ventilate the area. Lint on Automatic Cycles. If loads are gone from forming. Drum stains are cooled slowly to reduced wrinkling...

Owners Manual
Page 13
... service by a Whirlpool designated service company. This major appliance is inconsistent to you need repair service, rst see the "Troubleshooting" section of your home. 7. This warranty gives you speci c legal rights, and you also may not apply to published user or operator instructions and/or installation instructions. 2. Damage resulting from accident, alteration, misuse, abuse, re, ood, acts of purchase or installation date for future reference. Replacement parts...
... service by a Whirlpool designated service company. This major appliance is inconsistent to you need repair service, rst see the "Troubleshooting" section of your home. 7. This warranty gives you speci c legal rights, and you also may not apply to published user or operator instructions and/or installation instructions. 2. Damage resulting from accident, alteration, misuse, abuse, re, ood, acts of purchase or installation date for future reference. Replacement parts...
Warranty
Page 1
... you specific legal rights, and you ever need to use or when it . WHIRLPOOL SHALL NOT BE LIABLE FOR INCIDENTAL OR CONSEQUENTIAL DAMAGES. In the U.S.A., call . 7/08 Keep this book and your major appliance, to replace or repair house fuses, or to obtain service under this information on the model and serial number label located on the duration of implied warranties of the Use & Care Guide. Repairs to parts...
... you specific legal rights, and you ever need to use or when it . WHIRLPOOL SHALL NOT BE LIABLE FOR INCIDENTAL OR CONSEQUENTIAL DAMAGES. In the U.S.A., call . 7/08 Keep this book and your major appliance, to replace or repair house fuses, or to obtain service under this information on the model and serial number label located on the duration of implied warranties of the Use & Care Guide. Repairs to parts...


