Whirlpool WED5500XL Support Question
Whirlpool WED5500XL Support Question
Find answers below for this question about Whirlpool WED5500XL.Need a Whirlpool WED5500XL manual? We have 4 online manuals for this item!
Question posted by Nedflora on October 4th, 2014
Drying Rack
Do they make a drying rack for Whirlpool Dryer Model WED5500XW0
Current Answers
Answer #1: Posted by BusterDoogen on October 4th, 2014 1:13 PM
BusterDoogen

Member since:
October 30th, 2011 Points: 28,565,407

Member since:
October 30th, 2011 Points: 28,565,407
Go here to select the proper rack for your unit.
I hope this is helpful to you!
Please respond to my effort to provide you with the best possible solution by using the "Acceptable Solution" and/or the "Helpful" buttons when the answer has proven to be helpful. Please feel free to submit further info for your question, if a solution was not provided. I appreciate the opportunity to serve you!
Related Whirlpool WED5500XL Manual Pages
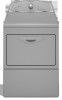
Dimension Guide - Page 1

... in the neutral or grounding circuit. Ref. 27" Electric Dryer
PRODUCT MODEL NUMBERS WED5500X, WED5550X, WED5600X, WED5700X
Electrical: This dryer requires a 3 or 4 wire, single phase, 120/240...
27" (687 mm)
A
*29 1/2" (749 mm)
27" (687 mm)
B
A. Because Whirlpool Corporation policy includes a continuous commitment to improve our products, we reserve the right to change materials and ...
Installation Instructions - Page 2
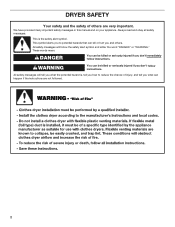
... not followed.
2 Always read and obey all safety messages.
All safety messages will follow the safety alert symbol and either the word "DANGER" or "WARNING." DRYER SAFETY
Your safety and the safety of injury, and tell you don't immediately follow instructions. All safety messages will tell you what can be killed...
Installation Instructions - Page 3

... Requirements
Adjustable wrench that all parts are included. Check that opens to the dryer must end in dryer drum. The wires that connect to 1" (25 mm) or hex-head ...UL listed power supply cord kit marked for purchase from the dealer from whom you purchased your dryer. INSTALLATION REQUIREMENTS
Tools and Parts
Parts supplied:
Gather the required tools and parts before purchasing parts...
Installation Instructions - Page 4

... hamper door
*Most installations require a minimum 5½" (140 mm) clearance behind the dryer for mobile home installations. The opening (such as the dryer exhaust opening side-swing door B. A time-delay fuse or circuit breaker is adequate.
4 Connect to open fully. Drying times can be considered.
■■ Level floor with elbow.
See "Venting...
Installation Instructions - Page 5

...wire power supply cord with a 3-wire electrical supply connection. Electrical Connection
To properly install your dryer, you must determine the type of electrical connection you will be using a power supply cord... solid copper wires and match a 3-wire receptacle of NEMA Type 14-30 R. If the dryer is installed with upturned ends.
■■ A UL listed strain relief.
The neutral ground...
Installation Instructions - Page 6

... Use two or more people to its feet. Screw in back or other injury. Slide the dryer until diamond marking is close to move and install dryer. diamond marking
1.
place under entire back edge of cardboard from dryer carton; To avoid damaging floor, use a wrench to finish turning legs until it is no...
Installation Instructions - Page 7
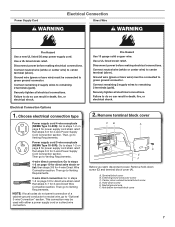
...to do so can result in death, fire, or electrical shock.
Disconnect power before making electrical connections.
Terminal block cover B. External ground conductor screw C. Neutral ground wire F....
WARNING
WARNING
Fire Hazard
use a ul listed strain relief.
Disconnect power before making electrical connections.
Connect neutral wire (white or center wire) to remaining 2 terminals...
Installation Instructions - Page 13

...heavy metal exhaust vent and clamps may result in final dryer location. ■■ Remove excess to seal all ...Rigid metal vent: ■■ Recommended for best drying performance and to achieve best drying performance.
Housecleaning problems and health problems.
See "... 12" (305 mm) from entire length of the system and make sure exhaust hood is not plugged with lint.
B
4"
C
...
Installation Instructions - Page 15
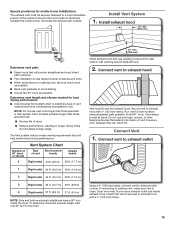
... and use duct tape, screws, or other fastening devices that will :
■■ Shorten life of dryer.
■■ Reduce performance, resulting in longer drying times and increased energy usage. Run vent to existing vent, make sure vent is secured to exhaust outlet in Vent system chart. Do not use caulking compound to...
Installation Instructions - Page 16

... that both circuit breakers have all parts are intact and tight, or that dryer is first heated. Once legs are level, make sure all packaging materials. Move dryer to back. Avoid crushing or kinking vent. Repeat from under the dryer.
q When the dryer has been running or "On" position.
■■ Start button has been...
Owners Manual - Page 3
....
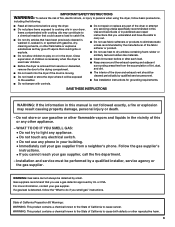
■ Do not use gasoline or other flammable or explosive substances as they give off vapors that could cause a load to the drying compartment.
■ Do not reach into the dryer if the drum is not followed exactly, a fire or explosion may contribute to a chemical reaction that you cannot reach your gas...
Owners Manual - Page 4
...
diameter heavy, rigid vent material. n Use no more drying time or when using the drying rack.
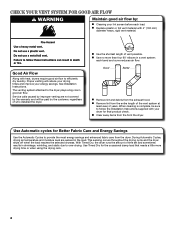
4 n Clear away items from the dryer. Use Automatic cycles for the occasional damp load that needs ...flow.
The venting system attached to efficiently dry laundry.
Good
Better
n Remove lint and debris from the entire length of who installed the dryer. n Remove lint from the exhaust ...
Owners Manual - Page 5

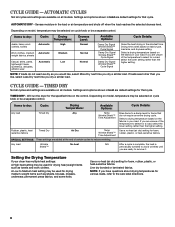
... fluffs the load to remove lightweight items in your laundry load. Turn the knob to select a cycle for the specified time on the fabrics in a mixed load to select for detailed descriptions of the drying cycles.
5 Timed Dry Will run the dryer for your load. On models with ACCUDRY™ Control Senses moisture in the...
Owners Manual - Page 6
... press fabrics, and some knits.
TIMED DRY
Not all cycles and settings are default settings for drying heavyweight items such as you would like , select Less Dry next time you are ready to dry:
Jeans, heavy work clothes.
Select a drying temperature based on all models.
Setting the Drying Temperature
If your dryer has multiple heat settings:
A High heat...
Owners Manual - Page 7
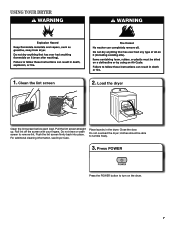
.... clothes should be able to remove lint. Load the dryer
Clean the lint screen before each load. Place laundry in the dryer. Do not overload the dryer; Clean the lint screen
2.
Close the door. Do not rinse or wash screen to tumble freely.
3. Push the lint screen firmly back into place. Roll ...
Owners Manual - Page 8
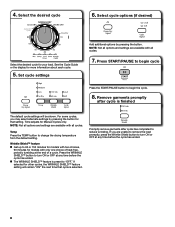
...settings will remain "ON" the next time that setting. Set cycle settings
Add additional options by pressing the button for models with only one choice of a cycle. Time adjusts for your load. NOTE: Not all options and settings are .... 4. Wrinkle Shield™ feature n Get up to 60 or 150 minutes for models with two choices,
90 minutes for that cycle is preset to change the...
Owners Manual - Page 9

.... To clean: 1. Tumble a load of lint screen with the brush to a residue buildup. Dry these items inside out to remove lint. This includes clearing piles of the dryer. Wet both the dryer and fabrics.
Reinstall screen in front of laundry in dryer.
9 This buildup can build up . The screen is probably clogged if lint falls...
Owners Manual - Page 10
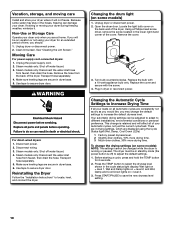
... should: 1. Make sure leveling legs are secure in the hoses, freezing can be on
the back wall of the dryer.
Disconnect power. 2. Reinstalling the Dryer
Follow the "...drying settings (on some models): NOTE: The settings cannot be in standby mode (the power button is running or paused. Press START/PAUSE to locate, level, and connect the dryer. Clean lint screen. Steam models...
Owners Manual - Page 11
... completely.
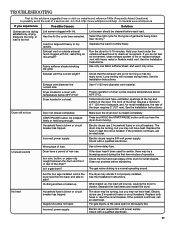
Use 4" (102 mm) diameter vent material. Proper operation of fuse.
Make sure the dryer door is too hot
Lint screen clogged with heavy metal or flexible metal vent. ...line.
Electric dryers require 240-volt power supply. http://www.whirlpool.com/help - Use only one fabric softener sheet, and use 2 household fuses or circuit breakers.
Dryer will increase drying times. ...
Owners Manual - Page 12
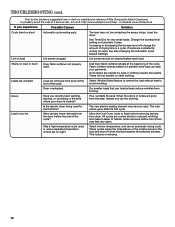
...and make it easier to avoid wrinkling. Lint on Automatic Cycles. Level the dryer....dryer at the beginning of the cycle. http://www.whirlpool.com/help - Increasing or decreasing the dryness level will not transfer to a partially dried...laundry items removed from dryer. Lint screen should be cleaned before removing laundry from the dryer before Cool Down may have an odor.
Add dryer...
Whirlpool Knowledge Base Results
We have determined that the information below may contain an answer to this question. If you find an answer, please remember to return to this page and add it here using the "I KNOW THE ANSWER!" button above. It's that easy to earn points!-
Can I change the door-swing direction? - Front-load washer
...? - Front-load washer Vibration - No. The washer door is not reversible. However, the dryer door can be reversed. See the Dryer Installation Instructions for details. Can I change the door-swing direction on my front-load washer? Dryer Moving your dryer model number in the search tool below to find them online. -
Cycle is too short - Dryer
... these sensor strips, so the cycle will increase drying time for the automatic drying cycle. dryer does not dry My dryer will not contact these strips if the dryer is not level. Make sure that the dryer is dry. Wet load items may not make contact with a dry rack. Automatic Dry or Accudry cycles determine the length of... -
My dryer makes sounds or vibrations
...make the dryer shake or vibrate. Use a dry rack when drying tennis shoes. My dryer will not start Loads are missing. Replace any missing legs, and level the dryer...model by using the search feature below. Normal dryer sounds: The following are normal sounds of nonuse? A dryer...legs adjust up . Laundry items with a towel load inside the dryer along the front and ...
Similar Questions

Dryer Model Wed7500vw What Is The Drive Belt Number And How Do You Install It
Whirlpool Dryer Model WED7500VW. Replacing drive belt, ordered belt almost two inches to short I nee...
Whirlpool Dryer Model WED7500VW. Replacing drive belt, ordered belt almost two inches to short I nee...
(Posted by meetingstreetmaint 9 years ago)


Troubleshoot Whirlpool Dryer Model Wed6400sw
Troubleshoot Whirlpool Dryer Model Wed6400sw
Troubleshoot Whirlpool Dryer Model Wed6400sw
(Posted by jimmytracy 10 years ago)
I Have A Whirlpool Dryer Model No. Wed5900sw0 That Is Running Too Hot.
Hello! I have a Whirlpool dryer Model No. WED5900SW0 that is running too hot. I had this problem bef...
Hello! I have a Whirlpool dryer Model No. WED5900SW0 that is running too hot. I had this problem bef...
(Posted by mgy7 10 years ago)

How Can We Remove A Coin From The Lint Blower On A Whirlpool Dryer, Model Wed927
How can we remove a coin from the lint blower on a whirlpool dryer, model wed9270x
How can we remove a coin from the lint blower on a whirlpool dryer, model wed9270x
(Posted by last 12 years ago)