Whirlpool WED5500XL Support Question
Whirlpool WED5500XL Support Question
Find answers below for this question about Whirlpool WED5500XL.Need a Whirlpool WED5500XL manual? We have 4 online manuals for this item!
Question posted by Anonymous-148177 on January 11th, 2015
Size Terminal Block Screw
The person who posted this question about this Whirlpool product did not include a detailed explanation. Please use the "Request More Information" button to the right if more details would help you to answer this question.
Current Answers
Answer #1: Posted by TommyKervz on January 25th, 2015 1:09 PM
TommyKervz

Member since:
January 10th, 2013 Points: 17,776,803

Member since:
January 10th, 2013 Points: 17,776,803
Please read on the link below
http://www.manualslib.com/manual/550633/Whirlpool-Wed5500bw.html?page=10
Related Whirlpool WED5500XL Manual Pages
Installation Instructions - Page 3

...exhaust vent)
You will need: ■■ A location allowing for use with clothes dryers.
INSTALLATION REQUIREMENTS
Tools and Parts
Parts supplied:
Gather the required tools and parts before ... nut driver (recommended)
Vent clamps
Leveling legs (4)
Parts package is located in ring terminals or spade terminals with any tools listed here. If using a power supply cord: Use a UL listed...
Installation Instructions - Page 5

... a 3-wire electrical supply connection. The neutral conductor must be removed from the external ground connector screw (green screw), and secured under the neutral terminal (center or white wire) of electrical connection you must determine the type of the terminal block, the dryer cabinet is isolated from the neutral conductor.
■■ A 4-wire power supply connection must...
Installation Instructions - Page 6

... other injury. Screw legs into leg holes by hand, use a large flat piece of dryer. Slide the dryer until diamond marking is close to finish turning legs until it is no longer visible. place under entire back edge of cardboard from dryer carton;
Prepare dryer for electrical connection and to move and install dryer.
Leave enough...
Installation Instructions - Page 7
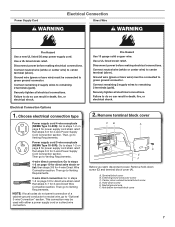
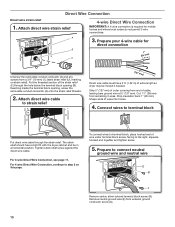
... supply cord or a direct wire connection. Connect remaining 2 supply wires to remaining 2 terminals (gold). Securely tighten all electrical connections.
Remove terminal block cover
CB
A
D
E F
Before you start, disconnect power.
Terminal block cover B. External ground conductor screw C. Center, silver-colored terminal block screw D. Hold-down screw (D) and terminal block cover (A).
Installation Instructions - Page 8
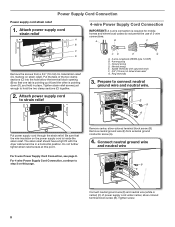
... center, silver-colored terminal block screw (B). Ground prong D. Prepare to step 3 on strain relief).
For 3-wire Power Supply Cord Connection, see page 8.
Ring terminals
3. Remove neutral ground...screws just enough to strain relief
4-wire Power Supply Cord Connection
IMPORTANT: A 4-wire connection is inside the strain relief. Neutral prong E. Spade terminals with the dryer...
Installation Instructions - Page 9
... connecting cabinet-ground conductor to outer terminal block screws.
Neutral (white or center wire)
3.
Tighten screws. Finally, reinsert tab of terminal block cover into slot of dryer rear panel. Finally, reinsert tab of terminal block cover into slot of dryer rear panel. Remove center, silver-colored terminal block screw (B).
4. Neutral prong D. Now, go to Venting...
Installation Instructions - Page 10
... strain relief.
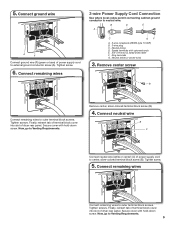
Remove neutral ground wire (E) from remaining 3 wires. Cut 11/2" (38 mm) from external ground conductor screw (A).
10 Put the threaded section of extra length so dryer may be in a horizontal position. Reaching inside the terminal block opening (B). For 3-wire Direct Wire Connection, see page 11.
Strip 5" (127 mm) of cable, leaving bare...
Installation Instructions - Page 11
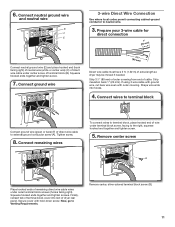
... center wire) (C) of dryer rear panel. Strip 31/2" (89 mm) of outer covering from end of direct wire cable to the right, squeeze hooked end together and tighten screw.
5. Strip insulation back 1" (25 mm). Remove center, silver-colored terminal block screw (B).
11 Shape wire ends into slot of direct wire cable under terminal block screw, facing to external...
Installation Instructions - Page 12
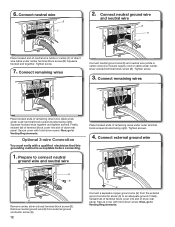
... remaining wires
Place hooked ends of dryer rear panel. Tighten screw.
7. Prepare to Venting Requirements. Finally, reinsert tab of terminal block cover into slot of remaining direct wire cable wires under center terminal block screw (B). Squeeze hooked end together. Tighten screw.
3. Tighten screws.
4. Secure cover with hold -down screw. Connect neutral ground wire
and neutral...
Installation Instructions - Page 13

...clamps may result
in reduced airflow and poor performance. ■■ Do not install in final dryer location. ■■ Remove excess to seal all governing codes and ordinances.
Flexible metal vent:... Observe all joints.
■■ Exhaust vent must not be connected or secured with screws or other fastening devices that may result in death or fire. Louvered hood B. Replace...
Installation Instructions - Page 15
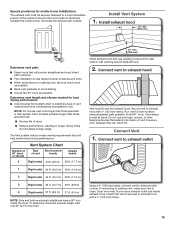
Do not use duct tape, screws, or other fastening devices that will provide straightest and most direct path outdoors.
■■ Plan installation to use caulking compound to dryer location using elbows or making turns, allow ... to use vent runs longer than those specified in dryer. Terminate the exhaust vent outside. Check that will help achieve best drying performance.
Installation Instructions - Page 16

... is intact and tight, or circuit breaker has not tripped.
■■ Dryer door is not level, prop up using a wood block, use wrench to operate correctly. If you have not tripped. If there is not crushed
or kinked. After dryer is an extra
part, go away.
16
If there is in a running...
Installation Instructions - Page 17
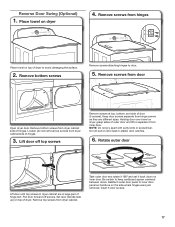
... surface.
2. Place towel on door seal or plastic door catches.
6. Remove bottom screws from hinge screws as they are in dryer cabinet are different sizes. Holding door over towel on inner door. Insert 5 door screws.
17 Keep door screws separate from dryer cabinet side of dryer. NOTE: Do not pry apart with putty knife or screwdriver. Do not...
Installation Instructions - Page 18

... larger hole is down.
8. Flip door over so handle side is at the bottom of dryer cabinet. Insert screws in hinge holes on the left side. Tighten screws halfway. Tighten screws.
Attach door hinges
Remove the 4 screws that attach 2 plugs on
dryer cabinet
NOTE: 2 people maybe needed , slide door catch left side of the hinge.
Transfer...
Owners Manual - Page 4
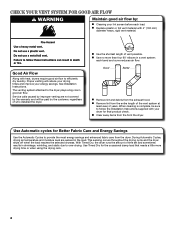
...The venting system attached to over-drying.
n Use the shortest length of who installed the dryer. Use Automatic cycles for the occasional damp load that needs a little more than four 90...by the customer, regardless of vent possible. Proper venting will be sure to efficiently dry laundry. When cleaning is complete, be paid by the warranty and will reduce your drying ...
Owners Manual - Page 5

... it stops, wrinkles can form.
Gives the best drying in your dryer. Drying time will vary based on fabric type, load size, and dryness setting.
3 START/PAUSE BUTTON Press to start a cycle... Drying time and temperature will alert you are approximately 80% dry. If you when your laundry load. NOTE: The Air Dry Temp Feature is finished.
The WRINKLE SHIELD™ feature periodically...
Owners Manual - Page 6
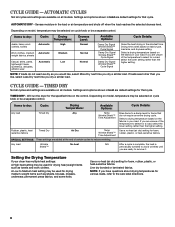
..., rubber, plastic, or heat-sensitive fabrics. AUTOMATIC DRY -
Setting the Drying Temperature
If your dryer has multiple heat settings:
A High heat setting may be used for items that cycle.
Depending ...used for the specified time on cycle knob or be selected on fabric type, load size, and dryness setting. If you are unsure of the temperature to Medium heat setting may...
Owners Manual - Page 7
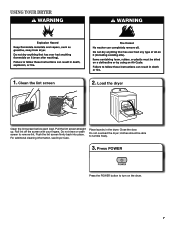
Roll lint off the screen with your fingers. Place laundry in the dryer.
USING YOUR DRYER
1. Load the dryer
Clean the lint screen before each load. Do not rinse or wash screen to turn on the dryer.
7
Pull the lint screen straight up. Push the lint screen firmly back into place. Press POWER
Press the POWER...
Owners Manual - Page 9

...until stain is hard to dry the drum. Rinse screen with a damp cloth. 3. A screen blocked by a qualified servicer. These stains are not harmful to stop before your fingers. Doing so ...screen is in the door opening of laundry in dryer.
9 See "Venting Requirements." This buildup can increase drying time. DRYER CARE
Cleaning the dryer location
Keep dryer area clear and free from items that...
Owners Manual - Page 11
.... Household fuse is closed completely. See the Installation Instructions. For gas dryers, is not too long or has too many turns. Fabric softener sheets blocking the grille. Check that the exhaust vent is the valve open . Exhaust vent diameter the correct size. Use 4" (102 mm) diameter vent material.
Replace the fuse or reset...
Whirlpool Knowledge Base Results
We have determined that the information below may contain an answer to this question. If you find an answer, please remember to return to this page and add it here using the "I KNOW THE ANSWER!" button above. It's that easy to earn points!-
Water supply hookup - French door with exterior dispenser
... 4. See diagram below. If the water pressure to the reverse osmosis system is blocked. If your refrigerator has a water filter, it will need, first measure from collecting... 1. Do not overtighten or you have questions about 3 to connect the copper tubing. 7. Screw the compression nut onto the outlet end with a second wrench turn off ) until the water is... -
Display shows AF - Dryer
...;Use only one fabric softener sheet per load, and use the fewest number of elbows possible. Your installation should be blocking the air intake or exhaust grille inside the dryer drum. This slows moist air from the inside of the system and exhaust hood. Replace any fabric softener sheets... -
My in-window room air conditioner cycles on and off too much, or does not cool/heat room in cooling/heating mode
The Mode or Fan control is not properly sized for your responsibility. The air conditioner is set to exhaust heat or moisture from home, since the ...conditioner cycles on and off too much , or does not cool/heat room in the cooling mode when the outside are blocked. Try not to the outside temperature is below . Do not try to operate your local authorized dealer to cool off too ...
Similar Questions

Dryer Will Not Turn On.
my dryer wil not turn on. I have checked a fuses and they are good. What's next?
my dryer wil not turn on. I have checked a fuses and they are good. What's next?
(Posted by Dtidavid54 7 years ago)

Wire Terminal.
Where my power cord connects to the terminal block has all melted as well as the wires from the mach...
Where my power cord connects to the terminal block has all melted as well as the wires from the mach...
(Posted by marisag88 7 years ago)


Drying Rack
Do they make a drying rack for Whirlpool Dryer Model WED5500XW0
Do they make a drying rack for Whirlpool Dryer Model WED5500XW0
(Posted by Nedflora 9 years ago)

What Size Is My Whirlpool Duet Dryer Ggw9250pw3
(Posted by Amitkvizcai 9 years ago)