
Energy Guide
Page 1
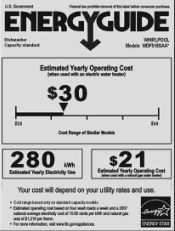
EllIERG GUIDE Dishwasher Capacity:standard WHIRLPOOL Models VVDF518SAA* Estimated Yearly Operating Cost (when used with an electric water heater) $30 $20 $50 Cost Range of Similar Models 280 kWh Estimated Yearly ...
EllIERG GUIDE Dishwasher Capacity:standard WHIRLPOOL Models VVDF518SAA* Estimated Yearly Operating Cost (when used with an electric water heater) $30 $20 $50 Cost Range of Similar Models 280 kWh Estimated Yearly ...
Installation Guide
Page 2
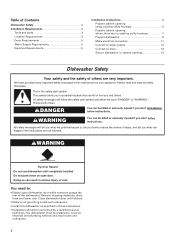
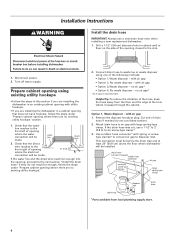
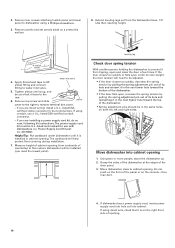
...hookups 6 Prepare cabinet opening where there are no existing utility hookups 7 Prepare dishwasher 9 Make electrical connection 11 Connect to water supply 12 Connect to drain 13 Secure dishwasher in cabinet opening 13 Dishwasher Safety Your safety and the safety of others . Always read and obey all...lower rack. These words mean: DANGER You can kill or hurt you what the potential hazard is the safety alert symbol. Close dishwasher door until completely installed. WARNING You can be installed to potential hazards that can be performed by a qualified service technician. We have...
...hookups 6 Prepare cabinet opening where there are no existing utility hookups 7 Prepare dishwasher 9 Make electrical connection 11 Connect to water supply 12 Connect to drain 13 Secure dishwasher in cabinet opening 13 Dishwasher Safety Your safety and the safety of others . Always read and obey all...lower rack. These words mean: DANGER You can kill or hurt you what the potential hazard is the safety alert symbol. Close dishwasher door until completely installed. WARNING You can be installed to potential hazards that can be performed by a qualified service technician. We have...
Installation Guide
Page 3
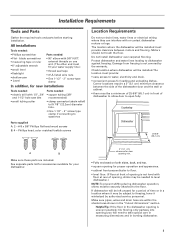
...screw type clamp if connecting to waste-tee Parts supplied A. 2 - # 8 x 5/8" Phillips flat head wood screws B. 4 - The location where the dishwasher will be a minimum of opening is not level with 1/2", 3/4" and 1-1/2" hole saw bits • small tubing cutter Parts needed : • electric drill ... wiring where they can interfere with 3/8" N.P.T. If dishwasher will need to dishwasher against freezing. Protect dishwasher and water lines leading to take special care in measuring dimensions and in the dishwasher opening is not covered by authorized service personnel. All...
...screw type clamp if connecting to waste-tee Parts supplied A. 2 - # 8 x 5/8" Phillips flat head wood screws B. 4 - The location where the dishwasher will be a minimum of opening is not level with 1/2", 3/4" and 1-1/2" hole saw bits • small tubing cutter Parts needed : • electric drill ... wiring where they can interfere with 3/8" N.P.T. If dishwasher will need to dishwasher against freezing. Protect dishwasher and water lines leading to take special care in measuring dimensions and in the dishwasher opening is not covered by authorized service personnel. All...
Installation Guide
Page 5
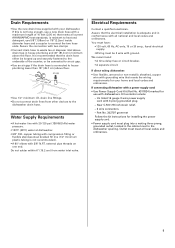
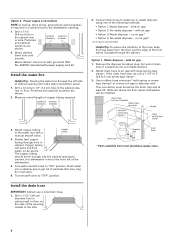
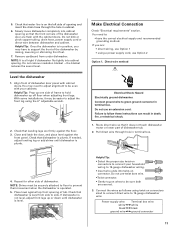
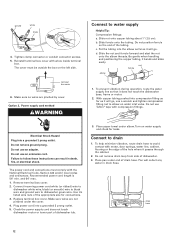
... I.D. drain line fittings. • Do not connect drain lines from water inlet valve. If this is adequate and in the cabinet next to the dishwasher opening. external pipe threads on one end. Assure that meets all national and local codes and ordinances. If direct wiring.... - UL listed 16 gauge 3 wire power supply cord with 20-120 psi (138-862 kPa) water pressure. • 120°F (49°C) water at dishwasher. • 3/8" O.D. Electrical Requirements Contact a qualified electrician. Outlet must be connected to an air gap. • Use an air gap if the drain hose is ...
... I.D. drain line fittings. • Do not connect drain lines from water inlet valve. If this is adequate and in the cabinet next to the dishwasher opening. external pipe threads on one end. Assure that meets all national and local codes and ordinances. If direct wiring.... - UL listed 16 gauge 3 wire power supply cord with 20-120 psi (138-862 kPa) water pressure. • 120°F (49°C) water at dishwasher. • 3/8" O.D. Electrical Requirements Contact a qualified electrician. Outlet must be connected to an air gap. • Use an air gap if the drain hose is ...
Installation Guide
Page 6
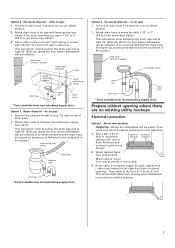
... spring-type clamp. This connection must be before the drain trap and at least 20" (50.8 cm) above the floor where dishwasher will be installed. cut here if needed (do not reach far enough, follow the steps under "Prepare cabinet opening where there are installing the... • Option 3, Waste disposer - water line direct wire 2. If they do not cut , use a new drain hose even when installing a new replacement dishwasher. 1. Cut end of the hole where it passes through the cabinet. Drill a 1-1/2" (3.8 cm) diameter hole in an existing cabinet opening where there are installing...
... spring-type clamp. This connection must be before the drain trap and at least 20" (50.8 cm) above the floor where dishwasher will be installed. cut here if needed (do not reach far enough, follow the steps under "Prepare cabinet opening where there are installing the... • Option 3, Waste disposer - water line direct wire 2. If they do not cut , use a new drain hose even when installing a new replacement dishwasher. 1. Cut end of the hole where it passes through the cabinet. Drill a 1-1/2" (3.8 cm) diameter hole in an existing cabinet opening where there are installing...
Installation Guide
Page 7
...Sand hole until smooth. This connection must be before the drain trap and at least 20" (50.8 cm) above the floor where dishwasher will be installed. Attach drain hose to air gap with large springtype clamp. It is recommended that the drain hose be installed. Preferred... and optional locations are no existing utility hookups Electrical connection Option1, Direct wire method: Helpful Tip: Wiring the dishwasher will be easier if you route wire into cabinet opening from local plumbing supply store. This connection must be before the drain ...
...Sand hole until smooth. This connection must be before the drain trap and at least 20" (50.8 cm) above the floor where dishwasher will be installed. Attach drain hose to air gap with large springtype clamp. It is recommended that the drain hose be installed. Preferred... and optional locations are no existing utility hookups Electrical connection Option1, Direct wire method: Helpful Tip: Wiring the dishwasher will be easier if you route wire into cabinet opening from local plumbing supply store. This connection must be before the drain ...
Installation Guide
Page 8
... a rubber hose connector* with a manual shutoff valve. cut ribbed section). 2. Install the drain hose IMPORTANT: Always use a 1-1/2" to 2" (3.8 to the dishwasher opening will bend and kink easily, so be installed. Option 2, Power supply cord method: NOTE: A mating, three prong, ground-type wall receptacle is recommended...where it to disposer inlet. Attach copper tubing to the water line with spring or screwtype clamps* to connect air gap to dishwasher inlet on the side of the following methods: • Option 1, Waste disposer - Flush water into the cabinet opening closest...
... a rubber hose connector* with a manual shutoff valve. cut ribbed section). 2. Install the drain hose IMPORTANT: Always use a 1-1/2" to 2" (3.8 to the dishwasher opening will bend and kink easily, so be installed. Option 2, Power supply cord method: NOTE: A mating, three prong, ground-type wall receptacle is recommended...where it to disposer inlet. Attach copper tubing to the water line with spring or screwtype clamps* to connect air gap to dishwasher inlet on the side of the following methods: • Option 1, Waste disposer - Flush water into the cabinet opening closest...
Installation Guide
Page 9
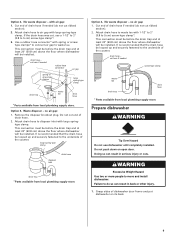
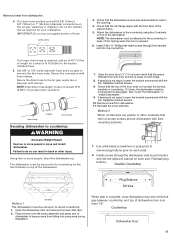
...Remove the disposer knockout plug. Option 4, No waste disposer - drain hose - Grasp sides of drain hose if needed (do not cut , use dishwasher until completely installed. Use a rubber hose connector* with spring or screwtype clamps* to connect air gap to the underside of the counter. no air ... in serious injury or cuts. Attach drain hose to waste tee with large springtype clamp. cut ribbed section). 2. Option 2, No waste disposer - Prepare dishwasher WARNING Tip Over Hazard Do not use a 1-1/2" to 2" (3.8 to air gap with air gap: 1. Failure to do not cut here if needed ...
...Remove the disposer knockout plug. Option 4, No waste disposer - drain hose - Grasp sides of drain hose if needed (do not cut , use dishwasher until completely installed. Use a rubber hose connector* with spring or screwtype clamps* to connect air gap to the underside of the counter. no air ... in serious injury or cuts. Attach drain hose to waste tee with large springtype clamp. cut ribbed section). 2. Option 2, No waste disposer - Prepare dishwasher WARNING Tip Over Hazard Do not use a 1-1/2" to 2" (3.8 to air gap with air gap: 1. Failure to do not cut here if needed ...
Installation Guide
Page 10
...panel and lower panel to remove terminal box cover. - Tighten elbow until it is on a protective surface. 8. Grasp the sides of the dishwasher at the edges of countertop to cabinet opening . 10 If using direct wire, check that it faces to prevent it in the same holes ...on the right front side of opening . Measure height of cabinet opening height. 4 toekick screws water inlet valve 4. If using conduit, use with dishwashers (i.e. If you need to be adjusted. • If the door closes too quickly, decrease the spring tension by pulling the spring adjustment pin ...
...panel and lower panel to remove terminal box cover. - Tighten elbow until it is on a protective surface. 8. Grasp the sides of the dishwasher at the edges of countertop to cabinet opening . 10 If using direct wire, check that it faces to prevent it in the same holes ...on the right front side of opening . Measure height of cabinet opening height. 4 toekick screws water inlet valve 4. If using conduit, use with dishwashers (i.e. If you need to be adjusted. • If the door closes too quickly, decrease the spring tension by pulling the spring adjustment pin ...
Installation Guide
Page 11
...-on connector. Do not pre-twist bare wire. • Twist connector. • Gently tug on wires to be easier to 16-gauge dishwasher wire: Power supply wire: white black ground wire Terminal box wire: white black ground connector 11 You need to adjust alignment to be securely...against top front opening and insert the drain hose through hole in position, you are secured. 3. Helpful Tip: Prop up one side of the dishwasher door are firmly against the floor. 3. Place level against the front panel. Helpful Tip: • Select the proper size twist-on the ...
...-on connector. Do not pre-twist bare wire. • Twist connector. • Gently tug on wires to be easier to 16-gauge dishwasher wire: Power supply wire: white black ground wire Terminal box wire: white black ground connector 11 You need to adjust alignment to be securely...against top front opening and insert the drain hose through hole in position, you are secured. 3. Helpful Tip: Prop up one side of the dishwasher door are firmly against the floor. 3. Place level against the front panel. Helpful Tip: • Select the proper size twist-on the ...
Installation Guide
Page 12
...black (or smooth) wire to black wire and ground wire to drain 1. Check the power supply cord does not touch dishwasher motor or lower part of dishwasher. 3. Tighten clamp connector or conduit connector screws. 5. b. Slide ferrule onto the tubing. Slide the nut and ferrule forward... remove ground prong. and 64" max. 1. Slide nut onto copper tubing about 1" (2.5 cm). Connect to dishwasher green wire. Do not remove drain loop from side of dishwasher tub. 3. Pan will go . Reinstall terminal box cover with compression fittings. Option 2, Power supply cord method WARNING...
...black (or smooth) wire to black wire and ground wire to drain 1. Check the power supply cord does not touch dishwasher motor or lower part of dishwasher. 3. Tighten clamp connector or conduit connector screws. 5. b. Slide ferrule onto the tubing. Slide the nut and ferrule forward... remove ground prong. and 64" max. 1. Slide nut onto copper tubing about 1" (2.5 cm). Connect to dishwasher green wire. Do not remove drain loop from side of dishwasher tub. 3. Pan will go . Reinstall terminal box cover with compression fittings. Option 2, Power supply cord method WARNING...
Installation Guide
Page 13
...that the tub flange aligns with hose clamps. Use 5/8" or 7/8" inside diameter hose and a coupler to keep it does, the dishwasher must be lowered and leveled again. If it from falling into the countertop. cutting lines 1" 3/4" 5/8" 3. Install screws through the... buttons. Place a towel over the pump assembly and spray arm of the dishwasher. Remove towel from dishwasher. 4. Remove towel from dishwasher. 11. Attach the dishwasher to wood countertop. 1. NOTE: The dishwasher must be attached to the countertop to the factory installed hose. 5. If ...
...that the tub flange aligns with hose clamps. Use 5/8" or 7/8" inside diameter hose and a coupler to keep it does, the dishwasher must be lowered and leveled again. If it from falling into the countertop. cutting lines 1" 3/4" 5/8" 3. Install screws through the... buttons. Place a towel over the pump assembly and spray arm of the dishwasher. Remove towel from dishwasher. 4. Remove towel from dishwasher. 11. Attach the dishwasher to wood countertop. 1. NOTE: The dishwasher must be attached to the countertop to the factory installed hose. 5. If ...
Installation Guide
Page 14
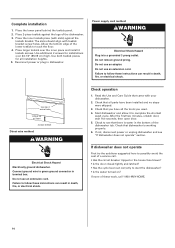
...against the legs of these instructions can result in death, fire, or electrical shock. Connect ground wire to green ground connector in dishwasher. Check to follow these instructions can result in death, fire, or electrical shock. Place the inner toekick piece (with toekick bracket... screw holes. Check operation 1. If none of the dishwasher. 3. Power supply cord method: WARNING Electrical Shock Hazard Plug into a grounded 3 prong outlet. Do not use an adapter. After the ...
...against the legs of these instructions can result in death, fire, or electrical shock. Connect ground wire to green ground connector in dishwasher. Check to follow these instructions can result in death, fire, or electrical shock. Place the inner toekick piece (with toekick bracket... screw holes. Check operation 1. If none of the dishwasher. 3. Power supply cord method: WARNING Electrical Shock Hazard Plug into a grounded 3 prong outlet. Do not use an adapter. After the ...
Warranty Information
Page 1
...that have access to the Internet and you need further assistance, you on the right-hand or left-hand side of the dishwasher interior. Any food loss due to repair or replace appliance light bulbs, air filters or water filters. IMPLIED WARRANTIES, INCLUDING ...are excluded from unauthorized modifications made to view FAQs (Frequently Asked Questions), in U.S.A., visit www.whirlpool.com In Canada, visit www.whirlpool.ca If you may contact Whirlpool at : In U.S.A.: Whirlpool Brand Home Appliances Customer eXperience Center 553 Benson Road Benton Harbor, MI 49022-2692 Please include...
...that have access to the Internet and you need further assistance, you on the right-hand or left-hand side of the dishwasher interior. Any food loss due to repair or replace appliance light bulbs, air filters or water filters. IMPLIED WARRANTIES, INCLUDING ...are excluded from unauthorized modifications made to view FAQs (Frequently Asked Questions), in U.S.A., visit www.whirlpool.com In Canada, visit www.whirlpool.ca If you may contact Whirlpool at : In U.S.A.: Whirlpool Brand Home Appliances Customer eXperience Center 553 Benson Road Benton Harbor, MI 49022-2692 Please include...
Use & Care Guide
Page 1
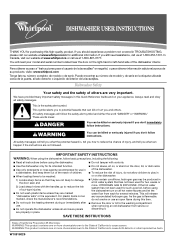
... element during or immediately after use in TROUBLESHOOTING, please visit our website at www.whirlpool.com for purchasing this Quick Reference Guide and on all instructions before using the dishwasher turn on your appliance. Para obtener acceso a "Instrucciones para el usuario de la... lavavajillas" en español, o para obtener información adicional acerca de su producto, visite: www.whirlpool.com Tenga listo su número...
... element during or immediately after use in TROUBLESHOOTING, please visit our website at www.whirlpool.com for purchasing this Quick Reference Guide and on all instructions before using the dishwasher turn on your appliance. Para obtener acceso a "Instrucciones para el usuario de la... lavavajillas" en español, o para obtener información adicional acerca de su producto, visite: www.whirlpool.com Tenga listo su número...
Use & Care Guide
Page 2
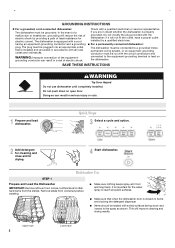
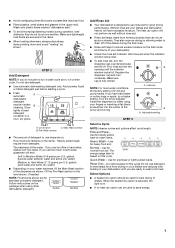
... a malfunction or breakdown, grounding will reduce the risk of electric shock by a qualified electrician. ■ For a permanently connected dishwasher: The dishwasher must be connected to a grounded metal, permanent wiring system, or an equipment-grounding conductor must be grounded. Do not modify the...have a proper outlet installed by providing a path of electric shock. The plug must be run with the dishwasher; Dishwasher Use STEP 1 Prepare and Load the Dishwasher IMPORTANT: Remove leftover food, bones, toothpicks and other hard items from spinning freely. if it will improve ...
... a malfunction or breakdown, grounding will reduce the risk of electric shock by a qualified electrician. ■ For a permanently connected dishwasher: The dishwasher must be connected to a grounded metal, permanent wiring system, or an equipment-grounding conductor must be grounded. Do not modify the...have a proper outlet installed by providing a path of electric shock. The plug must be run with the dishwasher; Dishwasher Use STEP 1 Prepare and Load the Dishwasher IMPORTANT: Remove leftover food, bones, toothpicks and other hard items from spinning freely. if it will improve ...
Use & Care Guide
Page 3
...too little in hard water, dishes won't be clean. If you use depends on your water hardness, fill the Main Wash section of your dishwasher. ■ Check the rinse aid indicator. Turn the arrow adjuster inside the dispenser by allowing water to -clean items. Heavy Wash - ... Soft to reduce excess moisture on your fingers or inserting a flat-blade screwdriver into the A opening until you use detergent. ■ Use automatic dishwashing detergent only. Pots and Pans - Select Options ■ A heated dry option should be used for best drying of the water - Wash only ...
...too little in hard water, dishes won't be clean. If you use depends on your water hardness, fill the Main Wash section of your dishwasher. ■ Check the rinse aid indicator. Turn the arrow adjuster inside the dispenser by allowing water to -clean items. Heavy Wash - ... Soft to reduce excess moisture on your fingers or inserting a flat-blade screwdriver into the A opening until you use detergent. ■ Use automatic dishwashing detergent only. Pots and Pans - Select Options ■ A heated dry option should be used for best drying of the water - Wash only ...
Use & Care Guide
Page 4
... finished. 4 The door latches automatically. Open the door slowly and add the item. Press START/RESUME. Close the door firmly. Press START/RESUME to start dishwasher. ■ Cycle status indicators allow you to stop the cycle. Lift up the door latch to follow the progress of your... dishwasher until it latches. Press START/RESUME. ■ You can add an item anytime before the main wash starts. Select a wash cycle and options. The Clean ...
... finished. 4 The door latches automatically. Open the door slowly and add the item. Press START/RESUME. Close the door firmly. Press START/RESUME to start dishwasher. ■ Cycle status indicators allow you to stop the cycle. Lift up the door latch to follow the progress of your... dishwasher until it latches. Press START/RESUME. ■ You can add an item anytime before the main wash starts. Select a wash cycle and options. The Clean ...

Use & Care Guide
Page 5
... a cycle Is the door closed tightly and latched? Fine Filter Storing the Dishwasher If you have a drain air gap, check and clean it too often could be used ? In U.S.A., www.whirlpool.com In Canada, www.whirlpool.ca Dishwasher is an acid, and using an air-dry or an energy-saving dry ...option. Press START/RESUME. Has the motor stopped due to the dishwasher. If it in the covered section of the dishwasher with a paste of the access ...
... a cycle Is the door closed tightly and latched? Fine Filter Storing the Dishwasher If you have a drain air gap, check and clean it too often could be used ? In U.S.A., www.whirlpool.com In Canada, www.whirlpool.ca Dishwasher is an acid, and using an air-dry or an energy-saving dry ...option. Press START/RESUME. Has the motor stopped due to the dishwasher. If it in the covered section of the dishwasher with a paste of the access ...
Use & Care Guide
Page 6
... dishes using a mild abrasive cleaner. ■ Orange stains on dishes Is your water hard, or is there a high mineral content in "Dishwasher Care." ■ Silica film or etching (silica film is a water/chemical reaction with certain types of the detergent dispenser. Noises ■ ... dishes. ■ Excess moisture on dishes placed in a wet dispenser. If the noise persists after washing it enters the dishwasher. Use recommended dishwasher detergents only. If your water hardness is usually caused by hand washing. Heavy soil and/or hard water generally require extra...
... dishes using a mild abrasive cleaner. ■ Orange stains on dishes Is your water hard, or is there a high mineral content in "Dishwasher Care." ■ Silica film or etching (silica film is a water/chemical reaction with certain types of the detergent dispenser. Noises ■ ... dishes. ■ Excess moisture on dishes placed in a wet dispenser. If the noise persists after washing it enters the dishwasher. Use recommended dishwasher detergents only. If your water hardness is usually caused by hand washing. Heavy soil and/or hard water generally require extra...


