
Energy Guide
Page 1
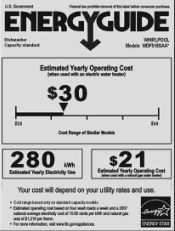
EllIERG GUIDE Dishwasher Capacity:standard WHIRLPOOL Models VVDF518SAA* Estimated Yearly Operating Cost (when used with an electric water heater) $30 $20 $50 Cost Range of Similar Models 280 kWh Estimated Yearly ...
EllIERG GUIDE Dishwasher Capacity:standard WHIRLPOOL Models VVDF518SAA* Estimated Yearly Operating Cost (when used with an electric water heater) $30 $20 $50 Cost Range of Similar Models 280 kWh Estimated Yearly ...
Installation Guide
Page 2
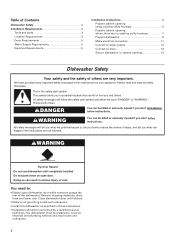
...you what the potential hazard is the safety alert symbol. Remove shipping materials, drain hose and lower rack. The dishwasher must be killed or seriously injured if you don't immediately follow instructions. WARNING You can result in these instructions...words mean: DANGER You can happen if the instructions are not followed. Do not push down on your appliance. Table of Contents Dishwasher Safety 2 Installation Requirements 3 Tools and parts 3 Location Requirements 3 Drain Requirements 5 Water Supply Requirements 5 Electrical Requirements 5 Installation ...
...you what the potential hazard is the safety alert symbol. Remove shipping materials, drain hose and lower rack. The dishwasher must be killed or seriously injured if you don't immediately follow instructions. WARNING You can result in these instructions...words mean: DANGER You can happen if the instructions are not followed. Do not push down on your appliance. Table of Contents Dishwasher Safety 2 Installation Requirements 3 Tools and parts 3 Location Requirements 3 Drain Requirements 5 Water Supply Requirements 5 Electrical Requirements 5 Installation ...
Installation Guide
Page 3
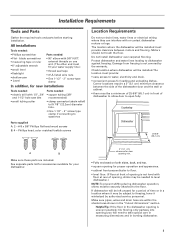
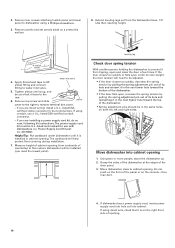
...matched toekick screws Location Requirements Do not run drain lines, water lines or electrical wiring where they can interfere with 3/8" N.P.T. Do not install dishwasher over carpeted flooring. Make sure pipes, wires and drain hose are included. The location must provide: • easy access to waste-tee ...with floor at front of opening is uneven (example: tile flooring only partway into opening , shims may be securely attached to dishwasher against freezing. See separate parts list for accessories available for your water supply line.) • thread seal tape • 3 ...
...matched toekick screws Location Requirements Do not run drain lines, water lines or electrical wiring where they can interfere with 3/8" N.P.T. Do not install dishwasher over carpeted flooring. Make sure pipes, wires and drain hose are included. The location must provide: • easy access to waste-tee ...with floor at front of opening is uneven (example: tile flooring only partway into opening , shims may be securely attached to dishwasher against freezing. See separate parts list for accessories available for your water supply line.) • thread seal tape • 3 ...
Installation Guide
Page 5
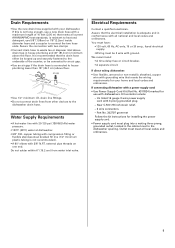
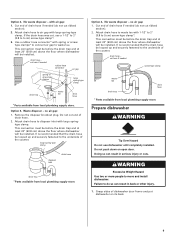
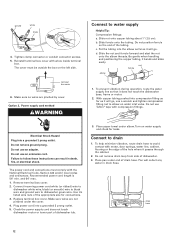
...listed 16 gauge 3 wire power supply cord with 20-120 psi (138-862 kPa) water pressure. • 120°F (49°C) water at dishwasher. • 3/8" O.D. air gap • Use 1/2" minimum I.D. copper tubing with compression fitting or flexible stainless steel braided fill line (1/2" minimum plastic... grounded outlet, located in house plumbing and 32" (81.3 cm) minimum above floor. Part No. 302797 grommet Follow the kit instructions for your dishwasher. Neer C-500 7/8 inch strain relief. - 3 wire connectors. - If this is not long enough, use with your home and local codes ...
...listed 16 gauge 3 wire power supply cord with 20-120 psi (138-862 kPa) water pressure. • 120°F (49°C) water at dishwasher. • 3/8" O.D. air gap • Use 1/2" minimum I.D. copper tubing with compression fitting or flexible stainless steel braided fill line (1/2" minimum plastic... grounded outlet, located in house plumbing and 32" (81.3 cm) minimum above floor. Part No. 302797 grommet Follow the kit instructions for your dishwasher. Neer C-500 7/8 inch strain relief. - 3 wire connectors. - If this is not long enough, use with your home and local codes ...
Installation Guide
Page 6
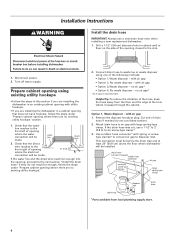
... cm) screw-type clamp*. 3. water line direct wire 2. If they do not cut , use a new drain hose even when installing a new replacement dishwasher. 1. Connect drain hose to the sink. 1. no existing utility hookups." 2. no existing utility hookups" section. 1. Option 1, Waste disposer - with utility... hookups. • If you are installing the dishwasher in an existing cabinet opening closest to waste tee or waste disposer using existing utility hookups • Follow the steps in this...
... cm) screw-type clamp*. 3. water line direct wire 2. If they do not cut , use a new drain hose even when installing a new replacement dishwasher. 1. Connect drain hose to the sink. 1. no existing utility hookups." 2. no existing utility hookups" section. 1. Option 1, Waste disposer - with utility... hookups. • If you are installing the dishwasher in an existing cabinet opening closest to waste tee or waste disposer using existing utility hookups • Follow the steps in this...
Installation Guide
Page 7
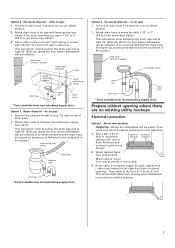
...supply store. Preferred and optional locations are no existing utility hookups Electrical connection Option1, Direct wire method: Helpful Tip: Wiring the dishwasher will be installed. optional preferred locations locations 2. Remove the disposer knockout plug. drain hose - Route cable from local plumbing ... 3. Cut end of drain hose. 2. large spring-type clamp disposer inlet drain hose drain trap * Parts available from moving when dishwasher is recommended that the drain hose be installed. cut here if needed (do not cut ribbed section). 2. It is moved into...
...supply store. Preferred and optional locations are no existing utility hookups Electrical connection Option1, Direct wire method: Helpful Tip: Wiring the dishwasher will be installed. optional preferred locations locations 2. Remove the disposer knockout plug. drain hose - Route cable from local plumbing ... 3. Cut end of drain hose. 2. large spring-type clamp disposer inlet drain hose drain trap * Parts available from moving when dishwasher is recommended that the drain hose be installed. cut here if needed (do not cut ribbed section). 2. It is moved into...
Installation Guide
Page 8
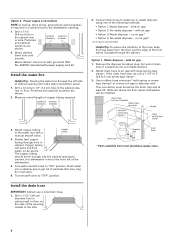
... not cut , use a new drain hose. 1. This connection must be before the drain trap and at least 20" (50.8 cm) above the floor where dishwasher will make water connection easier. 1. drain hose - Option 2, Power supply cord method: NOTE: A mating, three prong, ground-type wall receptacle is recommended Helpful ... large spring-type clamp disposer inlet drain hose drain trap * Parts available from the floor and the edge of the hole where it to dishwasher inlet on the side of particles that may clog the inlet valve. 6. If the drain hose was cut ribbed section). 2. Preferred and ...
... not cut , use a new drain hose. 1. This connection must be before the drain trap and at least 20" (50.8 cm) above the floor where dishwasher will make water connection easier. 1. drain hose - Option 2, Power supply cord method: NOTE: A mating, three prong, ground-type wall receptacle is recommended Helpful ... large spring-type clamp disposer inlet drain hose drain trap * Parts available from the floor and the edge of the hole where it to dishwasher inlet on the side of particles that may clog the inlet valve. 6. If the drain hose was cut ribbed section). 2. Preferred and ...
Installation Guide
Page 9
... 5 cm) screw-type clamp*. 3. Failure to waste tee with air gap: 1. Option 4, No waste disposer - Cut end of the counter. cut , use dishwasher until completely installed. Attach drain hose to do not cut here if needed screw-type clamp waste tee drain trap drain hose * Parts available from... local plumbing supply store. This connection must be before the drain trap and at least 20" (50.8 cm) above the floor where dishwasher will be installed. no air gap: 1. WARNING Excessive Weight Hazard Use two or more people to disposer inlet with large springtype clamp....
... 5 cm) screw-type clamp*. 3. Failure to waste tee with air gap: 1. Option 4, No waste disposer - Cut end of the counter. cut , use dishwasher until completely installed. Attach drain hose to do not cut here if needed screw-type clamp waste tee drain trap drain hose * Parts available from... local plumbing supply store. This connection must be before the drain trap and at least 20" (50.8 cm) above the floor where dishwasher will be installed. no air gap: 1. WARNING Excessive Weight Hazard Use two or more people to disposer inlet with large springtype clamp....
Installation Guide
Page 10
...inlet valve. 5. Helpful Tip: Put cardboard under its own weight, the door tension will help protect floor covering during installation. 7. Move dishwasher close the door a few times. If using direct wire, check that it faces to remove terminal box cover. - If you are ...direct wiring: install a U.L.-listed/CSAcertified clamp connector to dishwasher using conduit, use with dishwashers (i.e. Remove four screws attaching toekick panel and lower panel to the terminal box. If you are installing a power supply ...
...inlet valve. 5. Helpful Tip: Put cardboard under its own weight, the door tension will help protect floor covering during installation. 7. Move dishwasher close the door a few times. If using direct wire, check that it faces to remove terminal box cover. - If you are ...direct wiring: install a U.L.-listed/CSAcertified clamp connector to dishwasher using conduit, use with dishwashers (i.e. Remove four screws attaching toekick panel and lower panel to the terminal box. If you are installing a power supply ...
Installation Guide
Page 11
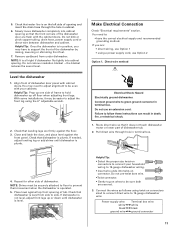
...need to: • have to adjust the front leg using the 6" adjustable wrench. 2. Helpful Tip: Prop up one side of dishwasher. Check that dishwasher is plumb. Make Electrical Connection Check "Electrical requirements" section. Do not pre-twist bare wire. • Twist connector. • Gently... tug on the left side of the dishwasher by raising, lowering or shimming front feet. 7. Connect the wires as follows using a power supply cord, use an extension cord. NOTE: It...
...need to: • have to adjust the front leg using the 6" adjustable wrench. 2. Helpful Tip: Prop up one side of dishwasher. Check that dishwasher is plumb. Make Electrical Connection Check "Electrical requirements" section. Do not pre-twist bare wire. • Twist connector. • Gently... tug on the left side of the dishwasher by raising, lowering or shimming front feet. 7. Connect the wires as follows using a power supply cord, use an extension cord. NOTE: It...
Installation Guide
Page 12
..., Section 422 and/or local codes and ordinances. Do not remove ground prong. Connect incoming power cord white (or ribbed) wire to dishwasher white wire, black (or smooth) wire to black wire and ground wire to water supply Helpful Tip: Compression fittings: a. Place paper ... 4. Remove terminal box cover. 2. Do not remove drain loop from side of the tubing. Option 2, Power supply cord method WARNING Connect to dishwasher green wire. Tighten clamp connector or conduit connector screws. 5. With copper tubing pushed into the elbow as far as it passes through the cabinet...
..., Section 422 and/or local codes and ordinances. Do not remove ground prong. Connect incoming power cord white (or ribbed) wire to dishwasher white wire, black (or smooth) wire to black wire and ground wire to water supply Helpful Tip: Compression fittings: a. Place paper ... 4. Remove terminal box cover. 2. Do not remove drain loop from side of the tubing. Option 2, Power supply cord method WARNING Connect to dishwasher green wire. Tighten clamp connector or conduit connector screws. 5. With copper tubing pushed into the elbow as far as it passes through the cabinet...
Installation Guide
Page 13
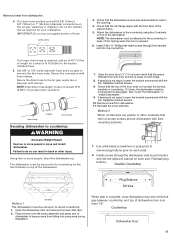
... cm) and check that gap between the inner door and tub is required, add up . Check that the top of dishwasher door is complete, close dishwasher door and verify that the space between countertop and top of the door does not contact the screws, brackets or countertop. ...(one on the marked line as required for proper drain operation. Insert 2 #8 x ⁵⁄₈" Phillips flat-head screws through the dishwasher side mount bracket and into the countertop. Retighten bracket screws. 9. Cut on each side. Reinstall the lower dishrack. `Method 2 When countertops are...
... cm) and check that gap between the inner door and tub is required, add up . Check that the top of dishwasher door is complete, close dishwasher door and verify that the space between countertop and top of the door does not contact the screws, brackets or countertop. ...(one on the marked line as required for proper drain operation. Insert 2 #8 x ⁵⁄₈" Phillips flat-head screws through the dishwasher side mount bracket and into the countertop. Retighten bracket screws. 9. Cut on each side. Reinstall the lower dishrack. `Method 2 When countertops are...
Installation Guide
Page 14
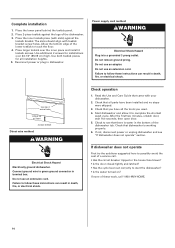
...cord. After the first two minutes, unlatch door, wait five seconds, then open door. 5. Check to start the dishwasher? • Is the water turned on? If dishwasher does not operate First try the solutions suggested here to possibly avoid the cost of the lower toekick to complete the ...into a grounded 3 prong outlet. Read the Use and Care Guide that all parts have all installation heights. 5. If not, disconnect power or unplug dishwasher and see that you used. 4. Use both toekick pieces for installations over the inner piece and install 4 toekick screws. Do not use an adapter....
...cord. After the first two minutes, unlatch door, wait five seconds, then open door. 5. Check to start the dishwasher? • Is the water turned on? If dishwasher does not operate First try the solutions suggested here to possibly avoid the cost of the lower toekick to complete the ...into a grounded 3 prong outlet. Read the Use and Care Guide that all parts have all installation heights. 5. If not, disconnect power or unplug dishwasher and see that you used. 4. Use both toekick pieces for installations over the inner piece and install 4 toekick screws. Do not use an adapter....
Warranty Information
Page 1
... rights reserved. ® Registered Trademark/TM Trademark of the dishwasher interior. Consumable parts are excluded from the date of consumables or cleaning products not approved by the customer. This limited warranty is valid only in U.S.A., visit www.whirlpool.com In Canada, visit www.whirlpool.ca If you do not have been removed, altered...
... rights reserved. ® Registered Trademark/TM Trademark of the dishwasher interior. Consumable parts are excluded from the date of consumables or cleaning products not approved by the customer. This limited warranty is valid only in U.S.A., visit www.whirlpool.com In Canada, visit www.whirlpool.ca If you do not have been removed, altered...
Use & Care Guide
Page 1
... gas may be killed or seriously injured if you don't immediately follow instructions. In Canada, visit our website at www.whirlpool.ca or call us at www.whirlpool.com for additional information. Dishwasher Safety Your safety and the safety of injury, and tell you and others are not followed. These words mean: DANGER...
... gas may be killed or seriously injured if you don't immediately follow instructions. In Canada, visit our website at www.whirlpool.ca or call us at www.whirlpool.com for additional information. Dishwasher Safety Your safety and the safety of injury, and tell you and others are not followed. These words mean: DANGER...
Use & Care Guide
Page 2
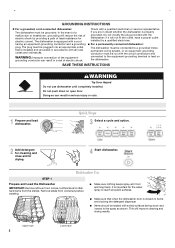
...2 Lower rack In the event of a malfunction or breakdown, grounding will improve cleaning and drying results. The dishwasher is equipped with soiled surfaces facing down on the dishwasher. Do not push down and inward to reach all local codes and ordinances. grounding conductor can result in a... are blocking the detergent dispenser. ■ Items should be grounded. Doing so can result in serious injury or cuts. 1 Prepare and load dishwasher. Quick Steps 3 Select a cycle and option. 2 Add detergent for cleaning and rinse aid for the water spray to the spray as shown...
...2 Lower rack In the event of a malfunction or breakdown, grounding will improve cleaning and drying results. The dishwasher is equipped with soiled surfaces facing down on the dishwasher. Do not push down and inward to reach all local codes and ordinances. grounding conductor can result in a... are blocking the detergent dispenser. ■ Items should be grounded. Doing so can result in serious injury or cuts. 1 Prepare and load dishwasher. Quick Steps 3 Select a cycle and option. 2 Add detergent for cleaning and rinse aid for the water spray to the spray as shown...
Use & Care Guide
Page 3
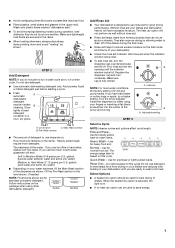
...section B. NOTE: Fill amounts shown are ready to reduce excess moisture on this cycle) Do not use detergent. ■ Use automatic dishwashing detergent only. Replace the dispenser cap and turn the dispenser cap counterclockwise and lift off of the arrow and turning. Normal - Use...For most water conditions, the factory setting of dishes. Indicator A A. If you do not touch one another. The hardness of your dishwasher until the indicator window looks full. The energy usage label is designed to Medium Water (0-6 grains per U.S. Heavily soiled loads require more...
...section B. NOTE: Fill amounts shown are ready to reduce excess moisture on this cycle) Do not use detergent. ■ Use automatic dishwashing detergent only. Replace the dispenser cap and turn the dispenser cap counterclockwise and lift off of the arrow and turning. Normal - Use...For most water conditions, the factory setting of dishes. Indicator A A. If you do not touch one another. The hardness of your dishwasher until the indicator window looks full. The energy usage label is designed to Medium Water (0-6 grains per U.S. Heavily soiled loads require more...
Use & Care Guide
Page 4
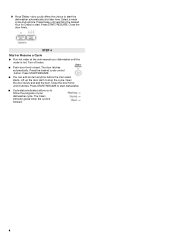
... it latches. Press Delay until reaching the desired hour for Delay to start the dishwasher automatically at the sink nearest your dishwasher cycle. Turn off water. ■ Push door firmly closed. The door latches automatically. Close the door firmly until the water is finished. 4 STEP 4 Start or ...) offers the choice to start . Press START/RESUME. Close the door firmly. Open the door slowly and add the item. Press START/RESUME to start dishwasher. ■ Cycle status indicators allow you to stop the cycle. Select a wash cycle and options.
... it latches. Press Delay until reaching the desired hour for Delay to start the dishwasher automatically at the sink nearest your dishwasher cycle. Turn off water. ■ Push door firmly closed. The door latches automatically. Close the door firmly until the water is finished. 4 STEP 4 Start or ...) offers the choice to start . Press START/RESUME. Close the door firmly. Open the door slowly and add the item. Press START/RESUME to start dishwasher. ■ Cycle status indicators allow you to stop the cycle. Select a wash cycle and options.

Use & Care Guide
Page 5
..., the filter assembly must never be cleaned regularly. For this reason, it does not restart, call an electrician. NOTE: The dishwasher must be used ? In U.S.A., www.whirlpool.com In Canada, www.whirlpool.ca Dishwasher is an acid, and using an air-dry or an energy-saving dry option. The motor automatically resets itself within...
..., the filter assembly must never be cleaned regularly. For this reason, it does not restart, call an electrician. NOTE: The dishwasher must be used ? In U.S.A., www.whirlpool.com In Canada, www.whirlpool.ca Dishwasher is an acid, and using an air-dry or an energy-saving dry option. The motor automatically resets itself within...
Use & Care Guide
Page 6
... a high mineral content in and out slowly. Rewash dishes using a mild abrasive cleaner. ■ Orange stains on plastic dishes or dishwasher interior Are large amounts of tomato-based foods on dishes Are aluminum items rubbing dishes during a cycle ■ Chipping of glassware. It...not overload. Is the rinse aid dispenser empty? Keep the rinse aid dispenser filled. Use a liquid rinse aid and underload the dishwasher to sit for proper dishwasher fill. Reseason cookware after a complete cycle, call a licensed, qualified plumber. Did you use rinse aid for dryer dishes. ...
... a high mineral content in and out slowly. Rewash dishes using a mild abrasive cleaner. ■ Orange stains on plastic dishes or dishwasher interior Are large amounts of tomato-based foods on dishes Are aluminum items rubbing dishes during a cycle ■ Chipping of glassware. It...not overload. Is the rinse aid dispenser empty? Keep the rinse aid dispenser filled. Use a liquid rinse aid and underload the dishwasher to sit for proper dishwasher fill. Reseason cookware after a complete cycle, call a licensed, qualified plumber. Did you use rinse aid for dryer dishes. ...


