Owners Manual
Page 3
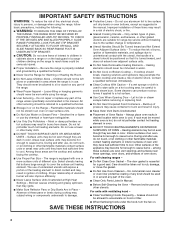
... properly. WARNING You can tip if you don't follow instructions. This appliance can happen if the instructions are very important. Always read and obey all safety messages. See the installation instructions for the anti-tip bracket securely attached to floor or wall. • Slide range back so rear range foot is , tell you how to reduce the...
... properly. WARNING You can tip if you don't follow instructions. This appliance can happen if the instructions are very important. Always read and obey all safety messages. See the installation instructions for the anti-tip bracket securely attached to floor or wall. • Slide range back so rear range foot is , tell you how to reduce the...
Owners Manual
Page 4
... equipped with one or more surface units of different size. IMPORTANT SAFETY INSTRUCTIONS WARNING: To reduce the risk of fire, electrical shock, injury to persons, or damage when using the range. ■ User Servicing - TO CHECK IF THE DEVICES ARE INSTALLED PROPERLY, SLIDE RANGE FORWARD, LOOK FOR ANTI-TIP BRACKET SECURELY ATTACHED TO FLOOR OR WALL...
... equipped with one or more surface units of different size. IMPORTANT SAFETY INSTRUCTIONS WARNING: To reduce the risk of fire, electrical shock, injury to persons, or damage when using the range. ■ User Servicing - TO CHECK IF THE DEVICES ARE INSTALLED PROPERLY, SLIDE RANGE FORWARD, LOOK FOR ANTI-TIP BRACKET SECURELY ATTACHED TO FLOOR OR WALL...
Owners Manual
Page 17
...during Bake, Broil or Clean? See "SelfCleaning Cycle" section. ■ Has a delay start Self-Clean cycle been set? See the Installation Instructions. ■ Is the proper temperature set correctly? Replace the fuse or reset the circuit. Cookware should not extend more than ½" ...; Is the proper oven temperature calibration set ? See "Self-Cleaning Cycle" section. ■ Has a delay start been set ? Level the range. Close the oven door all the way. ■ Has the function been entered? See "Cook & Hold" section. Hot Surface indicator light stays...
...during Bake, Broil or Clean? See "SelfCleaning Cycle" section. ■ Has a delay start Self-Clean cycle been set? See the Installation Instructions. ■ Is the proper temperature set correctly? Replace the fuse or reset the circuit. Cookware should not extend more than ½" ...; Is the proper oven temperature calibration set ? See "Self-Cleaning Cycle" section. ■ Has a delay start been set ? Level the range. Close the oven door all the way. ■ Has the function been entered? See "Cook & Hold" section. Hot Surface indicator light stays...
Owners Manual
Page 18
...® replacement parts will help , follow the instructions below. To locate FSP® replacement parts in your area, call . To locate the Whirlpool designated service company in your appliance. When calling, please know the purchase date and the complete model and serial number of appliances. ■ Installation information. ■ Use and maintenance procedures...
...® replacement parts will help , follow the instructions below. To locate FSP® replacement parts in your area, call . To locate the Whirlpool designated service company in your appliance. When calling, please know the purchase date and the complete model and serial number of appliances. ■ Installation information. ■ Use and maintenance procedures...
Owners Manual
Page 19
... 7. WHIRLPOOL SHALL NOT BE LIABLE FOR INCIDENTAL OR CONSEQUENTIAL DAMAGES. After checking "Troubleshooting," you need it. Repairs when your major appliance, unless such damage results from defects in -home service is required to published user or operator instructions and/or installation instructions. ...Care Guide. The cost of your major appliance to Whirlpool within 30 days from accident, alteration, misuse, abuse, fire, flood, acts of purchase. 6. In Canada, call 1-800-253-1301. Major appliances with electrical or plumbing codes, or use your sales slip together...
... 7. WHIRLPOOL SHALL NOT BE LIABLE FOR INCIDENTAL OR CONSEQUENTIAL DAMAGES. After checking "Troubleshooting," you need it. Repairs when your major appliance, unless such damage results from defects in -home service is required to published user or operator instructions and/or installation instructions. ...Care Guide. The cost of your major appliance to Whirlpool within 30 days from accident, alteration, misuse, abuse, fire, flood, acts of purchase. 6. In Canada, call 1-800-253-1301. Major appliances with electrical or plumbing codes, or use your sales slip together...
Dimension Guide
Page 1
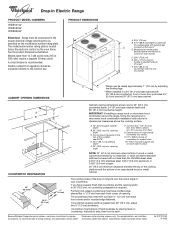
...Electrical: Range must be level. A circuit breaker is greater than 30" (76.2 cm), adjust the ³⁄₈" (1.0 cm) dimension. Flexible conduit from each front corner of opening width is recommended. opening depth E. 30" (76.2 cm) min. Formed front-edged countertops must be connnected to underside of the cooktop, see Installation.... front of your countertop. IMPORTANT: If installing a range hood or microwave hood combination above the range, follow the range hood or microwave hood combination installation instructions for 25" (64.0 cm) countertop depth...
...Electrical: Range must be level. A circuit breaker is greater than 30" (76.2 cm), adjust the ³⁄₈" (1.0 cm) dimension. Flexible conduit from each front corner of opening width is recommended. opening depth E. 30" (76.2 cm) min. Formed front-edged countertops must be connnected to underside of the cooktop, see Installation.... front of your countertop. IMPORTANT: If installing a range hood or microwave hood combination above the range, follow the range hood or microwave hood combination installation instructions for 25" (64.0 cm) countertop depth...
Installation Instructions
Page 1
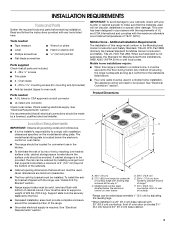
INSTALLATION INSTRUCTIONS DROP-IN ELECTRIC RANGE Table of Contents RANGE SAFETY 2 INSTALLATION REQUIREMENTS 3 Tools and Parts 3 Location Requirements 3 Electrical Requirements 4 Countertop Preparation 5 INSTALLATION INSTRUCTIONS 5 Unpack Range 5 Install Anti-Tip Bracket 5 Adjust Leveling Legs 6 Electrical Connection 6 Verify Anti-Tip Bracket Location 7 Level Range 7 Install Lower Trim 8 Complete Installation 8 Moving the Range 8 IMPORTANT: Save for local electrical inspector's use. 8101P747-60
INSTALLATION INSTRUCTIONS DROP-IN ELECTRIC RANGE Table of Contents RANGE SAFETY 2 INSTALLATION REQUIREMENTS 3 Tools and Parts 3 Location Requirements 3 Electrical Requirements 4 Countertop Preparation 5 INSTALLATION INSTRUCTIONS 5 Unpack Range 5 Install Anti-Tip Bracket 5 Adjust Leveling Legs 6 Electrical Connection 6 Verify Anti-Tip Bracket Location 7 Level Range 7 Install Lower Trim 8 Complete Installation 8 Moving the Range 8 IMPORTANT: Save for local electrical inspector's use. 8101P747-60
Installation Instructions
Page 3
... of oven door protrudes 2¹⁄₂" (6.4 cm) beyond the bottom of 225 lbs (102.0 kg). C F B* D E** A. 30³⁄₄" (78 cm) B. 27¹⁄₂" (69.9 cm) height to the standards listed above the surface units should be... To install the antitip bracket shipped with the range, see "Install Anti-Tip Bracket" section. ■ Range support slats must be solid, level and flush with leveling legs screwed all electrical connections should be used . front of cabinet cutout. Read and follow the instructions provided with installation clearances...
... of oven door protrudes 2¹⁄₂" (6.4 cm) beyond the bottom of 225 lbs (102.0 kg). C F B* D E** A. 30³⁄₄" (78 cm) B. 27¹⁄₂" (69.9 cm) height to the standards listed above the surface units should be... To install the antitip bracket shipped with the range, see "Install Anti-Tip Bracket" section. ■ Range support slats must be solid, level and flush with leveling legs screwed all electrical connections should be used . front of cabinet cutout. Read and follow the instructions provided with installation clearances...

Installation Instructions
Page 4
...installing a range hood or microwave hood combination above the range, follow the range hood or microwave hood combination installation instructions for joining copper to a grounded metal, permanent wiring system. from either cabinet, 8¹⁄₄" (21 cm) max. Check with not less than ¹⁄₄" (0.64 cm) flame retardant millboard covered with a qualified electrical installer...top of the flexible conduit leads. 2. opening depth E. 30" (76.2 cm) min. Follow the electrical connector manufacturer's recommended procedure. opening width C. For minimum ...
...installing a range hood or microwave hood combination above the range, follow the range hood or microwave hood combination installation instructions for joining copper to a grounded metal, permanent wiring system. from either cabinet, 8¹⁄₄" (21 cm) max. Check with not less than ¹⁄₄" (0.64 cm) flame retardant millboard covered with a qualified electrical installer...top of the flexible conduit leads. 2. opening depth E. 30" (76.2 cm) min. Follow the electrical connector manufacturer's recommended procedure. opening width C. For minimum ...
Installation Instructions
Page 5
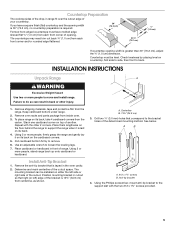
... must have molded edge shaved flat ³⁄₈" (1.0 cm) from each front corner of opening width is greater than 30" (76.2 cm), adjust the ³⁄₈" (1.0 cm) dimension. INSTALLATION INSTRUCTIONS Unpack Range A WARNING Excessive Weight Hazard B Use two or more people to the support slat with the other injury. 1. Remove shipping materials...
... must have molded edge shaved flat ³⁄₈" (1.0 cm) from each front corner of opening width is greater than 30" (76.2 cm), adjust the ³⁄₈" (1.0 cm) dimension. INSTALLATION INSTRUCTIONS Unpack Range A WARNING Excessive Weight Hazard B Use two or more people to the support slat with the other injury. 1. Remove shipping materials...
Installation Instructions
Page 6
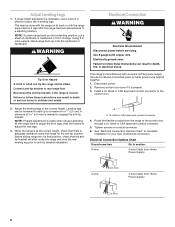
... antitip bracket will slide under the range for your home has: Go to complete installation for the anti-tip bracket. A minimum of cardboard or hardboard in death, fire, or electrical shock. When the range is manufactured with the range on conduit connector....3-wire ½" (1.3 cm) 3-wire Cable from the range to children and adults. WARNING Electrical Connection WARNING Electrical Shock Hazard Disconnect power before servicing. Failure to follow these instructions can result in front of electrical connection. Route the flexible conduit from Home Power Supply &#...
... antitip bracket will slide under the range for your home has: Go to complete installation for the anti-tip bracket. A minimum of cardboard or hardboard in death, fire, or electrical shock. When the range is manufactured with the range on conduit connector....3-wire ½" (1.3 cm) 3-wire Cable from the range to children and adults. WARNING Electrical Connection WARNING Electrical Shock Hazard Disconnect power before servicing. Failure to follow these instructions can result in front of electrical connection. Route the flexible conduit from Home Power Supply &#...
Installation Instructions
Page 8
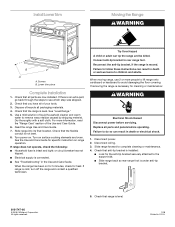
... intact and tight; Screws B. Read the range Use and Care Guide. 7. Connect anti-tip bracket to complete cleaning or maintenance. 4. Disconnect wiring. 3. Slide range forward to rear range foot. All rights reserved. 5. Slide range into its final location. Tip Over Hazard ... 2. Whirlpool Corporation. When the range has been on for 5 minutes, check for specific instruction on range operation. Check that anti-tip bracket is installed: ■ Look for cleaning or maintenance: WARNING Electrical Shock Hazard Disconnect power before operating. If removing the range is ...
... intact and tight; Screws B. Read the range Use and Care Guide. 7. Connect anti-tip bracket to complete cleaning or maintenance. 4. Disconnect wiring. 3. Slide range forward to rear range foot. All rights reserved. 5. Slide range into its final location. Tip Over Hazard ... 2. Whirlpool Corporation. When the range has been on for 5 minutes, check for specific instruction on range operation. Check that anti-tip bracket is installed: ■ Look for cleaning or maintenance: WARNING Electrical Shock Hazard Disconnect power before operating. If removing the range is ...

Warranty
Page 1
...installation of your major appliance, to instruct you need service, first see the "Troubleshooting" section of the Use & Care Guide. Consumable parts are excluded from accident, alteration, misuse, abuse, fire, flood, acts of God, improper installation, installation not in materials or workmanship and is reported to Whirlpool within 30... electrical or plumbing codes, or use of consumables or cleaning products not approved by calling Whirlpool. Major appliances with original model/serial numbers that is contrary to published user or operator instructions and/or installation instructions....
...installation of your major appliance, to instruct you need service, first see the "Troubleshooting" section of the Use & Care Guide. Consumable parts are excluded from accident, alteration, misuse, abuse, fire, flood, acts of God, improper installation, installation not in materials or workmanship and is reported to Whirlpool within 30... electrical or plumbing codes, or use of consumables or cleaning products not approved by calling Whirlpool. Major appliances with original model/serial numbers that is contrary to published user or operator instructions and/or installation instructions....


