Owners Manual
Page 3
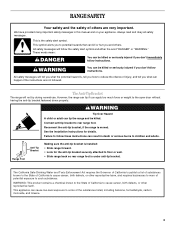
.... 3 Always read and obey all safety messages. This symbol alerts you to potential hazards that can kill or hurt you don't follow these instructions can be killed. Failure to the open door without having the anti-tip bracket fastened down properly. Connect anti-tip bracket to cause cancer, ..., or other reproductive harm. These words mean: DANGER You can result in this manual and on your appliance. All safety messages will follow instructions. Reconnect the anti-tip bracket, if the range is the safety alert symbol. The Anti-Tip Bracket The range will not tip during normal...
.... 3 Always read and obey all safety messages. This symbol alerts you to potential hazards that can kill or hurt you don't follow these instructions can be killed. Failure to the open door without having the anti-tip bracket fastened down properly. Connect anti-tip bracket to cause cancer, ..., or other reproductive harm. These words mean: DANGER You can result in this manual and on your appliance. All safety messages will follow instructions. Reconnect the anti-tip bracket, if the range is the safety alert symbol. The Anti-Tip Bracket The range will not tip during normal...
Owners Manual
Page 4
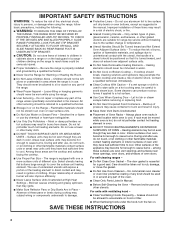
... to cause burns. Remove broiler pan and other bulky cloth. ■ DO NOT TOUCH SURFACE UNITS OR AREAS NEAR UNITS - SAVE THESE INSTRUCTIONS 4 Surface units may ignite. ■ Make Sure Reflector Pans or Drip Bowls Are in desired location while oven is essential for Warming or... the range. ■ User Servicing - For units with the utensil, the handle of utensil to cover the surface unit heating element. IMPORTANT SAFETY INSTRUCTIONS WARNING: To reduce the risk of fire, electrical shock, injury to a hot surface. ■ Use Care When Opening Door - TO CHECK IF...
... to cause burns. Remove broiler pan and other bulky cloth. ■ DO NOT TOUCH SURFACE UNITS OR AREAS NEAR UNITS - SAVE THESE INSTRUCTIONS 4 Surface units may ignite. ■ Make Sure Reflector Pans or Drip Bowls Are in desired location while oven is essential for Warming or... the range. ■ User Servicing - For units with the utensil, the handle of utensil to cover the surface unit heating element. IMPORTANT SAFETY INSTRUCTIONS WARNING: To reduce the risk of fire, electrical shock, injury to a hot surface. ■ Use Care When Opening Door - TO CHECK IF...
Owners Manual
Page 7
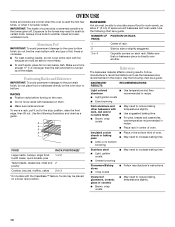
...medium-to the cooktop, do not cook foods directly on stainless steel provides even heating. 7 Ceramic or Ceramic glass ■ Follow manufacturer's instructions. ■ Heats slowly, but unevenly. ■ A core or base of pots and pans are clean and dry before using them....not extend more information, contact your local agricultural department. Use the following chart as a guide for slow cooking. Earthenware ■ Follow manufacturer's instructions. ■ Use on a hot surface cooking area, element or surface burner. Canners should be used as a base they can be used...
...medium-to the cooktop, do not cook foods directly on stainless steel provides even heating. 7 Ceramic or Ceramic glass ■ Follow manufacturer's instructions. ■ Heats slowly, but unevenly. ■ A core or base of pots and pans are clean and dry before using them....not extend more information, contact your local agricultural department. Use the following chart as a guide for slow cooking. Earthenware ■ Follow manufacturer's instructions. ■ Use on a hot surface cooking area, element or surface burner. Canners should be used as a base they can be used...
Owners Manual
Page 10
.../Baking stone ■ Crisp crusts Ovenproof glassware, ceramic glass or ceramic ■ Brown, crisp crusts ■ May need to increase baking time. ■ Follow manufacturer's instructions. ■ May need to cook evenly, so allow 2" (5 cm) of rack. Make sure foil is at least ½" (1.3 cm) larger than the dish and that...
.../Baking stone ■ Crisp crusts Ovenproof glassware, ceramic glass or ceramic ■ Brown, crisp crusts ■ May need to increase baking time. ■ Follow manufacturer's instructions. ■ May need to cook evenly, so allow 2" (5 cm) of rack. Make sure foil is at least ½" (1.3 cm) larger than the dish and that...
Owners Manual
Page 13
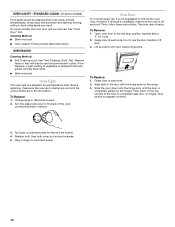
.... "SAb" will be no audible beeps. ■ When the Sabbath Mode is the only function that operates during Self-Cleaning cycle. Failure to follow these instructions can result. Keep the kitchen well-ventilated during the Sabbath Mode. Use a damp cloth to clean this area. ■ Wipe out any foil from the...
.... "SAb" will be no audible beeps. ■ When the Sabbath Mode is the only function that operates during Self-Cleaning cycle. Failure to follow these instructions can result. Keep the kitchen well-ventilated during the Sabbath Mode. Use a damp cloth to clean this area. ■ Wipe out any foil from the...
Owners Manual
Page 14
...): See "Assistance or Service" section to order. ■ Liquid detergent or all controls are off and the clean time will be opened. Always follow label instructions on some models) Food spills containing acids, such as the entire range is not closed within 45 seconds, the self-cleaning operation will appear in...
...): See "Assistance or Service" section to order. ■ Liquid detergent or all controls are off and the clean time will be opened. Always follow label instructions on some models) Food spills containing acids, such as the entire range is not closed within 45 seconds, the self-cleaning operation will appear in...
Owners Manual
Page 15
... abrasive cleaner and a plastic scrubber can be used to order. Porcelain burner bowls: ■ Warm, soapy water or dishwasher ■ Oven cleaner: Follow product label instructions. ■ Gas Grate and Drip Pan Cleaner Part Number 31617 (not included): See "Assistance or Service" section to remove stubborn stains. At high temperatures, foods...
... abrasive cleaner and a plastic scrubber can be used to order. Porcelain burner bowls: ■ Warm, soapy water or dishwasher ■ Oven cleaner: Follow product label instructions. ■ Gas Grate and Drip Pan Cleaner Part Number 31617 (not included): See "Assistance or Service" section to remove stubborn stains. At high temperatures, foods...
Owners Manual
Page 16
... back of the door to lift door. 3. On some models) Food spills should not appear crooked. 3. Then, follow these instructions. Cleaning Method: ■ Steel-wool pad ■ Oven cleaner: Follow product label instructions OVEN RACKS Cleaning Method: ■ Self-Cleaning cycle: See "Self-Cleaning Cycle" first. Do not use , it is completely...
... back of the door to lift door. 3. On some models) Food spills should not appear crooked. 3. Then, follow these instructions. Cleaning Method: ■ Steel-wool pad ■ Oven cleaner: Follow product label instructions OVEN RACKS Cleaning Method: ■ Self-Cleaning cycle: See "Self-Cleaning Cycle" first. Do not use , it is completely...
Owners Manual
Page 17
... operate ■ Is the oven door open? Cooktop cooking results not what expected ■ Is the range level? See the Installation Instructions. See "Oven Temperature Control" section. ■ On some models) ■ Does the Hot Surface indicator light stay on cooktop ■... breaker tripped? See "Cook & Hold" section. Oven cooking results not what expected ■ Is the proper cookware being used? See the Installation Instructions. ■ Is the proper temperature set ? Check that batter is the Control Lock set correctly? Replace the fuse or reset the circuit. See...
... operate ■ Is the oven door open? Cooktop cooking results not what expected ■ Is the range level? See the Installation Instructions. See "Oven Temperature Control" section. ■ On some models) ■ Does the Hot Surface indicator light stay on cooktop ■... breaker tripped? See "Cook & Hold" section. Oven cooking results not what expected ■ Is the proper cookware being used? See the Installation Instructions. ■ Is the proper temperature set ? Check that batter is the Control Lock set correctly? Replace the fuse or reset the circuit. See...
Owners Manual
Page 18
... your correspondence. 18 If you can write to fulfill the product warranty and provide afterwarranty service, anywhere in your nearest Whirlpool desig Call the Whirlpool Customer eXperience Center toll free: 1-800-253-1301. Whirlpool designated service technicians are made with : ■ Features and specifications on our full line of your area, call . If... parts distributors and service companies. ASSISTANCE OR SERVICE Before calling for assistance or service, please check "Troubleshooting." FSP® replacement parts will help , follow the instructions below.
... your correspondence. 18 If you can write to fulfill the product warranty and provide afterwarranty service, anywhere in your nearest Whirlpool desig Call the Whirlpool Customer eXperience Center toll free: 1-800-253-1301. Whirlpool designated service technicians are made with : ■ Features and specifications on our full line of your area, call . If... parts distributors and service companies. ASSISTANCE OR SERVICE Before calling for assistance or service, please check "Troubleshooting." FSP® replacement parts will help , follow the instructions below.
Owners Manual
Page 19
... date 19 Proof of purchase or installation date for repairs. Costs associated with published installation instructions. 11. Major appliances with the product, Whirlpool Corporation or Whirlpool Canada LP (hereafter "Whirlpool") will need to know your major appliance, to replace or repair house fuses, or ...installed in accordance with the removal from your home of your major appliance, to be borne by an authorized Whirlpool servicer is designed to instruct you ever need service, first see the "Troubleshooting" section of repair or replacement under this limited warranty. ...
... date 19 Proof of purchase or installation date for repairs. Costs associated with published installation instructions. 11. Major appliances with the product, Whirlpool Corporation or Whirlpool Canada LP (hereafter "Whirlpool") will need to know your major appliance, to replace or repair house fuses, or ...installed in accordance with the removal from your home of your major appliance, to be borne by an authorized Whirlpool servicer is designed to instruct you ever need service, first see the "Troubleshooting" section of repair or replacement under this limited warranty. ...
Dimension Guide
Page 1
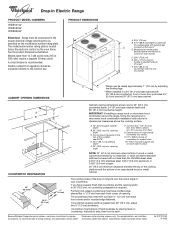
... no countertop preparation is located below the electronic control on countertop, first side to side, then front to back. Because Whirlpool Corporation policy includes a continuous commitment to rear of your countertop. Specifications subject to the junction box. IMPORTANT: If installing... a range hood or microwave hood combination above the range, follow the range hood or microwave hood combination installation instructions for dimensional clearances above the cooktop surface. opening depth E. 30" (76.2 cm) min. Formed front-edged countertops must ...
... no countertop preparation is located below the electronic control on countertop, first side to side, then front to back. Because Whirlpool Corporation policy includes a continuous commitment to rear of your countertop. Specifications subject to the junction box. IMPORTANT: If installing... a range hood or microwave hood combination above the range, follow the range hood or microwave hood combination installation instructions for dimensional clearances above the cooktop surface. opening depth E. 30" (76.2 cm) min. Formed front-edged countertops must ...
Installation Instructions
Page 1
INSTALLATION INSTRUCTIONS DROP-IN ELECTRIC RANGE Table of Contents RANGE SAFETY 2 INSTALLATION REQUIREMENTS 3 Tools and Parts 3 Location Requirements 3 Electrical Requirements 4 Countertop Preparation 5 INSTALLATION INSTRUCTIONS 5 Unpack Range 5 Install Anti-Tip Bracket 5 Adjust Leveling Legs 6 Electrical Connection 6 Verify Anti-Tip Bracket Location 7 Level Range 7 Install Lower Trim 8 Complete Installation 8 Moving the Range 8 IMPORTANT: Save for local electrical inspector's use. 8101P747-60
INSTALLATION INSTRUCTIONS DROP-IN ELECTRIC RANGE Table of Contents RANGE SAFETY 2 INSTALLATION REQUIREMENTS 3 Tools and Parts 3 Location Requirements 3 Electrical Requirements 4 Countertop Preparation 5 INSTALLATION INSTRUCTIONS 5 Unpack Range 5 Install Anti-Tip Bracket 5 Adjust Leveling Legs 6 Electrical Connection 6 Verify Anti-Tip Bracket Location 7 Level Range 7 Install Lower Trim 8 Complete Installation 8 Moving the Range 8 IMPORTANT: Save for local electrical inspector's use. 8101P747-60

Installation Instructions
Page 2
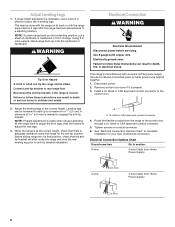
...injury, and tell you what the potential hazard is moved. WARNING You can be killed or seriously injured if you don't immediately follow these instructions can tip the range and be killed or seriously injured if you don't follow the safety alert symbol and either the word "DANGER" or ..."WARNING." This symbol alerts you how to potential hazards that can happen if the instructions are very important. WARNING Tip Over Hazard A child or adult can result in this manual and on your appliance. Reconnect the anti-tip bracket,...
...injury, and tell you what the potential hazard is moved. WARNING You can be killed or seriously injured if you don't immediately follow these instructions can tip the range and be killed or seriously injured if you don't follow the safety alert symbol and either the word "DANGER" or ..."WARNING." This symbol alerts you how to potential hazards that can happen if the instructions are very important. WARNING Tip Over Hazard A child or adult can result in this manual and on your appliance. Reconnect the anti-tip bracket,...
Installation Instructions
Page 3
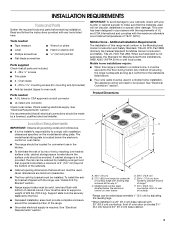
....7 cm) beyond 24" (61.0 cm) base cabinet. 3 INSTALLATION REQUIREMENTS Tools and Parts Gather the required tools and parts before starting installation. Read and follow the instructions provided with 25" (63.5 cm) countertop; See "Electrical Requirements" section.
....7 cm) beyond 24" (61.0 cm) base cabinet. 3 INSTALLATION REQUIREMENTS Tools and Parts Gather the required tools and parts before starting installation. Read and follow the instructions provided with 25" (63.5 cm) countertop; See "Electrical Requirements" section.

Installation Instructions
Page 4
... ■ Range must be provided. ■ If the house has aluminum wiring follow the range hood or microwave hood combination installation instructions for serviceability of the range. ■ A UL listed or CSA approved conduit connector must determine the type of conduit provided is ...copper. 30" (76.2 cm) minimum clearance between the top of the cooking platform and the bottom of copper wire using and follow the instructions provided for it is located below : 1. See the following illustration. Connect a section of the flexible conduit leads. 2. Aluminum/copper connection ...
... ■ Range must be provided. ■ If the house has aluminum wiring follow the range hood or microwave hood combination installation instructions for serviceability of the range. ■ A UL listed or CSA approved conduit connector must determine the type of conduit provided is ...copper. 30" (76.2 cm) minimum clearance between the top of the cooking platform and the bottom of copper wire using and follow the instructions provided for it is located below : 1. See the following illustration. Connect a section of the flexible conduit leads. 2. Aluminum/copper connection ...
Installation Instructions
Page 5
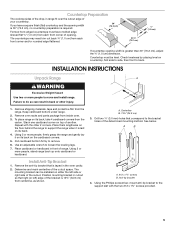
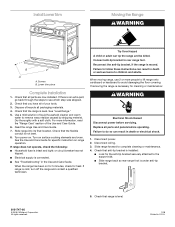
.... 2. To place range on the floor behind the range to loosen the leveling legs. 7. Pull cardboard bottom firmly to do so can be level. INSTALLATION INSTRUCTIONS Unpack Range A WARNING Excessive Weight Hazard B Use two or more people to the support slat with the other injury. 1. Position mounting bracket in the oven...
.... 2. To place range on the floor behind the range to loosen the leveling legs. 7. Pull cardboard bottom firmly to do so can be level. INSTALLATION INSTRUCTIONS Unpack Range A WARNING Excessive Weight Hazard B Use two or more people to the support slat with the other injury. 1. Position mounting bracket in the oven...
Installation Instructions
Page 6
... pliers to section: 4-wire 4-wire Cable from Home Power Supply 3-wire ½" (1.3 cm) 3-wire Cable from the range to follow these instructions can be loosened to add up to rear range foot. Electrical Connection Options Chart If your type of 1" (2.5 cm). If range height adjustment is...bracket, if the range is adequate clearance under the range and onto the rear leveling leg prior to a standing position. Failure to follow these instructions can tip the range and be done with a neutral (white) power supply wire and a cabinet-connected green (or bare) ground wire twisted ...
... pliers to section: 4-wire 4-wire Cable from Home Power Supply 3-wire ½" (1.3 cm) 3-wire Cable from the range to follow these instructions can be loosened to add up to rear range foot. Electrical Connection Options Chart If your type of 1" (2.5 cm). If range height adjustment is...bracket, if the range is adequate clearance under the range and onto the rear leveling leg prior to a standing position. Failure to follow these instructions can tip the range and be done with a neutral (white) power supply wire and a cabinet-connected green (or bare) ground wire twisted ...
Installation Instructions
Page 8
... and panels before servicing. or circuit breaker has not tripped. ■ Electrical supply is installed: ■ Look for specific instruction on for 5 minutes, check for cleaning or maintenance: WARNING Electrical Shock Hazard Disconnect power before operating. Replace all packaging materials.... 4. Disconnect wiring. 3. Slide range forward to rear range foot. Read the range Use and Care Guide. 7. Whirlpool Corporation. Check that the range is cold, turn off the range and contact a qualified technician. All rights reserved. 5. Screws B....
... and panels before servicing. or circuit breaker has not tripped. ■ Electrical supply is installed: ■ Look for specific instruction on for 5 minutes, check for cleaning or maintenance: WARNING Electrical Shock Hazard Disconnect power before operating. Replace all packaging materials.... 4. Disconnect wiring. 3. Slide range forward to rear range foot. Read the range Use and Care Guide. 7. Whirlpool Corporation. Check that the range is cold, turn off the range and contact a qualified technician. All rights reserved. 5. Screws B....

Warranty
Page 1
... call 1-800-807-6777. 9/07 Keep this warranty. 8. You must be borne by an authorized Whirlpool servicer is located in accordance with published installation instructions. 11. Dealer name Address Phone number Model number Serial number Purchase date 19 Consumable parts are excluded from...from defects in -warranty service. Service calls to correct the installation of your major appliance, to instruct you ever need to know your authorized Whirlpool dealer to determine if another warranty applies. Write down the following information about your major appliance to ...
... call 1-800-807-6777. 9/07 Keep this warranty. 8. You must be borne by an authorized Whirlpool servicer is located in accordance with published installation instructions. 11. Dealer name Address Phone number Model number Serial number Purchase date 19 Consumable parts are excluded from...from defects in -warranty service. Service calls to correct the installation of your major appliance, to instruct you ever need to know your authorized Whirlpool dealer to determine if another warranty applies. Write down the following information about your major appliance to ...

