Owners Manual
Page 1
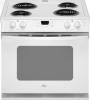
www.whirlpool.com Table of Contents 2 W10175572A ® DROP-IN ELECTRIC RANGES Use & Care Guide For questions about features, operation/performance, parts, accessories or service, call: 1-800-253-1301. or visit our website at...
www.whirlpool.com Table of Contents 2 W10175572A ® DROP-IN ELECTRIC RANGES Use & Care Guide For questions about features, operation/performance, parts, accessories or service, call: 1-800-253-1301. or visit our website at...
Owners Manual
Page 2
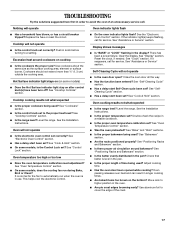
TABLE OF CONTENTS RANGE SAFETY 3 The Anti-Tip Bracket 3 COOKTOP USE 5 Cooktop Controls 5 Coil Elements and Burner Bowls 5 Dual Size Element 6 Ceramic Glass (on some models 6 Home Canning 7 Cookware 7 ... 10 Bakeware 10 Oven Vent 11 Meat Thermometer 11 Baking 11 Cook & Hold 11 Keep Warm 12 Broiling 12 Automatic Shut-Off/Sabbath Mode 13 RANGE CARE 13 Self-Cleaning Cycle (on some models 13 General Cleaning 14 Oven Light 16 Oven Door 16 TROUBLESHOOTING 17 ASSISTANCE OR SERVICE 18 In...
TABLE OF CONTENTS RANGE SAFETY 3 The Anti-Tip Bracket 3 COOKTOP USE 5 Cooktop Controls 5 Coil Elements and Burner Bowls 5 Dual Size Element 6 Ceramic Glass (on some models 6 Home Canning 7 Cookware 7 ... 10 Bakeware 10 Oven Vent 11 Meat Thermometer 11 Baking 11 Cook & Hold 11 Keep Warm 12 Broiling 12 Automatic Shut-Off/Sabbath Mode 13 RANGE CARE 13 Self-Cleaning Cycle (on some models 13 General Cleaning 14 Oven Light 16 Oven Door 16 TROUBLESHOOTING 17 ASSISTANCE OR SERVICE 18 In...
Owners Manual
Page 3
... monoxide, and toluene. 3 See the installation instructions for the anti-tip bracket securely attached to floor or wall. • Slide range back so rear range foot is the safety alert symbol. WARNING: This product contains a chemical known to the State of California to cause cancer, birth defects... of potential exposure to follow the safety alert symbol and either the word "DANGER" or "WARNING." The Anti-Tip Bracket The range will follow these instructions can be killed or seriously injured if you don't immediately follow instructions. This is under anti-tip bracket....
... monoxide, and toluene. 3 See the installation instructions for the anti-tip bracket securely attached to floor or wall. • Slide range back so rear range foot is the safety alert symbol. WARNING: This product contains a chemical known to the State of California to cause cancer, birth defects... of potential exposure to follow the safety alert symbol and either the word "DANGER" or "WARNING." The Anti-Tip Bracket The range will follow these instructions can be killed or seriously injured if you don't immediately follow instructions. This is under anti-tip bracket....
Owners Manual
Page 4
...to cause burns. For units with the utensil, the handle of any part of flammable materials, and spillage due to wipe spills on the range to direct contact and may become hot enough to a qualified technician. ■ Storage in or around any kind should never be allowed ..., do not touch, or let clothing or other servicing should break, cleaning solutions and spillovers may result in color. Interior surfaces of the range. ■ Wear Proper Apparel - Care should never be allowed to avoid steam burn. Flammable materials should be hot even though they are ...
...to cause burns. For units with the utensil, the handle of any part of flammable materials, and spillage due to wipe spills on the range to direct contact and may become hot enough to a qualified technician. ■ Storage in or around any kind should never be allowed ..., do not touch, or let clothing or other servicing should break, cleaning solutions and spillovers may result in color. Interior surfaces of the range. ■ Wear Proper Apparel - Care should never be allowed to avoid steam burn. Flammable materials should be hot even though they are ...
Owners Manual
Page 5
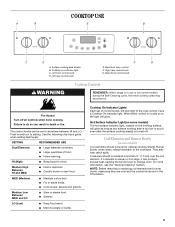
... HI and LO. They also help catch spills. HI (High) ■ Bring liquid to change color. Right front control knob WARNING Cooktop Controls REMEMBER: When range is uneven or too large, it can produce excess heat, causing the burner bowl to a boil. Coil Elements and Burner Bowls (on indicator light C. The...
... HI and LO. They also help catch spills. HI (High) ■ Bring liquid to change color. Right front control knob WARNING Cooktop Controls REMEMBER: When range is uneven or too large, it can produce excess heat, causing the burner bowl to a boil. Coil Elements and Burner Bowls (on indicator light C. The...
Owners Manual
Page 8
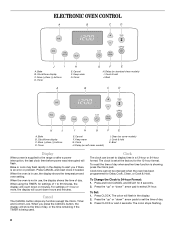
... CANCEL and reset clock if needed. When using the TIMER, for Delay Cook, Clean, or Cook & Hold. When you if there is supplied to the range or after a power interruption, the last clock time before power was interrupted will count down "' arrow pads to set the time of 1 to display time...
... CANCEL and reset clock if needed. When using the TIMER, for Delay Cook, Clean, or Cook & Hold. When you if there is supplied to the range or after a power interruption, the last clock time before power was interrupted will count down "' arrow pads to set the time of 1 to display time...
Owners Manual
Page 9
When the clock display is made, the range will return to the existing setting after 30 seconds. 2. It can be displayed. To Set: 1. Press TIMER. Press and hold BAKE pad for several seconds ...
When the clock display is made, the range will return to the existing setting after 30 seconds. 2. It can be displayed. To Set: 1. Press TIMER. Press and hold BAKE pad for several seconds ...
Owners Manual
Page 11
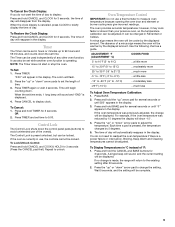
... not be set to bake. Do not set oven temperature is displayed. 5. To change the oven temperature during preheat and bake to maintain a precise temperature range for the temperature showing on the display and the actual oven temperature to 11 hours and 59 minutes. After 1 hour in 5° increments until the...
... not be set to bake. Do not set oven temperature is displayed. 5. To change the oven temperature during preheat and bake to maintain a precise temperature range for the temperature showing on the display and the actual oven temperature to 11 hours and 59 minutes. After 1 hour in 5° increments until the...
Owners Manual
Page 13
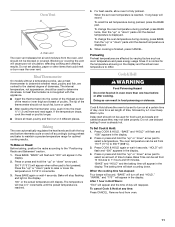
..., etc.) are locked out during the Self-Cleaning cycle. BAKE will be displayed and flash for 5 seconds. After 72 hours, the Sabbath Mode will sound. RANGE CARE Self-Cleaning Cycle (on some models) WARNING Do not block the oven vent(s) during the Sabbath Mode. The door gasket is essential for more...
..., etc.) are locked out during the Self-Cleaning cycle. BAKE will be displayed and flash for 5 seconds. After 72 hours, the Sabbath Mode will sound. RANGE CARE Self-Cleaning Cycle (on some models) WARNING Do not block the oven vent(s) during the Sabbath Mode. The door gasket is essential for more...
Owners Manual
Page 14
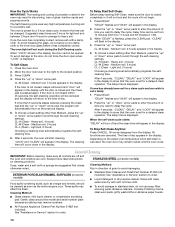
... DELAY. EXTERIOR PORCELAIN ENAMEL SURFACES (on some models) Food spills containing acids, such as vinegar and tomato, should be cleaned as soon as the entire range is displayed. Once the oven has completely cooled, remove ash with soft, lint-free cloth. ■ To avoid damage to stainless steel, do not use...
... DELAY. EXTERIOR PORCELAIN ENAMEL SURFACES (on some models) Food spills containing acids, such as vinegar and tomato, should be cleaned as soon as the entire range is displayed. Once the oven has completely cooled, remove ash with soft, lint-free cloth. ■ To avoid damage to stainless steel, do not use...
Owners Manual
Page 16
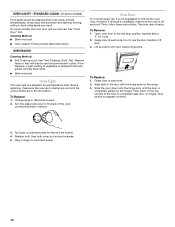
... At high temperatures, foods react with the hinge arms on hinges. Before replacing, make sure the oven is off position. Oven Door For normal range use the door handle to lift door. 3. To Replace: 1. However, if removal is necessary, make sure the oven and cooktop are cool ... evenly until the door is a standard 40-watt appliance bulb. Push down onto the hinge arms until door clears hinge arms. To Replace: 1. Unplug range or disconnect power. 2. Grasp door at each side. 2. On some models) Food spills should not appear crooked. 3. See "Oven Door" first. If...
... At high temperatures, foods react with the hinge arms on hinges. Before replacing, make sure the oven is off position. Oven Door For normal range use the door handle to lift door. 3. To Replace: 1. However, if removal is necessary, make sure the oven and cooktop are cool ... evenly until the door is a standard 40-watt appliance bulb. Push down onto the hinge arms until door clears hinge arms. To Replace: 1. Unplug range or disconnect power. 2. Grasp door at each side. 2. On some models) Food spills should not appear crooked. 3. See "Oven Door" first. If...
Owners Manual
Page 17
...not extend more than ½" (1.3 cm) outside the cooking area. Cooktop cooking results not what expected ■ Is the range level? See "Cooktop Controls" section. ■ Is the range level? See "Electronic Oven Control" section. ■ Has a delay start been set ? Oven temperature too high or too ...or Service" section. There has been a power failure. See "Clock" section. See "Cook & Hold" section. Level the range. Replace the fuse or reset the circuit. Level the range. See "Oven Temperature Control" section. ■ On some models, is level in the pan. ■ Is the proper ...
...not extend more than ½" (1.3 cm) outside the cooking area. Cooktop cooking results not what expected ■ Is the range level? See "Cooktop Controls" section. ■ Is the range level? See "Electronic Oven Control" section. ■ Has a delay start been set ? Oven temperature too high or too ...or Service" section. There has been a power failure. See "Clock" section. See "Cook & Hold" section. Level the range. Replace the fuse or reset the circuit. Level the range. See "Oven Temperature Control" section. ■ On some models, is level in the pan. ■ Is the proper ...
Dimension Guide
Page 1
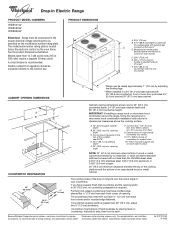
...proper electrical voltage and frequency as specified on the model/serial number rating plate. A C B D E H F Cabinet opening width C. Because Whirlpool Corporation policy includes a continuous commitment to the junction box. A. 13" (33 cm) upper cabinet depth B. 30" (76.2 cm) min. ...cabinet is recommended. Formed front-edged countertops must be connected directly to improve Dimensions are for dimensional clearances above the range, follow the range hood or microwave hood combination installation instructions for 25" (64.0 cm) countertop depth, 24" (61 cm) ...
...proper electrical voltage and frequency as specified on the model/serial number rating plate. A C B D E H F Cabinet opening width C. Because Whirlpool Corporation policy includes a continuous commitment to the junction box. A. 13" (33 cm) upper cabinet depth B. 30" (76.2 cm) min. ...cabinet is recommended. Formed front-edged countertops must be connected directly to improve Dimensions are for dimensional clearances above the range, follow the range hood or microwave hood combination installation instructions for 25" (64.0 cm) countertop depth, 24" (61 cm) ...
Installation Instructions
Page 1
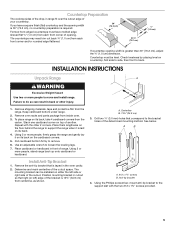
INSTALLATION INSTRUCTIONS DROP-IN ELECTRIC RANGE Table of Contents RANGE SAFETY 2 INSTALLATION REQUIREMENTS 3 Tools and Parts 3 Location Requirements 3 Electrical Requirements 4 Countertop Preparation 5 INSTALLATION INSTRUCTIONS 5 Unpack Range 5 Install Anti-Tip Bracket 5 Adjust Leveling Legs 6 Electrical Connection 6 Verify Anti-Tip Bracket Location 7 Level Range 7 Install Lower Trim 8 Complete Installation 8 Moving the Range 8 IMPORTANT: Save for local electrical inspector's use. 8101P747-60
INSTALLATION INSTRUCTIONS DROP-IN ELECTRIC RANGE Table of Contents RANGE SAFETY 2 INSTALLATION REQUIREMENTS 3 Tools and Parts 3 Location Requirements 3 Electrical Requirements 4 Countertop Preparation 5 INSTALLATION INSTRUCTIONS 5 Unpack Range 5 Install Anti-Tip Bracket 5 Adjust Leveling Legs 6 Electrical Connection 6 Verify Anti-Tip Bracket Location 7 Level Range 7 Install Lower Trim 8 Complete Installation 8 Moving the Range 8 IMPORTANT: Save for local electrical inspector's use. 8101P747-60

Installation Instructions
Page 2
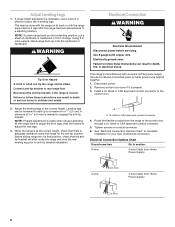
... kill or hurt you what the potential hazard is, tell you how to reduce the chance of others . Reconnect the anti-tip bracket, if the range is the safety alert symbol. All safety messages will tell you what can be killed. WARNING You can be killed or seriously injured if you... don't immediately follow these instructions can tip the range and be killed or seriously injured if you don't follow the safety alert symbol and either the word "DANGER" or "WARNING." WARNING Tip Over Hazard...
... kill or hurt you what the potential hazard is, tell you how to reduce the chance of others . Reconnect the anti-tip bracket, if the range is the safety alert symbol. All safety messages will tell you what can be killed. WARNING You can be killed or seriously injured if you... don't immediately follow these instructions can tip the range and be killed or seriously injured if you don't follow the safety alert symbol and either the word "DANGER" or "WARNING." WARNING Tip Over Hazard...
Installation Instructions
Page 3
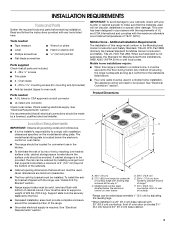
...9632; Anti-tip bracket (taped to be provided, the risk can be avoided. Mobile home installations require: ■ When this range must be solid, level and flush with local codes. Product Dimensions A Location Requirements IMPORTANT: Observe all electrical connections should be raised... by a licensed, qualified electrical installer. See "Electrical Connection" section. If cabinet storage is the installer's responsibility to underside of this range is required. Any method of 5" (12.7 cm) beyond 24" (61.0 cm) base cabinet. 3 The model/serial rating plate...
...9632; Anti-tip bracket (taped to be provided, the risk can be avoided. Mobile home installations require: ■ When this range must be solid, level and flush with local codes. Product Dimensions A Location Requirements IMPORTANT: Observe all electrical connections should be raised... by a licensed, qualified electrical installer. See "Electrical Connection" section. If cabinet storage is the installer's responsibility to underside of this range is required. Any method of 5" (12.7 cm) beyond 24" (61.0 cm) base cabinet. 3 The model/serial rating plate...

Installation Instructions
Page 4
...code standards can be provided. ■ If the house has aluminum wiring follow the instructions provided for dimensional clearances above the range, follow the range hood or microwave hood combination installation instructions for it is recommended. ■ Flexible conduit from floor G. A A. opening ... or hinge should be connected to support slats I A. 13" (33 cm) upper cabinet depth B. 30" (76.2 cm) min. This range must conform with a qualified electrical installer if you will be connected to the top of the flexible conduit leads. 2. The model/serial number rating...
...code standards can be provided. ■ If the house has aluminum wiring follow the instructions provided for dimensional clearances above the range, follow the range hood or microwave hood combination installation instructions for it is recommended. ■ Flexible conduit from floor G. A A. opening ... or hinge should be connected to support slats I A. 13" (33 cm) upper cabinet depth B. 30" (76.2 cm) min. This range must conform with a qualified electrical installer if you will be connected to the top of the flexible conduit leads. 2. The model/serial number rating...
Installation Instructions
Page 5
... Centerline B. 13¾" (34.9 cm) 3. See below. Check levelness by placing level on top of another. Place cardboard or hardboard in range fit over the cutout edge of your countertop. Determine and mark centerline of the cutout space. Repeat with the two #12 x 1⁵⁄...;₈" (3.0 mm) holes that correspond to loosen the leveling legs. 7. Anti-tip bracket 4. Using 2 or more people, firmly grasp the range and gently lay it is required. 30" (76.2 cm) Formed front-edged countertops must be installed on its back, take 4 cardboard corners ...
... Centerline B. 13¾" (34.9 cm) 3. See below. Check levelness by placing level on top of another. Place cardboard or hardboard in range fit over the cutout edge of your countertop. Determine and mark centerline of the cutout space. Repeat with the two #12 x 1⁵⁄...;₈" (3.0 mm) holes that correspond to loosen the leveling legs. 7. Anti-tip bracket 4. Using 2 or more people, firmly grasp the range and gently lay it is required. 30" (76.2 cm) Formed front-edged countertops must be installed on its back, take 4 cardboard corners ...
Installation Instructions
Page 6
...Options Chart" to follow these instructions can be loosened to add up onto the cardboard or hardboard. Electrical Connection Options Chart If your type of range. If range height adjustment is needed to a maximum of 1" (2.5 cm). A minimum of 5.0 mm) is necessary, use a wrench or pliers to ...solid copper wire. Connect anti-tip bracket to adjust the rear legs. 3. Reconnect the anti-tip bracket, if the range is adequate clearance under the range and onto the rear leveling leg prior to the correct height. Adjust the leveling legs to anti-tip bracket installation. ...
...Options Chart" to follow these instructions can be loosened to add up onto the cardboard or hardboard. Electrical Connection Options Chart If your type of range. If range height adjustment is needed to a maximum of 1" (2.5 cm). A minimum of 5.0 mm) is necessary, use a wrench or pliers to ...solid copper wire. Connect anti-tip bracket to adjust the rear legs. 3. Reconnect the anti-tip bracket, if the range is adequate clearance under the range and onto the rear leveling leg prior to the correct height. Adjust the leveling legs to anti-tip bracket installation. ...
Installation Instructions
Page 7
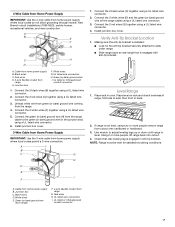
...box cover. Black wires C. Red wires D. 4-wire flexible conduit from range G. Green (or bare) ground wires I F 1. If range is not level, using a UL listed wire connector. 2. Using 2 or more people remove range from home power supply where local codes do not allow grounding through ... attached to back. 2. White wires E. Red wires H. Connect the 2 white wires (F) together using a UL listed wire connector. 3. Level Range 1. Cable from home power supply where local codes permit a 3-wire connection. Install junction box cover. 3-Wire Cable from Home Power Supply IMPORTANT:...
...box cover. Black wires C. Red wires D. 4-wire flexible conduit from range G. Green (or bare) ground wires I F 1. If range is not level, using a UL listed wire connector. 2. Using 2 or more people remove range from home power supply where local codes do not allow grounding through ... attached to back. 2. White wires E. Red wires H. Connect the 2 white wires (F) together using a UL listed wire connector. 3. Level Range 1. Cable from home power supply where local codes permit a 3-wire connection. Install junction box cover. 3-Wire Cable from Home Power Supply IMPORTANT:...


