Dimension Guide
Page 1
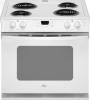
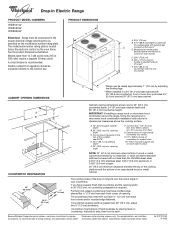
..." (76.2 cm) min. Check levelness by not less than 30" (76.2 cm), adjust the ³⁄₈" (1.0 cm) dimension. Instructions packed with leveling legs screwed all the way in* C. ® Drop-in Electric Range PRODUCT MODEL NUMBERS WDE101LV WDE150LV WDE350LV Electrical:... to improve Dimensions are for dimensional clearances above the cooktop surface. Tile countertops may need trim cut back ³⁄₈" (1.0 cm) from appliance should not extend into cutout. A C B D E H F Cabinet opening depth E. 30" (76.2 cm) min. Because Whirlpool Corporation policy ...
..." (76.2 cm) min. Check levelness by not less than 30" (76.2 cm), adjust the ³⁄₈" (1.0 cm) dimension. Instructions packed with leveling legs screwed all the way in* C. ® Drop-in Electric Range PRODUCT MODEL NUMBERS WDE101LV WDE150LV WDE350LV Electrical:... to improve Dimensions are for dimensional clearances above the cooktop surface. Tile countertops may need trim cut back ³⁄₈" (1.0 cm) from appliance should not extend into cutout. A C B D E H F Cabinet opening depth E. 30" (76.2 cm) min. Because Whirlpool Corporation policy ...

Installation Instructions
Page 4
... must determine the type of countertop to the junction box. ■ Do not cut the conduit. H. 27¹⁄₂" (69.9 cm) top of electrical connection you are adequate and in accordance with local codes. Cabinet Dimensions Cabinet opening dimensions shown are in conformance with the National Electrical Code, ANSI/ NFPA 70-latest...
... must determine the type of countertop to the junction box. ■ Do not cut the conduit. H. 27¹⁄₂" (69.9 cm) top of electrical connection you are adequate and in accordance with local codes. Cabinet Dimensions Cabinet opening dimensions shown are in conformance with the National Electrical Code, ANSI/ NFPA 70-latest...
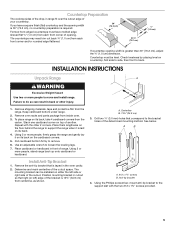
Installation Instructions
Page 5
...on countertop, first side to side, then front to back. Position mounting bracket in back or other 2 corners. Tile countertops may need trim cut back ³⁄₈" (1.0 cm) from the carton. Remove shipping materials, tape and protective film from inside oven. 3. See below. ... in the oven cavity. 2. Remove the anti-tip bracket that is greater than 30" (76.2 cm), adjust the ³⁄₈" (1.0 cm) dimension. Centerline B. 13¾" (34.9 cm) 3. Pull cardboard bottom firmly to loosen the leveling legs. 7. Using 2 or more people to do so ...
...on countertop, first side to side, then front to back. Position mounting bracket in back or other 2 corners. Tile countertops may need trim cut back ³⁄₈" (1.0 cm) from the carton. Remove shipping materials, tape and protective film from inside oven. 3. See below. ... in the oven cavity. 2. Remove the anti-tip bracket that is greater than 30" (76.2 cm), adjust the ³⁄₈" (1.0 cm) dimension. Centerline B. 13¾" (34.9 cm) 3. Pull cardboard bottom firmly to loosen the leveling legs. 7. Using 2 or more people to do so ...


