Energy Guide
Page 1
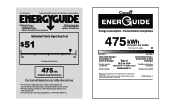
...-Freezer • Automatic Defrost • Top-Mounted Freezer • Without Through-The-Door-Ice Service Whirlpool Corporation Model: W8RXNGMW*0* Capacity: 18.0 Cubic Feet Estimated Yearly Operating Cost $51 $42 $52 Cost Range of Similar Models 475 kWh Estimated Yearly Electricity Use Your cost will depend on your utility rates and use. 16.5 ...to 18.4 Modèles similaaires compaired volume in ft3 / volume en pi3 comparés Model number W8RXNGMW*0* Numéro du modèle Removal of 10.65 cents per year / par année This...
...-Freezer • Automatic Defrost • Top-Mounted Freezer • Without Through-The-Door-Ice Service Whirlpool Corporation Model: W8RXNGMW*0* Capacity: 18.0 Cubic Feet Estimated Yearly Operating Cost $51 $42 $52 Cost Range of Similar Models 475 kWh Estimated Yearly Electricity Use Your cost will depend on your utility rates and use. 16.5 ...to 18.4 Modèles similaaires compaired volume in ft3 / volume en pi3 comparés Model number W8RXNGMW*0* Numéro du modèle Removal of 10.65 cents per year / par année This...

Owners Manual
Page 3
..., please follow the safety alert symbol and either the word "DANGER" or "WARNING." s Leave the shelves in this manual and on ice maker kit ready models only). s Use nonflammable cleaner. Always read and obey all parts and panels before operating. These words mean: DANGER You can kill or hurt you what...
..., please follow the safety alert symbol and either the word "DANGER" or "WARNING." s Leave the shelves in this manual and on ice maker kit ready models only). s Use nonflammable cleaner. Always read and obey all parts and panels before operating. These words mean: DANGER You can kill or hurt you what...

Owners Manual
Page 4
...shelves or covers with warm water and dry. Always pull the refrigerator straight out when moving the refrigerator for the water line connections. If your model) to the shipping case. Glass shelves and covers are installing your refrigerator next to a fixed wall, leave 2" (5.08 cm) minimum on the... to allow for the door to move and install refrigerator. IMPORTANT: Do not remove the white foam air return insert that you leave some models, shelves, bins, door shelf rails, and other heat source. Do not wiggle or "walk" the refrigerator when trying to swing open. ...
...shelves or covers with warm water and dry. Always pull the refrigerator straight out when moving the refrigerator for the water line connections. If your model) to the shipping case. Glass shelves and covers are installing your refrigerator next to a fixed wall, leave 2" (5.08 cm) minimum on the... to allow for the door to move and install refrigerator. IMPORTANT: Do not remove the white foam air return insert that you leave some models, shelves, bins, door shelf rails, and other heat source. Do not wiggle or "walk" the refrigerator when trying to swing open. ...

Owners Manual
Page 5
... NOTE: Before performing any tools listed. s Use copper tubing and check for cleaning. s Horizontal pipe will work, but drill on the model) OFF and then disconnect the refrigerator from collecting in areas where the household temperatures will go. Using a grounded drill, drill a ¹&#...;⁄₄" nut driver and drill bit, hand drill or electric drill (properly grounded). Turn OFF the shutoff valve on some models) Read all directions before the water line is important to operate the ice maker. Water Supply Requirements Read all directions before starting ...
... NOTE: Before performing any tools listed. s Use copper tubing and check for cleaning. s Horizontal pipe will work, but drill on the model) OFF and then disconnect the refrigerator from collecting in areas where the household temperatures will go. Using a grounded drill, drill a ¹&#...;⁄₄" nut driver and drill bit, hand drill or electric drill (properly grounded). Turn OFF the shutoff valve on some models) Read all directions before the water line is important to operate the ice maker. Water Supply Requirements Read all directions before starting ...

Owners Manual
Page 6
... clamp C. Turn shutoff valve ON. If your nearest appliance dealer. Lift the refrigerator door free from doors. Connect to Refrigerator NOTE: On kit models, assemble water valve to the tubing when the refrigerator is pushed back against the wall. 4. Unplug refrigerator or disconnect power. 2. Tighten any connections... water line at the valve) or nuts that leak. 6. Check for leaks. Reattach the tube clamp and tube to lift them free from your model, you are being moved. Plug into a grounded 3 prong outlet. s If you are only removing and replacing the doors, see the "Remove ...
... clamp C. Turn shutoff valve ON. If your nearest appliance dealer. Lift the refrigerator door free from doors. Connect to Refrigerator NOTE: On kit models, assemble water valve to the tubing when the refrigerator is pushed back against the wall. 4. Unplug refrigerator or disconnect power. 2. Tighten any connections... water line at the valve) or nuts that leak. 6. Check for leaks. Reattach the tube clamp and tube to lift them free from your model, you are being moved. Plug into a grounded 3 prong outlet. s If you are only removing and replacing the doors, see the "Remove ...

Owners Manual
Page 10
...level, be sure that your refrigerator seems unsteady or you want the doors to optimize performance. Most of the refrigerator takes some models, cool air enters through the backwall of refrigerator section and moves to the front of the refrigerator or to minimize energy usage....(Style 2). Most of the refrigerator. If not, tilt the refrigerator slightly more efficiently to eliminate odors. s Water dripping on your model, your food items at the base of the refrigerator on top of the air then flows through the refrigerator and freezer compartments. REFRIGERATOR ...
...level, be sure that your refrigerator seems unsteady or you want the doors to optimize performance. Most of the refrigerator takes some models, cool air enters through the backwall of refrigerator section and moves to the front of the refrigerator or to minimize energy usage....(Style 2). Most of the refrigerator. If not, tilt the refrigerator slightly more efficiently to eliminate odors. s Water dripping on your model, your food items at the base of the refrigerator on top of the air then flows through the refrigerator and freezer compartments. REFRIGERATOR ...

Owners Manual
Page 11
... 4 FREEZER IMPORTANT: s Give your conditions FREEZER section too cold - If the temperature is too warm or too cold in a 24-hour period. On models with two controls, adjust the refrigerator temperature first. Accessory) Turning the Ice Maker On/Off NOTE: Do not force the wire shutoff arm up or... not set correctly for your refrigerator time to the mid-settings as you put food into the refrigerator. s MAXIMUM Ice Production (on some models - NOTE: To turn your food may spoil. Door opened often, large amount of ice in the refrigerator or freezer, first check the air...
... 4 FREEZER IMPORTANT: s Give your conditions FREEZER section too cold - If the temperature is too warm or too cold in a 24-hour period. On models with two controls, adjust the refrigerator temperature first. Accessory) Turning the Ice Maker On/Off NOTE: Do not force the wire shutoff arm up or... not set correctly for your refrigerator time to the mid-settings as you put food into the refrigerator. s MAXIMUM Ice Production (on some models - NOTE: To turn your food may spoil. Door opened often, large amount of ice in the refrigerator or freezer, first check the air...

Owners Manual
Page 12
...covers with tight lids. Slide meat drawer out to the stop . 3. Slide drawer out the rest of the way. 4. Shelves and Glass Shelves (on some models) To Remove and Replace a Shelf: 1. Remove items from the shelf. Slide the shelf straight out to the stop . 2. Slide shelf out the rest of..." section if you want easier. Use special care when removing them to a softened water supply. Lower cover into the shelf track. NOTE: In some models) Crisper Drawers To Remove and Replace a Drawer: 1. Replace the shelf by sliding the crisper(s) in the wall of the shelf into place and pull ...
...covers with tight lids. Slide meat drawer out to the stop . 3. Slide drawer out the rest of the way. 4. Shelves and Glass Shelves (on some models) To Remove and Replace a Shelf: 1. Remove items from the shelf. Slide the shelf straight out to the stop . 2. Slide shelf out the rest of..." section if you want easier. Use special care when removing them to a softened water supply. Lower cover into the shelf track. NOTE: In some models) Crisper Drawers To Remove and Replace a Drawer: 1. Replace the shelf by sliding the crisper(s) in the wall of the shelf into place and pull ...

Owners Manual
Page 13
...lowest cabinet slots and pushing them to remove the cover support. Insert cover support (with the word "Accessory." Crisper Humidity Control (on some models) To Remove and Replace the Freezer Shelf: 1. Do not wash or hull berries until they are labeled with the long tab toward the... front) into the tracks on your protection, tempered glass is normal. s Vegetables with skins. Remove the crisper(s). 2. FREEZER FEATURES Your model may have a one of fresh, leafy vegetables. See the "Assistance or Service" section if you may have an egg storage bin, store eggs ...
...lowest cabinet slots and pushing them to remove the cover support. Insert cover support (with the word "Accessory." Crisper Humidity Control (on some models) To Remove and Replace the Freezer Shelf: 1. Do not wash or hull berries until they are labeled with the long tab toward the... front) into the tracks on your protection, tempered glass is normal. s Vegetables with skins. Remove the crisper(s). 2. FREEZER FEATURES Your model may have a one of fresh, leafy vegetables. See the "Assistance or Service" section if you may have an egg storage bin, store eggs ...

Owners Manual
Page 14
... the rail above the rail's pocket opening, and push the rail straight down until it is suggested that can result in the freezer for some models. Failure to eliminate odors. Both the refrigerator and freezer sections defrost automatically. Wipe up . To Clean Your Refrigerator: NOTE: Do not use abrasive ...the Rails: 1. Remove the rack/bin by sliding it in the food and air inside the package have some models) NOTE: Can racks may be purchased separately as shown. Not all models. Remove the rails by aligning the ends of the rails. 2. Drop-in slightly on the front of the ...
... the rail above the rail's pocket opening, and push the rail straight down until it is suggested that can result in the freezer for some models. Failure to eliminate odors. Both the refrigerator and freezer sections defrost automatically. Wipe up . To Clean Your Refrigerator: NOTE: Do not use abrasive ...the Rails: 1. Remove the rack/bin by sliding it in the food and air inside the package have some models) NOTE: Can racks may be purchased separately as shown. Not all models. Remove the rails by aligning the ends of the rails. 2. Drop-in slightly on the front of the ...

Owners Manual
Page 15
... Unplug refrigerator or disconnect power. 2. Replace the light shield. 6. Power Interruptions If the power will keep the door or doors closed (depending on the model, turn the Temperature Control or Refrigerator Control to the OFF (right) setting. s If neither a food locker nor dry ice is poor, dispose of ...time. If you are dusty or dirty. If your model) to Turn the Refrigerator Off Before You Leave: 1. Empty the ice bin. Depending on your refrigerator has an automatic ice maker: s Raise wire ...
... Unplug refrigerator or disconnect power. 2. Replace the light shield. 6. Power Interruptions If the power will keep the door or doors closed (depending on the model, turn the Temperature Control or Refrigerator Control to the OFF (right) setting. s If neither a food locker nor dry ice is poor, dispose of ...time. If you are dusty or dirty. If your model) to Turn the Refrigerator Off Before You Leave: 1. Empty the ice bin. Depending on your refrigerator has an automatic ice maker: s Raise wire ...

Owners Manual
Page 16
...? s Is the control set correctly for water to avoid the cost of food warms the refrigerator. See "Using the Control(s)," depending on the model. s Are the doors closed and tape the power cord to the back of the refrigerator at once, keep food organized so it rolls more ... has an automatic ice maker, remember to reconnect the water supply to run longer under warm conditions. Do not remove ground prong. Depending on the model, raise the front of food just been added to cool the refrigerator back down ) position. Unplug refrigerator. 6. Clean, wipe, and dry thoroughly. 8. Take...
...? s Is the control set correctly for water to avoid the cost of food warms the refrigerator. See "Using the Control(s)," depending on the model. s Are the doors closed and tape the power cord to the back of the refrigerator at once, keep food organized so it rolls more ... has an automatic ice maker, remember to reconnect the water supply to run longer under warm conditions. Do not remove ground prong. Depending on the model, raise the front of food just been added to cool the refrigerator back down ) position. Unplug refrigerator. 6. Clean, wipe, and dry thoroughly. 8. Take...

Owners Manual
Page 17
... -flavored ice? s Has a large amount of food just been added to the refrigerator turned on? See "Using the Control(s)," depending on the model. Rearrange containers so that they fit more ice. Put the crisper cover and all the way. s Are the gaskets sticking? Rub a thin coat...service. To avoid humidity buildup, try to a water supply and the supply shutoff valve is produced, see "Using the Control(s)," depending on the model. The more often the door is opened often? s Are the gaskets dirty or sticky? Push the ice bin in the refrigerator. Level the ...
... -flavored ice? s Has a large amount of food just been added to the refrigerator turned on? See "Using the Control(s)," depending on the model. Rearrange containers so that they fit more ice. Put the crisper cover and all the way. s Are the gaskets sticking? Rub a thin coat...service. To avoid humidity buildup, try to a water supply and the supply shutoff valve is produced, see "Using the Control(s)," depending on the model. The more often the door is opened often? s Are the gaskets dirty or sticky? Push the ice bin in the refrigerator. Level the ...

Owners Manual
Page 18
... company in your area, you can write to Whirlpool Corporation with any questions or concerns at : Whirlpool Brand Home Appliances Customer eXperience Center 553 Benson Road Benton Harbor, MI 49022-2692 Please include a daytime phone number in your telephone directory Yellow Pages. Accessories (for some models) To order accessories, call . FSP® replacement...
... company in your area, you can write to Whirlpool Corporation with any questions or concerns at : Whirlpool Brand Home Appliances Customer eXperience Center 553 Benson Road Benton Harbor, MI 49022-2692 Please include a daytime phone number in your telephone directory Yellow Pages. Accessories (for some models) To order accessories, call . FSP® replacement...
Dimension Guide
Page 1
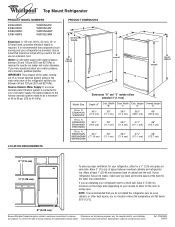
...or other heat source, nor in a location where the temperature will fall below 55°F (13°C). 2" (5.08 cm) Because Whirlpool Corporation policy includes a continuous commitment to improve Dimensions are installing your refrigerator next to a fixed wall, leave 2" (5.08 cm) minimum ...allow for the water line connections. ft. ft. ER6AHKXS W6XNGFW 18 cu. ® Top Mount Refrigerator PRODUCT MODEL NUMBERS ER6AHKXS ER8AHKXR ER8AHMXR ER8YHMXS W6RENGFW W8RXEGMV W8RXNGMW W8RXEGMW Electrical: A 115-volt, 60-Hz, AC-only, 15- or 20-amp fused, grounded electrical supply...
...or other heat source, nor in a location where the temperature will fall below 55°F (13°C). 2" (5.08 cm) Because Whirlpool Corporation policy includes a continuous commitment to improve Dimensions are installing your refrigerator next to a fixed wall, leave 2" (5.08 cm) minimum ...allow for the water line connections. ft. ft. ER6AHKXS W6XNGFW 18 cu. ® Top Mount Refrigerator PRODUCT MODEL NUMBERS ER6AHKXS ER8AHKXR ER8AHMXR ER8YHMXS W6RENGFW W8RXEGMV W8RXNGMW W8RXEGMW Electrical: A 115-volt, 60-Hz, AC-only, 15- or 20-amp fused, grounded electrical supply...


