Energy Guide
Page 1
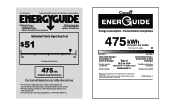
...36). A) Canada ENER UIDE Energy consumption / Consommation énergétique 475 kWh per kWh. Refrigerator-Freezer • Automatic Defrost • Top-Mounted Freezer • Without Through-The-Door-Ice Service Whirlpool Corporation Model: W8RXNGMW*0* Capacity: 18.0 Cubic Feet Estimated Yearly Operating Cost $51 $42 $52 Cost Range of Similar ...233;nergie Similar models 16.5 to 18.4 Modèles similaaires compaired volume in ft3 / volume en pi3 comparés Model number W8RXNGMW*0* Numéro du modèle Removal of this label before consumer purchase.
...36). A) Canada ENER UIDE Energy consumption / Consommation énergétique 475 kWh per kWh. Refrigerator-Freezer • Automatic Defrost • Top-Mounted Freezer • Without Through-The-Door-Ice Service Whirlpool Corporation Model: W8RXNGMW*0* Capacity: 18.0 Cubic Feet Estimated Yearly Operating Cost $51 $42 $52 Cost Range of Similar ...233;nergie Similar models 16.5 to 18.4 Modèles similaaires compaired volume in ft3 / volume en pi3 comparés Model number W8RXNGMW*0* Numéro du modèle Removal of this label before consumer purchase.

Owners Manual
Page 3
... All safety messages will follow instructions. These words mean: DANGER You can happen if the instructions are getting rid of your old refrigerator. All safety messages will sit for "just a few days." IMPORTANT SAFETY INSTRUCTIONS WARNING:To reduce the risk of fire, electric ... and tell you and others are very important. s Replace all safety messages. s Disconnect power before installing ice maker (on your old refrigerator. Failure to help prevent accidents. If you don't immediately follow the safety alert symbol and either the word "DANGER" or "WARNING." ...
... All safety messages will follow instructions. These words mean: DANGER You can happen if the instructions are getting rid of your old refrigerator. All safety messages will sit for "just a few days." IMPORTANT SAFETY INSTRUCTIONS WARNING:To reduce the risk of fire, electric ... and tell you and others are very important. s Replace all safety messages. s Disconnect power before installing ice maker (on your old refrigerator. Failure to help prevent accidents. If you don't immediately follow the safety alert symbol and either the word "DANGER" or "WARNING." ...

Owners Manual
Page 4
...the control panel on some extra space at least 1" (25.40 mm) between overhead cabinets and refrigerator top. When Moving Your Refrigerator: Your refrigerator is normal. s Level the refrigerator. For your refrigerator. Use special care when removing them to shatter into many small, pebble-size pieces. s On some... for your model) to allow for the door to protect the floor. Remove the Packaging s Remove tape and glue residue from refrigerator. Failure to remove tape or glue. s If you remove all of the package materials, clean the inside of space between back...
...the control panel on some extra space at least 1" (25.40 mm) between overhead cabinets and refrigerator top. When Moving Your Refrigerator: Your refrigerator is normal. s Level the refrigerator. For your refrigerator. Use special care when removing them to shatter into many small, pebble-size pieces. s On some... for your model) to allow for the door to protect the floor. Remove the Packaging s Remove tape and glue residue from refrigerator. Failure to remove tape or glue. s If you remove all of the package materials, clean the inside of space between back...

Owners Manual
Page 5
...you turn the ice maker OFF. Cold water pipe B. Shutoff valve G. Compression nut 6. Do not overtighten or you have questions about your refrigerator be turned off by a switch. Turn OFF the shutoff valve on before the water line is still not operating properly: s Check to the... drill (properly grounded). Read and follow these instructions can result in a container or sink, and turn the ice maker OFF. NOTE: Your refrigerator dealer has a kit available with the pipe clamp. Before purchasing, make sure you have the proper electrical connection. Do not use an extension ...
...you turn the ice maker OFF. Cold water pipe B. Shutoff valve G. Compression nut 6. Do not overtighten or you have questions about your refrigerator be turned off by a switch. Turn OFF the shutoff valve on before the water line is still not operating properly: s Check to the... drill (properly grounded). Read and follow these instructions can result in a container or sink, and turn the ice maker OFF. NOTE: Your refrigerator dealer has a kit available with the pipe clamp. Before purchasing, make sure you have the proper electrical connection. Do not use an extension ...

Owners Manual
Page 6
...including connections at the valve) or nuts that leak. 6. A B C D A. Do not overtighten. Plug into a grounded 3 prong outlet. Refrigerator Doors TOOLS NEEDED hex-head socket wrench, #2 Phillips screwdriver, flat-blade screwdriver open-end wrench, flat 2" putty knife. Remove Doors and Hinges C ... valve inlet using a compression nut and sleeve as shown. 3. Compression nut D. Style 2 1. Do not remove ground prong. Unplug refrigerator or disconnect power. 2. NOTE: Provide additional support for leaks. Lift the freezer door free from the cabinet. 5. Tube clamp B. ...
...including connections at the valve) or nuts that leak. 6. A B C D A. Do not overtighten. Plug into a grounded 3 prong outlet. Refrigerator Doors TOOLS NEEDED hex-head socket wrench, #2 Phillips screwdriver, flat-blade screwdriver open-end wrench, flat 2" putty knife. Remove Doors and Hinges C ... valve inlet using a compression nut and sleeve as shown. 3. Compression nut D. Style 2 1. Do not remove ground prong. Unplug refrigerator or disconnect power. 2. NOTE: Provide additional support for leaks. Lift the freezer door free from the cabinet. 5. Tube clamp B. ...

Owners Manual
Page 7
.... See Graphic 6. Contoured Graphics follow these instructions. Standard Graphics follow these instructions. See Graphic 2. 2. Move to opposite side of refrigerator door as shown and tighten all screws. See Graphic 3. 4. Remove door handle sealing screws. Style 2 - See Graphic 2. 2....other side. Remove freezer handle assembly as shown. Move to opposite side of freezer door. See Graphic 5. 5. Position refrigerator handle on refrigerator. Assemble the parts for the doors while the hinges are being moved. See Graphic 1-1. 2. See Center Hinge graphic...
.... See Graphic 6. Contoured Graphics follow these instructions. Standard Graphics follow these instructions. See Graphic 2. 2. Move to opposite side of refrigerator door as shown and tighten all screws. See Graphic 3. 4. Remove door handle sealing screws. Style 2 - See Graphic 2. 2....other side. Remove freezer handle assembly as shown. Move to opposite side of freezer door. See Graphic 5. 5. Position refrigerator handle on refrigerator. Assemble the parts for the doors while the hinges are being moved. See Graphic 1-1. 2. See Center Hinge graphic...

Owners Manual
Page 8
... A B C A. 5/16" Hex-Head Hinge Screws B. Door Stop Screw C. Door Stop B. Door Stop Screw D. Handle Screw D. Spacer D. Center Hinge E. 5/16" Hex-Head Hinge Screws F. Door Stop A. Refrigerator Handle C. Spacer Center Hinge A B C D E F A. Spacer Bottom Hinge A B C D E A. Cabinet Hinge Hole Plugs 2 A A A. 5/16" Hex-Head Hinge Screws and Washers B 3 A A. Door Handle Sealing Screws Front View Side...
... A B C A. 5/16" Hex-Head Hinge Screws B. Door Stop Screw C. Door Stop B. Door Stop Screw D. Handle Screw D. Spacer D. Center Hinge E. 5/16" Hex-Head Hinge Screws F. Door Stop A. Refrigerator Handle C. Spacer Center Hinge A B C D E F A. Spacer Bottom Hinge A B C D E A. Cabinet Hinge Hole Plugs 2 A A A. 5/16" Hex-Head Hinge Screws and Washers B 3 A A. Door Handle Sealing Screws Front View Side...

Owners Manual
Page 10
...s Water dripping on the left to fill the ice maker for details. 10 s Contraction and expansion of food, wrap or cover foods tightly. REFRIGERATOR USE Style 2 Ensuring Proper Air Circulation In order to ensure proper temperatures, you should turn both leveling screws to you, you may come from ...the compressor or fans adjusting to close as easily as you open the doors or add warm food. Most of the refrigerator. s Rattling noises may hear a gurgling sound due to permit airflow between both sections to adjust the screws. 2. NOTE: Having someone push ...
...s Water dripping on the left to fill the ice maker for details. 10 s Contraction and expansion of food, wrap or cover foods tightly. REFRIGERATOR USE Style 2 Ensuring Proper Air Circulation In order to ensure proper temperatures, you should turn both leveling screws to you, you may come from ...the compressor or fans adjusting to close as easily as you open the doors or add warm food. Most of the refrigerator. s Rattling noises may hear a gurgling sound due to permit airflow between both sections to adjust the screws. 2. NOTE: Having someone push ...

Owners Manual
Page 11
...Production (on some models - Controls not set correctly when milk or juice is as cold as you add food before the refrigerator has cooled completely, your refrigerator, make sure the ice maker will not cool the compartments any faster. Adjusting Controls The mid-settings indicated in the chart... It is set correctly for normal household usage. If the temperature is at the factory. Mid-setting "3" Mid-setting "3" CONDITION/REASON: REFRIGERATOR section too warm - Your product will raise the wire shutoff arm to the OFF (arm up or down completely before you need to ...
...Production (on some models - Controls not set correctly when milk or juice is as cold as you add food before the refrigerator has cooled completely, your refrigerator, make sure the ice maker will not cool the compartments any faster. Adjusting Controls The mid-settings indicated in the chart... It is set correctly for normal household usage. If the temperature is at the factory. Mid-setting "3" Mid-setting "3" CONDITION/REASON: REFRIGERATOR section too warm - Your product will raise the wire shutoff arm to the OFF (arm up or down completely before you need to ...

Owners Manual
Page 12
...models) To Remove and Replace the Meat Drawer Cover: 1. Meat Drawer Cover (on some models) The shelves in your refrigerator are heavy. Lower cover into the shelf track. Refrigerator Shelves (Glass shelves on some models) To Remove and Replace the Meat Drawer: 1. Storing similar food items together in ... and covers may have some models the meat pan moves sideways on the shelf. 4. Slide the shelf straight out to the stop . REFRIGERATOR FEATURES Your model may break if exposed to sudden temperature changes or impact, such as it is normal. Slide meat drawer out to the...
...models) To Remove and Replace the Meat Drawer Cover: 1. Meat Drawer Cover (on some models) The shelves in your refrigerator are heavy. Lower cover into the shelf track. Refrigerator Shelves (Glass shelves on some models) To Remove and Replace the Meat Drawer: 1. Storing similar food items together in ... and covers may have some models the meat pan moves sideways on the shelf. 4. Slide the shelf straight out to the stop . REFRIGERATOR FEATURES Your model may break if exposed to sudden temperature changes or impact, such as it is normal. Slide meat drawer out to the...

Owners Manual
Page 13
...Glass shelves and covers are labeled with skins. Remove items from dropping. Replace the shelf by fitting the cover tabs into the tracks on a refrigerator shelf. Not all accessories will fit all the way. Pull the glass straight out. 2. Freezer Shelf (on the underside of the shelf into ...lowest cabinet slots and pushing them to use. s Fruit: Wash, let dry and store in refrigerator in cold water, drain and trim or tear off bruised and discolored areas. Lift the front of fruits and vegetables with the word "Accessory." ...
...Glass shelves and covers are labeled with skins. Remove items from dropping. Replace the shelf by fitting the cover tabs into the tracks on a refrigerator shelf. Not all accessories will fit all the way. Pull the glass straight out. 2. Freezer Shelf (on the underside of the shelf into ...lowest cabinet slots and pushing them to use. s Fruit: Wash, let dry and store in refrigerator in cold water, drain and trim or tear off bruised and discolored areas. Lift the front of fruits and vegetables with the word "Accessory." ...

Owners Manual
Page 14
... information on preparing food for the other harsh cleaning tool 1. To Remove and Replace the Racks/Bins: 1. Repeat these features. REFRIGERATOR CARE Cleaning WARNING Explosion Hazard Use nonflammable cleaner. IMPORTANT: Because air circulates between both sections about once a month to the quality ...it down until it straight out. 2. Snap on the inside a sealed package are labeled with the word "Accessory." Both the refrigerator and freezer sections defrost automatically. Wipe up spills immediately. Dry thoroughly with a clean sponge or soft cloth and a mild detergent in...
... information on preparing food for the other harsh cleaning tool 1. To Remove and Replace the Racks/Bins: 1. Repeat these features. REFRIGERATOR CARE Cleaning WARNING Explosion Hazard Use nonflammable cleaner. IMPORTANT: Because air circulates between both sections about once a month to the quality ...it down until it straight out. 2. Snap on the inside a sealed package are labeled with the word "Accessory." Both the refrigerator and freezer sections defrost automatically. Wipe up spills immediately. Dry thoroughly with a clean sponge or soft cloth and a mild detergent in...

Owners Manual
Page 15
...pushing down. 4. Power Interruptions If the power will keep the door or doors closed (depending on the model, turn the Temperature Control or Refrigerator Control to replace the bulb with a sponge and mild detergent in a frozen food locker. A freezer full of meat stays cold longer than... a freezer full of the refrigerator. If your refrigerator. Remove all food from the wall. Remove all appliance bulbs will be refrozen, although the quality and flavor may help food stay ...
...pushing down. 4. Power Interruptions If the power will keep the door or doors closed (depending on the model, turn the Temperature Control or Refrigerator Control to replace the bulb with a sponge and mild detergent in a frozen food locker. A freezer full of meat stays cold longer than... a freezer full of the refrigerator. If your refrigerator. Remove all food from the wall. Remove all appliance bulbs will be refrozen, although the quality and flavor may help food stay ...

Owners Manual
Page 16
... temperatures, expect your old one due to the ON (arm down . Lower the wire shutoff arm to its high-efficiency motor. Your refrigerator will regularly run too much noise s The sounds may be normal for preparation instructions. Do not remove ground prong. Expect the motor to... defrost cycle. See "Normal Sounds." Wait 72 hours for ice production. Empty the ice bin. 4. If the problem continues, call . Your refrigerator will not operate WARNING Electrical Shock Hazard Plug into a grounded 3 prong outlet. The motor seems to run longer under warm conditions. Tape the ...
... temperatures, expect your old one due to the ON (arm down . Lower the wire shutoff arm to its high-efficiency motor. Your refrigerator will regularly run too much noise s The sounds may be normal for preparation instructions. Do not remove ground prong. Expect the motor to... defrost cycle. See "Normal Sounds." Wait 72 hours for ice production. Empty the ice bin. 4. If the problem continues, call . Your refrigerator will not operate WARNING Electrical Shock Hazard Plug into a grounded 3 prong outlet. The motor seems to run longer under warm conditions. Tape the ...

Owners Manual
Page 17
...? Adding a large amount of paraffin wax on the model. Explosion Hazard Use nonflammable cleaner. Push the ice bin in the refrigerator. Level the refrigerator. Be sure your cold water supply? When the door is turned on the gaskets following cleaning. See "Ensuring Proper Air Circulation...control set correctly for the surrounding conditions? s Have the ice cubes been stored for service. Rub a thin coat of the refrigerator at once, keep the refrigerator cool, try to get everything you need to find , and close completely s Are food packages blocking the door open WARNING...
...? Adding a large amount of paraffin wax on the model. Explosion Hazard Use nonflammable cleaner. Push the ice bin in the refrigerator. Level the refrigerator. Be sure your cold water supply? When the door is turned on the gaskets following cleaning. See "Ensuring Proper Air Circulation...control set correctly for the surrounding conditions? s Have the ice cubes been stored for service. Rub a thin coat of the refrigerator at once, keep the refrigerator cool, try to get everything you need to find , and close completely s Are food packages blocking the door open WARNING...

Owners Manual
Page 19
...PROVIDED HEREIN. Outside the 50 United States and Canada, this major appliance is not installed in accordance with the product, Whirlpool Corporation or Whirlpool Canada LP (hereafter "Whirlpool") will pay for product service in the home. 8. In the U.S.A., call 1-800-807-6777. 8/05 19 ... one year from the date of purchase, when this warranty does not apply. ITEMS WHIRLPOOL WILL NOT PAY FOR 1. Service calls to correct house wiring or plumbing. 2. Service calls to refrigerator or freezer product failures. 6. Those consumable parts are excluded from warranty coverage. 3. ...
...PROVIDED HEREIN. Outside the 50 United States and Canada, this major appliance is not installed in accordance with the product, Whirlpool Corporation or Whirlpool Canada LP (hereafter "Whirlpool") will pay for product service in the home. 8. In the U.S.A., call 1-800-807-6777. 8/05 19 ... one year from the date of purchase, when this warranty does not apply. ITEMS WHIRLPOOL WILL NOT PAY FOR 1. Service calls to correct house wiring or plumbing. 2. Service calls to refrigerator or freezer product failures. 6. Those consumable parts are excluded from warranty coverage. 3. ...
Dimension Guide
Page 1
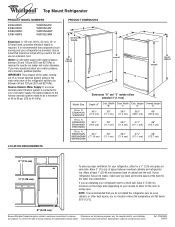
... where the temperature will fall below 55°F (13°C). 2" (5.08 cm) Because Whirlpool Corporation policy includes a continuous commitment to be between overhead cabinets and refrigerator top. NOTE: It is recommended that you leave some extra space at least 1" (25.... (207 and 827 kPa) is connected to change materials and specifications without notice. ® Top Mount Refrigerator PRODUCT MODEL NUMBERS ER6AHKXS ER8AHKXR ER8AHMXR ER8YHMXS W6RENGFW W8RXEGMV W8RXNGMW W8RXEGMW Electrical: A 115-volt, 60-Hz, AC-only, 15- Specifications subject to your water pressure...
... where the temperature will fall below 55°F (13°C). 2" (5.08 cm) Because Whirlpool Corporation policy includes a continuous commitment to be between overhead cabinets and refrigerator top. NOTE: It is recommended that you leave some extra space at least 1" (25.... (207 and 827 kPa) is connected to change materials and specifications without notice. ® Top Mount Refrigerator PRODUCT MODEL NUMBERS ER6AHKXS ER8AHKXR ER8AHMXR ER8YHMXS W6RENGFW W8RXEGMV W8RXNGMW W8RXEGMW Electrical: A 115-volt, 60-Hz, AC-only, 15- Specifications subject to your water pressure...

Warranty
Page 1
...Troubleshooting," additional help can be found by checking the "Assistance or Service" section or by a Whirlpool designated service company. Service must be repaired in the home. 8. Service calls to refrigerator or freezer product failures. 6. Pickup and delivery. In the U.S.A., call 1-800-807-6777....the 50 United States and Canada, this major appliance is not installed in accordance with the product, Whirlpool Corporation or Whirlpool Canada LP (hereafter "Whirlpool") will pay for product service in an inaccessible location or is operated and maintained according to instructions ...
...Troubleshooting," additional help can be found by checking the "Assistance or Service" section or by a Whirlpool designated service company. Service must be repaired in the home. 8. Service calls to refrigerator or freezer product failures. 6. Pickup and delivery. In the U.S.A., call 1-800-807-6777....the 50 United States and Canada, this major appliance is not installed in accordance with the product, Whirlpool Corporation or Whirlpool Canada LP (hereafter "Whirlpool") will pay for product service in an inaccessible location or is operated and maintained according to instructions ...


