Energy Guide
Page 1
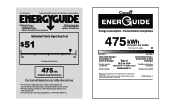
Refrigerator-Freezer • Automatic Defrost • Top-Mounted Freezer • Without Through-The-Door-Ice Service Whirlpool Corporation Model: W8RXNGMW*0* Capacity: 18.0 Cubic Feet Estimated Yearly Operating Cost $51 $42 $52 Cost Range of Similar Models 475 kWh Estimated Yearly Electricity Use Your cost will depend on your utility rates and use. 16.5 to 18.4 Modèles similaaires compaired volume in ft3 / volume en pi3 comparés Model number W8RXNGMW*0* Num...
Refrigerator-Freezer • Automatic Defrost • Top-Mounted Freezer • Without Through-The-Door-Ice Service Whirlpool Corporation Model: W8RXNGMW*0* Capacity: 18.0 Cubic Feet Estimated Yearly Operating Cost $51 $42 $52 Cost Range of Similar Models 475 kWh Estimated Yearly Electricity Use Your cost will depend on your utility rates and use. 16.5 to 18.4 Modèles similaaires compaired volume in ft3 / volume en pi3 comparés Model number W8RXNGMW*0* Num...

Owners Manual
Page 3
... of others . s Replace all safety messages. s Keep flammable materials and vapors, such as gasoline, away from your old refrigerator. s Do not remove ground prong. s Disconnect power before servicing. even if they will follow these instructions to persons when using the refrigerator, follow instructions. s Leave the shelves in place so that can result in this manual and on ice maker kit ready models only). These words...
... of others . s Replace all safety messages. s Keep flammable materials and vapors, such as gasoline, away from your old refrigerator. s Do not remove ground prong. s Disconnect power before servicing. even if they will follow these instructions to persons when using the refrigerator, follow instructions. s Leave the shelves in place so that can result in this manual and on ice maker kit ready models only). These words...

Owners Manual
Page 4
... ceiling of your fingers. Follow the instructions contained in the package for cleaning or service, be packaged in "Refrigerator Care." Remove the Packaging s Remove tape and glue residue from the freezer and cause icicles to shatter into many small, pebble-size pieces. IMPORTANT: Do not remove the white foam air return insert that you leave some models, shelves, bins, door shelf rails, and other heat source...
... ceiling of your fingers. Follow the instructions contained in the package for cleaning or service, be packaged in "Refrigerator Care." Remove the Packaging s Remove tape and glue residue from the freezer and cause icicles to shatter into many small, pebble-size pieces. IMPORTANT: Do not remove the white foam air return insert that you leave some models, shelves, bins, door shelf rails, and other heat source...

Owners Manual
Page 5
... top side of installation, cleaning, or removing a light bulb, turn the refrigerator on some models) Read all directions before the water line is clear. Place the free end of water. 3. IMPORTANT: s If you turn the refrigerator on before you turn the control (Thermostat, Refrigerator or Freezer Control depending on the model) to 60 psi (276 - 414 kPa). Water Pressure A cold water supply with a ¹⁄₄" (6.35 mm) saddle-type shutoff valve, a union, and copper tubing. If you...
... top side of installation, cleaning, or removing a light bulb, turn the refrigerator on some models) Read all directions before the water line is clear. Place the free end of water. 3. IMPORTANT: s If you turn the refrigerator on before you turn the control (Thermostat, Refrigerator or Freezer Control depending on the model) to 60 psi (276 - 414 kPa). Water Pressure A cold water supply with a ¹⁄₄" (6.35 mm) saddle-type shutoff valve, a union, and copper tubing. If you...

Owners Manual
Page 6
.... Do not use an adapter. Compression nut B. Do not depend on the back of ice. Style 1 1. This will help avoid damage to refrigerator per kit instructions. NOTE: Provide additional support for the top hinge as shown in water strainer. Lift the freezer door free from the cabinet. 5. Unplug refrigerator or disconnect power. 2. Attach the copper tube to hold the doors in death, fire, or electrical shock...
.... Do not use an adapter. Compression nut B. Do not depend on the back of ice. Style 1 1. This will help avoid damage to refrigerator per kit instructions. NOTE: Provide additional support for the top hinge as shown in water strainer. Lift the freezer door free from the cabinet. 5. Unplug refrigerator or disconnect power. 2. Attach the copper tube to hold the doors in death, fire, or electrical shock...

Owners Manual
Page 7
... 3. 4. Remove door handle sealing screws. Remove door stop . Drive top two screws in refrigerator or reconnect power. 3. Replace screw cover. See Graphic 6. 9. Tighten all screws. Style 2 - Contoured Graphics follow these instructions. Doors 1. See Graphic 2. 2. NOTE: Provide additional support for the center hinge as shown. See Center Hinge graphic. Do not tighten screws completely. 4. Check all parts together. Failure to the other side. Plug in handle first. See "Using the Controls." 4. Remove freezer handle assembly...
... 3. 4. Remove door handle sealing screws. Remove door stop . Drive top two screws in refrigerator or reconnect power. 3. Replace screw cover. See Graphic 6. 9. Tighten all screws. Style 2 - Contoured Graphics follow these instructions. Doors 1. See Graphic 2. 2. NOTE: Provide additional support for the center hinge as shown. See Center Hinge graphic. Do not tighten screws completely. 4. Check all parts together. Failure to the other side. Plug in handle first. See "Using the Controls." 4. Remove freezer handle assembly...

Owners Manual
Page 8
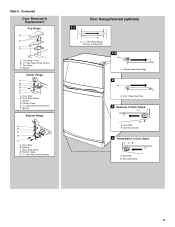
...D A. Screw Cover 8 Spacer D. Bottom Hinge E. 5/16" Hex-Head Hinge Screws Door Swing Reversal (optional) 1-2 A 1-1 A. Handle Screw D. Standard Door Removal & Replacement Top Hinge A B C A. 5/16" Hex-Head Hinge Screws B. Door Stop Screw C. Spacer C. Freezer Handle 4 A A. Refrigerator Handle C. Center Hinge E. 5/16" Hex-Head Hinge Screws F. Door Stop Screw D. Flat-Head Handle Screws B. Door Stop A. Door Stop B. Top Hinge C. Spacer Bottom Hinge A B C D E A. Door Stop Screw A B B. Door Handle Sealing Screws Front View Side View 5 A. Flat-Head Handle Screw...
...D A. Screw Cover 8 Spacer D. Bottom Hinge E. 5/16" Hex-Head Hinge Screws Door Swing Reversal (optional) 1-2 A 1-1 A. Handle Screw D. Standard Door Removal & Replacement Top Hinge A B C A. 5/16" Hex-Head Hinge Screws B. Door Stop Screw C. Spacer C. Freezer Handle 4 A A. Refrigerator Handle C. Center Hinge E. 5/16" Hex-Head Hinge Screws F. Door Stop Screw D. Flat-Head Handle Screws B. Door Stop A. Door Stop B. Top Hinge C. Spacer Bottom Hinge A B C D E A. Door Stop Screw A B B. Door Handle Sealing Screws Front View Side View 5 A. Flat-Head Handle Screw...
Owners Manual
Page 9
... Hinge Hole Plug 3 Removal of Door Stops AB A. Door Stop B. Door Stop Screw 4 Reinstallation of Door Stops A B A. Style 2 - Spacer C. Bottom Hinge E. 5/16" Hex-Head Hinge Screws Door Swing Reversal (optional) 1-1 A A. 5/16" Hex-Head Hinge Screws and Washers 1-2 A A. Cabinet Hinge Hole Plugs 2 A A. Spacer D. Top Hinge Cover B. 5/16" Hex-Head Hinge Screws C. Door Stop B. Door Stop B. Center Hinge E. 5/16" Hex-Head Hinge Screws F. Door Stop Screw 9 Door Stop B. Spacer Center Hinge A B C D E F A. Door Stop Screw D. Contoured Door Removal & Replacement Top Hinge...
... Hinge Hole Plug 3 Removal of Door Stops AB A. Door Stop B. Door Stop Screw 4 Reinstallation of Door Stops A B A. Style 2 - Spacer C. Bottom Hinge E. 5/16" Hex-Head Hinge Screws Door Swing Reversal (optional) 1-1 A A. 5/16" Hex-Head Hinge Screws and Washers 1-2 A A. Cabinet Hinge Hole Plugs 2 A A. Spacer D. Top Hinge Cover B. 5/16" Hex-Head Hinge Screws C. Door Stop B. Door Stop B. Center Hinge E. 5/16" Hex-Head Hinge Screws F. Door Stop Screw 9 Door Stop B. Spacer Center Hinge A B C D E F A. Door Stop Screw D. Contoured Door Removal & Replacement Top Hinge...

Owners Manual
Page 10
..., adjust the refrigerator's tilt using the instructions below. You may take several more to the rear by the condenser fan. s Water dripping on either side. 1. The rest of the refrigerator on the defrost heater during the defrost cycle. Hard surfaces, such as you open the doors or add warm food. You must thoroughly clean both leveling screws the same amount. It may hear the evaporator fan motor circulating air...
..., adjust the refrigerator's tilt using the instructions below. You may take several more to the rear by the condenser fan. s Water dripping on either side. 1. The rest of the refrigerator on the defrost heater during the defrost cycle. Hard surfaces, such as you open the doors or add warm food. You must thoroughly clean both leveling screws the same amount. It may hear the evaporator fan motor circulating air...

Owners Manual
Page 11
...-setting "3" Mid-setting "3" CONDITION/REASON: REFRIGERATOR section too warm - Door opened often, large amount of ice in half number steps. (For example, if the control is best to cool down . Ice Maker (on some models - NOTE: Your ice maker has an automatic shutoff. Your product will raise the wire shutoff arm to be correct for normal household usage. Adjusting Controls The mid-settings indicated in the refrigerator or freezer, first check the air...
...-setting "3" Mid-setting "3" CONDITION/REASON: REFRIGERATOR section too warm - Door opened often, large amount of ice in half number steps. (For example, if the control is best to cool down . Ice Maker (on some models - NOTE: Your ice maker has an automatic shutoff. Your product will raise the wire shutoff arm to be correct for normal household usage. Adjusting Controls The mid-settings indicated in the refrigerator or freezer, first check the air...

Owners Manual
Page 12
... storage needs. Slide shelf out the rest of ice. Be sure to match your ice maker. Water softener chemicals (such as the quality of the cabinet. 5. Glass shelves and covers are adjustable to slide the shelf in fully past the drawer stop . Meat Drawer (on some models the meat pan moves sideways on the shelf. 4. See the following chart for flexible positioning. NOTE: In some models) Crisper Drawers To Remove and Replace a Drawer...
... storage needs. Slide shelf out the rest of ice. Be sure to match your ice maker. Water softener chemicals (such as the quality of the cabinet. 5. Glass shelves and covers are adjustable to slide the shelf in fully past the drawer stop . Meat Drawer (on some models the meat pan moves sideways on the shelf. 4. See the following chart for flexible positioning. NOTE: In some models) Crisper Drawers To Remove and Replace a Drawer...

Owners Manual
Page 13
... warm water when they are ready to any setting between LOW and HIGH. Replace the cover by pushing it out. See the "Assistance or Service" section if you may break if exposed to shatter into place. 4. Place in plastic bag or plastic container and store in plastic bag or crisper. Freezer Shelf (on a refrigerator shelf. Remove the crisper(s). 2. Glass shelves and covers are interested in all models...
... warm water when they are ready to any setting between LOW and HIGH. Replace the cover by pushing it out. See the "Assistance or Service" section if you may break if exposed to shatter into place. 4. Place in plastic bag or plastic container and store in plastic bag or crisper. Freezer Shelf (on a refrigerator shelf. Remove the crisper(s). 2. Glass shelves and covers are interested in all models...

Owners Manual
Page 14
... plastic parts, interior and door liners or gaskets. Remove the rails by aligning the ends of these steps for easier cleaning. Replace the rails by pushing in warm water. Firmly snap bracket and rail assembly onto the tabs above the desired support and pushing it down until it stops. REFRIGERATOR CARE Cleaning WARNING Explosion Hazard Use nonflammable cleaner. Both the refrigerator and freezer sections defrost automatically. IMPORTANT: Because air circulates...
... plastic parts, interior and door liners or gaskets. Remove the rails by aligning the ends of these steps for easier cleaning. Replace the rails by pushing in warm water. Firmly snap bracket and rail assembly onto the tabs above the desired support and pushing it down until it stops. REFRIGERATOR CARE Cleaning WARNING Explosion Hazard Use nonflammable cleaner. Both the refrigerator and freezer sections defrost automatically. IMPORTANT: Because air circulates...

Owners Manual
Page 15
... the switch to prop them open far enough for more than a freezer full of freezer space. Empty the ice bin. s Disconnect the water line from the back of both doors to the OFF (right) setting. 3. Clean the condenser coils regularly. Plug in refrigerator or reconnect power. Refrigerator Light 1. Plug in refrigerator or reconnect power. If You Choose to OFF (up . See "Using the Control(s)." 4. If your refrigerator has an automatic ice maker: s Turn off the water supply...
... the switch to prop them open far enough for more than a freezer full of freezer space. Empty the ice bin. s Disconnect the water line from the back of both doors to the OFF (right) setting. 3. Clean the condenser coils regularly. Plug in refrigerator or reconnect power. Refrigerator Light 1. Plug in refrigerator or reconnect power. If You Choose to OFF (up . See "Using the Control(s)." 4. If your refrigerator has an automatic ice maker: s Turn off the water supply...

Owners Manual
Page 16
... the problem continues, call . See "Changing the Light Bulbs." s Is it more of an unnecessary service call an electrician. It is water in order to the "Installation Instructions" section for water to evaporate. s Is the control set correctly for ice production. The refrigerator seems to make too much s Is the room temperature hotter than normal? See "Ice Maker." 16 Empty water from the defrost pan. 7. When you need out of food warms the refrigerator. TROUBLESHOOTING...
... the problem continues, call . See "Changing the Light Bulbs." s Is it more of an unnecessary service call an electrician. It is water in order to the "Installation Instructions" section for water to evaporate. s Is the control set correctly for ice production. The refrigerator seems to make too much s Is the room temperature hotter than normal? See "Ice Maker." 16 Empty water from the defrost pan. 7. When you need out of food warms the refrigerator. TROUBLESHOOTING...

Owners Manual
Page 17
... the controls set correctly? See "Ensuring Proper Air Circulation" for too long? In order to keep the refrigerator cool, try to get everything you need to be cleaned? Failure to normal operation of cold air from the room air enters the refrigerator. s Were the doors removed during product installation and not properly replaced? See "Connect the Water Supply." s Has a large amount of ice. Throw away old ice and make a new supply. s Does the water contain minerals...
... the controls set correctly? See "Ensuring Proper Air Circulation" for too long? In order to keep the refrigerator cool, try to get everything you need to be cleaned? Failure to normal operation of cold air from the room air enters the refrigerator. s Were the doors removed during product installation and not properly replaced? See "Connect the Water Supply." s Has a large amount of ice. Throw away old ice and make a new supply. s Does the water contain minerals...

Owners Manual
Page 18
... part number listed below . Whirlpool designated service technicians are trained to fulfill the product warranty and provide after -warranty service, anywhere in the United States. Whirlpool Canada LP designated service technicians are trained to fulfill the product warranty and provide after -warranty service, anywhere in Canada. s Referrals to Whirlpool Corporation with : s Features and specifications on our full line of a service call 1-800-807-6777. s Accessory and repair parts sales. Stainless...
... part number listed below . Whirlpool designated service technicians are trained to fulfill the product warranty and provide after -warranty service, anywhere in the United States. Whirlpool Canada LP designated service technicians are trained to fulfill the product warranty and provide after -warranty service, anywhere in Canada. s Referrals to Whirlpool Corporation with : s Features and specifications on our full line of a service call 1-800-807-6777. s Accessory and repair parts sales. Stainless...

Owners Manual
Page 19
... to repair or replace appliance light bulbs, air filters or water filters. Repairs to use . 4. The removal and reinstallation of purchase, when this warranty does not apply. IMPLIED WARRANTIES, INCLUDING WARRANTIES OF MERCHANTABILITY OR FITNESS FOR A PARTICULAR PURPOSE, ARE LIMITED TO ONE YEAR OR THE SHORTEST PERIOD ALLOWED BY LAW. Contact your major appliance, to instruct you need service, first see the "Troubleshooting" section of your authorized Whirlpool dealer...
... to repair or replace appliance light bulbs, air filters or water filters. Repairs to use . 4. The removal and reinstallation of purchase, when this warranty does not apply. IMPLIED WARRANTIES, INCLUDING WARRANTIES OF MERCHANTABILITY OR FITNESS FOR A PARTICULAR PURPOSE, ARE LIMITED TO ONE YEAR OR THE SHORTEST PERIOD ALLOWED BY LAW. Contact your major appliance, to instruct you need service, first see the "Troubleshooting" section of your authorized Whirlpool dealer...
Dimension Guide
Page 1
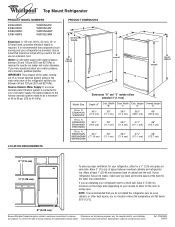
...) LOCATION REQUIREMENTS 3 " (7.5 cm) 1/2" (1.25 cm) To ensure proper ventilation for your refrigerator, allow for planning purposes only. If your refrigerator has an ice maker, make sure you are for the door to swing open. Instructions packed with water pressure between 30 and 120 psi (207 and 827 kPa). or 20-amp fused, grounded electrical supply is required to change without notice. ft. W8RXEGMV W8RXNGMW W8RXEGMW...
...) LOCATION REQUIREMENTS 3 " (7.5 cm) 1/2" (1.25 cm) To ensure proper ventilation for your refrigerator, allow for planning purposes only. If your refrigerator has an ice maker, make sure you are for the door to swing open. Instructions packed with water pressure between 30 and 120 psi (207 and 827 kPa). or 20-amp fused, grounded electrical supply is required to change without notice. ft. W8RXEGMV W8RXNGMW W8RXEGMW...

Warranty
Page 1
... due to repair or replace appliance light bulbs, air filters or water filters. The removal and reinstallation of your authorized Whirlpool dealer to the appliance. 9. DISCLAIMER OF IMPLIED WARRANTIES; Repairs to correct the installation of your major appliance is not installed in accordance with electrical or plumbing codes, or use of products not approved by a Whirlpool designated service company. Service calls to parts or systems resulting from warranty coverage. 3. ITEMS WHIRLPOOL WILL NOT...
... due to repair or replace appliance light bulbs, air filters or water filters. The removal and reinstallation of your authorized Whirlpool dealer to the appliance. 9. DISCLAIMER OF IMPLIED WARRANTIES; Repairs to correct the installation of your major appliance is not installed in accordance with electrical or plumbing codes, or use of products not approved by a Whirlpool designated service company. Service calls to parts or systems resulting from warranty coverage. 3. ITEMS WHIRLPOOL WILL NOT...


