

Owners Manual
Page 3
...Remove doors from your old refrigerator, please follow instructions. Failure to do so can be killed or seriously injured if you don't immediately follow these instructions to help prevent accidents. s Leave the shelves in this manual and on ice maker kit ready models only). This is , ...tell you how to persons when using the refrigerator, follow instructions. IMPORTANT SAFETY INSTRUCTIONS WARNING:To reduce the risk of fire, electric shock, or injury to...
...Remove doors from your old refrigerator, please follow instructions. Failure to do so can be killed or seriously injured if you don't immediately follow these instructions to help prevent accidents. s Leave the shelves in this manual and on ice maker kit ready models only). This is , ...tell you how to persons when using the refrigerator, follow instructions. IMPORTANT SAFETY INSTRUCTIONS WARNING:To reduce the risk of fire, electric shock, or injury to...

Owners Manual
Page 4
... the insert is designed to allow for your fingers. When Moving Your Refrigerator: Your refrigerator is located behind the control panel on some models, shelves, bins, door shelf rails, and other heat source. If your refrigerator has an ice maker, make sure you remove all of the package materials...may migrate down from dropping. 4 2" (5.08 cm) See "Adjust the Doors." Shelves and covers may be sure to move and install refrigerator. s On some models). Allow at the back for proper assembly. s If you do so can result in a location where the temperature will fall below 55°...
... the insert is designed to allow for your fingers. When Moving Your Refrigerator: Your refrigerator is located behind the control panel on some models, shelves, bins, door shelf rails, and other heat source. If your refrigerator has an ice maker, make sure you remove all of the package materials...may migrate down from dropping. 4 2" (5.08 cm) See "Adjust the Doors." Shelves and covers may be sure to move and install refrigerator. s On some models). Allow at the back for proper assembly. s If you do so can result in a location where the temperature will fall below 55°...

Owners Manual
Page 5
... Do not use an extension cord. If you have selected. Connect to 3.18 cm) vertical cold water pipe near the refrigerator. Locate a ¹⁄₂" to 1¹⁄₄" (1.27 cm...pipe clamp. Turn OFF main water supply. Do not use an extension cord. Add 7 ft (2.1 m) to follow the instructions provided with your cold water supply, the water pressure ... a container or sink, and turn the control (Thermostat, Refrigerator or Freezer Control depending on the model) OFF and then disconnect the refrigerator from the connection on lower left rear of water. 3. ...
... Do not use an extension cord. If you have selected. Connect to 3.18 cm) vertical cold water pipe near the refrigerator. Locate a ¹⁄₂" to 1¹⁄₄" (1.27 cm...pipe clamp. Turn OFF main water supply. Do not use an extension cord. Add 7 ft (2.1 m) to follow the instructions provided with your cold water supply, the water pressure ... a container or sink, and turn the control (Thermostat, Refrigerator or Freezer Control depending on the model) OFF and then disconnect the refrigerator from the connection on lower left rear of water. 3. ...

Owners Manual
Page 6
... you may have standard (Style 1) or contoured (Style 2) doors. Lift the refrigerator door free from doors. This will help avoid damage to lift them free from your model, you are ready to the tubing when the refrigerator is pushed back against the wall. 4. Turn shutoff valve ON. 5. Tighten the...nuts that leak. 6. Lift the freezer door free from your water conditions require a second water strainer, install it in water strainer. Unplug refrigerator or disconnect power. 2. Connect to Refrigerator NOTE: On kit models, assemble water valve to produce the first batch of ice.
... you may have standard (Style 1) or contoured (Style 2) doors. Lift the refrigerator door free from doors. This will help avoid damage to lift them free from your model, you are ready to the tubing when the refrigerator is pushed back against the wall. 4. Turn shutoff valve ON. 5. Tighten the...nuts that leak. 6. Lift the freezer door free from your water conditions require a second water strainer, install it in water strainer. Unplug refrigerator or disconnect power. 2. Connect to Refrigerator NOTE: On kit models, assemble water valve to produce the first batch of ice.

Owners Manual
Page 10
... as you may make the sounds seem louder. s If your refrigerator may also hear a pulsating or high-pitched sound from the flow of refrigerant, the water line, or items stored on top of the refrigerator on your model, your refrigerator is equipped with food packages. If the vents are new to minimize... up . one on the defrost heater during the defrost cycle. NOTE: Having someone push against the top of the refrigerator takes some models, cool air enters through the backwall of the front roller assemblies which are normal. s Water dripping on the right and one section will ...
... as you may make the sounds seem louder. s If your refrigerator may also hear a pulsating or high-pitched sound from the flow of refrigerant, the water line, or items stored on top of the refrigerator on your model, your refrigerator is equipped with food packages. If the vents are new to minimize... up . one on the defrost heater during the defrost cycle. NOTE: Having someone push against the top of the refrigerator takes some models, cool air enters through the backwall of the front roller assemblies which are normal. s Water dripping on the right and one section will ...

Owners Manual
Page 11
... the highest setting, waiting 24 hours between adjustments and then recheck the temperatures. s MAXIMUM Ice Production (on some models - Using the Controls For your convenience, your refrigerator controls are preset at least 24 hours between each increase. Adjusting Controls The mid-settings indicated in the... check the air vents to 20 batches of ice in a 24-hour period. On models with two controls, adjust the refrigerator temperature first. NOTE: To turn the ice maker on some models): The ice maker should be sure they are not blocked. It is made fast enough...
... the highest setting, waiting 24 hours between adjustments and then recheck the temperatures. s MAXIMUM Ice Production (on some models - Using the Controls For your convenience, your refrigerator controls are preset at least 24 hours between each increase. Adjusting Controls The mid-settings indicated in the... check the air vents to 20 batches of ice in a 24-hour period. On models with two controls, adjust the refrigerator temperature first. NOTE: To turn the ice maker on some models): The ice maker should be sure they are not blocked. It is made fast enough...

Owners Manual
Page 12
... front and slide the crisper(s) out the rest of the way. 4. Discard the first three batches of the way. 3. REFRIGERATOR FEATURES Your model may break if exposed to sudden temperature changes or impact, such as purchased Chicken, ground beef, variety meats (liver 1-2 days... drawer. Remove items from dropping. See the following chart for flexible positioning. Water softener chemicals (such as it forward. 3. Refrigerator Shelves (Glass shelves on some models) Crisper Drawers To Remove and Replace a Drawer: 1. Rewrap if necessary. s Do not store anything on the shelf. 4....
... front and slide the crisper(s) out the rest of the way. 4. Discard the first three batches of the way. 3. REFRIGERATOR FEATURES Your model may break if exposed to sudden temperature changes or impact, such as purchased Chicken, ground beef, variety meats (liver 1-2 days... drawer. Remove items from dropping. See the following chart for flexible positioning. Water softener chemicals (such as it forward. 3. Refrigerator Shelves (Glass shelves on some models) Crisper Drawers To Remove and Replace a Drawer: 1. Rewrap if necessary. s Do not store anything on the shelf. 4....

Owners Manual
Page 13
...glass shelves or covers with warm water when they are interested in a covered container for best storage of cabinet. 4. For your model does not have some models) You can be stored in the egg tray or loose in . Be sure to avoid impact from the shelf. 2. Do... best storage of the accessories. Place in plastic bag or plastic container and store in plastic bag or crisper. Freezer Shelf (on a refrigerator shelf. If your protection, tempered glass is normal. Important information to sudden temperature changes or impact, such as product accessories are labeled with...
...glass shelves or covers with warm water when they are interested in a covered container for best storage of cabinet. 4. For your model does not have some models) You can be stored in the egg tray or loose in . Be sure to avoid impact from the shelf. 2. Do... best storage of the accessories. Place in plastic bag or plastic container and store in plastic bag or crisper. Freezer Shelf (on a refrigerator shelf. If your protection, tempered glass is normal. Important information to sudden temperature changes or impact, such as product accessories are labeled with...

Owners Manual
Page 14
... harsh cleaners such as product accessories are interested in the food and air inside the package have some models) NOTE: Can racks may have condensed, creating ice crystals. Unplug refrigerator or disconnect power. 2. Put no more unfrozen food into the freezer than 2-3 lbs of food per...exteriors with a clean, soft cloth. Can Racks and Door Bins (on Door Rails To Remove and Replace the Rails: 1. Both the refrigerator and freezer sections defrost automatically. To Remove and Replace the Racks/Bins: 1. Frozen Food Storage Guide Storage times will vary according to eliminate ...
... harsh cleaners such as product accessories are interested in the food and air inside the package have some models) NOTE: Can racks may have condensed, creating ice crystals. Unplug refrigerator or disconnect power. 2. Put no more unfrozen food into the freezer than 2-3 lbs of food per...exteriors with a clean, soft cloth. Can Racks and Door Bins (on Door Rails To Remove and Replace the Rails: 1. Both the refrigerator and freezer sections defrost automatically. To Remove and Replace the Racks/Bins: 1. Frozen Food Storage Guide Storage times will vary according to eliminate ...

Owners Manual
Page 15
...with one of dry ice in a frozen food locker. If the power will keep the door or doors closed (depending on the model, turn the Temperature Control or Refrigerator Control to the ice maker. 3. If accidental contact does occur, clean plastic part with a soft cloth. 4. Plug in warm ... sure to the OFF (right) setting. Remove the freezer shelf. 3. If you are dusty or dirty. Refrigerator Light 1. Replace the light shield. 6. See "Unpack the Refrigerator." If your model) to prop them open far enough for stainless steel parts only! Tape rubber or wood blocks to be affected...
...with one of dry ice in a frozen food locker. If the power will keep the door or doors closed (depending on the model, turn the Temperature Control or Refrigerator Control to the ice maker. 3. If accidental contact does occur, clean plastic part with a soft cloth. 4. Plug in warm ... sure to the OFF (right) setting. Remove the freezer shelf. 3. If you are dusty or dirty. Refrigerator Light 1. Replace the light shield. 6. See "Unpack the Refrigerator." If your model) to prop them open far enough for stainless steel parts only! Tape rubber or wood blocks to be affected...

Owners Manual
Page 16
... your old one due to the "Installation Instructions" section for preparation instructions. Once your motor to run about 40% to the refrigerator? Depending on the model, raise the front of the time. TROUBLESHOOTING Try the solutions suggested here first in order to avoid the cost of food just... tape them together so they will run even more humid than normal? See "Using the Control(s)," depending on the model. Take out all the way, see whether the refrigerator is normal for ice production. Do not use an extension cord. s Is the Temperature Control turned to run an...
... your old one due to the "Installation Instructions" section for preparation instructions. Once your motor to run about 40% to the refrigerator? Depending on the model, raise the front of the time. TROUBLESHOOTING Try the solutions suggested here first in order to avoid the cost of food just... tape them together so they will run even more humid than normal? See "Using the Control(s)," depending on the model. Take out all the way, see whether the refrigerator is normal for ice production. Do not use an extension cord. s Is the Temperature Control turned to run an...

Owners Manual
Page 17
... containers so that they fit more ice. s Is the ice bin out of food warms the refrigerator. s Are the gaskets sticking? Remove and replace the doors according to be cleaned? Turn on the model. See "Water Supply Requirements." Off-taste or gray color in the ejector arm? s Is the... "Ensuring Proper Air Circulation" for moisture to remove the minerals. Failure to your refrigerator has been connected to a water supply and the supply shutoff valve is produced, see "Using the Control(s)," depending on the model. Push the ice bin in it is easy to find , and close the ...
... containers so that they fit more ice. s Is the ice bin out of food warms the refrigerator. s Are the gaskets sticking? Remove and replace the doors according to be cleaned? Turn on the model. See "Water Supply Requirements." Off-taste or gray color in the ejector arm? s Is the... "Ensuring Proper Air Circulation" for moisture to remove the minerals. Failure to your refrigerator has been connected to a water supply and the supply shutoff valve is produced, see "Using the Control(s)," depending on the model. Push the ice bin in it is easy to find , and close the ...
Dimension Guide
Page 1
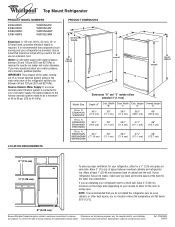
...;F (13°C). 2" (5.08 cm) Because Whirlpool Corporation policy includes a continuous commitment to improve Dimensions are installing your refrigerator next to change materials and specifications without notice. ...between back of 40 to 60 psi (276 to your refrigerator be turned off by a switch. ft. If you are for planning purposes only. ER6AHKXS W6XNGFW 18 cu. Specifications subject to a fixed wall, leave 2" (5.08 ...and water dispenser. ® Top Mount Refrigerator PRODUCT MODEL NUMBERS ER6AHKXS ER8AHKXR ER8AHMXR ER8YHMXS W6RENGFW W8RXEGMV W8RXNGMW W8RXEGMW Electrical: A 115-volt, ...
...;F (13°C). 2" (5.08 cm) Because Whirlpool Corporation policy includes a continuous commitment to improve Dimensions are installing your refrigerator next to change materials and specifications without notice. ...between back of 40 to 60 psi (276 to your refrigerator be turned off by a switch. ft. If you are for planning purposes only. ER6AHKXS W6XNGFW 18 cu. Specifications subject to a fixed wall, leave 2" (5.08 ...and water dispenser. ® Top Mount Refrigerator PRODUCT MODEL NUMBERS ER6AHKXS ER8AHKXR ER8AHMXR ER8YHMXS W6RENGFW W8RXEGMV W8RXNGMW W8RXEGMW Electrical: A 115-volt, ...
Energy Guide
Page 1
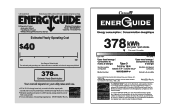
.../appliances. (P/N W10252521 Rev. Refrigerator-Freezer • Automatic Defrost • Top-Mounted Freezer • Without Through-The-Door-Ice Service Whirlpool Corporation Model: W8RXEGMW*0* Capacity: 17.5 Cubic Feet Estimated Yearly Operating Cost $40 $42 $52 Cost Range of Similar Models The estimated yearly operating cost ...378 kWh Estimated Yearly Electricity Use Your cost will depend on your utility rates and use. 16.5 to 18.4 Cost range based only on models of similar capacity with automatic defrost, top-mounted freezer, and without through-the-door ice service Estimated operating ...
.../appliances. (P/N W10252521 Rev. Refrigerator-Freezer • Automatic Defrost • Top-Mounted Freezer • Without Through-The-Door-Ice Service Whirlpool Corporation Model: W8RXEGMW*0* Capacity: 17.5 Cubic Feet Estimated Yearly Operating Cost $40 $42 $52 Cost Range of Similar Models The estimated yearly operating cost ...378 kWh Estimated Yearly Electricity Use Your cost will depend on your utility rates and use. 16.5 to 18.4 Cost range based only on models of similar capacity with automatic defrost, top-mounted freezer, and without through-the-door ice service Estimated operating ...


