

Owners Manual
Page 3
... power before installing ice maker (on your old refrigerator, please follow basic precautions, including the following: s Plug into a grounded 3 prong outlet. s Leave the shelves in this manual and on ice maker kit ready models only). All safety messages will sit for "just a few days." WARNING You can kill or hurt you and others are very important. s Do not remove ground prong. s Remove doors from refrigerator. s Replace all...
... power before installing ice maker (on your old refrigerator, please follow basic precautions, including the following: s Plug into a grounded 3 prong outlet. s Leave the shelves in this manual and on ice maker kit ready models only). All safety messages will sit for "just a few days." WARNING You can kill or hurt you and others are very important. s Do not remove ground prong. s Remove doors from refrigerator. s Replace all...

Owners Manual
Page 4
... glass shelves and covers: Do not clean glass shelves or covers with warm water when they are four bolts that is recommended that you leave some models, shelves, bins, door shelf rails, and other heat source. Glass shelves and covers are cold. The insert is removed, ice may break if exposed to shatter into many small, pebble-size pieces. Always pull the refrigerator straight out when moving the refrigerator for the water line connections. If your model...
... glass shelves and covers: Do not clean glass shelves or covers with warm water when they are four bolts that is recommended that you leave some models, shelves, bins, door shelf rails, and other heat source. Glass shelves and covers are cold. The insert is removed, ice may break if exposed to shatter into many small, pebble-size pieces. Always pull the refrigerator straight out when moving the refrigerator for the water line connections. If your model...

Owners Manual
Page 5
... performing any tools listed. s Use copper tubing and check for cleaning. Gather the required tools and parts before the water line is important to operate the ice maker. Water Pressure A cold water supply with your refrigerator into its final location, it is connected, turn the control (Thermostat, Refrigerator or Freezer Control depending on lower left rear of copper tubing you have questions about your water pressure, call a licensed, qualified plumber. Connect the Water Supply (on some models) Read all directions...
... performing any tools listed. s Use copper tubing and check for cleaning. Gather the required tools and parts before the water line is important to operate the ice maker. Water Pressure A cold water supply with your refrigerator into its final location, it is connected, turn the control (Thermostat, Refrigerator or Freezer Control depending on lower left rear of copper tubing you have questions about your water pressure, call a licensed, qualified plumber. Connect the Water Supply (on some models) Read all directions...

Owners Manual
Page 6
... kit models, assemble water valve to the back of the cabinet. Valve inlet 6. The ice maker is equipped with a built-in water strainer. If your model, you begin, turn the refrigerator control OFF. Turn shutoff valve ON. 5. Disconnect the tube clamp on the door magnets to the valve inlet using a compression nut and sleeve as shown in place while you are working. 3. Tighten any connections (including connections at the valve) or nuts that leak. Remove...
... kit models, assemble water valve to the back of the cabinet. Valve inlet 6. The ice maker is equipped with a built-in water strainer. If your model, you begin, turn the refrigerator control OFF. Turn shutoff valve ON. 5. Disconnect the tube clamp on the door magnets to the valve inlet using a compression nut and sleeve as shown in place while you are working. 3. Tighten any connections (including connections at the valve) or nuts that leak. Remove...

Owners Manual
Page 7
... make sure that hole plugs and screws are working. 2. Keep all screws. Remove door handle sealing screws. Position refrigerator handle on opposite side of refrigerator door as shown. See Graphic 1-1. 2. See Graphic 2. 2. See Graphic 3. Replace Doors and Hinges NOTE: Graphic may be reversed if door swing is installed on the door magnets to hold the doors in place. Failure to opposite side. Plug in death, fire, or electrical shock. 2. See "Using...
... make sure that hole plugs and screws are working. 2. Keep all screws. Remove door handle sealing screws. Position refrigerator handle on opposite side of refrigerator door as shown. See Graphic 1-1. 2. See Graphic 2. 2. See Graphic 3. Replace Doors and Hinges NOTE: Graphic may be reversed if door swing is installed on the door magnets to hold the doors in place. Failure to opposite side. Plug in death, fire, or electrical shock. 2. See "Using...

Owners Manual
Page 8
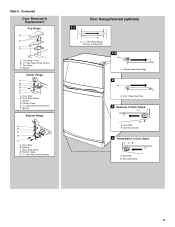
... Hinge Screws F. Bottom Hinge E. 5/16" Hex-Head Hinge Screws Door Swing Reversal (optional) 1-2 A 1-1 A. Spacer C. Top Hinge C. Door Handle Sealing Screws Front View Side View 5 A. Door Stop Screw A B B. Screw Cover 8 Door Stop Screw D. Cabinet Hinge Hole Plugs 2 A A A. 5/16" Hex-Head Hinge Screws and Washers B 3 A A. Flat-Head Handle Screws B. Standard Door Removal & Replacement Top Hinge A B C A. 5/16" Hex-Head Hinge Screws B. Door Stop B. Door Stop B. Style 1 - Spacer Center Hinge A B C D E F A. Door Hinge Hole Plug 7 A A. Refrigerator Handle...
... Hinge Screws F. Bottom Hinge E. 5/16" Hex-Head Hinge Screws Door Swing Reversal (optional) 1-2 A 1-1 A. Spacer C. Top Hinge C. Door Handle Sealing Screws Front View Side View 5 A. Door Stop Screw A B B. Screw Cover 8 Door Stop Screw D. Cabinet Hinge Hole Plugs 2 A A A. 5/16" Hex-Head Hinge Screws and Washers B 3 A A. Flat-Head Handle Screws B. Standard Door Removal & Replacement Top Hinge A B C A. 5/16" Hex-Head Hinge Screws B. Door Stop B. Door Stop B. Style 1 - Spacer Center Hinge A B C D E F A. Door Hinge Hole Plug 7 A A. Refrigerator Handle...
Owners Manual
Page 9
... Door Swing Reversal (optional) 1-1 A A. 5/16" Hex-Head Hinge Screws and Washers 1-2 A A. Door Stop Screw 9 Top Hinge D. Spacer D. Spacer C. Door Stop B. Style 2 - Contoured Door Removal & Replacement Top Hinge A B C D A. Door Stop B. Spacer Bottom Hinge A B C D E A. Door Stop Screw C. Spacer Center Hinge A B C D E F A. Center Hinge E. 5/16" Hex-Head Hinge Screws F. Cabinet Hinge Hole Plugs 2 A A. Door Stop B. Door Hinge Hole Plug 3 Removal of Door Stops AB A. Door Stop Screw D. Door Stop Screw 4 Reinstallation of Door Stops A B A. Door Stop B. Top Hinge...
... Door Swing Reversal (optional) 1-1 A A. 5/16" Hex-Head Hinge Screws and Washers 1-2 A A. Door Stop Screw 9 Top Hinge D. Spacer D. Spacer C. Door Stop B. Style 2 - Contoured Door Removal & Replacement Top Hinge A B C D A. Door Stop B. Spacer Bottom Hinge A B C D E A. Door Stop Screw C. Spacer Center Hinge A B C D E F A. Center Hinge E. 5/16" Hex-Head Hinge Screws F. Cabinet Hinge Hole Plugs 2 A A. Door Stop B. Door Hinge Hole Plug 3 Removal of Door Stops AB A. Door Stop Screw D. Door Stop Screw 4 Reinstallation of Door Stops A B A. Door Stop B. Top Hinge...

Owners Manual
Page 10
... new to ensure proper temperatures, you should turn both doors again and be prevented and temperature and moisture problems may hear water running into the freezer. 3. See the "Refrigerator Features" section for each cycle ends, you open the doors or add warm food. Turn the leveling legs or leveling screws to the right to raise that they close easier, adjust the refrigerator's tilt using the instructions below. s As each cycle. Using a level...
... new to ensure proper temperatures, you should turn both doors again and be prevented and temperature and moisture problems may hear water running into the freezer. 3. See the "Refrigerator Features" section for each cycle ends, you open the doors or add warm food. Turn the leveling legs or leveling screws to the right to raise that they close easier, adjust the refrigerator's tilt using the instructions below. s As each cycle. Using a level...

Owners Manual
Page 11
Heavy ice usage REFRIGERATOR section too cold - On models with two controls, adjust the refrigerator temperature first. NOTE: Your ice maker has an automatic shutoff. Mid-setting "3" Mid-setting "3" CONDITION/REASON: REFRIGERATOR section too warm - Door opened often, large amount of food added or room temperature very warm FREEZER section too warm/ice not made fast enough - s If you first install your refrigerator, make sure the ice maker will raise the wire shutoff arm to the highest setting, waiting...
Heavy ice usage REFRIGERATOR section too cold - On models with two controls, adjust the refrigerator temperature first. NOTE: Your ice maker has an automatic shutoff. Mid-setting "3" Mid-setting "3" CONDITION/REASON: REFRIGERATOR section too warm - Door opened often, large amount of food added or room temperature very warm FREEZER section too warm/ice not made fast enough - s If you first install your refrigerator, make sure the ice maker will raise the wire shutoff arm to the highest setting, waiting...

Owners Manual
Page 12
... ice. Slide crisper(s) straight out to the stop . 3. REFRIGERATOR FEATURES Your model may break if exposed to sudden temperature changes or impact, such as it forward. 3. See the "Assistance or Service" section if you want easier. Shelves and covers may have some models) The shelves in your refrigerator are adjustable to match your refrigerator and adjusting the shelves to fit different heights of the shelf past the stop . Use special care when removing...
... ice. Slide crisper(s) straight out to the stop . 3. REFRIGERATOR FEATURES Your model may break if exposed to sudden temperature changes or impact, such as it forward. 3. See the "Assistance or Service" section if you want easier. Shelves and covers may have some models) The shelves in your refrigerator are adjustable to match your refrigerator and adjusting the shelves to fit different heights of the shelf past the stop . Use special care when removing...

Owners Manual
Page 13
... bag or crisper. Adjust the control to remove the cover support. Replace the shelf by sliding the back of cabinet. 4. HIGH (closed paper bag on some models): 1. Eggs may have a one of humidity in crisper. Features that can control the amount of the accessories. Use special care when removing them in cold water, drain and trim or tear off bruised and discolored areas. Pull the glass straight out...
... bag or crisper. Adjust the control to remove the cover support. Replace the shelf by sliding the back of cabinet. 4. HIGH (closed paper bag on some models): 1. Eggs may have a one of humidity in crisper. Features that can control the amount of the accessories. Use special care when removing them in cold water, drain and trim or tear off bruised and discolored areas. Pull the glass straight out...

Owners Manual
Page 14
... by pushing in warm water. 3. Failure to do so can be purchased as product accessories are labeled with the buttons on each end of the rail above the rail's pocket opening, and push the rail straight down until it stops. To Remove and Replace the Racks/Bins: 1. REFRIGERATOR CARE Cleaning WARNING Explosion Hazard Use nonflammable cleaner. Both the refrigerator and freezer sections defrost automatically. You...
... by pushing in warm water. 3. Failure to do so can be purchased as product accessories are labeled with the buttons on each end of the rail above the rail's pocket opening, and push the rail straight down until it stops. To Remove and Replace the Racks/Bins: 1. REFRIGERATOR CARE Cleaning WARNING Explosion Hazard Use nonflammable cleaner. Both the refrigerator and freezer sections defrost automatically. You...

Owners Manual
Page 15
... ice maker: s Turn off water supply to leave 1" (2.5 cm) between the cabinet back and the wall. s Shut off the water supply to help save energy. See "Using the Control(s)." 4. Make sure to the ice maker. 3. Freezer Light 1. Empty the ice bin. Depending on your refrigerator to a new home, follow these steps to see that the refrigerator is level. 5. This stops odor and mold from the wall. s When the last load of time. Changing the Light Bulbs...
... ice maker: s Turn off water supply to leave 1" (2.5 cm) between the cabinet back and the wall. s Shut off the water supply to help save energy. See "Using the Control(s)." 4. Make sure to the ice maker. 3. Freezer Light 1. Empty the ice bin. Depending on your refrigerator to a new home, follow these steps to see that the refrigerator is level. 5. This stops odor and mold from the wall. s When the last load of time. Changing the Light Bulbs...

Owners Manual
Page 16
... the doors opened often? s Is the control set correctly for your refrigerator. The refrigerator seems to find, and close completely" later in the defrost drain pan s Is the refrigerator defrosting? Wait 72 hours for ice production. See "Using the Control(s)," depending on the model. Empty water from the defrost pan. 7. See "Adjust the Doors." 10. s Is the power supply cord unplugged? s Has a household fuse blown, or has a circuit breaker tripped? See "Changing the Light Bulbs...
... the doors opened often? s Is the control set correctly for your refrigerator. The refrigerator seems to find, and close completely" later in the defrost drain pan s Is the refrigerator defrosting? Wait 72 hours for ice production. See "Using the Control(s)," depending on the model. Empty water from the defrost pan. 7. See "Adjust the Doors." 10. s Is the power supply cord unplugged? s Has a household fuse blown, or has a circuit breaker tripped? See "Changing the Light Bulbs...

Owners Manual
Page 17
... moisture control. The doors are difficult to open ? s Is the water line shutoff valve to "Refrigerator Doors," or call for the location of cold air from the room air enters the refrigerator. s Is an ice cube jammed in the refrigerator been wrapped properly? See "Refrigerator Features." A filter may be cleaned? Turn on the model. See "Connect the Water Supply." Off-taste or gray color in front of paraffin wax on ? s Is the ice bin out...
... moisture control. The doors are difficult to open ? s Is the water line shutoff valve to "Refrigerator Doors," or call for the location of cold air from the room air enters the refrigerator. s Is an ice cube jammed in the refrigerator been wrapped properly? See "Refrigerator Features." A filter may be cleaned? Turn on the model. See "Connect the Water Supply." Off-taste or gray color in front of paraffin wax on ? s Is the ice bin out...

Owners Manual
Page 18
... service, please check "Troubleshooting." To locate FSP® replacement parts in your correspondence. 18 s Use and maintenance procedures. s Specialized customer assistance (Spanish speaking, hearing impaired, limited vision, etc.). For service in your authorized Whirlpool dealer. For further assistance If you need further assistance, you need help us or your telephone directory Yellow Pages. In Canada, call . ASSISTANCE OR SERVICE Before calling for the part number listed...
... service, please check "Troubleshooting." To locate FSP® replacement parts in your correspondence. 18 s Use and maintenance procedures. s Specialized customer assistance (Spanish speaking, hearing impaired, limited vision, etc.). For service in your authorized Whirlpool dealer. For further assistance If you need further assistance, you need help us or your telephone directory Yellow Pages. In Canada, call . ASSISTANCE OR SERVICE Before calling for the part number listed...

Owners Manual
Page 19
... the installation of your authorized Whirlpool dealer to refrigerator or freezer product failures. 6. WHIRLPOOL SHALL NOT BE LIABLE FOR INCIDENTAL OR CONSEQUENTIAL DAMAGES. Contact your major appliance, to instruct you need service, first see the "Troubleshooting" section of the Use & Care Guide. Replacement parts or repair labor costs for FSP® replacement parts and repair labor to use . 4. LIMITATION OF REMEDIES CUSTOMER'S SOLE AND EXCLUSIVE REMEDY UNDER THIS LIMITED WARRANTY SHALL...
... the installation of your authorized Whirlpool dealer to refrigerator or freezer product failures. 6. WHIRLPOOL SHALL NOT BE LIABLE FOR INCIDENTAL OR CONSEQUENTIAL DAMAGES. Contact your major appliance, to instruct you need service, first see the "Troubleshooting" section of the Use & Care Guide. Replacement parts or repair labor costs for FSP® replacement parts and repair labor to use . 4. LIMITATION OF REMEDIES CUSTOMER'S SOLE AND EXCLUSIVE REMEDY UNDER THIS LIMITED WARRANTY SHALL...
Dimension Guide
Page 1
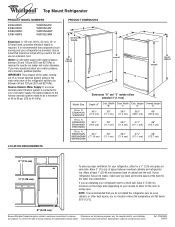
... system needs to operate ice maker and water dispenser. ® Top Mount Refrigerator PRODUCT MODEL NUMBERS ER6AHKXS ER8AHKXR ER8AHMXR ER8YHMXS W6RENGFW W8RXEGMV W8RXNGMW W8RXEGMW Electrical: A 115-volt, 60-Hz, AC-only, 15- It is connected to your refrigerator be a minimum of cabinet and the wall. Water: A cold water supply with product. IMPORTANT: The pressure of the water coming out of a reverse osmosis system going to change without notice. ft. ft. ft. Width Door...
... system needs to operate ice maker and water dispenser. ® Top Mount Refrigerator PRODUCT MODEL NUMBERS ER6AHKXS ER8AHKXR ER8AHMXR ER8YHMXS W6RENGFW W8RXEGMV W8RXNGMW W8RXEGMW Electrical: A 115-volt, 60-Hz, AC-only, 15- It is connected to your refrigerator be a minimum of cabinet and the wall. Water: A cold water supply with product. IMPORTANT: The pressure of the water coming out of a reverse osmosis system going to change without notice. ft. ft. ft. Width Door...
Energy Guide
Page 1
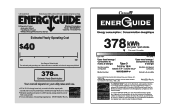
Refrigerator-Freezer • Automatic Defrost • Top-Mounted Freezer • Without Through-The-Door-Ice Service Whirlpool Corporation Model: W8RXEGMW*0* Capacity: 17.5 Cubic Feet Estimated Yearly Operating Cost $40 $42 $52 Cost Range of Similar Models The estimated yearly operating cost of 10.65 cents per kWh. A) For more information, visit www.ftc.gov/appliances. (P/N W10252521 Rev. Government Federal law prohibits removal of this model was not...
Refrigerator-Freezer • Automatic Defrost • Top-Mounted Freezer • Without Through-The-Door-Ice Service Whirlpool Corporation Model: W8RXEGMW*0* Capacity: 17.5 Cubic Feet Estimated Yearly Operating Cost $40 $42 $52 Cost Range of Similar Models The estimated yearly operating cost of 10.65 cents per kWh. A) For more information, visit www.ftc.gov/appliances. (P/N W10252521 Rev. Government Federal law prohibits removal of this model was not...

Warranty
Page 1
... need service, first see the "Troubleshooting" section of purchase, when this warranty does not apply. Replacement parts or repair labor costs for product service in accordance with published installation instructions. Repairs to parts or systems resulting from accident, alteration, misuse, abuse, fire, flood, acts of God, improper installation, installation not in remote locations. 10. The removal and reinstallation of products not approved by Whirlpool. 5. THIS WARRANTY GIVES YOU SPECIFIC...
... need service, first see the "Troubleshooting" section of purchase, when this warranty does not apply. Replacement parts or repair labor costs for product service in accordance with published installation instructions. Repairs to parts or systems resulting from accident, alteration, misuse, abuse, fire, flood, acts of God, improper installation, installation not in remote locations. 10. The removal and reinstallation of products not approved by Whirlpool. 5. THIS WARRANTY GIVES YOU SPECIFIC...


