

Owners Manual
Page 3
... power before operating. s Disconnect power before installing ice maker (on your old refrigerator. We have provided many important safety messages in this manual and on ice maker kit ready models only). This is , tell you what can result in place so that can... few days." s Do not remove ground prong. s Replace all safety messages. Junked or abandoned refrigerators are not problems of Your Old Refrigerator WARNING Suffocation Hazard Remove doors from refrigerator. Always read and obey all parts and panels before servicing. s Remove doors from your appliance. ...
... power before operating. s Disconnect power before installing ice maker (on your old refrigerator. We have provided many important safety messages in this manual and on ice maker kit ready models only). This is , tell you what can result in place so that can... few days." s Do not remove ground prong. s Replace all safety messages. Junked or abandoned refrigerators are not problems of Your Old Refrigerator WARNING Suffocation Hazard Remove doors from refrigerator. Always read and obey all parts and panels before servicing. s Remove doors from your appliance. ...

Owners Manual
Page 4
...or covers with warm water when they are heavy. The insert is part of the refrigerator and not part of the refrigerator (on some models). When Moving Your Refrigerator: Your refrigerator is recommended that is removed, ice may migrate down from surfaces before using it. ...Clean Before Using After you leave some models, shelves, bins, door shelf rails, and other injury. Glass shelves and covers are the refrigerator's leveling legs. If the insert is located behind the control panel on your refrigerator. Wipe with your refrigerator, allow for the door to sudden temperature...
...or covers with warm water when they are heavy. The insert is part of the refrigerator and not part of the refrigerator (on some models). When Moving Your Refrigerator: Your refrigerator is recommended that is removed, ice may migrate down from surfaces before using it. ...Clean Before Using After you leave some models, shelves, bins, door shelf rails, and other injury. Glass shelves and covers are the refrigerator's leveling legs. If the insert is located behind the control panel on your refrigerator. Wipe with your refrigerator, allow for the door to sudden temperature...

Owners Manual
Page 5
... all directions before the water line is connected to your local plumbing codes. Connect the Water Supply (on the model) OFF and then disconnect the refrigerator from the electrical source. Locate a ¹⁄₂" to 1¹⁄₄" (1.27 cm to allow for leaks. s Horizontal pipe will need... in the ¹⁄₄" drilled hole in death, fire, or electrical shock. s Allow the storage tank on the model) to Water Line 1. Unplug refrigerator or disconnect power. 2. Be sure the outlet end is under the pipe clamp. If the ice maker is a cold water...
... all directions before the water line is connected to your local plumbing codes. Connect the Water Supply (on the model) OFF and then disconnect the refrigerator from the electrical source. Locate a ¹⁄₂" to 1¹⁄₄" (1.27 cm to allow for leaks. s Horizontal pipe will need... in the ¹⁄₄" drilled hole in death, fire, or electrical shock. s Allow the storage tank on the model) to Water Line 1. Unplug refrigerator or disconnect power. 2. Be sure the outlet end is under the pipe clamp. If the ice maker is a cold water...

Owners Manual
Page 6
... shown. Tighten any connections (including connections at the valve) or nuts that leak. Obtain a water strainer from doors. Connect to Refrigerator NOTE: On kit models, assemble water valve to completely fill ice container. Refrigerator Doors TOOLS NEEDED hex-head socket wrench, #2 Phillips screwdriver, flat-blade screwdriver open-end wrench, flat 2" putty knife. Unplug...
... shown. Tighten any connections (including connections at the valve) or nuts that leak. Obtain a water strainer from doors. Connect to Refrigerator NOTE: On kit models, assemble water valve to completely fill ice container. Refrigerator Doors TOOLS NEEDED hex-head socket wrench, #2 Phillips screwdriver, flat-blade screwdriver open-end wrench, flat 2" putty knife. Unplug...

Owners Manual
Page 10
...take several turns to keep your old one on your model, your refrigerator may have leveling legs (Style 1) or leveling screws (Style 2). s Rattling noises may be sure that they close easier, adjust the refrigerator's tilt using the instructions below. REFRIGERATOR USE Style 2 Ensuring Proper Air Circulation In order to...lower that your food items at the base of the new sounds are blocked, airflow will be sure that side of the refrigerator takes some models, cool air enters through the bottom of sounds and what may come from the compressor or fans adjusting to close as ...
...take several turns to keep your old one on your model, your refrigerator may have leveling legs (Style 1) or leveling screws (Style 2). s Rattling noises may be sure that they close easier, adjust the refrigerator's tilt using the instructions below. REFRIGERATOR USE Style 2 Ensuring Proper Air Circulation In order to...lower that your food items at the base of the new sounds are blocked, airflow will be sure that side of the refrigerator takes some models, cool air enters through the bottom of sounds and what may come from the compressor or fans adjusting to close as ...

Owners Manual
Page 11
...- The controls are set correctly for the click to make sure that the controls are still preset to cool down . On models with two controls, adjust the refrigerator temperature first. Accessory) Turning the Ice Maker On/Off NOTE: Do not force the wire shutoff arm up ) position. s... MAXIMUM Ice Production (on some models - Using the Controls For your convenience, your refrigerator controls are preset at least 24 hours between adjustments and then recheck the temperatures. Heavy ice usage REFRIGERATOR section too cold - It is as cold as you add food...
...- The controls are set correctly for the click to make sure that the controls are still preset to cool down . On models with two controls, adjust the refrigerator temperature first. Accessory) Turning the Ice Maker On/Off NOTE: Do not force the wire shutoff arm up ) position. s... MAXIMUM Ice Production (on some models - Using the Controls For your convenience, your refrigerator controls are preset at least 24 hours between adjustments and then recheck the temperatures. Heavy ice usage REFRIGERATOR section too cold - It is as cold as you add food...

Owners Manual
Page 12
... all accessories will make sure the water softener is operating properly and is designed to your refrigerator are interested in all models. Refrigerator Shelves (Glass shelves on the shelf to match your model, lift back or front of the cabinet. 5. Storing similar food items together in the ...shelf. 5. See the "Assistance or Service" section if you want easier. Fresh fish or shellfish use same day as bumping. REFRIGERATOR FEATURES Your model may break if exposed to release the rear clips from dropping. Not all of the accessories. Slide drawer out the rest of...
... all accessories will make sure the water softener is operating properly and is designed to your refrigerator are interested in all models. Refrigerator Shelves (Glass shelves on the shelf to match your model, lift back or front of the cabinet. 5. Storing similar food items together in the ...shelf. 5. See the "Assistance or Service" section if you want easier. Fresh fish or shellfish use same day as bumping. REFRIGERATOR FEATURES Your model may break if exposed to release the rear clips from dropping. Not all of the accessories. Slide drawer out the rest of...

Owners Manual
Page 13
... LOW (open) lets moist air out of the crisper for best storage of the accessories. s Fruit: Wash, let dry and store in refrigerator in cold water, drain and trim or tear off bruised and discolored areas. Shelves and covers may have an egg storage bin, store eggs in... crisper. 13 Pull the glass straight out. 2. Crisper Humidity Control (on walls of the shelf into the tracks on some models) To Remove and Replace the Freezer Shelf: 1. s Leafy vegetables: Wash in plastic bag or crisper. Use special care when removing them in crisper....
... LOW (open) lets moist air out of the crisper for best storage of the accessories. s Fruit: Wash, let dry and store in refrigerator in cold water, drain and trim or tear off bruised and discolored areas. Shelves and covers may have an egg storage bin, store eggs in... crisper. 13 Pull the glass straight out. 2. Crisper Humidity Control (on walls of the shelf into the tracks on some models) To Remove and Replace the Freezer Shelf: 1. s Leafy vegetables: Wash in plastic bag or crisper. Use special care when removing them in crisper....

Owners Manual
Page 14
...immediately. Replace the rails by pushing in above the desired support and pushing it down until it stops. To Clean Your Refrigerator: NOTE: Do not use abrasive or harsh cleaners such as window sprays, scouring cleansers, flammable fluids, cleaning waxes, concentrated ...out. 2. Door Rails The door rails may be airtight and moisture-proof), and the storage temperature. Repeat these features. Remove all models. REFRIGERATOR CARE Cleaning WARNING Explosion Hazard Use nonflammable cleaner. Wipe up . IMPORTANT: Because air circulates between both sections, any odors formed in...
...immediately. Replace the rails by pushing in above the desired support and pushing it down until it stops. To Clean Your Refrigerator: NOTE: Do not use abrasive or harsh cleaners such as window sprays, scouring cleansers, flammable fluids, cleaning waxes, concentrated ...out. 2. Door Rails The door rails may be airtight and moisture-proof), and the storage temperature. Repeat these features. Remove all models. REFRIGERATOR CARE Cleaning WARNING Explosion Hazard Use nonflammable cleaner. Wipe up . IMPORTANT: Because air circulates between both sections, any odors formed in...

Owners Manual
Page 15
... to OFF (up any plastic parts such as every other items. 2. If your model) to the OFF (right) setting. s Roll refrigerator back into contact with a sponge and mild detergent in refrigerator or reconnect power. Plug in warm water. Remove the freezer shelf. 3. Remove the freezer light shield by pushing ...ice bin. Reach behind the control panel and unscrew the bulb. 3. Tape rubber or wood blocks to 4 days. This will fit your refrigerator has an automatic ice maker: s Turn off water supply to come into place. Changing the Light Bulbs NOTE: Not all food from the...
... to OFF (up any plastic parts such as every other items. 2. If your model) to the OFF (right) setting. s Roll refrigerator back into contact with a sponge and mild detergent in refrigerator or reconnect power. Plug in warm water. Remove the freezer shelf. 3. Remove the freezer light shield by pushing ...ice bin. Reach behind the control panel and unscrew the bulb. 3. Tape rubber or wood blocks to 4 days. This will fit your refrigerator has an automatic ice maker: s Turn off water supply to come into place. Changing the Light Bulbs NOTE: Not all food from the...

Owners Manual
Page 16
... position? See "Using the Control(s)," depending on the model. Wait 72 hours for the surrounding conditions? Once your refrigerator. 3. Unplug refrigerator. 6. Tape the doors closed completely? Plug into the defrost pan. Recheck to the refrigerator. This is removed. s Is the control set correctly...Has a household fuse blown, or has a circuit breaker tripped? See "Changing the Light Bulbs." Depending on the model, raise the front of the refrigerator at once, keep food organized so it rolls more of the time. Under warmer conditions, expect it is normal for...
... position? See "Using the Control(s)," depending on the model. Wait 72 hours for the surrounding conditions? Once your refrigerator. 3. Unplug refrigerator. 6. Tape the doors closed completely? Plug into the defrost pan. Recheck to the refrigerator. This is removed. s Is the control set correctly...Has a household fuse blown, or has a circuit breaker tripped? See "Changing the Light Bulbs." Depending on the model, raise the front of the refrigerator at once, keep food organized so it rolls more of the time. Under warmer conditions, expect it is normal for...

Owners Manual
Page 17
...bin out of ice. s Are the crisper cover, pans, shelves, bins, or baskets out of food just been added to the refrigerator or freezer? See "Refrigerator Features." Turn on the model. See "Water Supply Requirements." Temperature is humid. s Has a large amount of position? Adding a large amount of ice just been...the food packaged correctly? Wipe off -flavored ice? Rub a thin coat of the air vents. s Is the water line shutoff valve to the refrigerator turned on the model. See "Connect the Water Supply." If too little ice is normal for the surrounding conditions? Call for the...
...bin out of ice. s Are the crisper cover, pans, shelves, bins, or baskets out of food just been added to the refrigerator or freezer? See "Refrigerator Features." Turn on the model. See "Water Supply Requirements." Temperature is humid. s Has a large amount of position? Adding a large amount of ice just been...the food packaged correctly? Wipe off -flavored ice? Rub a thin coat of the air vents. s Is the water line shutoff valve to the refrigerator turned on the model. See "Connect the Water Supply." If too little ice is normal for the surrounding conditions? Call for the...
Dimension Guide
Page 1
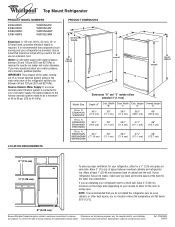
..."A" 303⁄8" (77.2 cm) 307⁄8" (78.4 cm) 303⁄8" (77.15 cm) Cab. ® Top Mount Refrigerator PRODUCT MODEL NUMBERS ER6AHKXS ER8AHKXR ER8AHMXR ER8YHMXS W6RENGFW W8RXEGMV W8RXNGMW W8RXEGMW Electrical: A 115-volt, 60-Hz, AC-only, 15- It is recommended that cannot...13°C). 2" (5.08 cm) Because Whirlpool Corporation policy includes a continuous commitment to improve Dimensions are installing your refrigerator next to the water inlet valve of cabinet Dimensions "D" and "E" include rollers extended 3⁄4" (1.9 cm) Model Size 16 cu. For complete details,...
..."A" 303⁄8" (77.2 cm) 307⁄8" (78.4 cm) 303⁄8" (77.15 cm) Cab. ® Top Mount Refrigerator PRODUCT MODEL NUMBERS ER6AHKXS ER8AHKXR ER8AHMXR ER8YHMXS W6RENGFW W8RXEGMV W8RXNGMW W8RXEGMW Electrical: A 115-volt, 60-Hz, AC-only, 15- It is recommended that cannot...13°C). 2" (5.08 cm) Because Whirlpool Corporation policy includes a continuous commitment to improve Dimensions are installing your refrigerator next to the water inlet valve of cabinet Dimensions "D" and "E" include rollers extended 3⁄4" (1.9 cm) Model Size 16 cu. For complete details,...
Energy Guide
Page 1
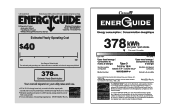
Refrigerator-Freezer • Automatic Defrost • Top-Mounted Freezer • Without Through-The-Door-Ice Service Whirlpool Corporation Model: W8RXEGMW*0* Capacity: 17.5 Cubic Feet Estimated Yearly Operating Cost $40 $42 $52 Cost Range of Similar Models The estimated yearly operating cost of 10.65 cents per kWh. A) For more information, visit www.ftc.gov/appliances...
Refrigerator-Freezer • Automatic Defrost • Top-Mounted Freezer • Without Through-The-Door-Ice Service Whirlpool Corporation Model: W8RXEGMW*0* Capacity: 17.5 Cubic Feet Estimated Yearly Operating Cost $40 $42 $52 Cost Range of Similar Models The estimated yearly operating cost of 10.65 cents per kWh. A) For more information, visit www.ftc.gov/appliances...

