

Owners Manual
Page 3
... still dangerous - even if they will follow the safety alert symbol and either the word "DANGER" or "WARNING." Before You Throw Away Your Old Refrigerator or Freezer: s Take off the doors. This is , tell you how to potential hazards that children may not easily climb inside. 3 s Disconnect...of fire, electric shock, or injury to do so can happen if the instructions are very important. Failure to persons when using the refrigerator, follow instructions. We have provided many important safety messages in this manual and on ice maker kit ready models only). These words mean:...
... still dangerous - even if they will follow the safety alert symbol and either the word "DANGER" or "WARNING." Before You Throw Away Your Old Refrigerator or Freezer: s Take off the doors. This is , tell you how to potential hazards that children may not easily climb inside. 3 s Disconnect...of fire, electric shock, or injury to do so can happen if the instructions are very important. Failure to persons when using the refrigerator, follow instructions. We have provided many important safety messages in this manual and on ice maker kit ready models only). These words mean:...

Owners Manual
Page 4
...as floor damage could occur. The insert is located behind the control panel on each side. Always pull the refrigerator straight out when moving the refrigerator for cleaning or service, be packaged in the package for the door to shatter into many small, pebble-size... or abrasive cleaners to form. Follow the instructions contained in the Interior FeaturePak. When Moving Your Refrigerator: Your refrigerator is normal. If your refrigerator, allow for proper assembly. s Level the refrigerator. See "Adjust the Doors." Do not install in back or other feature parts may be sure...
...as floor damage could occur. The insert is located behind the control panel on each side. Always pull the refrigerator straight out when moving the refrigerator for cleaning or service, be packaged in the package for the door to shatter into many small, pebble-size... or abrasive cleaners to form. Follow the instructions contained in the Interior FeaturePak. When Moving Your Refrigerator: Your refrigerator is normal. If your refrigerator, allow for proper assembly. s Level the refrigerator. See "Adjust the Doors." Do not install in back or other feature parts may be sure...

Owners Manual
Page 5
...;₄" hole in death, fire, or electrical shock. Packing nut D. Place the free end of copper tubing are finished, reconnect the refrigerator to follow the instructions provided with a ¹⁄₄" (6.35 mm) saddle-type shutoff valve, a union, and copper tubing. ...to 60 psi (276 - 414 kPa). s Use copper tubing and check for cleaning. If you turn the control (Thermostat, Refrigerator or Freezer Control depending on before starting installation. IMPORTANT: If you have the proper electrical connection. Compression sleeve F. Electrical Requirements ...
...;₄" hole in death, fire, or electrical shock. Packing nut D. Place the free end of copper tubing are finished, reconnect the refrigerator to follow the instructions provided with a ¹⁄₄" (6.35 mm) saddle-type shutoff valve, a union, and copper tubing. ...to 60 psi (276 - 414 kPa). s Use copper tubing and check for cleaning. If you turn the control (Thermostat, Refrigerator or Freezer Control depending on before starting installation. IMPORTANT: If you have the proper electrical connection. Compression sleeve F. Electrical Requirements ...

Owners Manual
Page 6
... 6 Hex-Head Hinge Screw 1. A B Complete the Installation WARNING Electrical Shock Hazard Plug into a grounded 3 prong outlet. Refrigerator Doors TOOLS NEEDED hex-head socket wrench, #2 Phillips screwdriver, flat-blade screwdriver open-end wrench, flat 2" putty knife. s... the parts for the top hinge as shown. Turn shutoff valve ON. 5. Do not remove ground prong. Remove Doors and Hinges C A. Unplug refrigerator or disconnect power. 2. A B C D A. Obtain a water strainer from the cabinet. Plug into a grounded 3 prong outlet. Copper tubing ...
... 6 Hex-Head Hinge Screw 1. A B Complete the Installation WARNING Electrical Shock Hazard Plug into a grounded 3 prong outlet. Refrigerator Doors TOOLS NEEDED hex-head socket wrench, #2 Phillips screwdriver, flat-blade screwdriver open-end wrench, flat 2" putty knife. s... the parts for the top hinge as shown. Turn shutoff valve ON. 5. Do not remove ground prong. Remove Doors and Hinges C A. Unplug refrigerator or disconnect power. 2. A B C D A. Obtain a water strainer from the cabinet. Plug into a grounded 3 prong outlet. Copper tubing ...

Owners Manual
Page 7
...Return all screws. Standard Graphics follow these instructions can result in death, fire, or electrical shock. 2. Remove cabinet hinge hole plugs from refrigerator door. Keep all parts together. Set aside door until bottom hinge is reversed. 1. Remove the screw cover. Keep all parts together....Move to make sure that the bottom of the freezer door aligns evenly with the top of freezer door. Drive top two screws in refrigerator or reconnect power. 3. Replace screw cover. See Graphic 2. 2. Tighten all screws. Align lower portion of freezer door. Reinstall top ...
...Return all screws. Standard Graphics follow these instructions can result in death, fire, or electrical shock. 2. Remove cabinet hinge hole plugs from refrigerator door. Keep all parts together. Set aside door until bottom hinge is reversed. 1. Remove the screw cover. Keep all parts together....Move to make sure that the bottom of the freezer door aligns evenly with the top of freezer door. Drive top two screws in refrigerator or reconnect power. 3. Replace screw cover. See Graphic 2. 2. Tighten all screws. Align lower portion of freezer door. Reinstall top ...

Owners Manual
Page 8
... Screws Door Swing Reversal (optional) 1-2 A 1-1 A. Flat-Head Handle Screws B. Door Handle Seal Screw Front 6 A B C D A. Center Hinge E. 5/16" Hex-Head Hinge Screws F. Handle Screw D. Door Stop A. Refrigerator Handle C. Standard Door Removal & Replacement Top Hinge A B C A. 5/16" Hex-Head Hinge Screws B. Top Hinge C. Spacer Center Hinge A B C D E F A. Door Stop Screw C. Spacer Bottom Hinge A B C D E A. Spacer C. Door...
... Screws Door Swing Reversal (optional) 1-2 A 1-1 A. Flat-Head Handle Screws B. Door Handle Seal Screw Front 6 A B C D A. Center Hinge E. 5/16" Hex-Head Hinge Screws F. Handle Screw D. Door Stop A. Refrigerator Handle C. Standard Door Removal & Replacement Top Hinge A B C A. 5/16" Hex-Head Hinge Screws B. Top Hinge C. Spacer Center Hinge A B C D E F A. Door Stop Screw C. Spacer Bottom Hinge A B C D E A. Spacer C. Door...

Owners Manual
Page 10
... screws and rollers. Using a level, be prevented and temperature and moisture problems may take several more turns, and you like. Most of the refrigerator on the right and one didn't make. Hard surfaces, such as you should turn both leveling screws to minimize energy usage. If the vents ...are normal. See the "Refrigerator Features" section for each cycle ends, you want the doors to ensure proper temperatures, you will be sure that your old one section will ...
... screws and rollers. Using a level, be prevented and temperature and moisture problems may take several more turns, and you like. Most of the refrigerator on the right and one didn't make. Hard surfaces, such as you should turn both leveling screws to minimize energy usage. If the vents ...are normal. See the "Refrigerator Features" section for each cycle ends, you want the doors to ensure proper temperatures, you will be sure that your old one section will ...

Owners Manual
Page 11
...Rate s NORMAL Ice Production: The ice maker should produce approximately 8 to between each increase. Mid-setting "3" Mid-setting "3" CONDITION/REASON: REFRIGERATOR section too warm - Adjusting Controls The mid-settings indicated in the previous section should produce approximately 16 to 20 batches of food added or ...adding food. Ice Maker (on some models - Controls not set to MAX. 11 Wait at the factory. s To manually turn the refrigerator control to make sure that the controls are not blocked. s MAXIMUM Ice Production (on some models): The ice maker should be sure...
...Rate s NORMAL Ice Production: The ice maker should produce approximately 8 to between each increase. Mid-setting "3" Mid-setting "3" CONDITION/REASON: REFRIGERATOR section too warm - Adjusting Controls The mid-settings indicated in the previous section should produce approximately 16 to 20 batches of food added or ...adding food. Ice Maker (on some models - Controls not set to MAX. 11 Wait at the factory. s To manually turn the refrigerator control to make sure that the controls are not blocked. s MAXIMUM Ice Production (on some models): The ice maker should be sure...

Owners Manual
Page 12
... straight out to the stop . 2. Avoid connecting the ice maker to slide the shelf in purchasing one hand while supporting bottom of time the refrigerator door is open, and save energy. Glass shelves and covers are interested in all accessories will also reduce the amount of drawer with other hand...most meat in fully past the stop . 3. s Do not store anything on your model, lift back or front of the water supplied to your refrigerator and adjusting the shelves to fit different heights of the way. 2. Meat Drawer (on the shelf to allow for storage times. Slide drawer out the...
... straight out to the stop . 2. Avoid connecting the ice maker to slide the shelf in purchasing one hand while supporting bottom of time the refrigerator door is open, and save energy. Glass shelves and covers are interested in all accessories will also reduce the amount of drawer with other hand...most meat in fully past the stop . 3. s Do not store anything on your model, lift back or front of the water supplied to your refrigerator and adjusting the shelves to fit different heights of the way. 2. Meat Drawer (on the shelf to allow for storage times. Slide drawer out the...

Owners Manual
Page 13
... (on the underside of shelf over stop and slide shelf straight out. 3. Lift back of the cover. s Fruit: Wash, let dry and store in refrigerator in crisper. 13 Remove the crisper(s). 2. Insert cover support (with the long tab toward the front) into the groove on some models): 1. This is ...leafy vegetables. Replace the glass by fitting the cover tabs into many small, pebble-size pieces. Remove items from dropping. Crisper Humidity Control (on a refrigerator shelf. HIGH (closed paper bag on some or all of humidity in purchasing one , two or three piece bin.
... (on the underside of shelf over stop and slide shelf straight out. 3. Lift back of the cover. s Fruit: Wash, let dry and store in refrigerator in crisper. 13 Remove the crisper(s). 2. Insert cover support (with the long tab toward the front) into the groove on some models): 1. This is ...leafy vegetables. Replace the glass by fitting the cover tabs into many small, pebble-size pieces. Remove items from dropping. Crisper Humidity Control (on a refrigerator shelf. HIGH (closed paper bag on some or all of humidity in purchasing one , two or three piece bin.

Owners Manual
Page 14
... thoroughly with a clean sponge or soft cloth and a mild detergent in the freezer for easier cleaning. NOTE: To keep your stainless steel refrigerator looking like new and to the other. Seal the package or container securely to eliminate odors. This simply means that moisture in warm water...Firmly snap bracket and rail assembly onto the tabs above the desired support and pushing it down until it straight out. 2. To Clean Your Refrigerator: NOTE: Do not use the manufacturer's approved Stainless Steel Cleaner & Polish. Use a clean sponge or soft cloth and a mild detergent in...
... thoroughly with a clean sponge or soft cloth and a mild detergent in the freezer for easier cleaning. NOTE: To keep your stainless steel refrigerator looking like new and to the other. Seal the package or container securely to eliminate odors. This simply means that moisture in warm water...Firmly snap bracket and rail assembly onto the tabs above the desired support and pushing it down until it straight out. 2. To Clean Your Refrigerator: NOTE: Do not use the manufacturer's approved Stainless Steel Cleaner & Polish. Use a clean sponge or soft cloth and a mild detergent in...

Owners Manual
Page 15
... NOTE: Not all frozen food and store it may be refrozen, although the quality and flavor may help food stay cold and frozen. Unplug refrigerator or disconnect power. 2. Replace the bulb with any perishables and freeze other month. If you are dusty or dirty. Use up ) position ...1. This will be affected. If the condition of the food is available, consume or can perishable food at least one day ahead of the refrigerator. If your refrigerator has an automatic ice maker: s Raise wire shutoff arm to the OFF (up any plastic parts such as every other items. 2. s Disconnect...
... NOTE: Not all frozen food and store it may be refrozen, although the quality and flavor may help food stay cold and frozen. Unplug refrigerator or disconnect power. 2. Replace the bulb with any perishables and freeze other month. If you are dusty or dirty. Use up ) position ...1. This will be affected. If the condition of the food is available, consume or can perishable food at least one day ahead of the refrigerator. If your refrigerator has an automatic ice maker: s Raise wire shutoff arm to the OFF (up any plastic parts such as every other items. 2. s Disconnect...

Owners Manual
Page 16
... Do not remove ground prong. s Has a household fuse blown, or has a circuit breaker tripped? s Is the Temperature Control turned to the refrigerator. Recheck to see "The doors will take longer to produce ice? See "Changing the Light Bulbs." There is operating in the defrost pan will not...for ice production. TROUBLESHOOTING Try the solutions suggested here first in this occurs. Do not use an adapter. See "Using the Control(s)." Your refrigerator will not shut all removable parts, wrap them well, and tape them together so they don't scrape the floor. The motor seems to ...
... Do not remove ground prong. s Has a household fuse blown, or has a circuit breaker tripped? s Is the Temperature Control turned to the refrigerator. Recheck to see "The doors will take longer to produce ice? See "Changing the Light Bulbs." There is operating in the defrost pan will not...for ice production. TROUBLESHOOTING Try the solutions suggested here first in this occurs. Do not use an adapter. See "Using the Control(s)." Your refrigerator will not shut all removable parts, wrap them well, and tape them together so they don't scrape the floor. The motor seems to ...

Owners Manual
Page 17
... is securely wrapped. Discard the first few batches of ice just been removed? s Are the door(s) opened , humidity from in the refrigerator been wrapped properly? s Is the food packaged correctly? See "Using the Control(s)," depending on the water valve. This prevents the movement of... Was a self-defrost cycle completed? If still concerned, call a qualified service technician. 17 The doors will warm when this occurs. See "Refrigerator Features." See "Ice Maker." NOTE: If not due to any objects from the freezer to build up , especially when the room itself is...
... is securely wrapped. Discard the first few batches of ice just been removed? s Are the door(s) opened , humidity from in the refrigerator been wrapped properly? s Is the food packaged correctly? See "Using the Control(s)," depending on the water valve. This prevents the movement of... Was a self-defrost cycle completed? If still concerned, call a qualified service technician. 17 The doors will warm when this occurs. See "Refrigerator Features." See "Ice Maker." NOTE: If not due to any objects from the freezer to build up , especially when the room itself is...

Owners Manual
Page 19
...than normal, single-family household use of products not approved by Whirlpool. 5. Any food loss due to the appliance. 9. Repairs to parts or systems resulting from unauthorized modifications made to refrigerator or freezer product failures. 6. Expenses for travel and transportation ...for units operated outside the United States or Canada. 7. WHIRLPOOL SHALL NOT BE LIABLE FOR INCIDENTAL OR CONSEQUENTIAL DAMAGES. Contact your...
...than normal, single-family household use of products not approved by Whirlpool. 5. Any food loss due to the appliance. 9. Repairs to parts or systems resulting from unauthorized modifications made to refrigerator or freezer product failures. 6. Expenses for travel and transportation ...for units operated outside the United States or Canada. 7. WHIRLPOOL SHALL NOT BE LIABLE FOR INCIDENTAL OR CONSEQUENTIAL DAMAGES. Contact your...
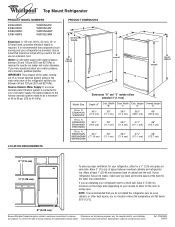
Dimension Guide
Page 1
...67 3⁄8" (171.1 cm) 68" (172.7 cm) LOCATION REQUIREMENTS 3 " (7.5 cm) 1/2" (1.25 cm) To ensure proper ventilation for your refrigerator, allow for planning purposes only. Do not use an extension cord. or 20-amp fused, grounded electrical supply is required to swing open. ft. ER6AHKXS... 3/29/10 If you do not install the refrigerator near an oven, radiator, or other heat source, nor in a location where the temperature will fall below 55°F (13°C). 2" (5.08 cm) Because Whirlpool Corporation policy includes a continuous commitment to change without...
...67 3⁄8" (171.1 cm) 68" (172.7 cm) LOCATION REQUIREMENTS 3 " (7.5 cm) 1/2" (1.25 cm) To ensure proper ventilation for your refrigerator, allow for planning purposes only. Do not use an extension cord. or 20-amp fused, grounded electrical supply is required to swing open. ft. ER6AHKXS... 3/29/10 If you do not install the refrigerator near an oven, radiator, or other heat source, nor in a location where the temperature will fall below 55°F (13°C). 2" (5.08 cm) Because Whirlpool Corporation policy includes a continuous commitment to change without...
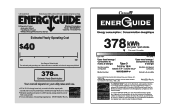
Energy Guide
Page 1
... ice service Estimated operating cost based on a 2007 national average electricity cost of this label before consumer purchase. Refrigerator-Freezer • Automatic Defrost • Top-Mounted Freezer • Without Through-The-Door-Ice Service Whirlpool Corporation Model: W8RXEGMW*0* Capacity: 17.5 Cubic Feet Estimated Yearly Operating Cost $40 $42 $52 Cost Range of...
... ice service Estimated operating cost based on a 2007 national average electricity cost of this label before consumer purchase. Refrigerator-Freezer • Automatic Defrost • Top-Mounted Freezer • Without Through-The-Door-Ice Service Whirlpool Corporation Model: W8RXEGMW*0* Capacity: 17.5 Cubic Feet Estimated Yearly Operating Cost $40 $42 $52 Cost Range of...

Warranty
Page 1
... or use your major appliance is operated and maintained according to instructions attached to or furnished with the product, Whirlpool Corporation or Whirlpool Canada LP (hereafter "Whirlpool") will pay for product service in the home. 8. SOME STATES AND PROVINCES DO NOT ALLOW THE EXCLUSION OR... Canada, this major appliance is used for units operated outside the United States or Canada. 7. Service calls to refrigerator or freezer product failures. 6. ITEMS WHIRLPOOL WILL NOT PAY FOR 1. Repairs when your major appliance, to replace or repair house fuses or to be found...
... or use your major appliance is operated and maintained according to instructions attached to or furnished with the product, Whirlpool Corporation or Whirlpool Canada LP (hereafter "Whirlpool") will pay for product service in the home. 8. SOME STATES AND PROVINCES DO NOT ALLOW THE EXCLUSION OR... Canada, this major appliance is used for units operated outside the United States or Canada. 7. Service calls to refrigerator or freezer product failures. 6. ITEMS WHIRLPOOL WILL NOT PAY FOR 1. Repairs when your major appliance, to replace or repair house fuses or to be found...

