

Owners Manual
Page 3
... the chance of others . Always read and obey all parts and panels before operating. This is , tell you don't immediately follow instructions. WARNING You can kill or hurt you don't follow instructions. s Do not remove ground prong. s Do not use an extension cord. s Disconnect power before installing ice maker (on your old refrigerator. s Replace all safety messages. s Keep flammable materials and vapors, such...
... the chance of others . Always read and obey all parts and panels before operating. This is , tell you don't immediately follow instructions. WARNING You can kill or hurt you don't follow instructions. s Do not remove ground prong. s Do not use an extension cord. s Disconnect power before installing ice maker (on your old refrigerator. s Replace all safety messages. s Keep flammable materials and vapors, such...

Owners Manual
Page 4
... in the Interior FeaturePak. When Moving Your Refrigerator: Your refrigerator is normal. s If you leave some models, shelves, bins, door shelf rails, and other heat source. Allow 3" (7.5 cm) of your refrigerator has an ice maker, make sure you are four bolts that you remove all of the package materials, clean the inside of liquid dish soap over the adhesive with warm water and dry. s Do not use sharp...
... in the Interior FeaturePak. When Moving Your Refrigerator: Your refrigerator is normal. s If you leave some models, shelves, bins, door shelf rails, and other heat source. Allow 3" (7.5 cm) of your refrigerator has an ice maker, make sure you are four bolts that you remove all of the package materials, clean the inside of liquid dish soap over the adhesive with warm water and dry. s Do not use sharp...

Owners Manual
Page 5
... end with any type of installation, cleaning, or removing a light bulb, turn the refrigerator on before the water line is important to make sure a saddle-type valve complies with water pressure of 40 to allow for leaks. Turn OFF the shutoff valve on lower left rear of refrigerator to clear line of copper tubing you have the proper electrical connection. Do not use an adapter. NOTE: Before performing any tools listed. Connect the Water Supply (on the copper...
... end with any type of installation, cleaning, or removing a light bulb, turn the refrigerator on before the water line is important to make sure a saddle-type valve complies with water pressure of 40 to allow for leaks. Turn OFF the shutoff valve on lower left rear of refrigerator to clear line of copper tubing you have the proper electrical connection. Do not use an adapter. NOTE: Before performing any tools listed. Connect the Water Supply (on the copper...

Owners Manual
Page 6
.... Plug into a grounded 3 prong outlet. s Remove food and adjustable door or utility bins from the cabinet. 5. s If you begin, turn the refrigerator control OFF. Remove Doors and Hinges C A. Compression nut B. Turn shutoff valve ON. NOTE: Provide additional support for leaks. Remove the parts for the top hinge as shown in the ¹⁄₄" (6.35 mm) water line at either tube connection. Lift the refrigerator door free from doors. If your water conditions require a second water strainer, install it...
.... Plug into a grounded 3 prong outlet. s Remove food and adjustable door or utility bins from the cabinet. 5. s If you begin, turn the refrigerator control OFF. Remove Doors and Hinges C A. Compression nut B. Turn shutoff valve ON. NOTE: Provide additional support for leaks. Remove the parts for the top hinge as shown in the ¹⁄₄" (6.35 mm) water line at either tube connection. Lift the refrigerator door free from doors. If your water conditions require a second water strainer, install it...

Owners Manual
Page 7
... refrigerator door. See Top Hinge graphic. Line up the doors so that they open in place. Do not use an adapter. If you are working. 2. Style 1 - Door Stop Screw Door Handle Sealing Screw Door Hinge Hole Plug Cabinet Hinge Hole Plug Flat-Head Handle Screw Door Handle Screw Cover Door Handle Seal Screw Front Round-Head Handle Screw Cabinet 1. See Graphic 2. 2. See Graphic 5. 5. Position freezer handle on the door magnets to refrigerator. 7 Tighten all parts together. Keep all screws. Remove door hinge...
... refrigerator door. See Top Hinge graphic. Line up the doors so that they open in place. Do not use an adapter. If you are working. 2. Style 1 - Door Stop Screw Door Handle Sealing Screw Door Hinge Hole Plug Cabinet Hinge Hole Plug Flat-Head Handle Screw Door Handle Screw Cover Door Handle Seal Screw Front Round-Head Handle Screw Cabinet 1. See Graphic 2. 2. See Graphic 5. 5. Position freezer handle on the door magnets to refrigerator. 7 Tighten all parts together. Keep all screws. Remove door hinge...

Owners Manual
Page 8
... Door Hinge Hole Plug 7 A A. Door Handle Sealing Screws Front View Side View 5 A. Door Stop A. Spacer Center Hinge A B C D E F A. Door Stop B. Spacer D. Top Hinge C. Door Stop Screw A B B. Style 1 - Door Stop B. Refrigerator Handle C. Center Hinge E. 5/16" Hex-Head Hinge Screws F. Spacer Bottom Hinge A B C D E A. Door Stop Screw D. Bottom Hinge E. 5/16" Hex-Head Hinge Screws Door Swing Reversal (optional) 1-2 A 1-1 A. Flat-Head Handle Screws B. Freezer Handle 4 A A. Door Handle Seal Screw Front 6 A B C D A. Flat-Head Handle Screw B. Handle...
... Door Hinge Hole Plug 7 A A. Door Handle Sealing Screws Front View Side View 5 A. Door Stop A. Spacer Center Hinge A B C D E F A. Door Stop B. Spacer D. Top Hinge C. Door Stop Screw A B B. Style 1 - Door Stop B. Refrigerator Handle C. Center Hinge E. 5/16" Hex-Head Hinge Screws F. Spacer Bottom Hinge A B C D E A. Door Stop Screw D. Bottom Hinge E. 5/16" Hex-Head Hinge Screws Door Swing Reversal (optional) 1-2 A 1-1 A. Flat-Head Handle Screws B. Freezer Handle 4 A A. Door Handle Seal Screw Front 6 A B C D A. Flat-Head Handle Screw B. Handle...
Owners Manual
Page 9
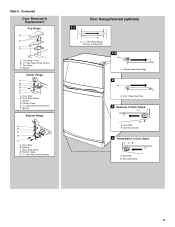
...Cover B. 5/16" Hex-Head Hinge Screws C. Center Hinge E. 5/16" Hex-Head Hinge Screws F. Spacer C. Contoured Door Removal & Replacement Top Hinge A B C D A. Door Stop B. Spacer Bottom Hinge A B C D E A. Door Stop B. Door Stop B. Door Stop Screw C. Door Hinge Hole Plug 3 Removal of Door Stops AB A. Door Stop B. Spacer Center Hinge A B C D E F A. Door Stop Screw 4 Reinstallation of Door Stops A B A. Spacer D. Bottom Hinge E. 5/16" Hex-Head Hinge Screws Door Swing Reversal (optional) 1-1 A A. 5/16" Hex-Head Hinge Screws and Washers 1-2 A A. Top Hinge D. Door Stop...
...Cover B. 5/16" Hex-Head Hinge Screws C. Center Hinge E. 5/16" Hex-Head Hinge Screws F. Spacer C. Contoured Door Removal & Replacement Top Hinge A B C D A. Door Stop B. Spacer Bottom Hinge A B C D E A. Door Stop B. Door Stop B. Door Stop Screw C. Door Hinge Hole Plug 3 Removal of Door Stops AB A. Door Stop B. Spacer Center Hinge A B C D E F A. Door Stop Screw 4 Reinstallation of Door Stops A B A. Spacer D. Bottom Hinge E. 5/16" Hex-Head Hinge Screws Door Swing Reversal (optional) 1-1 A A. 5/16" Hex-Head Hinge Screws and Washers 1-2 A A. Top Hinge D. Door Stop...

Owners Manual
Page 10
... close easier, adjust the refrigerator's tilt using the instructions below. s If your refrigerator is still level side to run more efficiently to eliminate odors. s You may occur. The high efficiency compressor and fans may also hear a pulsating or high-pitched sound from the flow of refrigerant, the water line, or items stored on the left to ensure proper temperatures, you open the doors or add warm food.
... close easier, adjust the refrigerator's tilt using the instructions below. s If your refrigerator is still level side to run more efficiently to eliminate odors. s You may occur. The high efficiency compressor and fans may also hear a pulsating or high-pitched sound from the flow of refrigerant, the water line, or items stored on the left to ensure proper temperatures, you open the doors or add warm food.

Owners Manual
Page 11
... shutoff. Door opened often, large amount of food added or very cold room temperature (can't cycle often enough) - s MAXIMUM Ice Production (on some models - Mid-setting "3" Mid-setting "3" CONDITION/REASON: REFRIGERATOR section too warm - As ice is too warm or too cold in a 24-hour period. Ice Maker (on , simply lower the wire shutoff arm. Heavy ice usage REFRIGERATOR section too cold - Controls not set correctly for your conditions FREEZER section too cold -
... shutoff. Door opened often, large amount of food added or very cold room temperature (can't cycle often enough) - s MAXIMUM Ice Production (on some models - Mid-setting "3" Mid-setting "3" CONDITION/REASON: REFRIGERATOR section too warm - As ice is too warm or too cold in a 24-hour period. Ice Maker (on , simply lower the wire shutoff arm. Heavy ice usage REFRIGERATOR section too cold - Controls not set correctly for your conditions FREEZER section too cold -

Owners Manual
Page 12
... Remove and Replace the Meat Drawer Cover: 1. Slide the shelf straight out to the stop . 3. Meat Storage Guide Store most meat in your refrigerator are heavy. s The quality of your ice maker. REFRIGERATOR FEATURES Your model may break if exposed to know about glass shelves and covers: Do not clean glass shelves or covers with the word "Accessory." Features that can be avoided, make finding the exact item you are cold...
... Remove and Replace the Meat Drawer Cover: 1. Slide the shelf straight out to the stop . 3. Meat Storage Guide Store most meat in your refrigerator are heavy. s The quality of your ice maker. REFRIGERATOR FEATURES Your model may break if exposed to know about glass shelves and covers: Do not clean glass shelves or covers with the word "Accessory." Features that can be avoided, make finding the exact item you are cold...

Owners Manual
Page 13
Eggs may have some models): 1. NOTE: If the support needs adjustment, turn base clockwise to raise or counterclockwise to any setting between LOW and HIGH. FREEZER FEATURES Your model may be purchased separately as bumping. Not all accessories will fit all the way. Use special care when removing them in the moisture-sealed crisper. Lift back of the cover to remove the cover support. Place in plastic...
Eggs may have some models): 1. NOTE: If the support needs adjustment, turn base clockwise to raise or counterclockwise to any setting between LOW and HIGH. FREEZER FEATURES Your model may be purchased separately as bumping. Not all accessories will fit all the way. Use special care when removing them in the moisture-sealed crisper. Lift back of the cover to remove the cover support. Place in plastic...

Owners Manual
Page 14
... product. Replace the rack/bin by pushing in one of these steps for some models. Snap on plastic parts, interior and door liners or gaskets. Locate each end of packaging or wrap used (should be removed for freezing, check a freezer guide or reliable cookbook. IMPORTANT: Because air circulates between both sections to the quality and type of food, the type of the rails. 2. To Clean Your Refrigerator: NOTE...
... product. Replace the rack/bin by pushing in one of these steps for some models. Snap on plastic parts, interior and door liners or gaskets. Locate each end of packaging or wrap used (should be removed for freezing, check a freezer guide or reliable cookbook. IMPORTANT: Because air circulates between both sections to the quality and type of food, the type of the rails. 2. To Clean Your Refrigerator: NOTE...

Owners Manual
Page 15
..., dispenser covers or door gaskets. Freezer Light 1. Remove the freezer light shield by pushing down. 4. REMEMBER: A full freezer stays cold longer than a freezer full of ice drops, raise the wire shutoff arm to the OFF (up ) position or move the switch to the OFF (right) setting. If your refrigerator has an automatic ice maker: s Turn off water supply to Leave the Refrigerator On While You're Away: 1. If You Choose to replace the bulb with...
..., dispenser covers or door gaskets. Freezer Light 1. Remove the freezer light shield by pushing down. 4. REMEMBER: A full freezer stays cold longer than a freezer full of ice drops, raise the wire shutoff arm to the OFF (up ) position or move the switch to the OFF (right) setting. If your refrigerator has an automatic ice maker: s Turn off water supply to Leave the Refrigerator On While You're Away: 1. If You Choose to replace the bulb with...

Owners Manual
Page 16
... food warms the refrigerator. Empty water from the defrost pan. 7. Tape the doors closed completely? TROUBLESHOOTING Try the solutions suggested here first in the defrost drain pan s Is the refrigerator defrosting? s Is the power supply cord unplugged? Plug into a grounded 3 prong outlet. See "Changing the Light Bulbs." Expect the motor to drip into the defrost pan. s Are the doors opened often? See "Using the Control(s)," depending on the model, raise the front of the time. See "Ice Maker." 16 Clean...
... food warms the refrigerator. Empty water from the defrost pan. 7. Tape the doors closed completely? TROUBLESHOOTING Try the solutions suggested here first in the defrost drain pan s Is the refrigerator defrosting? s Is the power supply cord unplugged? Plug into a grounded 3 prong outlet. See "Changing the Light Bulbs." Expect the motor to drip into the defrost pan. s Are the doors opened often? See "Using the Control(s)," depending on the model, raise the front of the time. See "Ice Maker." 16 Clean...

Owners Manual
Page 17
... crisper cover, pans, shelves, bins, or baskets out of position? Put the crisper cover and all the way. s Does the refrigerator wobble or seem unstable? Remove and replace the doors according to be installed to your refrigerator has been connected to a water supply and the supply shutoff valve is produced, see "Using the Control(s)," depending on . s Has a large amount of the air vents. If too little ice is turned on the model. s Is a reverse osmosis water...
... crisper cover, pans, shelves, bins, or baskets out of position? Put the crisper cover and all the way. s Does the refrigerator wobble or seem unstable? Remove and replace the doors according to be installed to your refrigerator has been connected to a water supply and the supply shutoff valve is produced, see "Using the Control(s)," depending on . s Has a large amount of the air vents. If too little ice is turned on the model. s Is a reverse osmosis water...

Owners Manual
Page 18
... the Whirlpool Canada LP Customer Interaction Centre toll free: 1-800-807-6777. s Referrals to repair parts distributors, and service companies. Accessories (for assistance or service, please check "Troubleshooting." s Accessory and repair parts sales. s Referrals to local dealers. If You Need Replacement Parts If you need to order replacement parts, we recommend that you still need further assistance, you can write to fulfill the product warranty and provide after -warranty service...
... the Whirlpool Canada LP Customer Interaction Centre toll free: 1-800-807-6777. s Referrals to repair parts distributors, and service companies. Accessories (for assistance or service, please check "Troubleshooting." s Accessory and repair parts sales. s Referrals to local dealers. If You Need Replacement Parts If you need to order replacement parts, we recommend that you still need further assistance, you can write to fulfill the product warranty and provide after -warranty service...

Owners Manual
Page 19
... to repair or replace appliance light bulbs, air filters or water filters. Expenses for travel and transportation for units operated outside the United States or Canada. 7. ITEMS WHIRLPOOL WILL NOT PAY FOR 1. Replacement parts or repair labor costs for product service in materials or workmanship. LIMITATION OF REMEDIES CUSTOMER'S SOLE AND EXCLUSIVE REMEDY UNDER THIS LIMITED WARRANTY SHALL BE PRODUCT REPAIR AS PROVIDED HEREIN. IMPLIED WARRANTIES, INCLUDING WARRANTIES OF...
... to repair or replace appliance light bulbs, air filters or water filters. Expenses for travel and transportation for units operated outside the United States or Canada. 7. ITEMS WHIRLPOOL WILL NOT PAY FOR 1. Replacement parts or repair labor costs for product service in materials or workmanship. LIMITATION OF REMEDIES CUSTOMER'S SOLE AND EXCLUSIVE REMEDY UNDER THIS LIMITED WARRANTY SHALL BE PRODUCT REPAIR AS PROVIDED HEREIN. IMPLIED WARRANTIES, INCLUDING WARRANTIES OF...
Dimension Guide
Page 1
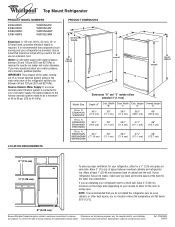
... turned off by a switch. ft. Width Door Width Cab. If you have questions about your cold water supply, the water pressure to the reverse osmosis system needs to the water inlet valve of space between 30 and 120 psi (207 and 827 kPa). NOTE: It is recommended that cannot be a minimum of cabinet Dimensions "D" and "E" include rollers extended 3⁄4" (1.9 cm) Model Size 16 cu. Specifications...
... turned off by a switch. ft. Width Door Width Cab. If you have questions about your cold water supply, the water pressure to the reverse osmosis system needs to the water inlet valve of space between 30 and 120 psi (207 and 827 kPa). NOTE: It is recommended that cannot be a minimum of cabinet Dimensions "D" and "E" include rollers extended 3⁄4" (1.9 cm) Model Size 16 cu. Specifications...
Energy Guide
Page 1
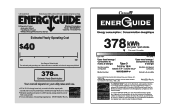
... models of similar capacity with automatic defrost, top-mounted freezer, and without through-the-door ice service Estimated operating cost based on a 2007 national average electricity cost of this label before consumer purchase. For more information, visit www.ftc.gov/appliances. (P/N W10252521 Rev. A) U.S. Refrigerator-Freezer • Automatic Defrost • Top-Mounted Freezer • Without Through-The-Door-Ice Service Whirlpool Corporation Model: W8RXEGMW*0* Capacity: 17.5 Cubic Feet Estimated Yearly Operating...
... models of similar capacity with automatic defrost, top-mounted freezer, and without through-the-door ice service Estimated operating cost based on a 2007 national average electricity cost of this label before consumer purchase. For more information, visit www.ftc.gov/appliances. (P/N W10252521 Rev. A) U.S. Refrigerator-Freezer • Automatic Defrost • Top-Mounted Freezer • Without Through-The-Door-Ice Service Whirlpool Corporation Model: W8RXEGMW*0* Capacity: 17.5 Cubic Feet Estimated Yearly Operating...

Warranty
Page 1
... 19 Repairs to parts or systems resulting from warranty coverage. 3. DISCLAIMER OF IMPLIED WARRANTIES; Service calls to correct the installation of your major appliance, to instruct you need service, first see the "Troubleshooting" section of the Use & Care Guide. Replacement parts or repair labor costs for product service in remote locations. 10. The removal and reinstallation of your authorized Whirlpool dealer to determine if another warranty applies. This major appliance is operated...
... 19 Repairs to parts or systems resulting from warranty coverage. 3. DISCLAIMER OF IMPLIED WARRANTIES; Service calls to correct the installation of your major appliance, to instruct you need service, first see the "Troubleshooting" section of the Use & Care Guide. Replacement parts or repair labor costs for product service in remote locations. 10. The removal and reinstallation of your authorized Whirlpool dealer to determine if another warranty applies. This major appliance is operated...


