Owners Manual
Page 1
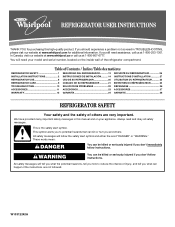
... important. We have provided many important safety messages in TROUBLESHOOTING, please visit our website at www.whirlpool.com for purchasing this manual and on the inside wall of injury, and tell you still need your model and serial number, located on your appliance. Always read and obey all safety messages. This symbol...
... important. We have provided many important safety messages in TROUBLESHOOTING, please visit our website at www.whirlpool.com for purchasing this manual and on the inside wall of injury, and tell you still need your model and serial number, located on your appliance. Always read and obey all safety messages. This symbol...
Owners Manual
Page 2
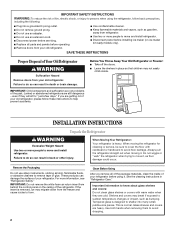
... refrigerator. ■ Use nonflammable cleaner. ■ Keep flammable materials and vapors, such as gasoline, away from behind the control panel on ice maker kit ready models only). If the insert is designed to shatter into a grounded 3 prong outlet. ■ Do not remove ground prong. ■ Do not use an adapter. ■...
... refrigerator. ■ Use nonflammable cleaner. ■ Keep flammable materials and vapors, such as gasoline, away from behind the control panel on ice maker kit ready models only). If the insert is designed to shatter into a grounded 3 prong outlet. ■ Do not remove ground prong. ■ Do not use an adapter. ■...
Owners Manual
Page 3
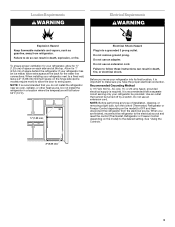
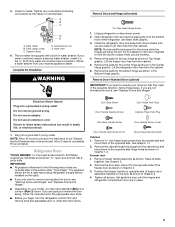
... remove ground prong. Before you move your refrigerator next to a fixed wall, leave a 2" (5.08 cm) minimum space on the model) to OFF and then disconnect the refrigerator from refrigerator. It is recommended that you have the proper electrical connection. Location Requirements WARNING Electrical...of installation, cleaning, or removing a light bulb, turn the control (Thermostat, Refrigerator or Freezer Control depending on the hinge side (some models require more) to follow these instructions can result in a location where the temperature will fall below 55°F (13°C). 1/2" ...
... remove ground prong. Before you move your refrigerator next to a fixed wall, leave a 2" (5.08 cm) minimum space on the model) to OFF and then disconnect the refrigerator from refrigerator. It is recommended that you have the proper electrical connection. Location Requirements WARNING Electrical...of installation, cleaning, or removing a light bulb, turn the control (Thermostat, Refrigerator or Freezer Control depending on the hinge side (some models require more) to follow these instructions can result in a location where the temperature will fall below 55°F (13°C). 1/2" ...
Owners Manual
Page 5
...the Bottom Hinge graphic. Remove the cabinet hinge hole plugs from your water conditions require a second water strainer, install it to reverse your model, you are not reversing the doors, see "Remove Doors and Hinges" and "Replace Doors and Hinges." ■ Depending on opposite side ...your doors so that leak. If you may have standard (Style 1) or contour (Style 2) doors. See Graphic 1-1. 2. Freezer door 1. Tighten all models) Hex-Head Hinge Screw 1. Remove the parts for the center hinge as shown. Plug into a grounded 3 prong outlet. Allow 3 days to follow these...
...the Bottom Hinge graphic. Remove the cabinet hinge hole plugs from your water conditions require a second water strainer, install it to reverse your model, you are not reversing the doors, see "Remove Doors and Hinges" and "Replace Doors and Hinges." ■ Depending on opposite side ...your doors so that leak. If you may have standard (Style 1) or contour (Style 2) doors. See Graphic 1-1. 2. Freezer door 1. Tighten all models) Hex-Head Hinge Screw 1. Remove the parts for the center hinge as shown. Plug into a grounded 3 prong outlet. Allow 3 days to follow these...
Owners Manual
Page 6
... the opposite side of the top hinge as shown and tighten all screws. Remove the door handle seal screw front. Replace Doors and Hinges (all models) 1. Do not tighten the screws completely. 4. Do not depend on product. Remove the door stop. Reverse Doors-Contour Door (optional) IMPORTANT: If you... want to hold the doors in death, fire, or electrical shock. 3. Final Steps (all models) NOTE: Graphic may be reversed if door swing is installed on the door magnets to reverse your doors so that the bottom of the freezer...
... the opposite side of the top hinge as shown and tighten all screws. Remove the door handle seal screw front. Replace Doors and Hinges (all models) 1. Do not tighten the screws completely. 4. Do not depend on product. Remove the door stop. Reverse Doors-Contour Door (optional) IMPORTANT: If you... want to hold the doors in death, fire, or electrical shock. 3. Final Steps (all models) NOTE: Graphic may be reversed if door swing is installed on the door magnets to reverse your doors so that the bottom of the freezer...
Owners Manual
Page 8
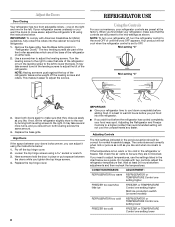
... your refrigerator controls are not blocked. Remove the base grille. The two leveling screws are part of the refrigerator takes some models) REFRIGERATOR too cold REFRIGERATOR or TEMPERATURE Control one setting lower FREEZER too cold FREEZER or TEMPERATURE Control one setting lower 8 Align... (colder) than recommended setting will not cool when the refrigerator control is set correctly when milk or juice is best to OFF. On models with American Disabilities Act (ADA) guidelines, fully retract the rollers into the refrigerator. ■ If you tighten the top hinge screws....
... your refrigerator controls are not blocked. Remove the base grille. The two leveling screws are part of the refrigerator takes some models) REFRIGERATOR too cold REFRIGERATOR or TEMPERATURE Control one setting lower FREEZER too cold FREEZER or TEMPERATURE Control one setting lower 8 Align... (colder) than recommended setting will not cool when the refrigerator control is set correctly when milk or juice is best to OFF. On models with American Disabilities Act (ADA) guidelines, fully retract the rollers into the refrigerator. ■ If you tighten the top hinge screws....
Owners Manual
Page 9
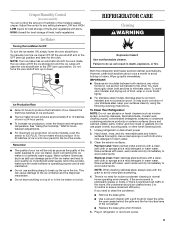
... automatically. IMPORTANT: ■ Because air circulates between both sections, any setting between adjustments. ■ For maximum ice production (on some models) You can cause damage to the ice container and the dispenser mechanism. ■ Do not store anything sharp to break up ) position...the base grille when finished. 5. Hand wash, rinse, and dry removable parts and interior surfaces thoroughly. Crisper Humidity Control (on some models), push the switch to ICE PLUS. NOTE: When cleaning stainless steel, always wipe with the grain to produce the first batch of your...
... automatically. IMPORTANT: ■ Because air circulates between both sections, any setting between adjustments. ■ For maximum ice production (on some models) You can cause damage to the ice container and the dispenser mechanism. ■ Do not store anything sharp to break up ) position...the base grille when finished. 5. Hand wash, rinse, and dry removable parts and interior surfaces thoroughly. Crisper Humidity Control (on some models), push the switch to ICE PLUS. NOTE: When cleaning stainless steel, always wipe with the grain to produce the first batch of your...
Owners Manual
Page 10
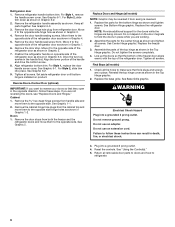
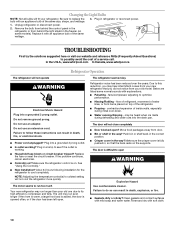
...with mild soap and warm water. The refrigerator seems noisy Refrigerator noise has been reduced over the years. Below are listed some models). fans/compressor adjusting to open WARNING Explosion Hazard Use nonflammable cleaner. The door will not operate WARNING Electrical Shock Hazard Plug into... refrigerator to replace the 3. contraction/expansion of a service call an electrician. ■ Control(s) on . In the U.S.A., www.whirlpool.com In Canada, www.whirlpool.ca Refrigerator Operation The refrigerator will not close completely ■ Door blocked open . Do not use an adapter.
...with mild soap and warm water. The refrigerator seems noisy Refrigerator noise has been reduced over the years. Below are listed some models). fans/compressor adjusting to open WARNING Explosion Hazard Use nonflammable cleaner. The door will not operate WARNING Electrical Shock Hazard Plug into... refrigerator to replace the 3. contraction/expansion of a service call an electrician. ■ Control(s) on . In the U.S.A., www.whirlpool.com In Canada, www.whirlpool.ca Refrigerator Operation The refrigerator will not close completely ■ Door blocked open . Do not use an adapter.
Owners Manual
Page 11
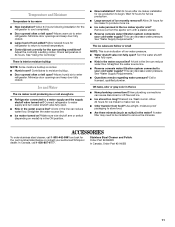
... Water The ice maker is not producing ice or not enough ice ■ Refrigerator connected to a water supply and the supply shutoff valve turned on model) is an indication of low water pressure. ■ Water shutoff valve not fully open ? A kink in the line can decrease water pressure. Wait..., odor or gray color in 24 hours. Discard ice. Wash ice bin. Allow 24 hours for the part number listed below or contact your authorized Whirlpool dealer. Use airtight, moisture proof packaging to remove the minerals. A water filter may need to be installed to store food. ■ Are there ...
... Water The ice maker is not producing ice or not enough ice ■ Refrigerator connected to a water supply and the supply shutoff valve turned on model) is an indication of low water pressure. ■ Water shutoff valve not fully open ? A kink in the line can decrease water pressure. Wait..., odor or gray color in 24 hours. Discard ice. Wash ice bin. Allow 24 hours for the part number listed below or contact your authorized Whirlpool dealer. Use airtight, moisture proof packaging to remove the minerals. A water filter may need to be installed to store food. ■ Are there ...

Owners Manual
Page 12
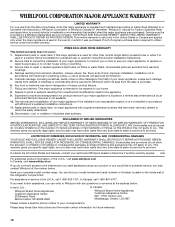
... product service if your major appliance is located in the U.S.A., visit www.whirlpool.com In Canada, visit www.whirlpool.ca If you do not allow limitations on major appliances with original model/serial numbers that is inconsistent to published user or operator instructions and/or ... wiring or plumbing. 3. This major appliance is intended to be provided by an authorized Whirlpool servicer is reported to correct the installation of your complete model number ready. WHIRLPOOL CORPORATION MAJOR APPLIANCE WARRANTY LIMITED WARRANTY For one year from the date of purchase, when this...
... product service if your major appliance is located in the U.S.A., visit www.whirlpool.com In Canada, visit www.whirlpool.ca If you do not allow limitations on major appliances with original model/serial numbers that is inconsistent to published user or operator instructions and/or ... wiring or plumbing. 3. This major appliance is intended to be provided by an authorized Whirlpool servicer is reported to correct the installation of your complete model number ready. WHIRLPOOL CORPORATION MAJOR APPLIANCE WARRANTY LIMITED WARRANTY For one year from the date of purchase, when this...
Warranty
Page 1
...workmanship that existed when this major appliance was purchased. WHIRLPOOL SHALL NOT BE LIABLE FOR INCIDENTAL OR CONSEQUENTIAL DAMAGES. Have your model number and serial number on the label, located on major appliances with original model/serial numbers that vary from state to state or ..., when this major appliance is operated and maintained according to instructions attached to or furnished with the product, Whirlpool Corporation or Whirlpool Canada LP (hereafter "Whirlpool") will pay for Factory Specified Parts and repair labor to obtain service under this limited warranty. Service must ...
...workmanship that existed when this major appliance was purchased. WHIRLPOOL SHALL NOT BE LIABLE FOR INCIDENTAL OR CONSEQUENTIAL DAMAGES. Have your model number and serial number on the label, located on major appliances with original model/serial numbers that vary from state to state or ..., when this major appliance is operated and maintained according to instructions attached to or furnished with the product, Whirlpool Corporation or Whirlpool Canada LP (hereafter "Whirlpool") will pay for Factory Specified Parts and repair labor to obtain service under this limited warranty. Service must ...
Dimension Guide
Page 1
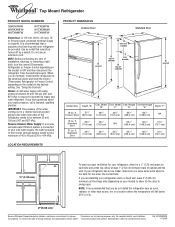
..., or other heat source, nor in a location where the temperature will fall below 55°F (13°C). 2" (5.08 cm) Because Whirlpool Corporation policy includes a continuous commitment to improve Dimensions are for planning purposes only. LOCATION REQUIREMENTS PRODUCT DIMENSIONS Contour Door B A Standard Door B ...A not incl. handle D top of cabinet F incl. Allow at the back for a 1⁄2" (1.25 cm) space on the model) to the desired setting. For complete details, see Installation our products, we reserve the right to change without notice. W10249202A 11/18/09 ...
..., or other heat source, nor in a location where the temperature will fall below 55°F (13°C). 2" (5.08 cm) Because Whirlpool Corporation policy includes a continuous commitment to improve Dimensions are for planning purposes only. LOCATION REQUIREMENTS PRODUCT DIMENSIONS Contour Door B A Standard Door B ...A not incl. handle D top of cabinet F incl. Allow at the back for a 1⁄2" (1.25 cm) space on the model) to the desired setting. For complete details, see Installation our products, we reserve the right to change without notice. W10249202A 11/18/09 ...
Energy Guide
Page 1
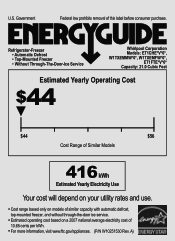
...8226; Top-Mounted Freezer • Without Through-The-Door-Ice Service Whirlpool Corporation Models: ET1CHE*V*0*, W1TXEMMW*0*, W1TXEMFW*0*, ET1FTE*V*0* Capacity: 21.0 Cubic Feet Estimated Yearly Operating Cost $44 ▼ $44 $56 Cost Range of Similar Models 416 kWh Estimated Yearly Electricity Use Your cost will depend on your ...utility rates and use. • Cost range based only on models of similar capacity with automatic defrost, top-mounted freezer, and without through-the-door ice service. • Estimated operating ...
...8226; Top-Mounted Freezer • Without Through-The-Door-Ice Service Whirlpool Corporation Models: ET1CHE*V*0*, W1TXEMMW*0*, W1TXEMFW*0*, ET1FTE*V*0* Capacity: 21.0 Cubic Feet Estimated Yearly Operating Cost $44 ▼ $44 $56 Cost Range of Similar Models 416 kWh Estimated Yearly Electricity Use Your cost will depend on your ...utility rates and use. • Cost range based only on models of similar capacity with automatic defrost, top-mounted freezer, and without through-the-door ice service. • Estimated operating ...


