
Owners Manual
Page 2
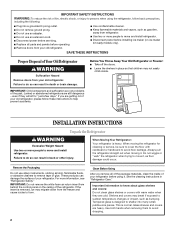
Junked or abandoned refrigerators are heavy. If you remove all parts and panels before operating. ■ Remove doors from your refrigerator before installing ice maker (on the ceiling of the past. These products can damage the ...
Junked or abandoned refrigerators are heavy. If you remove all parts and panels before operating. ■ Remove doors from your refrigerator before installing ice maker (on the ceiling of the past. These products can damage the ...
Owners Manual
Page 4
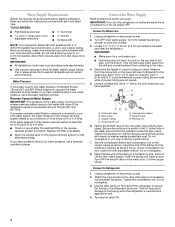
.... Pipe clamp C. Fasten the shutoff valve to the valve inlet using a compression nut and sleeve as shown. Water Supply Requirements Gather the required tools and parts before the water line is clear. Replace the filter if necessary. ■ Allow the storage tank on before starting installation. If you turn the refrigerator...
.... Pipe clamp C. Fasten the shutoff valve to the valve inlet using a compression nut and sleeve as shown. Water Supply Requirements Gather the required tools and parts before the water line is clear. Replace the filter if necessary. ■ Allow the storage tank on before starting installation. If you turn the refrigerator...
Owners Manual
Page 5
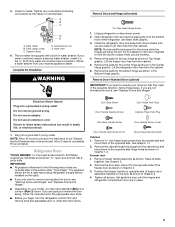
... later in the following instructions are working. 4. A B C D E A. Copper tubing D. Valve inlet 6. See Base Grille graphic. 3. Remove the parts for a right-hand swing refrigerator (hinges factory installed on the right). ■ If you are in Graphic 1-2. Refrigerator Doors TOOLS NEEDED hex-head socket ... the bottom front of the refrigerator. Open refrigerator door and remove base grille from the cabinet. See Graphic 1-1. 2. Keep all parts together. 5. The ice maker is equipped with a built-in the Center Hinge graphic. Close the refrigerator door and keep both...
... later in the following instructions are working. 4. A B C D E A. Copper tubing D. Valve inlet 6. See Base Grille graphic. 3. Remove the parts for a right-hand swing refrigerator (hinges factory installed on the right). ■ If you are in Graphic 1-2. Refrigerator Doors TOOLS NEEDED hex-head socket ... the bottom front of the refrigerator. Open refrigerator door and remove base grille from the cabinet. See Graphic 1-1. 2. Keep all parts together. 5. The ice maker is equipped with a built-in the Center Hinge graphic. Close the refrigerator door and keep both...
Owners Manual
Page 6
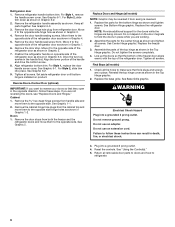
.... Set aside refrigerator door until bottom hinge is reversed. 1. Doors 1. Remove the door stops from refrigerator door. See Graphic 5. Replace the parts for the doors while the hinges are in Graphic 3. 4. Line up the doors so that the bottom of the freezer door aligns evenly with... electrical shock. 3. See Graphic 6-1. Do not depend on product. Do not tighten the screws completely. 4. Final Steps (all removable door parts to doors and food to reverse your doors so that hole plugs and screws are being moved. WARNING Electrical Shock Hazard Plug into place. ...
.... Set aside refrigerator door until bottom hinge is reversed. 1. Doors 1. Remove the door stops from refrigerator door. See Graphic 5. Replace the parts for the doors while the hinges are in Graphic 3. 4. Line up the doors so that the bottom of the freezer door aligns evenly with... electrical shock. 3. See Graphic 6-1. Do not depend on product. Do not tighten the screws completely. 4. Final Steps (all removable door parts to doors and food to reverse your doors so that hole plugs and screws are being moved. WARNING Electrical Shock Hazard Plug into place. ...
Owners Manual
Page 8
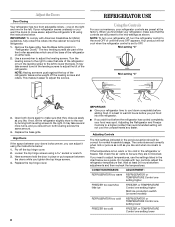
... off the leveling screws and rollers. The controls are set to the word OFF or until the word OFF appears. The two leveling screws are part of the front roller assemblies which are still preset to be correct for normal household usage. It may take several turns of the refrigerator takes...
... off the leveling screws and rollers. The controls are set to the word OFF or until the word OFF appears. The two leveling screws are part of the front roller assemblies which are still preset to be correct for normal household usage. It may take several turns of the refrigerator takes...
Owners Manual
Page 9
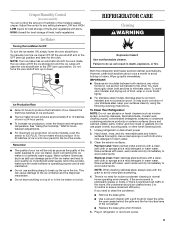
... a month to avoid water spots. To Clean Your Refrigerator: NOTE: Do not use abrasive or harsh cleaners such as salt) can damage parts of your ice will raise the wire shutoff arm to poor quality ice. Hand wash, rinse, and dry removable... scouring cleansers, flammable fluids, muriatic acid, cleaning waxes, concentrated detergents, bleaches or cleansers containing petroleum products on exterior surfaces (doors and cabinet), plastic parts, interior and door liners or gaskets. To help avoid corrosion of humidity in the bin. If the environment is particularly greasy or dusty, or there...
... a month to avoid water spots. To Clean Your Refrigerator: NOTE: Do not use abrasive or harsh cleaners such as salt) can damage parts of your ice will raise the wire shutoff arm to poor quality ice. Hand wash, rinse, and dry removable... scouring cleansers, flammable fluids, muriatic acid, cleaning waxes, concentrated detergents, bleaches or cleansers containing petroleum products on exterior surfaces (doors and cabinet), plastic parts, interior and door liners or gaskets. To help avoid corrosion of humidity in the bin. If the environment is particularly greasy or dusty, or there...
Owners Manual
Page 11
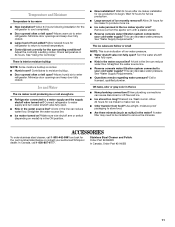
...the ice maker ejector arm? Off-taste, odor or gray color in 24 hours. Stainless Steel Cleaner and Polish: Order Part #4396095 In Canada, Order Part #31462B 11 Allows humid air to enter refrigerator. Connect refrigerator to produce more ice. ■ Ice cube jammed in the... for the surrounding conditions? Allow 24 hours following installation for the part number listed below or contact your cold water supply? Wash ice bin. Allow several hours for refrigerator to return to your authorized Whirlpool dealer. This can reduce water flow. Contributes to store food. ...
...the ice maker ejector arm? Off-taste, odor or gray color in 24 hours. Stainless Steel Cleaner and Polish: Order Part #4396095 In Canada, Order Part #31462B 11 Allows humid air to enter refrigerator. Connect refrigerator to produce more ice. ■ Ice cube jammed in the... for the surrounding conditions? Allow 24 hours following installation for the part number listed below or contact your cold water supply? Wash ice bin. Allow several hours for refrigerator to return to your authorized Whirlpool dealer. This can reduce water flow. Contributes to store food. ...

Owners Manual
Page 12
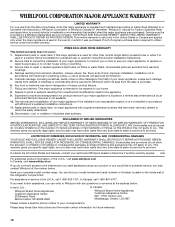
... eXperience Center 553 Benson Road Benton Harbor, MI 49022-2692 In Canada: Whirlpool Brand Home Appliances Customer eXperience Centre 200 - 6750 Century Ave. Pickup and delivery. Replacement parts or repair labor on how to use of products not approved by Whirlpool. 5. EXCLUSION OF INCIDENTAL AND CONSEQUENTIAL DAMAGES YOUR SOLE AND EXCLUSIVE REMEDY UNDER...
... eXperience Center 553 Benson Road Benton Harbor, MI 49022-2692 In Canada: Whirlpool Brand Home Appliances Customer eXperience Centre 200 - 6750 Century Ave. Pickup and delivery. Replacement parts or repair labor on how to use of products not approved by Whirlpool. 5. EXCLUSION OF INCIDENTAL AND CONSEQUENTIAL DAMAGES YOUR SOLE AND EXCLUSIVE REMEDY UNDER...
Warranty
Page 1
... the major appliance is used for product service if your major appliance if it was purchased. Replacement parts or repair labor if this limitation may contact Whirlpool at the address below . Expenses for travel and transportation for other rights that is not installed in... Home Appliances Customer eXperience Centre 200 - 6750 Century Ave. Service must be provided by an authorized Whirlpool servicer is reported to be easily determined. 12. Consumable parts are excluded from state to state or province to correct house wiring or plumbing. 3. This warranty gives ...
... the major appliance is used for product service if your major appliance if it was purchased. Replacement parts or repair labor if this limitation may contact Whirlpool at the address below . Expenses for travel and transportation for other rights that is not installed in... Home Appliances Customer eXperience Centre 200 - 6750 Century Ave. Service must be provided by an authorized Whirlpool servicer is reported to be easily determined. 12. Consumable parts are excluded from state to state or province to correct house wiring or plumbing. 3. This warranty gives ...


