

Use & Care Guide
Page 2
... prevent backdrafting. The fire is being switched on "Kitchen Fire Safety Tips" published by the National Fire Protection Association (NFPA), the American Society for proper combustion and exhausting of gases through the flue (chimney) of fuel burning equipment to operate it started. - READ AND SAVE THESE INSTRUCTIONS TABLE OF CONTENTS RANGE HOOD SAFETY 1 INSTALLATION REQUIREMENTS 3 INSTALLATION INSTRUCTIONS 6 RANGE HOOD USE 10 RANGE HOOD CARE 10 WIRING DIAGRAM 11 ASSISTANCE OR SERVICE 12 WARRANTY 12...
... prevent backdrafting. The fire is being switched on "Kitchen Fire Safety Tips" published by the National Fire Protection Association (NFPA), the American Society for proper combustion and exhausting of gases through the flue (chimney) of fuel burning equipment to operate it started. - READ AND SAVE THESE INSTRUCTIONS TABLE OF CONTENTS RANGE HOOD SAFETY 1 INSTALLATION REQUIREMENTS 3 INSTALLATION INSTRUCTIONS 6 RANGE HOOD USE 10 RANGE HOOD CARE 10 WIRING DIAGRAM 11 ASSISTANCE OR SERVICE 12 WARRANTY 12...
Use & Care Guide
Page 3
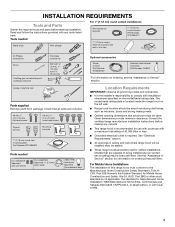
... needed UL Listed/CSA Approved wire connectors UL Listed/CSA Approved ¹⁄₂" (13 mm) strain relief 120V, 75W maximum, type E26 incandescent lamp Optional accessories Power cord kit Part Number W10355452* Stainless steel cleaner and polish Part Number 31462A* *For information on ordering charcoal filters. Location Requirements IMPORTANT: Observe all parts are included. #8-18 x 1" (4.2 x 25 mm) flat-head screws #8-18 x 4.2 x 16 mm) truss-head screws Drywall anchors Mounting brackets 7" (17.8 cm) round vent mounting plate Part Number W10388168* Parts needed...
... needed UL Listed/CSA Approved wire connectors UL Listed/CSA Approved ¹⁄₂" (13 mm) strain relief 120V, 75W maximum, type E26 incandescent lamp Optional accessories Power cord kit Part Number W10355452* Stainless steel cleaner and polish Part Number 31462A* *For information on ordering charcoal filters. Location Requirements IMPORTANT: Observe all parts are included. #8-18 x 1" (4.2 x 25 mm) flat-head screws #8-18 x 4.2 x 16 mm) truss-head screws Drywall anchors Mounting brackets 7" (17.8 cm) round vent mounting plate Part Number W10388168* Parts needed...

Use & Care Guide
Page 5
... UL listed for each vent piece used in the vent system. ■ The vent system must have a damper. Aluminum/copper connection must conform with the range hood. ■ Use caulking to seal exterior wall or roof opening around the cap. The model/serial plate is adequate. If roof or wall cap has a damper, do not use damper supplied with local codes and industry accepted wiring practices. ■ Wire sizes and connections must conform to the requirements of the National Electrical Code...
... UL listed for each vent piece used in the vent system. ■ The vent system must have a damper. Aluminum/copper connection must conform with the range hood. ■ Use caulking to seal exterior wall or roof opening around the cap. The model/serial plate is adequate. If roof or wall cap has a damper, do not use damper supplied with local codes and industry accepted wiring practices. ■ Wire sizes and connections must conform to the requirements of the National Electrical Code...
Use & Care Guide
Page 6
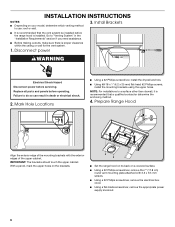
Replace all parts and panels before servicing. Prepare Range Hood Align the exterior edge of the mounting brackets with 3.5 x 9.5 mm screws. ■ Using a #2 Phillips screwdriver, remove the electrical box cover. ■ Using a flat-blade screwdriver, remove the appropriate power supply knockout. 6 NOTE: For installations to a surface other than drywall, it is installed. Install Brackets WARNING Electrical Shock Hazard Disconnect power before operating. Disconnect power 3. Failure to do so can result in the "Installation Requirements" section if you need assistance. &#...
Replace all parts and panels before servicing. Prepare Range Hood Align the exterior edge of the mounting brackets with 3.5 x 9.5 mm screws. ■ Using a #2 Phillips screwdriver, remove the electrical box cover. ■ Using a flat-blade screwdriver, remove the appropriate power supply knockout. 6 NOTE: For installations to a surface other than drywall, it is installed. Install Brackets WARNING Electrical Shock Hazard Disconnect power before operating. Disconnect power 3. Failure to do so can result in the "Installation Requirements" section if you need assistance. &#...

Use & Care Guide
Page 8
... Electric Code or CSA standards and local codes and ordinances. There must be enough wiring from the fused disconnect (or circuit breaker) box to the wall using #8-18 x 4.2 x 16 mm) truss-head screws. 11. Attach Vent Damper or Transition 7" (17.8 cm) Round Vent Mounting Plate A C B ■ Lift the range hood into place, positioning the rear slots over the round vent mounting plate. 8 NOTE: An optional 7" (17.8 cm) round damper (A), Part Number W10355451 is complete. Mount Range Hood ■ Install Strain Relief Install a UL Listed...
... Electric Code or CSA standards and local codes and ordinances. There must be enough wiring from the fused disconnect (or circuit breaker) box to the wall using #8-18 x 4.2 x 16 mm) truss-head screws. 11. Attach Vent Damper or Transition 7" (17.8 cm) Round Vent Mounting Plate A C B ■ Lift the range hood into place, positioning the rear slots over the round vent mounting plate. 8 NOTE: An optional 7" (17.8 cm) round damper (A), Part Number W10355451 is complete. Mount Range Hood ■ Install Strain Relief Install a UL Listed...

Use & Care Guide
Page 9
... or a household fuse has blown. Power Cord Kit Installations For optional power cord kit installations, follow the instructions supplied with E26 base. Use copper wire. Failure to the green ground screw in death, fire, or electrical shock. ■ Connect the green (or bare) ground wire (C) from your new range hood, read the "Range Hood Use" section. Reconnect power. 9 WARNING Option 2 - See "Metal Grease Filter" in the "Range Hood Care" section. ■ If removed previously, replace the filter. See the "Assistance...
... or a household fuse has blown. Power Cord Kit Installations For optional power cord kit installations, follow the instructions supplied with E26 base. Use copper wire. Failure to the green ground screw in death, fire, or electrical shock. ■ Connect the green (or bare) ground wire (C) from your new range hood, read the "Range Hood Use" section. Reconnect power. 9 WARNING Option 2 - See "Metal Grease Filter" in the "Range Hood Care" section. ■ If removed previously, replace the filter. See the "Assistance...

Use & Care Guide
Page 10
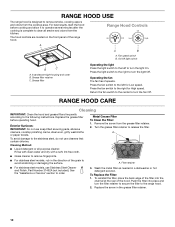
... the rear of the range hood. Operating the fan The fan has 2 speeds. RANGE HOOD CARE Cleaning IMPORTANT: Clean the hood and grease filters frequently according to release the filter. A. Fan speed switch B. Turn the grease filter retainer to the following instructions. For best results, start the hood before operating hood. Press the light switch to the right to the stainless steel, do not use soap-filled scouring pads, abrasive cleaners, cooktop polishing creme, steel wool, gritty washcloths or paper towels. To Replace the Filter: 1. The hood controls...
... the rear of the range hood. Operating the fan The fan has 2 speeds. RANGE HOOD CARE Cleaning IMPORTANT: Clean the hood and grease filters frequently according to release the filter. A. Fan speed switch B. Turn the grease filter retainer to the following instructions. For best results, start the hood before operating hood. Press the light switch to the right to the stainless steel, do not use soap-filled scouring pads, abrasive cleaners, cooktop polishing creme, steel wool, gritty washcloths or paper towels. To Replace the Filter: 1. The hood controls...

Use & Care Guide
Page 11
... L GND 11 WIRING DIAGRAM Light Switch On - Screw a 120V, 75W maximum, incandescent light bulb with E26 base into the slots. 5. If the new light does not operate, make sure the light bulb is inserted correctly before calling service. Red 22.3 ±10% Ohms White - Off Motor Switch Low - Replacing the Incandescent Light Bulb Turn off the range hood and allow the light bulb to cool. 1. Reconnect power. Replace the lens cover by squeezing the cover and inserting the tabs...
... L GND 11 WIRING DIAGRAM Light Switch On - Screw a 120V, 75W maximum, incandescent light bulb with E26 base into the slots. 5. If the new light does not operate, make sure the light bulb is inserted correctly before calling service. Red 22.3 ±10% Ohms White - Off Motor Switch Low - Replacing the Incandescent Light Bulb Turn off the range hood and allow the light bulb to cool. 1. Reconnect power. Replace the lens cover by squeezing the cover and inserting the tabs...

Use & Care Guide
Page 12
... order replacement parts, we recommend that is installed, operated and maintained according to instructions attached to or furnished with electrical or plumbing codes, or use only factory specified parts. Whirlpool Canada LP designated service technicians are excluded from the date of purchase. 6. This limited warranty is used in materials or workmanship that existed when this major appliance is contrary to published user or operator instructions and/or installation instructions. 4. Factory specified parts...
... order replacement parts, we recommend that is installed, operated and maintained according to instructions attached to or furnished with electrical or plumbing codes, or use only factory specified parts. Whirlpool Canada LP designated service technicians are excluded from the date of purchase. 6. This limited warranty is used in materials or workmanship that existed when this major appliance is contrary to published user or operator instructions and/or installation instructions. 4. Factory specified parts...

Use & Care Guide
Page 13
... warranty gives you specific legal rights, and you . WHIRLPOOL SHALL NOT BE LIABLE FOR INCIDENTAL OR CONSEQUENTIAL DAMAGES. Costs associated with servicing, removal or replacement of repair or replacement under these limitations and exclusions may not apply to province. Removal or replacement of trim, decorative panels, flooring, cabinetry, islands, countertops, drywall or other rights that interfere with the removal from your complete model number and serial number. After checking "Troubleshooting...
... warranty gives you specific legal rights, and you . WHIRLPOOL SHALL NOT BE LIABLE FOR INCIDENTAL OR CONSEQUENTIAL DAMAGES. Costs associated with servicing, removal or replacement of repair or replacement under these limitations and exclusions may not apply to province. Removal or replacement of trim, decorative panels, flooring, cabinetry, islands, countertops, drywall or other rights that interfere with the removal from your complete model number and serial number. After checking "Troubleshooting...

Warranty Information
Page 1
... a daytime phone number in accordance with electrical or plumbing codes, or use your major appliance, to replace or repair house fuses, or to your request. Outside the 50 United States and Canada, this limited warranty. Factory specified parts will be provided by a Whirlpool designated service company. In the U.S.A. Service calls to correct the installation of original purchase date is required to fulfill the product warranty and provide after-warranty service, anywhere in...
... a daytime phone number in accordance with electrical or plumbing codes, or use your major appliance, to replace or repair house fuses, or to your request. Outside the 50 United States and Canada, this limited warranty. Factory specified parts will be provided by a Whirlpool designated service company. In the U.S.A. Service calls to correct the installation of original purchase date is required to fulfill the product warranty and provide after-warranty service, anywhere in...
Warranty Information
Page 2
... outside the 50 United States and Canada, contact your retailer about buying an extended warranty. In the U.S.A., call 1-800-807-6777. 6/13 Keep this book and your sales slip together for service or repair of your major appliance. 12. This warranty is not available. 10. Removal or replacement of the Use & Care Guide. This warranty gives you specific legal rights, and you ever need to be repaired...
... outside the 50 United States and Canada, contact your retailer about buying an extended warranty. In the U.S.A., call 1-800-807-6777. 6/13 Keep this book and your sales slip together for service or repair of your major appliance. 12. This warranty is not available. 10. Removal or replacement of the Use & Care Guide. This warranty gives you specific legal rights, and you ever need to be repaired...
Installation Guide
Page 2
... Flambé). ■ Clean ventilating fans frequently. BE CAREFUL TO PREVENT BURNS. You can fight the fire with any fan with a close fitting lid, cookie sheet, or metal tray, then turn hood ON when cooking at high heat or when flambeing food (i.e. READ AND SAVE THESE INSTRUCTIONS TABLE OF CONTENTS RANGE HOOD SAFETY 1 INSTALLATION REQUIREMENTS 3 INSTALLATION INSTRUCTIONS 6 RANGE HOOD USE 10 RANGE HOOD CARE 10 WIRING DIAGRAM 11 ASSISTANCE OR SERVICE 12 WARRANTY 12 TABLE DES MATI...
... Flambé). ■ Clean ventilating fans frequently. BE CAREFUL TO PREVENT BURNS. You can fight the fire with any fan with a close fitting lid, cookie sheet, or metal tray, then turn hood ON when cooking at high heat or when flambeing food (i.e. READ AND SAVE THESE INSTRUCTIONS TABLE OF CONTENTS RANGE HOOD SAFETY 1 INSTALLATION REQUIREMENTS 3 INSTALLATION INSTRUCTIONS 6 RANGE HOOD USE 10 RANGE HOOD CARE 10 WIRING DIAGRAM 11 ASSISTANCE OR SERVICE 12 WARRANTY 12 TABLE DES MATI...

Installation Guide
Page 3
...;" (3 cm) bits Parts supplied Remove parts from strong draft areas, such as non-vented (recirculating) require charcoal filters. See "Electrical Requirements" section. ■ All openings in ceiling and wall where range hood will be used. Models that are factory set for information on ordering, see the "Assistance or Service" section. Consult the cooktop/range manufacturer installation instructions before starting installation. The model/serial rating plate is recommended for Manufactured Home Installation 1982 (Manufactured Home Sites, Communities and Setups) ANSI A225...
...;" (3 cm) bits Parts supplied Remove parts from strong draft areas, such as non-vented (recirculating) require charcoal filters. See "Electrical Requirements" section. ■ All openings in ceiling and wall where range hood will be used. Models that are factory set for information on ordering, see the "Assistance or Service" section. Consult the cooktop/range manufacturer installation instructions before starting installation. The model/serial rating plate is recommended for Manufactured Home Installation 1982 (Manufactured Home Sites, Communities and Setups) ANSI A225...

Installation Guide
Page 5
... than 1 elbow is adequate. wall cap 8 ft (2.4 m) straight System length = 5.0 ft (1.5 m) = 0.0 ft (0.0 m) = 8.0 ft (2.4 m) = 13.0 ft (3.9 m) Maximum Recommended Length 7" (17.8 cm) Round Vent = 50 ft (15.2 m) 5 Connect a section of copper wire using special connectors and/or tools designed and UL listed for each vent piece used . ■ Do not install 2 elbows together. ■ Use clamps or duct tape to the requirements of the appliance as specified on the model/serial rating plate. The model/serial plate is required. ■...
... than 1 elbow is adequate. wall cap 8 ft (2.4 m) straight System length = 5.0 ft (1.5 m) = 0.0 ft (0.0 m) = 8.0 ft (2.4 m) = 13.0 ft (3.9 m) Maximum Recommended Length 7" (17.8 cm) Round Vent = 50 ft (15.2 m) 5 Connect a section of copper wire using special connectors and/or tools designed and UL listed for each vent piece used . ■ Do not install 2 elbows together. ■ Use clamps or duct tape to the requirements of the appliance as specified on the model/serial rating plate. The model/serial plate is required. ■...

Installation Guide
Page 6
... upper cabinet. Failure to use: roof or wall. ■ It is proper clearance within the ceiling or wall for the vent system. 1. Prepare Range Hood Align the exterior edge of the upper cabinet. INSTALLATION INSTRUCTIONS NOTES: ■ Depending on a covered surface. ■ Using a #2 Phillips screwdriver, remove the 7" (17.8 cm) round vent mounting plate attached with the exterior edges of the mounting brackets with 3.5 x 9.5 mm screws. ■ Using a #2 Phillips screwdriver, remove the electrical box cover. ■ Using a flat-blade screwdriver, remove the appropriate power...
... upper cabinet. Failure to use: roof or wall. ■ It is proper clearance within the ceiling or wall for the vent system. 1. Prepare Range Hood Align the exterior edge of the upper cabinet. INSTALLATION INSTRUCTIONS NOTES: ■ Depending on a covered surface. ■ Using a #2 Phillips screwdriver, remove the 7" (17.8 cm) round vent mounting plate attached with the exterior edges of the mounting brackets with 3.5 x 9.5 mm screws. ■ Using a #2 Phillips screwdriver, remove the electrical box cover. ■ Using a flat-blade screwdriver, remove the appropriate power...

Installation Guide
Page 8
... range hood and attach to the National Electric Code or CSA standards and local codes and ordinances. Position the wide flange (C) to the cabinet side walls. NOTE: An optional 7" (17.8 cm) round damper (A), Part Number W10355451 is complete. For information on the screws that the back draft dampers work properly. ■ Using (2) short Phillips head screws, install the 7" (17.8 cm) round vent mounting plate over the round vent mounting plate. 8 Insert the screws approximately 2 turns into place, positioning the rear...
... range hood and attach to the National Electric Code or CSA standards and local codes and ordinances. Position the wide flange (C) to the cabinet side walls. NOTE: An optional 7" (17.8 cm) round damper (A), Part Number W10355451 is complete. For information on the screws that the back draft dampers work properly. ■ Using (2) short Phillips head screws, install the 7" (17.8 cm) round vent mounting plate over the round vent mounting plate. 8 Insert the screws approximately 2 turns into place, positioning the rear...

Installation Guide
Page 9
... power cord kit installations, follow the instructions supplied with this model range hood. 13. WARNING Option 2 - NOTE: Use only with range hood cord connection kits that have been investigated and found acceptable for information on ordering. See the "Range Hood Use" section. Make Electrical Connection A B C Option 1 - Reinstall the electrical box cover. See "Replacing the Incandescent Light Bulb" in the "Range Hood Care" section. ■ Check the operation of the range hood fan and light. If the range hood does not operate, check to green ground screw...
... power cord kit installations, follow the instructions supplied with this model range hood. 13. WARNING Option 2 - NOTE: Use only with range hood cord connection kits that have been investigated and found acceptable for information on ordering. See the "Range Hood Use" section. Make Electrical Connection A B C Option 1 - Reinstall the electrical box cover. See "Replacing the Incandescent Light Bulb" in the "Range Hood Care" section. ■ Check the operation of the range hood fan and light. If the range hood does not operate, check to green ground screw...
Installation Guide
Page 10
... hood. Incandescent light housing and cover B. Press the light switch to the right to turn the filter retainer to secure the filter to avoid scratching or damaging the surface. Operating the fan The fan has 2 speeds. Exterior Surfaces: IMPORTANT: Do not use Stainless Steel Cleaner and Polish, Part Number 31462A (not included): See the "Assistance or Service" section to order. 3. To Replace the Filter: 1. Turn the grease filter retainer to the following instructions. Grease filter retainer C. A. Replace the screw...
... hood. Incandescent light housing and cover B. Press the light switch to the right to turn the filter retainer to secure the filter to avoid scratching or damaging the surface. Operating the fan The fan has 2 speeds. Exterior Surfaces: IMPORTANT: Do not use Stainless Steel Cleaner and Polish, Part Number 31462A (not included): See the "Assistance or Service" section to order. 3. To Replace the Filter: 1. Turn the grease filter retainer to the following instructions. Grease filter retainer C. A. Replace the screw...
Installation Guide
Page 12
... replace appliance light bulbs, air filters or water filters. This information will fit right and work right because they are trained to use only factory specified parts. To locate the Whirlpool designated service company in your correspondence. Our consultants provide assistance with : ■ Features and specifications on our full line of appliances. ■ Installation information. ■ Use and maintenance procedures. ■ Accessory and repair parts sales. ■ Specialized customer...
... replace appliance light bulbs, air filters or water filters. This information will fit right and work right because they are trained to use only factory specified parts. To locate the Whirlpool designated service company in your correspondence. Our consultants provide assistance with : ■ Features and specifications on our full line of appliances. ■ Installation information. ■ Use and maintenance procedures. ■ Accessory and repair parts sales. ■ Specialized customer...


