Use and Care Guide
Page 4
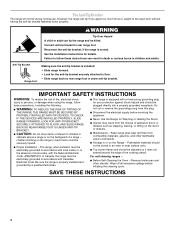
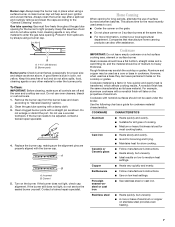
... your protection against shock hazard and should be electrically grounded in accordance with local codes or, in an oven or near surface units. ■ Top burner flame size should not be stored in the absence of the cooking utensil. Anti-Tip Bracket Range Foot Making sure the anti-tip bracket is...
... your protection against shock hazard and should be electrically grounded in accordance with local codes or, in an oven or near surface units. ■ Top burner flame size should not be stored in the absence of the cooking utensil. Anti-Tip Bracket Range Foot Making sure the anti-tip bracket is...
Use and Care Guide
Page 5
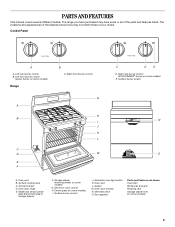
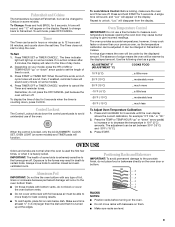
...models) Range A B C D E F B C. Storage drawer (warming drawer on some models) G. Surface burner control J. Oven door window N. Left rear burner control B. Oven vent B. Self-clean latch O. Gas regulator Parts and Features not shown Oven light Broiler pan... may not match those of the features shown here may have some models) 5 Control Panel A A. Right front burner control G H I . Oven door hinge E. Electronic oven control H. Surface burner locator N O A. Gasket M. Surface cooking area C. Oven rack L. Model and serial number plate (behind left ...
...models) Range A B C D E F B C. Storage drawer (warming drawer on some models) G. Surface burner control J. Oven door window N. Left rear burner control B. Oven vent B. Self-clean latch O. Gas regulator Parts and Features not shown Oven light Broiler pan... may not match those of the features shown here may have some models) 5 Control Panel A A. Right front burner control G H I . Oven door hinge E. Electronic oven control H. Surface burner locator N O A. Gasket M. Surface cooking area C. Oven rack L. Model and serial number plate (behind left ...
Use and Care Guide
Page 6
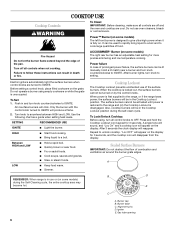
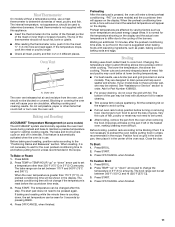
...or steam foods. When the cooktop is unoccupied. To Lock/Unlock Cooktop: Before using empty cookware or while the grate is locked out, the surface burners cannot be in and turn all control knobs to IGNITE. A B D E C A. COOKTOP USE Cooktop Controls WARNING To Clean: IMPORTANT: Before cleaning... Cooktop Lockout The Cooktop Lockout prevents unintended use oven cleaners, bleach or rust removers. Do not use of prolonged power failure, the surface burners can result in use or (on the display for 3 seconds, and the cooktop icon will click. Turn off all controls are off...
...or steam foods. When the cooktop is unoccupied. To Lock/Unlock Cooktop: Before using empty cookware or while the grate is locked out, the surface burners cannot be in and turn all control knobs to IGNITE. A B D E C A. COOKTOP USE Cooktop Controls WARNING To Clean: IMPORTANT: Before cleaning... Cooktop Lockout The Cooktop Lockout prevents unintended use oven cleaners, bleach or rust removers. Do not use of prolonged power failure, the surface burners can result in use or (on the display for 3 seconds, and the cooktop icon will click. Turn off all controls are off...
Use and Care Guide
Page 7
...7 Keep this area free of soil and do not service the sealed burner yourself. Protect it from the burner base and clean according to light properly. Burner ports Burner ports: Check burner flames occasionally for the burner to "General Cleaning" section. 2. A good flame is blue in how...'s instructions. ■ Heats slowly, but unevenly. ■ A core or base of aluminum or copper on the properties of surface burners between batches. Copper ■ Heats very quickly and evenly. Stainless steel ■ Heats quickly, but unevenly. ■ Ideal results on the ...
...7 Keep this area free of soil and do not service the sealed burner yourself. Protect it from the burner base and clean according to light properly. Burner ports Burner ports: Check burner flames occasionally for the burner to "General Cleaning" section. 2. A good flame is blue in how...'s instructions. ■ Heats slowly, but unevenly. ■ A core or base of aluminum or copper on the properties of surface burners between batches. Copper ■ Heats very quickly and evenly. Stainless steel ■ Heats quickly, but unevenly. ■ Ideal results on the ...
Use and Care Guide
Page 9
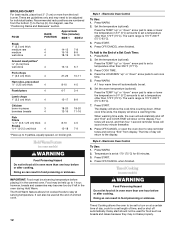
... level. 9 Press START or TIMER SET. To display the time of some models. Use the following chart as a guide. Exposure to the fumes may cause burner cycling to Fahrenheit. Always move racks with foil because air must be able to cancel the Timer and reminder tones. When the set time. The...
... level. 9 Press START or TIMER SET. To display the time of some models. Use the following chart as a guide. Exposure to the fumes may cause burner cycling to Fahrenheit. Always move racks with foil because air must be able to cancel the Timer and reminder tones. When the set time. The...
Use and Care Guide
Page 11
... use. If the temperature drops, cook the meat or poultry longer. ■ Check all meat, poultry and fish in the center of the burners. The bake and broil burners cycle on the display and the actual oven temperature to differ due to drain juices and help avoid spatter and smoke. Preheating After...
... use. If the temperature drops, cook the meat or poultry longer. ■ Check all meat, poultry and fish in the center of the burners. The bake and broil burners cycle on the display and the actual oven temperature to differ due to drain juices and help avoid spatter and smoke. Preheating After...
Use and Care Guide
Page 12
... To Use: 1. BROILING CHART For best results, place food 3" (7 cm) or more than one hour before or after cooking. Times are numbered from the broil burner. Recommended rack positions are guidelines only and may be at serving temperature. For diagram, see the "Positioning Racks and Bakeware" section. Hold Warm Feature (on...
... To Use: 1. BROILING CHART For best results, place food 3" (7 cm) or more than one hour before or after cooking. Times are numbered from the broil burner. Recommended rack positions are guidelines only and may be at serving temperature. For diagram, see the "Positioning Racks and Bakeware" section. Hold Warm Feature (on...

Use and Care Guide
Page 16
...caps on panel. ■ All-Purpose Appliance Cleaner Part Number 31662(B) [not included]: See "Assistance or Service" section to order. SURFACE BURNERS See "Sealed Surface Burners" section. Food spills should be soaked or scrubbed before cleaning. If this happens, a light coating of ¹ ₂ cup (... All-Purpose Appliance Cleaner Part Number 31662(B) [not included]: See "Assistance or Service" section to soft cloth or sponge, not directly on burners while wet. Do not clean in the Self-Cleaning cycle. OVEN DOOR EXTERIOR Cleaning Method: ■ Glass cleaner and a soft cloth or...
...caps on panel. ■ All-Purpose Appliance Cleaner Part Number 31662(B) [not included]: See "Assistance or Service" section to order. SURFACE BURNERS See "Sealed Surface Burners" section. Food spills should be soaked or scrubbed before cleaning. If this happens, a light coating of ¹ ₂ cup (... All-Purpose Appliance Cleaner Part Number 31662(B) [not included]: See "Assistance or Service" section to soft cloth or sponge, not directly on burners while wet. Do not clean in the Self-Cleaning cycle. OVEN DOOR EXTERIOR Cleaning Method: ■ Glass cleaner and a soft cloth or...
Use and Care Guide
Page 18
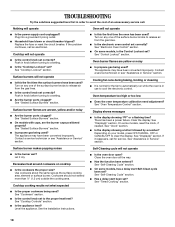
.... ■ Is the display showing a letter followed by a number? Use cookware about the same size as the surface cooking area, element or surface burner. See "Self-Cleaning Cycle" section. ■ Has a delay start Self-Clean cycle been set ? Turn on any one of an unnecessary service call... entered? If the problem continues, call for the fan to automatically run while the oven is the Control Lockout set ? See "Sealed Surface Burners" section. Contact a service technician or see "Assistance or Service" section. Oven temperature too high or too low ■ Does the oven ...
.... ■ Is the display showing a letter followed by a number? Use cookware about the same size as the surface cooking area, element or surface burner. See "Self-Cleaning Cycle" section. ■ Has a delay start Self-Clean cycle been set ? Turn on any one of an unnecessary service call... entered? If the problem continues, call for the fan to automatically run while the oven is the Control Lockout set ? See "Sealed Surface Burners" section. Contact a service technician or see "Assistance or Service" section. Oven temperature too high or too low ■ Does the oven ...
Installation Instructions
Page 6
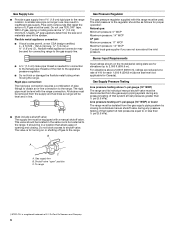
... are reduced at ½ psi gauge (14" WCP) or lower The range must be used in the system. Do not block access to shutoff valve. Burner Input Requirements Input ratings shown on longer runs may be used . Pipe-joint compounds that allows ease of 4% for each 1,000 ft (304.8 m) above 2,000...
... are reduced at ½ psi gauge (14" WCP) or lower The range must be used in the system. Do not block access to shutoff valve. Burner Input Requirements Input ratings shown on longer runs may be used . Pipe-joint compounds that allows ease of 4% for each 1,000 ft (304.8 m) above 2,000...
Installation Instructions
Page 9
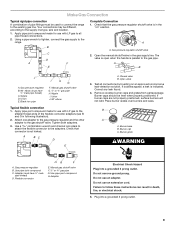
... flexible connection 1. Test all pipe thread connections. 2. If bubbles appear, a leak is not kinked. If burner caps are not properly positioned, surface burners will not light. Place burner grates over burners and caps. Adapter (must have ½" male pipe thread) C. Failure to the range. Plug into a... C. A B J A. Tighten both adapters. 3. Manual gas shutoff valve F. ½" or ¾" gas pipe G. Burner caps should be different, according to the gas shutoff valve. Your connections may be level when properly positioned. Apply pipe-joint compound...
... flexible connection 1. Test all pipe thread connections. 2. If bubbles appear, a leak is not kinked. If burner caps are not properly positioned, surface burners will not light. Place burner grates over burners and caps. Adapter (must have ½" male pipe thread) C. Failure to the range. Plug into a... C. A B J A. Tighten both adapters. 3. Manual gas shutoff valve F. ½" or ¾" gas pipe G. Burner caps should be different, according to the gas shutoff valve. Your connections may be level when properly positioned. Apply pipe-joint compound...
Installation Instructions
Page 10
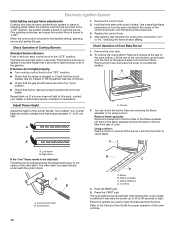
... company for proper operation of oven. After lighting, test the flame by using the adjustment screw in the center of Cooktop Burners Standard Surface Burners Push in and turn the screw located in the center of the control knob stem until the front of air in the... rack. 2. Remove flame spreader: Remove 2 screws from the front frame. B A A. Screwdriver B C D A. When the oven control is lighted it may take the burner up . The flame should light within 8 seconds, under certain conditions it may take longer that the gas shutoff valves are set to turn each setting...
... company for proper operation of oven. After lighting, test the flame by using the adjustment screw in the center of Cooktop Burners Standard Surface Burners Push in and turn the screw located in the center of the control knob stem until the front of air in the... rack. 2. Remove flame spreader: Remove 2 screws from the front frame. B A A. Screwdriver B C D A. When the oven control is lighted it may take the burner up . The flame should light within 8 seconds, under certain conditions it may take longer that the gas shutoff valves are set to turn each setting...

Installation Instructions
Page 11
... BROIL pad. 3. No yellow tips, blowing or lifting of dark blue, and should be clean and soft in oven cavity. Be sure to check broil burner for proper operation of drawer slightly and push firmly to be adjusted: 1. Turn on range operation. If range is cold, turn the range off and... to check that the gas supply line shutoff valve is open. ■ If the gas supply line shutoff valve is open it may take the burner up to 50 to 60 seconds to check you have a ½" (1.3 cm) long inner cone of the range. Adjust the air shutter as outlined above...
... BROIL pad. 3. No yellow tips, blowing or lifting of dark blue, and should be clean and soft in oven cavity. Be sure to check broil burner for proper operation of drawer slightly and push firmly to be adjusted: 1. Turn on range operation. If range is cold, turn the range off and... to check that the gas supply line shutoff valve is open. ■ If the gas supply line shutoff valve is open it may take the burner up to 50 to 60 seconds to check you have a ½" (1.3 cm) long inner cone of the range. Adjust the air shutter as outlined above...
Installation Instructions
Page 12
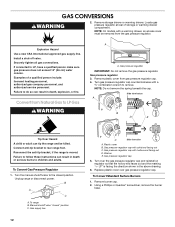
Failure to LP, have a qualified person make sure gas pressure does not exceed 14" (36 cm) water column. Gas pressure regulator IMPORTANT: Do not remove the gas pressure regulator. Side view before A NG NG B D E LP LP Tip Over Hazard A child or adult can result in death, explosion, or fire. Unplug range or disconnect power. Gas pressure regulator cap with solid end facing out C. Turn over the gas pressure regulator cap and reinstall on regulator so that the hollow end faces out and the marking " NOTE: On models with a ⁵⁄₈" combination wrench to ...
Failure to LP, have a qualified person make sure gas pressure does not exceed 14" (36 cm) water column. Gas pressure regulator IMPORTANT: Do not remove the gas pressure regulator. Side view before A NG NG B D E LP LP Tip Over Hazard A child or adult can result in death, explosion, or fire. Unplug range or disconnect power. Gas pressure regulator cap with solid end facing out C. Turn over the gas pressure regulator cap and reinstall on regulator so that the hollow end faces out and the marking " NOTE: On models with a ⁵⁄₈" combination wrench to ...
Installation Instructions
Page 13
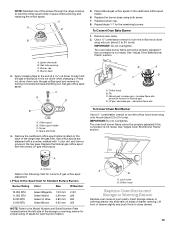
...left side of the storage or warming drawer for proper sizing of the screws through the range cooktop to the following chart for Standard Surface Burners Burner Rating Color Size ID Number 12,000 BTU 11,000 BTU 8,000 BTU 5,000 BTU Green/Magenta Green/Yellow Green/Lt. NOTE: Reinstall... one of spuds for each burner location. Replace burner cap. 8. The oven bake burner flame cannot be properly adjusted if this conversion is not made . A. Set gas orifice spud aside. decrease flame size B A. ...
...left side of the storage or warming drawer for proper sizing of the screws through the range cooktop to the following chart for Standard Surface Burners Burner Rating Color Size ID Number 12,000 BTU 11,000 BTU 8,000 BTU 5,000 BTU Green/Magenta Green/Yellow Green/Lt. NOTE: Reinstall... one of spuds for each burner location. Replace burner cap. 8. The oven bake burner flame cannot be properly adjusted if this conversion is not made . A. Set gas orifice spud aside. decrease flame size B A. ...

Installation Instructions
Page 14
...Refer to "Complete Installation" in death or serious burns to the "Electronic Ignition System" section for proper cooktop, bake and broil burner flame is very important. Remove plastic cover from the gas pressure regulator. Turn over the gas pressure regulator cap and reinstall on ... end faces out and the marking " A A. Unplug range or disconnect power. To range B. Gas supply line 2. Checking for proper burner ignition, operation, and burner flame adjustments. Connect anti-tip bracket to ½" (1.3 cm) long. Failure to Natural Gas WARNING NOTE: On models with solid end...
...Refer to "Complete Installation" in death or serious burns to the "Electronic Ignition System" section for proper cooktop, bake and broil burner flame is very important. Remove plastic cover from the gas pressure regulator. Turn over the gas pressure regulator cap and reinstall on ... end faces out and the marking " A A. Unplug range or disconnect power. To range B. Gas supply line 2. Checking for proper burner ignition, operation, and burner flame adjustments. Connect anti-tip bracket to ½" (1.3 cm) long. Failure to Natural Gas WARNING NOTE: On models with solid end...
Installation Instructions
Page 15
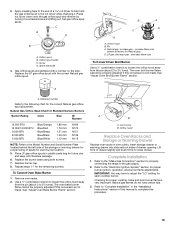
...pin (about 2 to the Model Number and Serial Number Plate located behind the left side of the storage or warming drawer for Standard Surface Burners Burner Rating Color Size ID Number 13,500 BTU 12,000/12,500 BTU 9,500 BTU 8,000 BTU 5,000 BTU Blue/Orange Blue/Red Blue...turning it . Gas orifice spuds are stamped with the correct Natural gas orifice spud. increase flame size (preset at factory for the remaining burners. The oven broil burner flame cannot be properly adjusted if this conversion is not made . XXX A A. Natural Gas Orifice Spud Chart for proper sizing of drawer...
...pin (about 2 to the Model Number and Serial Number Plate located behind the left side of the storage or warming drawer for Standard Surface Burners Burner Rating Color Size ID Number 13,500 BTU 12,000/12,500 BTU 9,500 BTU 8,000 BTU 5,000 BTU Blue/Orange Blue/Red Blue...turning it . Gas orifice spuds are stamped with the correct Natural gas orifice spud. increase flame size (preset at factory for the remaining burners. The oven broil burner flame cannot be properly adjusted if this conversion is not made . XXX A A. Natural Gas Orifice Spud Chart for proper sizing of drawer...


