Installation Instructions
Page 1
.... Save installation instructions for future reference. INSTALLATIONINSTRUCTIONS 30" (76 CM) FREESTANDINGGAS RANGES Table of Contents RANGE SAFETY 1 INSTALLATION REQUIREMENTS 2 Tools and Parts 2 Location Requirements 3 Electrical Requirements 4 Gas Supply Requirements 5 INSTALLATION INSTRUCTIONS 6 Unpack Range 6 Install Anti-Tip Bracket 6 Verify Anti-Tip Bracket Location 7 Level Range 7 Make Gas Connection 7 Electronic Ignition System 8 Replace Oven Racks and Storage or Warming...
.... Save installation instructions for future reference. INSTALLATIONINSTRUCTIONS 30" (76 CM) FREESTANDINGGAS RANGES Table of Contents RANGE SAFETY 1 INSTALLATION REQUIREMENTS 2 Tools and Parts 2 Location Requirements 3 Electrical Requirements 4 Gas Supply Requirements 5 INSTALLATION INSTRUCTIONS 6 Unpack Range 6 Install Anti-Tip Bracket 6 Verify Anti-Tip Bracket Location 7 Level Range 7 Make Gas Connection 7 Electronic Ignition System 8 Replace Oven Racks and Storage or Warming...
Installation Instructions
Page 2
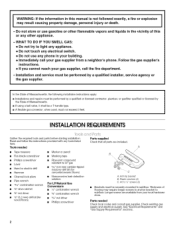
...) drill bit (for concrete/ceramic floors) • Noncorrosiveleak-detection solution For LP/Natural Gas Conversions • 1/2"combination wrench • %" combination wrench • %6" nut driver • Phillips screwdriver Parts supplied Check that all parts are available from a neighbor's phone, Follow the gas supplier's instructions, • If you cannot reach your local hardware store. WHAT TO...
...) drill bit (for concrete/ceramic floors) • Noncorrosiveleak-detection solution For LP/Natural Gas Conversions • 1/2"combination wrench • %" combination wrench • %6" nut driver • Phillips screwdriver Parts supplied Check that all parts are available from a neighbor's phone, Follow the gas supplier's instructions, • If you cannot reach your local hardware store. WHAT TO...
Installation Instructions
Page 3
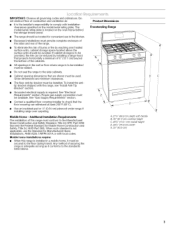
....inimumof5" (12.7cm)beyond Amlulosptbeensienaginlsethde. wallorfloorwhererangeistobeinstalled Donotseatlherangteo thesidecabinets. Proper gas supply connection must conform to the floor during transit. Additional Installation Requirements The installation of securing the range is not applicable, use the Standard for Mobile Home Construction and Safety, Title 24, HUD Part 280). When such standard is adequate as long as...
....inimumof5" (12.7cm)beyond Amlulosptbeensienaginlsethde. wallorfloorwhererangeistobeinstalled Donotseatlherangteo thesidecabinets. Proper gas supply connection must conform to the floor during transit. Additional Installation Requirements The installation of securing the range is not applicable, use the Standard for Mobile Home Construction and Safety, Title 24, HUD Part 280). When such standard is adequate as long as...

Installation Instructions
Page 6
... shipping materials, tape and protective film from the anti-tip bracket kit (found inside oven. 2. Remove oven racks and parts package from inside the oven cavity) or from the gas supply piping system during any pressure testing of that the left edge is against rear wall, molding or cabinet. 3. C... legs one -half turn . Tape template into place. 4. Line pressure testing at 1/2psi gauge (14" WOP) or lower The range must be isolated from the gas supply piping system by closing its individual manual shutoff valve must be kil}ed. Reconnect the anti-tip bracket, if the...
... shipping materials, tape and protective film from the anti-tip bracket kit (found inside oven. 2. Remove oven racks and parts package from inside the oven cavity) or from the gas supply piping system during any pressure testing of that the left edge is against rear wall, molding or cabinet. 3. C... legs one -half turn . Tape template into place. 4. Line pressure testing at 1/2psi gauge (14" WOP) or lower The range must be isolated from the gas supply piping system by closing its individual manual shutoff valve must be kil}ed. Reconnect the anti-tip bracket, if the...
Installation Instructions
Page 8
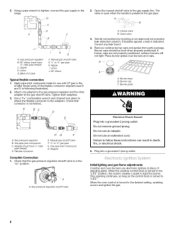
...emectricamshock. 5. Gas pressure regulator B. 90 ° elbow (must have Yp" male pipe thread) C. Y2" or 3/4,,gas pipe H....the gas pressure regulator shutoff valve is turned to "LITE." V2" or 3/4"gas pipe G. Remove cooktop burner caps and grates from parts package....one adapter to the gas pressure regulator and the other adapter to the desired setting, sparking occurs and ignites the gas. Open valve 3. Tighten... Manual gas shutoff valve G. Usinga pipewrencthotightenc,onnectht egassuppltyothe 2. If bubbles appear, a leak is turned to the gas shutoff valve. Manual gas shutoff...
...emectricamshock. 5. Gas pressure regulator B. 90 ° elbow (must have Yp" male pipe thread) C. Y2" or 3/4,,gas pipe H....the gas pressure regulator shutoff valve is turned to "LITE." V2" or 3/4"gas pipe G. Remove cooktop burner caps and grates from parts package....one adapter to the gas pressure regulator and the other adapter to the desired setting, sparking occurs and ignites the gas. Open valve 3. Tighten... Manual gas shutoff valve G. Usinga pipewrencthotightenc,onnectht egassuppltyothe 2. If bubbles appear, a leak is turned to the gas shutoff valve. Manual gas shutoff...
Installation Instructions
Page 10
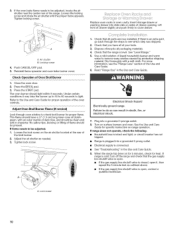
...Air shutter B. Press the START pad. Failure to see the "Range Care" section of drawer opening. Read "Range Use" in oven cavity. If there is an extra part, go back through oven window to light. E_ectrica_ Shock Hazard E_ectrica{ly ground range. A fJ A. See the Use and Care Guide for heat. ...needs to be adjusted: 1. Adjust the air shutter as outlined above. • If the gas supply line shutoff valve is level. Check that the gas supply line shutoff valve is open. • If the gas supply line shutoff valve is closed, open , contact a qualified technician. 10 Replace oven ...
...Air shutter B. Press the START pad. Failure to see the "Range Care" section of drawer opening. Read "Range Use" in oven cavity. If there is an extra part, go back through oven window to light. E_ectrica_ Shock Hazard E_ectrica{ly ground range. A fJ A. See the Use and Care Guide for heat. ...needs to be adjusted: 1. Adjust the air shutter as outlined above. • If the gas supply line shutoff valve is level. Check that the gas supply line shutoff valve is open. • If the gas supply line shutoff valve is closed, open , contact a qualified technician. 10 Replace oven ...

Installation Instructions
Page 14
Remove burner cap. 2. Apply masking tape to the end of a _6" nut driver to help hold the orifice spud holder in plastic parts bag for future use and keep with literature package. 6. See "Adjust Oven Bake Burner Flame" section. C A. Pin C. increase flame size (preset at..., and burner flame adjustments. Insert storage drawer or warming drawer into slide rails on the side. Refer to the "Make Gas Connection" section for properly connecting the range to the "Electronic Ignition System" section for proper sizing of this manual to "Complete Installation" in the nut driver while changing...
Remove burner cap. 2. Apply masking tape to the end of a _6" nut driver to help hold the orifice spud holder in plastic parts bag for future use and keep with literature package. 6. See "Adjust Oven Bake Burner Flame" section. C A. Pin C. increase flame size (preset at..., and burner flame adjustments. Insert storage drawer or warming drawer into slide rails on the side. Refer to the "Make Gas Connection" section for properly connecting the range to the "Electronic Ignition System" section for proper sizing of this manual to "Complete Installation" in the nut driver while changing...


