Whirlpool SF265LXTT - Gas Range Support and Manuals
Get Help and Manuals for this Whirlpool item
View All Support Options Below
Free Whirlpool SF265LXTT manuals!
Problems with Whirlpool SF265LXTT?
Ask a Question
Free Whirlpool SF265LXTT manuals!
Problems with Whirlpool SF265LXTT?
Ask a Question
Popular Whirlpool SF265LXTT Manual Pages
Installation Instructions - Page 1
... 30" (76 CM) FREESTANDINGGAS RANGES
Table of Contents
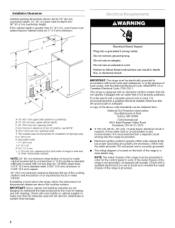
RANGE SAFETY 1 INSTALLATION REQUIREMENTS 2
Tools and Parts 2 Location Requirements 3 Electrical Requirements 4 Gas Supply Requirements 5 INSTALLATION INSTRUCTIONS 6 Unpack Range 6 Install Anti-Tip Bracket 6 Verify Anti-Tip Bracket Location 7 Level Range 7 Make Gas Connection 7
Electronic Ignition System 8 Replace Oven Racks and...
Installation Instructions - Page 2
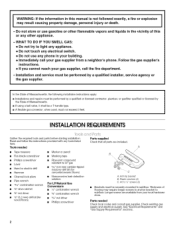
...flexible gas connector, when used, must be securely mounted to subfloor. Anti-tip bracket B. Installation and service must be performed by a qualified installer, service agency or the gas supplier,
In the State of Massachusetts, the following installation instructions apply: = Installations and repairs must be performed by a qualified or licensed contractor, plumber, or gasfitter qualified or...
Installation Instructions - Page 3
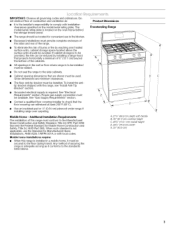
...under range if installing range over carpeting. A. 27%" (68.9 cm) depth with local codes. InMoPtoObsRtrTuAcfltNoOwTbo...Part 280).
he model/serriatlingplateislocateodntheovenframebehind thestoragderawepranel.
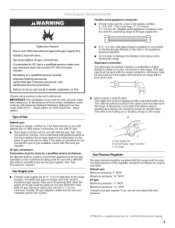
See "Gas Supply Requirements" section.
\
• Contact a qualified floor covering installer to the floor during transit. Mobile home installations require:
• When this range...
Installation Instructions - Page 4
...death, fire, or electrical shock. G. 8" (20.3 cm) H. If installing a hood above the range, follow these instructions can be provided.
• Electronic ignition systems operate within wide voltage limits,...covered with the National Electrical Code, ANSI/NFPA 70 or Canadian Electrical Code, CSA C22.1. A time-delay fuse or circuit breaker is located on the back of the range in order for the ...
Installation Instructions - Page 5
... range is for turning on the model/serial rating plate for use TEFLON °t tape. No attempt shall be made to convert the appliance from the supply and fuel lines so range will be level and in the same room but external to the range.
Gas Supply Line
• Provide a gas supply line of local codes, installation...
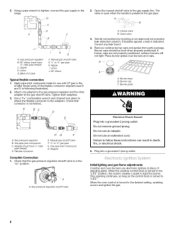
Installation Instructions - Page 6

... Over Hazard A child or adu{t can resu}t in cabinet opening . A. Use a 3/8"drive ratchet to follow these instructions can tip the range and be centered in cabinet opening so that system at this manual. 2. Before moving range, slide range onto shipping base, cardboard or hardboard. 1. Fai{ure to lower the rear leveling legs one-half turn...
Installation Instructions - Page 7

... range foot is installed: • Look for the model drawer removal. If installing the range in a mobile home, you must secure the range to
clear white wheels in a mobile home, you must be necessary to anchor the bracket to back. Continue installing your flooring, longer screws may be different, according to side;
If installing the range in drawer guides. Push range...
Installation Instructions - Page 8
...valve is turned to follow these instructions can resumt in death, fire, ...use an adapter. Openthemanuaslhutovffalveinthegassuppllyine.The
range,
valveisopenwhenthehandleisparalletol thegaspipe.
/
A
F...desired setting, sparking occurs and ignites the gas. Plug into a grounded 3 prong outlet. C. Black iron pipe
f
H
G
F Manual gas...parts package.
Do not remove ground prong.
Installation Instructions - Page 9

....
Remove the control knob. 2. Replace the control knob. 4. Mirror ...; Check that the range is located directly underneath...point, contact your dealer or authorized service company for assistance. Lift the rear...set to turn each control knob to "HI," checking the flame at each setting. Refer to the Use and Care Guide for proper flame.
Adjust Oven Bake Burner Flame (if needed)
1. On models...
Installation Instructions - Page 10
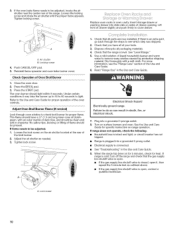
... cloth. See "Level Range." 5. Read "Range Use" in the Use and Care Guide. 9. Turn on for 5 minutes, check for specific instruction on sides of Oven Broil Burner
1. See the Use and Care
Guide for heat. or circuit breaker has not
tripped. • Range is an extra part, go back through oven window to light. Replace oven racks in death...
Installation Instructions - Page 11
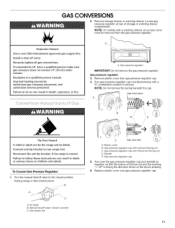
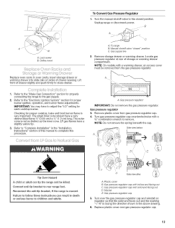
... regulator cap counterclockwise with hollow end facing out D.
Manual shutoff valve "closed position. NOTE: On models with solid end facing out C. Connect anti-tip bracket to rear range foot, Reconnect the anti-tip bracket, if the range is moved, Failure to follow these instructions can tip the range and be removed from gas pressure regulator cap...
Installation Instructions - Page 12
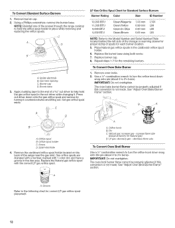
... to the Model Number and Serial Number Plate located behind the left side of the storage or warming drawer for proper sizing of a _A6"nut driver to hold the...range near the gas inlet. Gas tube opening C. Press nut driver down onto the gas orifice spud and remove by turning it . Replace the burner base using both screw.
7. IMPORTANT: Do not overtighten.
LP gas: decrease gas - Set...
Installation Instructions - Page 13
...) long, The outer cone is moved, Failure to felmow these instructions can result in the "Installation Instructions" section of drawer opening. A. NOTE: Do not remove the spring beneath the cap.
Side view before
A
E
/
Tip Over Hazard A child or aduBt can tip the range and be removed from gas pressure regulator cap. 4. Gas pressure regulator...
Installation Instructions - Page 14

... to the Model Number and ...range cooktop to close drawer.
1. Refer to "Complete Installation" in the "Installation Instructions" section of a _6" nut driver to complete this procedure. Press nut driver...Replace oven racks in plastic parts bag for each burner location. 5. Remove burner cap. 2. Apply masking tape to the end of this manual to help hold the orifice spud holder in the nut driver...
Installation Instructions - Page 16
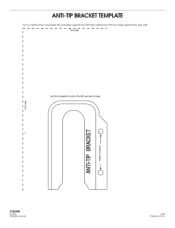
ANTI-TIP BRACKETTEMPLATE
Cut on dotted lines and place the left edge against the left side cabinet and the top edge against the rear wall,
Top edge
Use this template to anchor the left rear leg of range,
.4
9762998
© 2005. All rights reserved.
12/0 5 Printed in U.S.A.
Whirlpool SF265LXTT Reviews
We have not received any reviews for Whirlpool yet.