
User Manual
Page 2
... Oven 7 Using Your Oven 8 Positioning racks and pans 8 For best air circulation 9 The electronic oven control 10 Setting the clock 11 Using the electronic Minute Timer ..... 12 Canceling a function 12 Baking with preheating 13 Baking/roasting without preheating .... 14 Adjusting the oven temperature control 16 Broiling 17 Broiling tips 19 Energy saving tips 19 Page Using the electronic MEALTIMER™ control 20 The oven vents 24 The storage drawer 24 Using the Self-Cleaning Cycle 25 Before you start 25 Before setting the controls...
... Oven 7 Using Your Oven 8 Positioning racks and pans 8 For best air circulation 9 The electronic oven control 10 Setting the clock 11 Using the electronic Minute Timer ..... 12 Canceling a function 12 Baking with preheating 13 Baking/roasting without preheating .... 14 Adjusting the oven temperature control 16 Broiling 17 Broiling tips 19 Energy saving tips 19 Page Using the electronic MEALTIMER™ control 20 The oven vents 24 The storage drawer 24 Using the Self-Cleaning Cycle 25 Before you start 25 Before setting the controls...
User Manual
Page 5
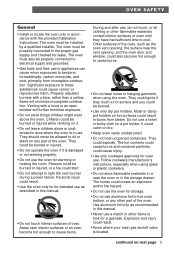
... properly connected to cause burns. • Do not wear loose or hanging garments when using glass or plastic cookware. • Do not store flammable materials in or near interior surfaces of the oven. During and after use . Use aluminum foil only as described in this manual. • Never use in area where the oven is located. Properly adjusted burners with the provided Installation Instructions...
... properly connected to cause burns. • Do not wear loose or hanging garments when using glass or plastic cookware. • Do not store flammable materials in or near interior surfaces of the oven. During and after use . Use aluminum foil only as described in this manual. • Never use in area where the oven is located. Properly adjusted burners with the provided Installation Instructions...
User Manual
Page 6
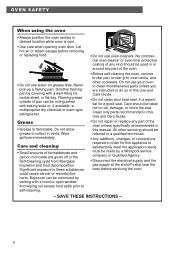
.... Let hot air or steam escape before servicing the oven. - It is essential for this appliance to do so in this Use and Care Guide. • Do not clean door heat seal. Exposure can be used in this Use and Care Guide. Grease • Grease is cool. • Use care when opening oven door. Wipe spillovers immediately. Significant exposure to self-cleaning. • Do not repair or replace any part of pan can be made...
.... Let hot air or steam escape before servicing the oven. - It is essential for this appliance to do so in this Use and Care Guide. • Do not clean door heat seal. Exposure can be used in this Use and Care Guide. Grease • Grease is cool. • Use care when opening oven door. Wipe spillovers immediately. Significant exposure to self-cleaning. • Do not repair or replace any part of pan can be made...
User Manual
Page 7
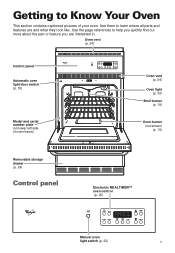
...burner (p. 18) Oven burner (not shown) (p. 15) Removable storage drawer (p. 24) Control panel Electronic MEALTIMER™ oven control (p. 20) OVEN LIGHT PREHEAT BAKE CLEAN BROIL HR O BROIL N DELAY BAKE DELAY BAKE CLN STOP TIMER CLEAN LOCKED BAKE TIME STOP TIME CLOCK TIMER ON/OFF CANCEL Manual oven light switch (p. 32) 7 Oven vent (p. 24) Control panel Automatic oven light/door switch (p. 32) Model and serial number plate (on lower left side of your oven. Getting to help you quickly find out more about the part or feature you are and what they look like. Use them to learn...
...burner (p. 18) Oven burner (not shown) (p. 15) Removable storage drawer (p. 24) Control panel Electronic MEALTIMER™ oven control (p. 20) OVEN LIGHT PREHEAT BAKE CLEAN BROIL HR O BROIL N DELAY BAKE DELAY BAKE CLN STOP TIMER CLEAN LOCKED BAKE TIME STOP TIME CLOCK TIMER ON/OFF CANCEL Manual oven light switch (p. 32) 7 Oven vent (p. 24) Control panel Automatic oven light/door switch (p. 32) Model and serial number plate (on lower left side of your oven. Getting to help you quickly find out more about the part or feature you are and what they look like. Use them to learn...
User Manual
Page 8
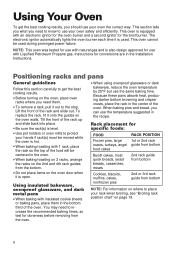
... stop. Positioning racks and pans General guidelines Follow this section carefully to get the best cooking results, you need to know to use the same baking time. Using Your Oven To get the best cooking results. • Before turning on the oven walls. The electronic ignitor automatically lights the oven burner each time it onto the guides on the oven, place oven racks where you should use the temperature suggested in the oven. • When baking/roasting on 2 racks...
... stop. Positioning racks and pans General guidelines Follow this section carefully to get the best cooking results, you need to know to use the same baking time. Using Your Oven To get the best cooking results. • Before turning on the oven walls. The electronic ignitor automatically lights the oven burner each time it onto the guides on the oven, place oven racks where you should use the temperature suggested in the oven. • When baking/roasting on 2 racks...
User Manual
Page 10
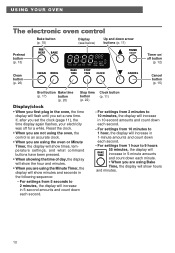
.... - For settings from 10 minutes to 10 minutes, the display will increase in 10-second amounts and count down each second. - USING YOUR OVEN The electronic oven control Bake button (p. 15) Display (see below) Up and down arrow buttons (p. 11) Preheat button (p. 13) Clean button (p. 26) PREHEAT BAKE CLEAN BROIL HR O BROIL N DELAY BAKE DELAY BAKE CLN STOP TIMER CLEAN LOCKED BAKE TIME STOP TIME CLOCK TIMER ON/OFF CANCEL Timer on/ off for a while. Reset the clock. • When you are not using the oven, the control is...
.... - For settings from 10 minutes to 10 minutes, the display will increase in 10-second amounts and count down each second. - USING YOUR OVEN The electronic oven control Bake button (p. 15) Display (see below) Up and down arrow buttons (p. 11) Preheat button (p. 13) Clean button (p. 26) PREHEAT BAKE CLEAN BROIL HR O BROIL N DELAY BAKE DELAY BAKE CLN STOP TIMER CLEAN LOCKED BAKE TIME STOP TIME CLOCK TIMER ON/OFF CANCEL Timer on/ off for a while. Reset the clock. • When you are not using the oven, the control is...
User Manual
Page 11
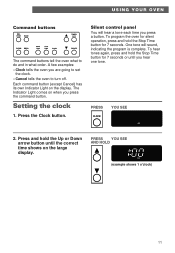
... 1 o'clock) 11 USING YOUR OVEN Command buttons PREHEAT BAKE CLEAN BROIL HR O BROIL N DELAY BAKE DELAY BAKE CLN STOP TIMER CLEAN LOCKED BAKE TIME STOP TIME CLOCK TIMER ON/OFF CANCEL The command buttons tell the oven what order. Press and hold the Stop Time button for 7 seconds or until the correct time shows on the large display. The Indicator Light comes on the display. Setting the clock 1. One tone will hear a tone each time you hear one tone. Press the Clock button. A few examples: - Silent control panel You...
... 1 o'clock) 11 USING YOUR OVEN Command buttons PREHEAT BAKE CLEAN BROIL HR O BROIL N DELAY BAKE DELAY BAKE CLN STOP TIMER CLEAN LOCKED BAKE TIME STOP TIME CLOCK TIMER ON/OFF CANCEL The command buttons tell the oven what order. Press and hold the Stop Time button for 7 seconds or until the correct time shows on the large display. The Indicator Light comes on the display. Setting the clock 1. One tone will hear a tone each time you hear one tone. Press the Clock button. A few examples: - Silent control panel You...
User Manual
Page 14
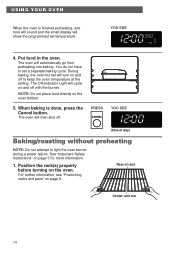
... oven temperature at the setting. During baking, the oven burner will turn on the oven bottom. 5. Rear of day) Baking/roasting without preheating NOTE: Do not attempt to light the oven burner during a power failure. USING YOUR OVEN When the oven is done, press the Cancel button. The oven will automatically go from preheating into baking. Position the rack(s) properly before turning on page 5 for more information. 1. See "Important Safety Instructions" on the oven...
... oven temperature at the setting. During baking, the oven burner will turn on the oven bottom. 5. Rear of day) Baking/roasting without preheating NOTE: Do not attempt to light the oven burner during a power failure. USING YOUR OVEN When the oven is done, press the Cancel button. The oven will automatically go from preheating into baking. Position the rack(s) properly before turning on page 5 for more information. 1. See "Important Safety Instructions" on the oven...
User Manual
Page 16
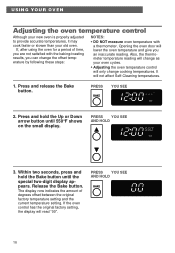
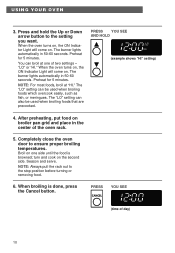
... affect Self-Cleaning temperatures. 1. Release the Bake button. If, after using the oven for a period of degrees offset between the original factory temperature setting and the current temperature setting. Opening the oven door will lower the oven temperature and give you can change the offset temperature by following these steps: NOTES: • DO NOT measure oven temperature with a thermometer. USING YOUR OVEN Adjusting the oven temperature control Although your new oven is properly adjusted to provide accurate temperatures, it may cook...
... affect Self-Cleaning temperatures. 1. Release the Bake button. If, after using the oven for a period of degrees offset between the original factory temperature setting and the current temperature setting. Opening the oven door will lower the oven temperature and give you can change the offset temperature by following these steps: NOTES: • DO NOT measure oven temperature with a thermometer. USING YOUR OVEN Adjusting the oven temperature control Although your new oven is properly adjusted to provide accurate temperatures, it may cook...
User Manual
Page 18
.... After preheating, put food on one of two settings - Broil on broiler pan grid and place in the center of day) 18 USING YOUR OVEN 3. Season and serve. Completely close the oven door to ensure proper broiling temperatures. PRESS YOU SEE AND HOLD BROIL (example shows "HI" setting) 4. When the oven turns on, the ON Indicator Light will come on. PRESS CANCEL YOU SEE (time of the oven rack. 5.
.... After preheating, put food on one of two settings - Broil on broiler pan grid and place in the center of day) 18 USING YOUR OVEN 3. Season and serve. Completely close the oven door to ensure proper broiling temperatures. PRESS YOU SEE AND HOLD BROIL (example shows "HI" setting) 4. When the oven turns on, the ON Indicator Light will come on. PRESS CANCEL YOU SEE (time of the oven rack. 5.
User Manual
Page 19
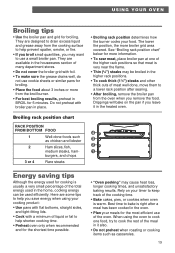
... other thick cuts of meat well done, move them to a lower rack position after searing. • After broiling, remove the broiler pan from the oven when you save energy when using the oven to cook one of the oven. Best time to bake is warm. USING YOUR OVEN Broiling tips • Use the broiler pan and grid for broiling. • Place the food about 3 inches or more broiler grid area covered. Broiling rack position chart RACK POSITION FROM...
... other thick cuts of meat well done, move them to a lower rack position after searing. • After broiling, remove the broiler pan from the oven when you save energy when using the oven to cook one of the oven. Best time to bake is warm. USING YOUR OVEN Broiling tips • Use the broiler pan and grid for broiling. • Place the food about 3 inches or more broiler grid area covered. Broiling rack position chart RACK POSITION FROM...
User Manual
Page 24
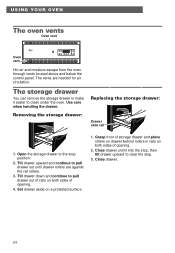
...sides of opening . 4. Close drawer. 24 Removing the storage drawer: Replacing the storage drawer: Drawer slide rail 1. Set drawer aside on both sides of opening . 2. Use care when handling the drawer. Close drawer until drawer rollers are needed for air circulation. USING YOUR OVEN The oven vents Oven vent Oven vent OVEN LIGHT PREHEAT BAKE CLEAN BROIL HR O BROIL N DELAY BAKE DELAY BAKE CLN STOP TIMER CLEAN LOCKED BAKE TIME STOP TIME CLOCK TIMER ON/OFF CANCEL Hot air and moisture escape from the oven through vents located above and below the control panel. The...
...sides of opening . 4. Close drawer. 24 Removing the storage drawer: Replacing the storage drawer: Drawer slide rail 1. Set drawer aside on both sides of opening . 2. Use care when handling the drawer. Close drawer until drawer rollers are needed for air circulation. USING YOUR OVEN The oven vents Oven vent Oven vent OVEN LIGHT PREHEAT BAKE CLEAN BROIL HR O BROIL N DELAY BAKE DELAY BAKE CLN STOP TIMER CLEAN LOCKED BAKE TIME STOP TIME CLOCK TIMER ON/OFF CANCEL Hot air and moisture escape from the oven through vents located above and below the control panel. The...
User Manual
Page 25
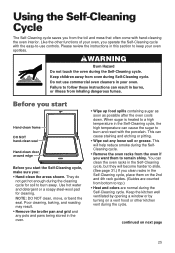
... hand-clean seal Hand-clean door around edge Before you start the Self-Cleaning cycle, make sure you operate the Self-Cleaning cycle with the easy-to-use commercial oven cleaners in your oven. Poor cleaning, baking, and roasting may result. • Remove the broiler pan and grid and any loose soil or grease. This will become harder to slide. (See page 31.) If you clean racks in the Self-Cleaning cycle...
... hand-clean seal Hand-clean door around edge Before you start the Self-Cleaning cycle, make sure you operate the Self-Cleaning cycle with the easy-to-use commercial oven cleaners in your oven. Poor cleaning, baking, and roasting may result. • Remove the broiler pan and grid and any loose soil or grease. This will become harder to slide. (See page 31.) If you clean racks in the Self-Cleaning cycle...

User Manual
Page 26
... cleaning time) When the Self-Cleaning temperature is equipped with an internal cooling fan. USING THE SELF-CLEANING CYCLE TIPS: • Do not force the door lock. Canceling the oven will come on automatically to tell you cleaning has begun. 26 You could burn or melt and damage the oven surface. • Make sure the oven light is closed. (See "Setting the clock" on page 11.) Setting the controls To start cleaning...
... cleaning time) When the Self-Cleaning temperature is equipped with an internal cooling fan. USING THE SELF-CLEANING CYCLE TIPS: • Do not force the door lock. Canceling the oven will come on automatically to tell you cleaning has begun. 26 You could burn or melt and damage the oven surface. • Make sure the oven light is closed. (See "Setting the clock" on page 11.) Setting the controls To start cleaning...
User Manual
Page 27
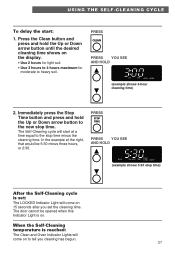
... button to tell you set : The LOCKED Indicator Light will start : 1. When the Self-Cleaning temperature is reached: The Clean and Oven Indicator Lights will come on to the new stop time. The Self-Cleaning cycle will come on 15 seconds after you cleaning has begun. 27 USING THE SELF-CLEANING CYCLE To delay the start at the right, that would be opened when this Indicator Light is set the cleaning time. In the example at a time...
... button to tell you set : The LOCKED Indicator Light will start : 1. When the Self-Cleaning temperature is reached: The Clean and Oven Indicator Lights will come on to the new stop time. The Self-Cleaning cycle will come on 15 seconds after you cleaning has begun. 27 USING THE SELF-CLEANING CYCLE To delay the start at the right, that would be opened when this Indicator Light is set the cleaning time. In the example at a time...
User Manual
Page 28
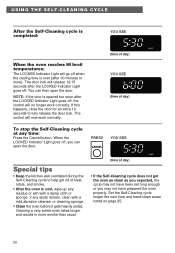
... longer work normally. Set the Self-Cleaning cycle longer the next time and hand-clean areas noted on page 25. 28 USING THE SELF-CLEANING CYCLE After the Self-Cleaning cycle is completed: YOU SEE When the oven reaches HI broil temperatures: The LOCKED Indicator Light will now work correctly. You can open the door. Special tips • Keep the kitchen well ventilated during the Self-Cleaning cycle to fully release the door lock. Cleaning...
... longer work normally. Set the Self-Cleaning cycle longer the next time and hand-clean areas noted on page 25. 28 USING THE SELF-CLEANING CYCLE After the Self-Cleaning cycle is completed: YOU SEE When the oven reaches HI broil temperatures: The LOCKED Indicator Light will now work correctly. You can open the door. Special tips • Keep the kitchen well ventilated during the Self-Cleaning cycle to fully release the door lock. Cleaning...
User Manual
Page 32
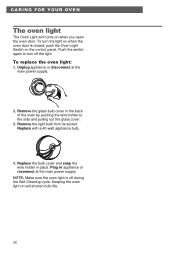
... the Self-Cleaning cycle. Remove the light bulb from its socket. NOTE: Make sure the oven light is closed, push the Oven Light Switch on the control panel. Plug in the back of the oven by pushing the wire holder to turn the light on when you open the oven door. CARING FOR YOUR OVEN The oven light The Oven Light will shorten bulb life. 32 To replace the oven light: 1. Keeping the oven light on will come on when the oven door is...
... the Self-Cleaning cycle. Remove the light bulb from its socket. NOTE: Make sure the oven light is closed, push the Oven Light Switch on the control panel. Plug in the back of the oven by pushing the wire holder to turn the light on when you open the oven door. CARING FOR YOUR OVEN The oven light The Oven Light will shorten bulb life. 32 To replace the oven light: 1. Keeping the oven light on will come on when the oven door is...
User Manual
Page 33
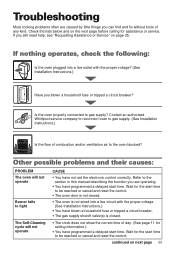
... reset the control. • The oven door is not closed. • The oven is not wired into a live circuit with the proper voltage? (See Installation Instructions.) w Have you still need help, see "Requesting Assistance or Service" on next page 33 Wait for the start time to the oven blocked? Contact an authorized Whirlpool service company to reconnect oven to gas supply? If nothing operates, check the following: Is the oven plugged...
... reset the control. • The oven door is not closed. • The oven is not wired into a live circuit with the proper voltage? (See Installation Instructions.) w Have you still need help, see "Requesting Assistance or Service" on next page 33 Wait for the start time to the oven blocked? Contact an authorized Whirlpool service company to reconnect oven to gas supply? If nothing operates, check the following: Is the oven plugged...
User Manual
Page 39
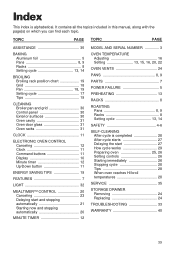
... 31 Oven door glass 31 Oven racks 31 CLOCK 11 ELECTRONIC OVEN CONTROL Canceling 12 Clock 11 Command buttons 11 Display 10 Minute timer 12 Up/Down button 11 ENERGY SAVING TIPS 19 FEATURES 7 LIGHT 32 MEALTIMER™ CONTROL 20 Canceling 23 Delaying start and stopping automatically 21 Starting now and stopping automatically 20 MINUTE TIMER 12 MODEL AND SERIAL NUMBER 3 OVEN TEMPERATURE Adjusting 16 Setting 13, 15, 16, 20, 22 OVEN VENTS 24 PANS 8, 9 PARTS 7 POWER FAILURE 5 PREHEATING 13 RACKS 8 ROASTING Pans 8, 9 Racks 8 Setting cycle 13, 14 SAFETY 4-6 SELF-CLEANING...
... 31 Oven door glass 31 Oven racks 31 CLOCK 11 ELECTRONIC OVEN CONTROL Canceling 12 Clock 11 Command buttons 11 Display 10 Minute timer 12 Up/Down button 11 ENERGY SAVING TIPS 19 FEATURES 7 LIGHT 32 MEALTIMER™ CONTROL 20 Canceling 23 Delaying start and stopping automatically 21 Starting now and stopping automatically 20 MINUTE TIMER 12 MODEL AND SERIAL NUMBER 3 OVEN TEMPERATURE Adjusting 16 Setting 13, 15, 16, 20, 22 OVEN VENTS 24 PANS 8, 9 PARTS 7 POWER FAILURE 5 PREHEATING 13 RACKS 8 ROASTING Pans 8, 9 Racks 8 Setting cycle 13, 14 SAFETY 4-6 SELF-CLEANING...
User Manual
Page 40
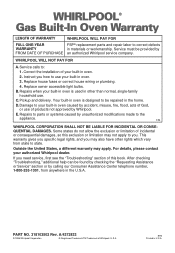
Replace owner accessible light bulbs. C.Pickup and delivery. E. This warranty gives you specific legal rights, and you . PART NO. 318103502 Rev. Instruct you need service, first see the "Troubleshooting" section of your authorized Whirlpool dealer. Repairs to be found by checking the "Requesting Assistance or Service" section or by FROM DATE OF PURCHASE an authorized Whirlpool service company. For details, please contact your built-in materials or workmanship...
Replace owner accessible light bulbs. C.Pickup and delivery. E. This warranty gives you specific legal rights, and you . PART NO. 318103502 Rev. Instruct you need service, first see the "Troubleshooting" section of your authorized Whirlpool dealer. Repairs to be found by checking the "Requesting Assistance or Service" section or by FROM DATE OF PURCHASE an authorized Whirlpool service company. For details, please contact your built-in materials or workmanship...


